
Download Assets
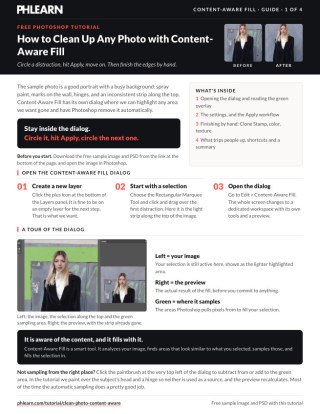
This tutorial includes 1 sample image, 1 sample PSD and 1 PDF guide. Downloads are free with a PHLEARN account.
- Download the sample images and PSDs from every free tutorial on PHLEARN
- New free tutorials published every week
- One free account — sign up once, then download anything
Free PDF Guide · 4 Pages
This Tutorial as a Step-by-Step PDF
The guide walks through a rough selection and Edit > Content-Aware Fill, reading the green sampling area, the settings (Auto, Sample All Layers, Output To: New Layer), the Apply workflow with the Lasso, merging with Ctrl/Command+E, cloning inside an inverted Select > Subject, and the Color, Healing Brush and Lighten fixes. Keep it next to your keyboard.
description
Learn how to clean up any photo with Content-Aware Fill in Photoshop. Make a rough Lasso selection around a distraction, open the Content-Aware Fill dialog, and use the green sampling overlay and brush to control where the fill samples from. Use the Apply button to remove distraction after distraction without leaving the dialog, output each fill to a new layer, then finish the edges by hand with the Clone Stamp and Healing Brush.
Enjoying This Free Tutorial?
We publish a new free tutorial every week, each one with sample images and PSDs you can download and follow along with. Sign up and they land straight in your inbox, along with early word on sales, events and subscriber-only offers.
Image Source
Photo by Alejandro Peralta via Pexels


How to Clean Up Any Photo with Content-Aware Fill in Photoshop
Content-Aware Fill can remove distractions from a busy background almost as fast as circling them, by analyzing the photo itself to figure out what should fill in the gap. This tutorial covers the full dialog — from making the first selection to staying inside the tool to knock out distraction after distraction without ever backing out to the main canvas.
Making a Selection and Opening the Content-Aware Fill Dialog
On a new layer, make a rough selection around a distraction with the Marquee or Lasso tool, then go to Edit > Content-Aware Fill. This opens a dedicated full-screen dialog with the original selection on the left and a live preview of the fill result on the right.
Understanding the Green Sampling Area Overlay
A green overlay highlights exactly which parts of the photo Content-Aware Fill is pulling information from to build its fill — it analyzes the image, finds areas that look similar to what surrounds the selection, and samples from those specific regions rather than the whole photo indiscriminately.
Adjusting the Sample Area with the Included Brush
The brush tool in the top-left of the dialog can subtract unwanted regions from the green sample area — useful when it’s pulling from a part of the subject that shouldn’t be used as a source — and the preview recalculates instantly to reflect the change.
Fine-Tuning Sampling and Fill Settings
The Sampling Area options default to Auto, which tends to work best left alone, and Sample All Layers should stay checked to allow the fill to work on a separate new layer. The Color Adaptation and Rotation Adaptation settings at the bottom rarely need adjusting, but are worth experimenting with on trickier areas — Rotation Adaptation in particular can help when a repeating pattern, like wood grain, doesn’t naturally line up.
Turning Off the Sampling Overlay for a Cleaner View
Unchecking Show Sampling Area hides the green overlay entirely, which makes it easier to judge the actual fill result without the visual clutter once the sampling itself is dialed in.
Staying Inside the Dialog and Using Apply to Work Faster
Rather than clicking OK, exiting the dialog, and reopening Content-Aware Fill for every single distraction, the Apply button commits the current fill without leaving the dialog. From there, the Lasso tool can make a brand new selection immediately, get its own live preview, and Apply again — turning a repetitive multi-step process into one continuous workflow of circling and applying.
Choosing New Layer Output to Avoid Selections Interfering with Each Other
Set to Current Layer, repeated fills in overlapping areas can start interfering with one another and produce confused results. Switching the Output To setting to New Layer instead makes each fill sample from the full original image and land on its own fresh layer, so successive fills never fight each other.
Merging the Resulting Layers Back Together
Working this way can leave behind a stack of individual fill layers. Selecting them all — clicking the top one, then Shift-clicking the bottom one — and pressing Cmd/Ctrl+E merges them into a single layer once every distraction has been handled.
Protecting the Subject with an Inverted Select Subject Selection
For any manual cleanup near the subject — with the Clone Stamp or Brush tool — Select > Subject followed by Select > Inverse creates a selection of everything except the subject. With that active, any tool used afterward is physically prevented from painting onto the subject at all, no matter how close or careless the brush strokes get near the edge.
Cleaning Up Leftover Color with the Color Blend Mode
A stray color cast left behind after a fill — like a bit of green bleeding in from the original background — can be corrected on a new layer by sampling a better color with the Brush tool and setting that layer’s blend mode to Color. This applies only the hue, leaving the underlying texture and brightness completely intact.
Adding or Removing Texture with the Regular Healing Brush Tool
The regular Healing Brush tool, sampled by holding Alt/Option and painting elsewhere, can both remove texture that doesn’t belong and add texture to an area that looks too flat after an automated fill — the same tool works in either direction depending on what’s sampled and where it’s painted.
Why Automated Tools Need Manual Backup Near Edges
Content-Aware Fill uses the same underlying technology as the Spot Healing Brush, and like that tool, it can struggle right at the edge of a subject. Leaving those specific areas for the Clone Stamp or Healing Brush tool to finish by hand avoids the odd artifacts automated fills sometimes produce right along a subject’s silhouette.
Evening Out Dark Patches with the Clone Stamp Tool in Lighten Mode
To make an inconsistent background read as more uniform, the Clone Stamp tool set to a Lighten blend mode only affects areas darker than the sampled source — painting over a dark patch lightens it up to match without flattening or losing any of the original texture underneath.
Why Staying Inside the Dialog Speeds Everything Up
Content-Aware Fill’s dialog is powerful on its own, but the real time savings come from the Apply button — it lets each new selection get its own analysis, preview, and fill without ever closing the tool and reopening it from the Edit menu. Combined with New Layer output to keep repeated fills from interfering with each other, and an inverted subject selection to keep manual cleanup tools from touching the subject by accident, a background full of distractions can be cleared out in a fraction of the time a purely manual approach would take.
Final Thoughts
Content-Aware Fill handles the bulk of background cleanup remarkably well, especially once the workflow settles into circle-and-apply using the Lasso tool. The areas it doesn’t handle perfectly — mostly right along a subject’s edge — are exactly where the Clone Stamp and regular Healing Brush tools pick up the slack, giving a result that’s both fast and genuinely convincing.
Quick Reference: Keys, Menus and Settings
- Open the dialogNew layer, a rough Rectangular Marquee or Lasso selection, then Edit > Content-Aware Fill
- Change the sample areaBrush at the top left of the dialog; uncheck Show Sampling Area to hide the green
- SettingsSampling Area Options: Auto; Sample All Layers checked; Fill Settings at default; Output To: New Layer
- Keep goingApply, not OK; Shift adds to the selection; hold Space for the Hand Tool
- Merge the fillsClick the top layer, Shift-click the last, Cmd/Ctrl + E
- Protect the subjectSelect > Subject, then Select > Inverse; S for Clone Stamp, Sample: Current & Below; Cmd/Ctrl + H hides the edges
- Finish by handB on a layer set to Color; Healing Brush with Alt/Option-click for texture; Clone Stamp layer set to Lighten
No generative AI: every fill is sampled from the photo itself.
Free Downloads
Follow Along on the Same Photo
Get the portrait in front of the marked-up wall, the finished cleaned-up PSD and the 4-page PDF guide to follow step by step. Free with a PHLEARN account.
Content-Aware Fill: Common Questions
How do I open the Content-Aware Fill dialog?
Create a new layer, make a rough selection around a distraction with the Rectangular Marquee or Lasso Tool, then go to Edit > Content-Aware Fill. Your image is on the left and a live preview of the fill is on the right.
What is the green area in Content-Aware Fill?
It shows where Photoshop is sampling from. It analyzes the image, finds areas that look similar to your selection and fills it with pixels from the green areas.
Why is it filling with part of my subject?
Your subject is inside the sampling area. Click the brush at the top left of the dialog and paint over the head, or anything else, to subtract it from the green. The preview recalculates.
Which settings should I use?
Keep Sampling Area Options on Auto and Sample All Layers checked, so the fill works on a new layer. Leave Color Adaptation and Rotation Adaptation at their defaults unless a fill, like wood grain, does not line up.
How do I remove lots of distractions without reopening the dialog?
Click Apply instead of OK. The fill is committed and the dialog stays open, so you can lasso the next distraction, check the preview and Apply again. Hold Shift to add to a selection and Space for the Hand Tool.
Why does a second fill in the same spot look wrong?
Output To is set to Current Layer, so the fills are stacking on each other. Switch it to New Layer; each fill then samples the whole image and lands on its own layer. Shift-click the layers afterwards and press Cmd/Ctrl + E to merge them.
How do I clone near my subject without painting on it?
Click the background layer and go to Select > Subject, then click your cloning layer and go to Select > Inverse. The Clone Stamp can now paint right up to the edge without touching the subject. Cmd/Ctrl + H hides the selection edges.
How do I fix a color cast left after the fill?
On a new layer, press B for the Brush, hold Alt/Option to sample a clean wall color and paint over the area. Change the layer’s blend mode to Color so only the color changes.
How do I fix flat texture or dark patches?
On a new layer, Alt/Option-click a textured area with the regular Healing Brush and paint it where texture is missing. For dark patches, Clone Stamp on a new layer set to Lighten, which only lightens and keeps the texture.
Are the sample files free?
Yes, with a free PHLEARN account. You get 1 sample image, 1 sample PSD and 1 PDF guide: the portrait against the marked-up wall, the finished PSD and a 4-page step-by-step guide.
From the Magazine View all
Stories, interviews and guides for photographers, new every week.
 EditingLightCraft vs Lightroom: I Edited the Same RAW Files in BothThe free clone on the same RAW files: what matches, what breaks and who should switch.
 InspirationRare Historical Photos: 13 of the Rarest Pictures Ever TakenFrom the earliest surviving picture of a person to the last passenger pigeon: who took each one and why it survives.
 EditingArtCraft: Photoshop Cloned by AI in Two Weeks. Is It Legal?ArtCraft cloned Photoshop and Lightroom with AI and gave them away. Any good? Legal? Safe?
Master Photoshop, Lightroom and Photography
Join PHLEARN PRO for $12.99 a month, or $99.99 a year (save 36%). Cancel anytime, with a 30-day money-back guarantee.