

Download Assets
This tutorial includes 2 sample images and 1 PDF guide. Downloads are free with a PHLEARN account.
- Download the sample images and PSDs from every free tutorial on PHLEARN
- New free tutorials published every week
- One free account — sign up once, then download anything
Free PDF Guide · 4 Pages
This Tutorial as a Step-by-Step PDF
Walks through the updated Object Selection Tool: Select People in the options bar, clicking Hair or hovering to pick a pupil, Apply, then Layer > New Adjustment Layer for Vibrance on hair, Curves on the pupils, Hue/Saturation on a hoodie and Exposure on a jacket, plus painting black on the mask with B. Keep it next to your keyboard.
description
The Object Selection Tool in Photoshop can now hand you a person’s hair, eyebrows, eyes, pupils, lips and clothing as separate selections, one click each. Here is how to use it, and where it over-selects.
Enjoying This Free Tutorial?
We publish a new free tutorial every week, each one with sample images and PSDs you can download and follow along with. Sign up and they land straight in your inbox, along with early word on sales, events and subscriber-only offers.
Image Source

How to Use the Object Selection Tool in Photoshop
Select Subject gives you the whole person. Most retouching does not want the whole person — it wants the hair, or the eyes, or one garment, and getting to those individually has always meant building the selection by hand.
The Object Selection Tool now identifies those parts for you. Hover over a portrait and Photoshop offers the hair, the eyebrows, the eyes, the pupils, the shirt, each as a separate selectable object.
A note on versions: this was recorded when the feature was available in the Photoshop beta. It may now be in the main release, and the options may have expanded since. The workflow is unchanged.
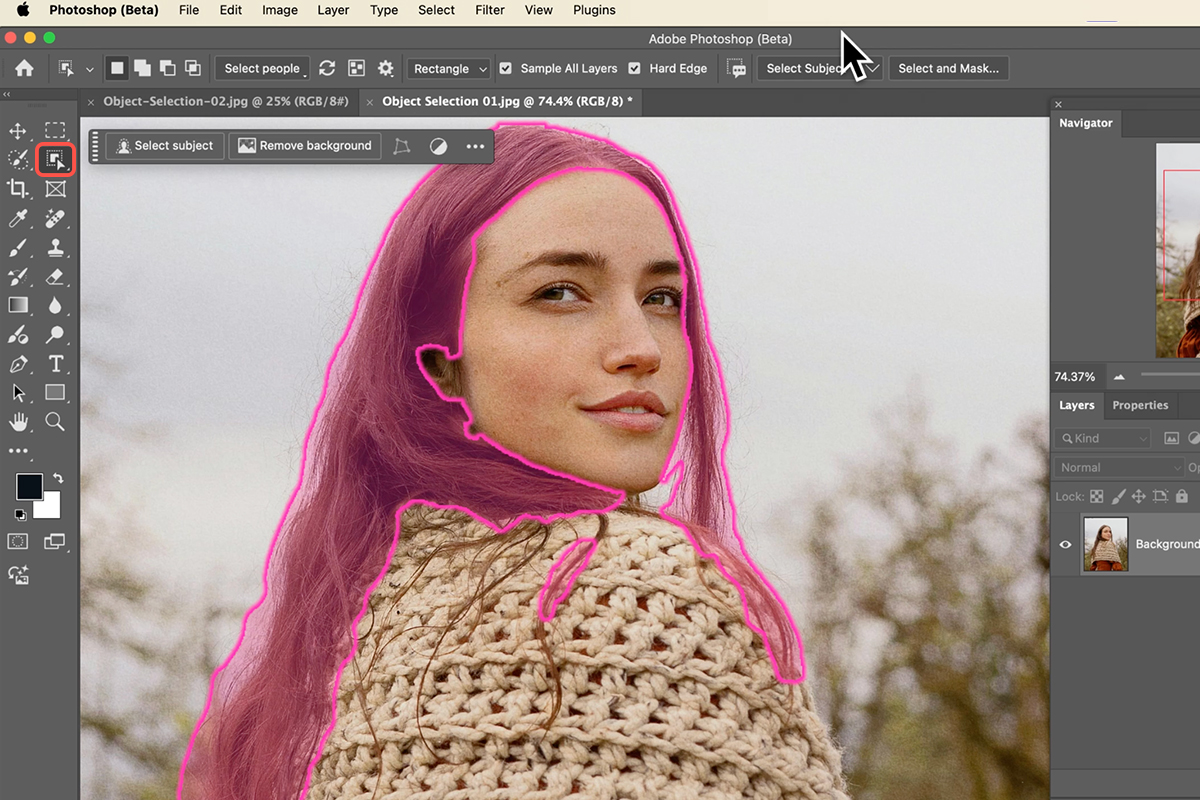
Where to Find It
The Object Selection Tool sits directly above the Magic Wand in the toolbar, grouped with the Quick Selection Tool.
With it active, look for the Select People option in the options bar. That is what switches the tool from general object detection into the person-aware mode described here.
The Workflow
-
Choose the Object Selection Tool and click Select People
Photoshop analyzes the image and identifies the people in it, along with their individual features.
-
Hover to preview
Moving over the image highlights whatever part sits under the cursor — hair, an eye, a garment. This is the fastest way to see what it has actually detected.
-
Click the parts you want
Click to add each element to your selection. Use Show More to reveal additional detected regions if what you want is not listed.
-
Click Apply
This converts the highlighted parts into a live selection.
-
Add an adjustment layer
With the selection active, create a Curves, Hue/Saturation, Vibrance or Exposure layer — the selection becomes its mask automatically.
That last step is what makes this worth using. You go from opening the image to having a masked adjustment layer targeting exactly one feature in about four clicks, with no brushwork at all.
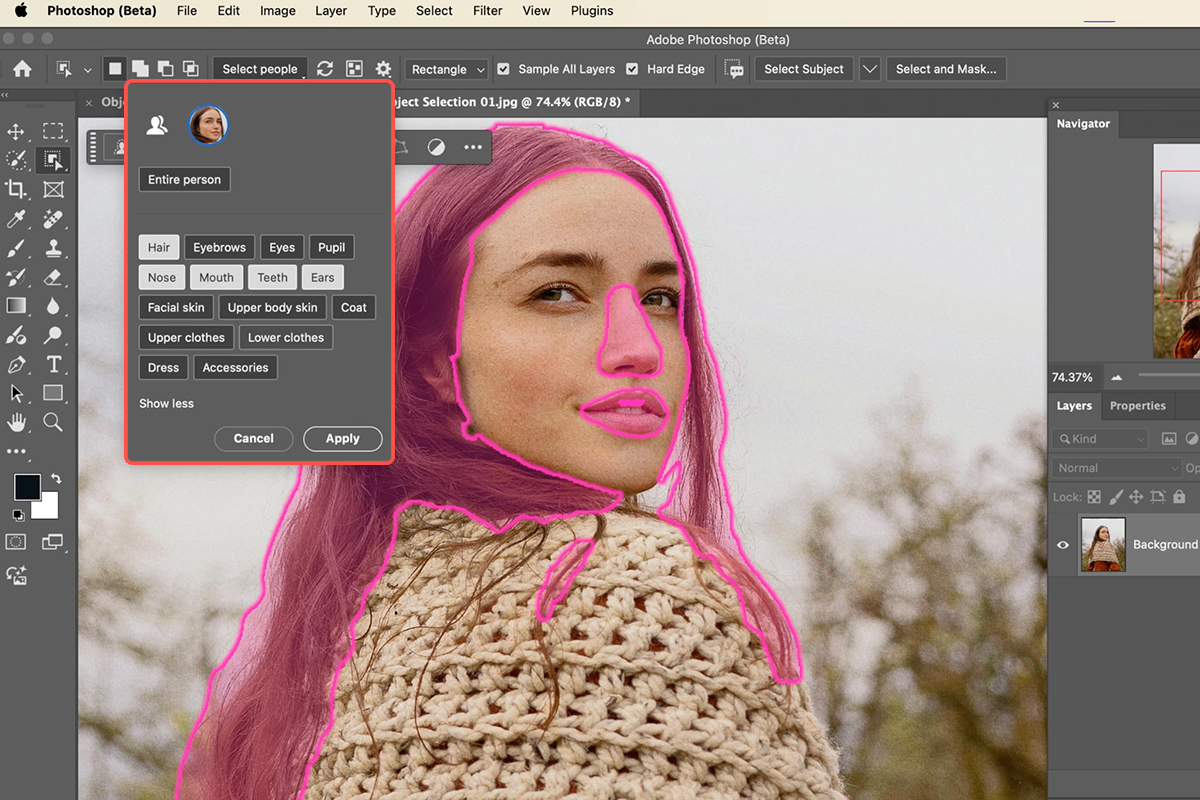
What It Can Detect
On a portrait, the tool typically offers the whole person, the hair, the eyebrows, the eyes, the pupils, the lips and individual items of clothing separately.
The eye detail is more useful than it first appears. Being handed the pupils as their own selection means brightening or shifting eye color becomes a two-second job — and that is one of the most common small portrait adjustments there is.
It also handles multiple people in a frame, identifying each separately, so you can adjust one person’s clothing without touching anyone else’s.
It Over-Selects, and That Is Fine
Being straightforward about the limitation: the detection is good but not exact. Selecting eyes frequently pulls in some eyelid; hair selections sometimes take a little background with them.
The fix takes seconds, and it is worth building the habit rather than expecting perfection.
-
Click the adjustment layer’s mask
You are editing the mask, not the image.
-
Press B for the Brush Tool
A soft brush at moderate opacity works best.
-
Paint black over the areas that should not be affected
Black conceals. Paint white to bring an area back if you overshoot.
Because the adjustment is already live, you can see exactly what you are correcting as you paint — far easier than judging a selection in the abstract before applying it.
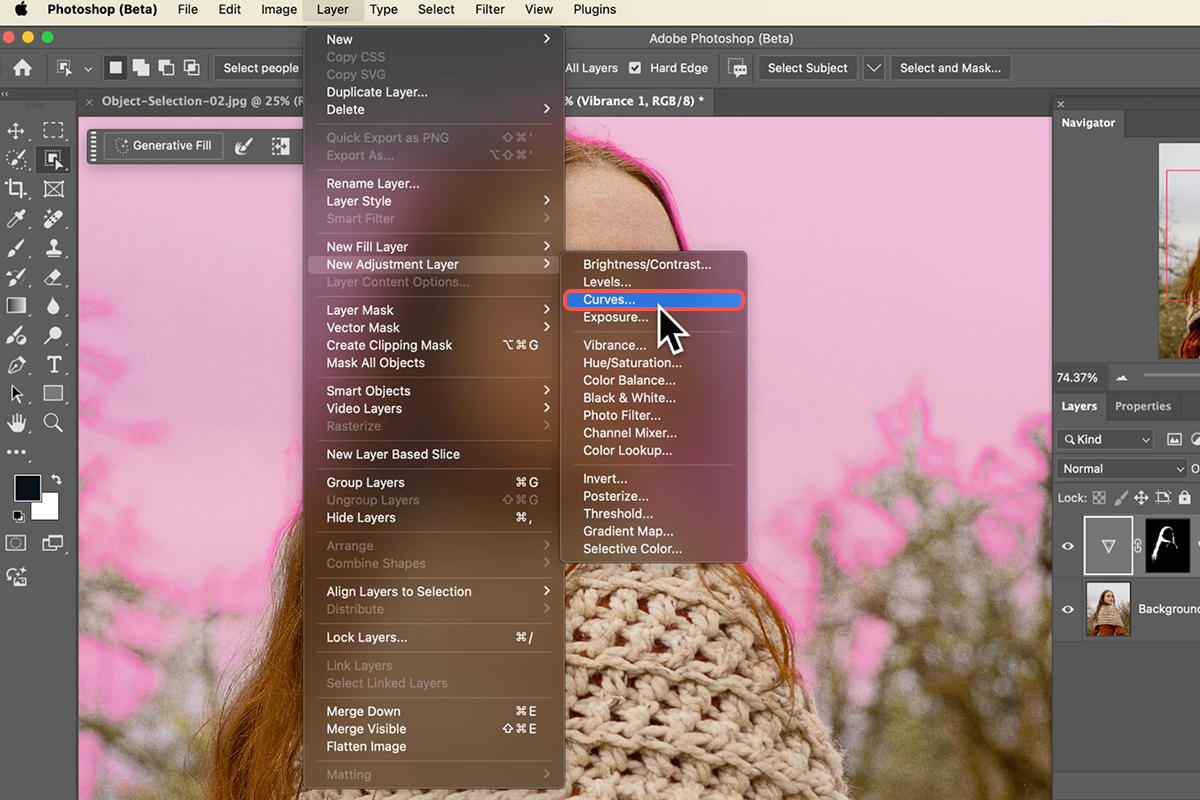
Check the mask itself
Hold Alt or Option and click the mask thumbnail to view it full size in the document. Problems that are invisible in the composite are obvious in black and white, particularly around hair.
Where This Genuinely Helps
Eye work. Brightening the whites, lifting the iris, adding a little contrast to the pupils. Previously fiddly, now essentially automatic.
Hair adjustments. Warming or cooling hair color, or adding contrast to it without affecting skin, is a standard portrait move that used to require a careful mask.
Clothing. Shifting the color or saturation of a single garment — useful for toning down a distracting shirt, or matching wardrobe across a set of images.
Group shots. Adjusting one person’s exposure when they fell into shadow, without touching the rest of the frame.
How It Fits With the Other Selection Tools
This does not replace anything — it fills a gap. Select Subject is still the right first move for a full cutout. The Pen Tool is still the answer for hard-edged products. Channels still handle soft edges and fine hair detail better than anything automatic.
What the Object Selection Tool covers is the middle ground that used to be tedious: a specific part of a person, wanted quickly, where the mask only needs to be good rather than perfect. Most local portrait adjustments fall into exactly that category.
The practical habit worth adopting is to reach for it first on any portrait adjustment, and fall back to manual masking only when the result is not clean enough. More often than not, four clicks and a moment of brushwork gets you there.
Quick Reference: Keys, Menus and Settings
- Object Selection ToolW, in the toolbar above the Magic Wand
- Pick parts from a listSelect People > click the person > click Hair, Eyes, Pupil (Show more for the rest) > Apply
- Adjust the selectionLayer > New Adjustment Layer > Vibrance; the selection becomes the layer mask
- Or hover and clickHover over the person, click the highlighted part, then Layer > New Adjustment Layer > Curves
- Clean up the maskB, paint black on the mask where the selection spilled over
- One person’s clothingClick the garment, then Hue/Saturation (drag Hue) or Exposure

Free Downloads
Follow Along on the Same Photos
Get the portrait, the group photo and the 4-page PDF guide, so you can repeat the hair, pupil and clothing adjustments. Free with a PHLEARN account.
Object Selection Tool: Common Questions
What is new in the Object Selection Tool?
It can now select people and their individual parts, like hair, eyebrows, eyes and pupils, and even single pieces of clothing, each with one click.
Where is the Object Selection Tool?
In the toolbar, right above the Magic Wand. With it active, Select People appears in the options bar at the top of the screen.
Do I need the Photoshop beta?
The video was recorded when the update was only in Photoshop (Beta), installed from the Beta apps section of Creative Cloud. It may now be in the main release; the workflow is the same.
Which parts of a person can it select?
Click Select People, then the person: you get Entire person, Hair, Eyebrows, Eyes and Pupil, and Show more opens the rest. Click several buttons to select them together, then click Apply.
Is there a faster way than the Select People panel?
Yes. With the Object Selection Tool active, hover over the person and each part highlights as you pass over it. Click the highlighted part to select it.
How do I adjust just the part I selected?
With the selection active, go to Layer > New Adjustment Layer and pick one, such as Vibrance for hair or Curves for pupils. The selection goes into the new layer’s mask automatically.
The selection caught some eyelid. How do I fix it?
Click the adjustment layer’s mask, press B for the Brush Tool and paint black over that area. Black hides the adjustment there; paint white to bring it back.
Does it work on photos with several people?
Yes. Select People shows a thumbnail for every person in the image, and each can be selected separately, down to one person’s hat, shirt or jacket.
How do I change the color of one piece of clothing?
Click the garment with the Object Selection Tool, add Layer > New Adjustment Layer > Hue/Saturation and drag the Hue slider. For a darker or lighter jacket, use an Exposure adjustment layer instead.
Are the sample files free?
Yes, with a free PHLEARN account. You get 2 sample images and 1 PDF guide: the portrait and the group photo used in the video, plus the step-by-step guide.
Master Photoshop, Lightroom and Photography
Join PHLEARN PRO for $12.99 a month or $99.99 a year. Cancel anytime, with a 100% money-back guarantee.





