

Download Assets
This tutorial includes 1 sample image and 1 PDF guide. Downloads are free with a PHLEARN account.
- Download the sample images and PSDs from every free tutorial on PHLEARN
- New free tutorials published every week
- One free account — sign up once, then download anything
Free PDF Guide · 4 Pages
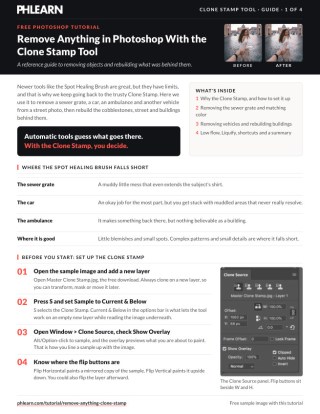
This Tutorial as a Step-by-Step PDF
The guide covers setting Sample to Current & Below on a new layer, Window > Clone Source with Show Overlay, flipping the sample, about 60 to 70% Hardness, a clipped color layer in Color mode, rebuilding the street and buildings, texture at about 20% Flow, and straightening with Image > Apply Image and Liquify. Keep it next to your keyboard.
description
The Spot Healing Brush handles small blemishes fine, but it falls apart the moment an object needs the scene behind it rebuilt. This takes the Clone Stamp through a street photo, removing a sewer grate, a car, an ambulance and another emergency vehicle, then rebuilding the cobblestones, street and architecture that would realistically sit behind them — blending the rebuilt areas with low flow and blend modes, and straightening the lines afterwards with Liquify.
Enjoying This Free Tutorial?
We publish a new free tutorial every week, each one with sample images and PSDs you can download and follow along with. Sign up and they land straight in your inbox, along with early word on sales, events and subscriber-only offers.
Remove Anything in Photoshop with the Clone Stamp Tool
This tutorial covers the Clone Stamp tool in depth, using it to completely remove a sewer grate, a car, an ambulance, and another emergency vehicle from a street photo, then rebuilding the buildings and architecture that would realistically sit behind them. The sample image is available as a free download on PHLEARN.com.
Why the Clone Stamp Tool Still Beats Spot Healing
Newer tools like the Spot Healing Brush handle small blemishes and simple areas well, but they fall apart on complex patterns, fine detail, or anything that needs to be rebuilt with real architectural logic rather than an automatic guess. Trying the Spot Healing Brush on a sewer grate or a parked car in this photo produces a muddy, unresolved mess, since the tool has no real understanding of what a cobblestone pattern or a building facade behind a vehicle should actually look like. That’s exactly the gap the Clone Stamp tool fills, since it lets a person deliberately choose exactly what to sample and where to place it.
Setting Up the Clone Stamp on a New Layer
Start by creating a new layer, then select the Clone Stamp tool and set its Sample option to Current & Below, which lets the tool work non-destructively on that new empty layer while still sampling from the visible image beneath it. Open Window, then Clone Source, and enable Show Overlay, which displays a live preview of exactly what will be painted before it’s committed, making it far easier to line up a sample precisely with the surrounding image.
Flipping Your Sample to Fit
The Clone Source panel also offers Flip Horizontal and Flip Vertical options, useful when a mirrored version of a sampled area fits the gap better than a direct copy, such as flipping a section of cobblestones or a sampled truck so it faces the opposite direction from its source.
Removing the Sewer Grate and Rebuilding Cobblestones
To remove a distracting sewer grate near the subject, hold Option/Alt and click to sample a clean patch of cobblestones nearby, flipping horizontally if needed for a better fit. Set brush hardness to around 60-70 percent, soft enough to avoid a harsh edge but hard enough to stay sharp and believable, and paint in slightly more area than strictly needed, since any excess can be trimmed later with a layer mask. Use Command/Ctrl+T afterward to rotate the newly painted layer, repositioning the rotation point over a specific reference point in the cobblestone lines so the pattern rotates into perfect alignment with the surrounding stones.
Matching Color with a Clipping Mask
Real cobblestones often have subtle color variation the clone stamp alone won’t fully match, so create another new layer above the clone stamp layer, hold Option/Alt with the Brush tool to sample the surrounding color directly, and paint it over the rebuilt cobblestones. Right-click that color layer and choose Create Clipping Mask so it’s only visible where the cobblestone layer beneath it is visible, then try different blend modes, Color tends to work best for this kind of subtle tint, over Overlay, Soft Light, or Hue. Add a layer mask to that clipping layer and paint black at a low flow, around 30 percent, to fade the color transition smoothly rather than leaving a visible hard edge. Group the clone stamp and color layers together to keep the stack organized.
Removing the Emergency Vehicles and Rebuilding the Street
For a cluster of emergency vehicles further back in the frame, create a new layer and use a softer, smaller brush since there’s less clean area available to sample from. Build the street and sidewalk back in gradually, sampling from whichever direction has the most usable material, remembering to also remove any shadows or light reflections the vehicles were casting onto the ground, since leaving those behind would undercut the illusion even after the vehicle itself is gone.
Rebuilding Architecture Behind the Vehicles
Rebuilding the buildings that would logically sit behind the removed vehicles means sampling similar architectural elements from elsewhere in the same building, a matching pillar, a doorway, or a section of facade, and placing each piece where it belongs. Create a new layer for each more complex piece being rebuilt, since starting fresh on its own layer makes it easy to reposition if the first placement isn’t quite right. Follow the direction the actual architecture in the photo is running, sampling straight down for a vertical facade element, and reuse a real edge from elsewhere in the same building for any hard architectural line rather than inventing one, so proportions and perspective stay believable.
Breaking Up Repeating Patterns
Repeated clone stamping over a similar area for a while can leave an obvious, repeating pattern behind. Fix this by sampling a fresh section from a different part of the photo and painting over the repeated section to introduce some natural variation, and consider copying in a small detail from elsewhere in the photo, like a little light source or one small dot of detail, purely to break up the monotony of an otherwise too-uniform rebuilt area. It’s worth testing whether the Spot Healing Brush can smooth a stubborn repeating area at this point, though in practice it often makes things look worse rather than better on complex rebuilt architecture, reinforcing why the Clone Stamp is the better tool for this kind of work in the first place.
Blending Rebuilt Areas with Low Flow and Blend Modes
Not every clone stamp needs to apply at full strength. Lowering the brush’s Flow to around 20 percent allows a sampled texture to blend in more subtly rather than overwhelming the area, and trying blend modes like Soft Light, Overlay, or Multiply on that layer can help a rebuilt texture sit more naturally against its surroundings. A Levels adjustment afterward can brighten or darken that specific rebuilt area slightly to match the surrounding light levels more closely.
Straightening Lines with Liquify
Clone-stamped reconstructions can sometimes end up slightly crooked, such as a rebuilt pillar leaning a touch off-vertical. Create a new layer, then choose Image, then Apply Image and click OK to get a flattened snapshot to work on, make a selection around the area that needs correcting, then go to Filter, then Liquify, and use the Forward Warp tool with a fairly large brush to gently push the leaning element back into a straighter alignment, disabling Show Backdrop if it’s not needed for reference. This final straightening pass catches the kind of subtle misalignment that’s easy to miss while focused on sampling and placement.
Why Manual Cloning Still Matters
Every technique in this tutorial, working on a new layer, using the Clone Source overlay, flipping a sample, clipping a color-matching layer on top, and breaking up repeating patterns, exists because automated tools can’t reliably reconstruct complex, structured detail the way a person deliberately choosing what to sample and where to place it can. Anyone who wants to pair this removal technique with a full background swap can also check out remove backgrounds for a complementary approach.
Final Thoughts
Mastering the Clone Stamp tool comes down to a handful of habits that keep the process controllable: always work on a new layer, keep the Clone Source overlay visible, flip samples when a mirrored copy fits better, use a clipping mask to match color and light, and watch for repeating patterns that need breaking up. Applied patiently, those habits are enough to completely remove and rebuild far more complex scene elements than any automated tool can handle on its own.
Quick Reference: Keys, Menus and Settings
- Set up the Clone StampNew layer, S, Sample: Current & Below
- Preview and sampleWindow > Clone Source > Show Overlay; Alt/Option-click to sample; Flip Horizontal or Vertical
- Brush hardnessRight-click, about 60 to 70% for the cobblestones
- Fit the cloneCmd/Ctrl + T, move the rotation point, rotate until the lines meet
- Match the colorBrush, Alt/Option-click a color, right-click > Create Clipping Mask, Color blend mode, mask at 30% Flow
- Texture passFlow about 20%; Soft Light, Overlay or Multiply; Cmd/Ctrl + L for Levels
- Straighten a lineNew layer, Image > Apply Image; Filter > Liquify, Forward Warp tool
No AI, no generative credits.
Free Downloads
Follow Along on the Same Photo
Get the street photo from the video and the 4-page PDF guide to every Clone Stamp step and setting. Free with a PHLEARN account.
The Clone Stamp Tool: Common Questions
Why use the Clone Stamp instead of the Spot Healing Brush?
The Spot Healing Brush is good on little blemishes and small spots, but on complex patterns and small details it leaves muddy areas. On this photo it can’t rebuild cobblestones or the building behind a vehicle. With the Clone Stamp you choose what to sample and where it goes.
How do I use the Clone Stamp on a new, empty layer?
Create a new layer, press S for the Clone Stamp and set Sample to Current & Below in the options bar. The tool reads the image underneath and paints on the empty layer, so you can transform, mask or move the clone later.
How can I see what I’m about to paint?
Open Window > Clone Source and check Show Overlay. After you Alt/Option-click to sample, the brush shows a preview of the sample, so you can line it up with the image before you paint.
Can I flip what the Clone Stamp paints?
Yes. The Clone Source panel has Flip Horizontal and Flip Vertical buttons beside W and H. Turn the flip off when you are done, so it isn’t still on the next time you sample.
What brush hardness should I use?
Aaron keeps it around 60 to 70% for the cobblestones; right-click to change it. Too soft looks fuzzy and too hard shows the edges. Where there is little to sample, a softer, smaller brush helps strokes fade together.
How do I make cloned stones line up with the rest?
Because the clone is on its own layer, press Cmd/Ctrl + T, drag the rotation point onto a spot that already lines up, then rotate until the lines between the stones run into the rest of the image.
Why is my cloned area a different color?
Paint a color sampled from the surrounding area on a new layer above the clone, right-click it and choose Create Clipping Mask, then set the blend mode to Color. Add a layer mask and paint black at about 30% Flow so it fades out.
How do I fix a pattern that repeats?
Sample from a different part of the photo and clone over the repeat a little more randomly. Copying in a small detail, like a little light source, also breaks up the monotony.
How do I straighten something I rebuilt crooked?
On a new layer, choose Image > Apply Image and click OK. Select the area, go to Filter > Liquify and push the line straight with the Forward Warp tool and a bigger brush.
Are the sample files free?
Yes, with a free PHLEARN account. You get 1 sample image and 1 PDF guide: the street photo from the video and a 4-page guide to every step and setting.
From the Magazine View all
Stories, interviews and guides for photographers, new every week.
 EditingLightCraft vs Lightroom: I Edited the Same RAW Files in BothThe free clone on the same RAW files: what matches, what breaks and who should switch.
 InspirationRare Historical Photos: 13 of the Rarest Pictures Ever TakenFrom the earliest surviving picture of a person to the last passenger pigeon: who took each one and why it survives.
 EditingArtCraft: Photoshop Cloned by AI in Two Weeks. Is It Legal?ArtCraft cloned Photoshop and Lightroom with AI and gave them away. Any good? Legal? Safe?
Master Photoshop, Lightroom and Photography
Join PHLEARN PRO for $12.99 a month, or $99.99 a year (save 36%). Cancel anytime, with a 100% money-back guarantee.





