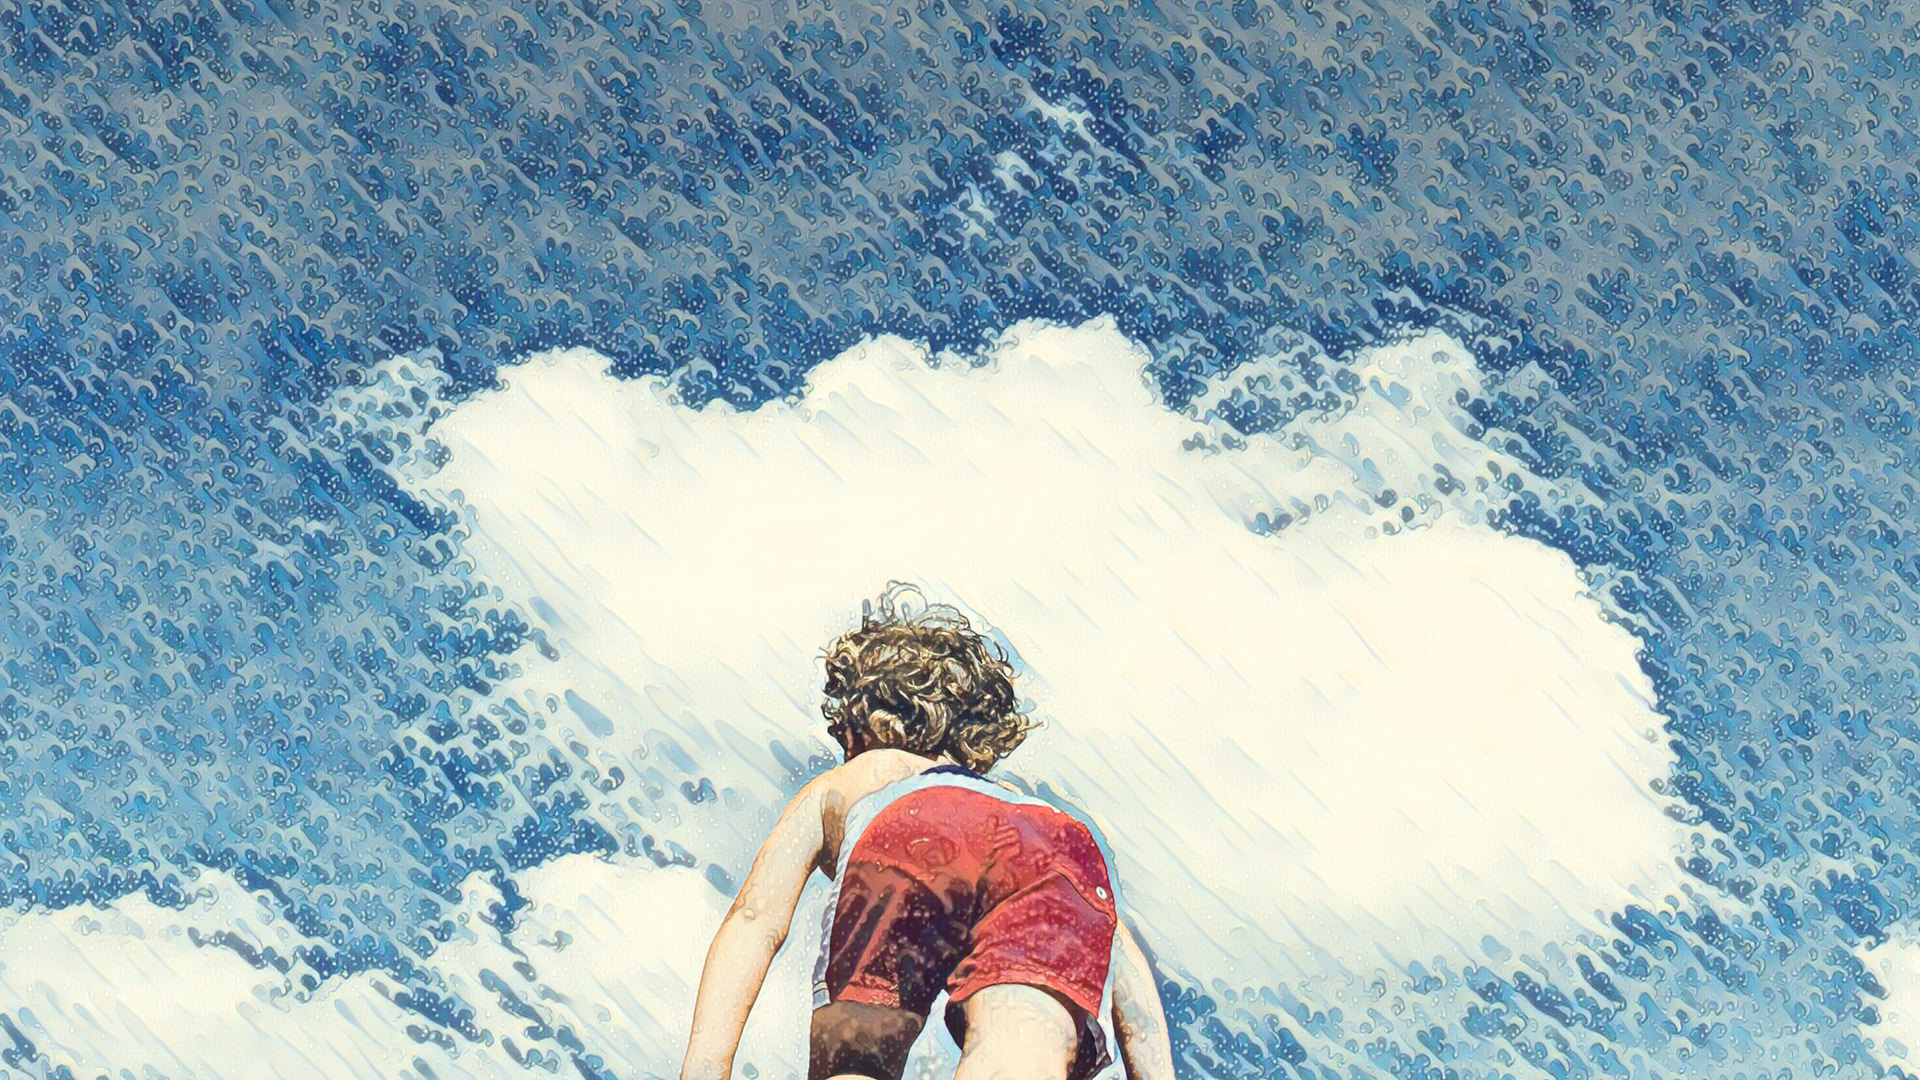

Download Assets
This tutorial includes 1 sample image, 1 sample PSD and 1 PDF guide. Downloads are free with a PHLEARN account.
- Download the sample images and PSDs from every free tutorial on PHLEARN
- New free tutorials published every week
- One free account — sign up once, then download anything
Free PDF Guide · 3 Pages
This Tutorial as a Step-by-Step PDF
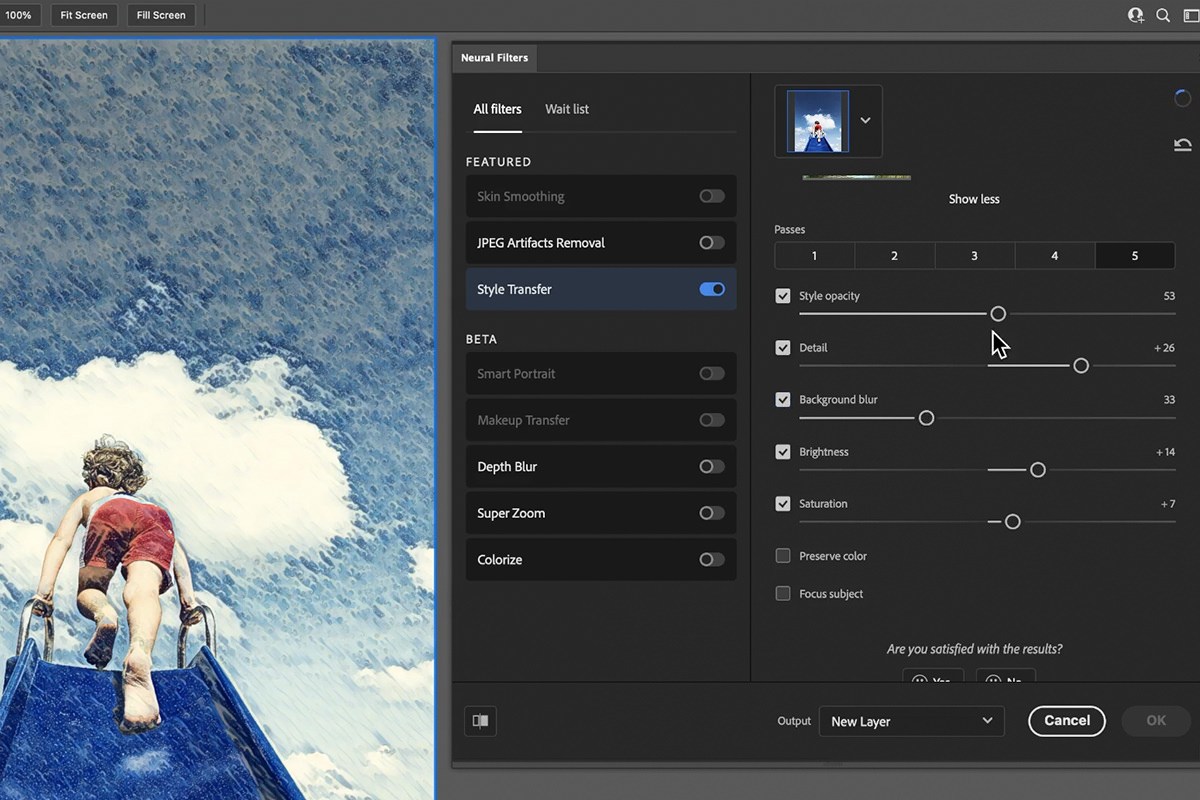
The 3-page guide walks through Filter > Neural Filters > Style Transfer, choosing a style and Show More, Preserve Color, Passes, Style Opacity, Detail, Brightness and Saturation, Background Blur and Focus Subject, then output to New Layer to compare styles. Keep it next to your keyboard.
description
Learn how to use the Style Transfer Neural Filter in Photoshop to push a photo toward the look of a painting, brushstroke texture, color palette, and all, without touching a brush. This tutorial walks through the featured and additional preset styles, the Preserve Color option, running multiple passes for a stronger effect, the Style Opacity and Detail sliders, Background Blur and Focus Subject, and outputting each style to its own layer so you can compare them.
If you want to learn how to create special effects like this from scratch, try PHLEARN PRO and learn how to transform your photos into a watercolor painting, a pencil sketch, pop art, and more!
Enjoying This Free Tutorial?
We publish a new free tutorial every week, each one with sample images and PSDs you can download and follow along with. Sign up and they land straight in your inbox, along with early word on sales, events and subscriber-only offers.
Image Source
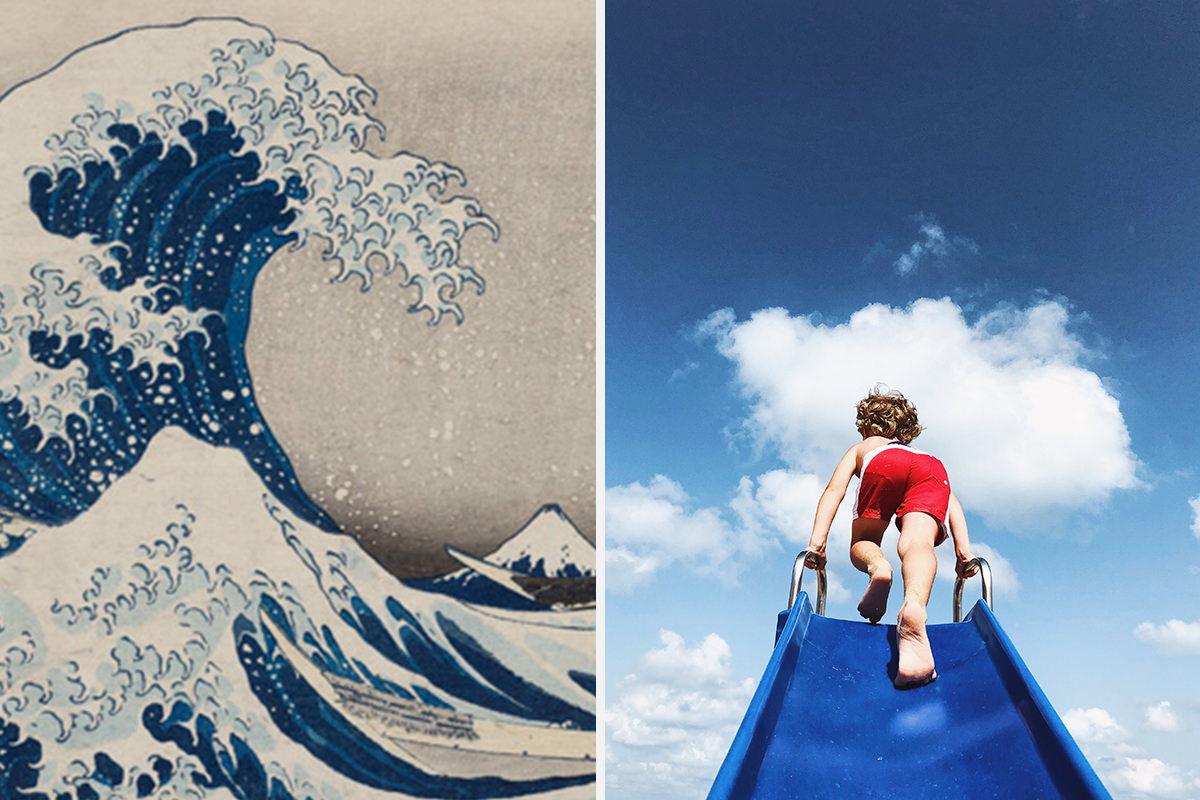
Photo by Anastasia Pavlova via Pexels
How to Use the Style Transfer Neural Filter in Photoshop
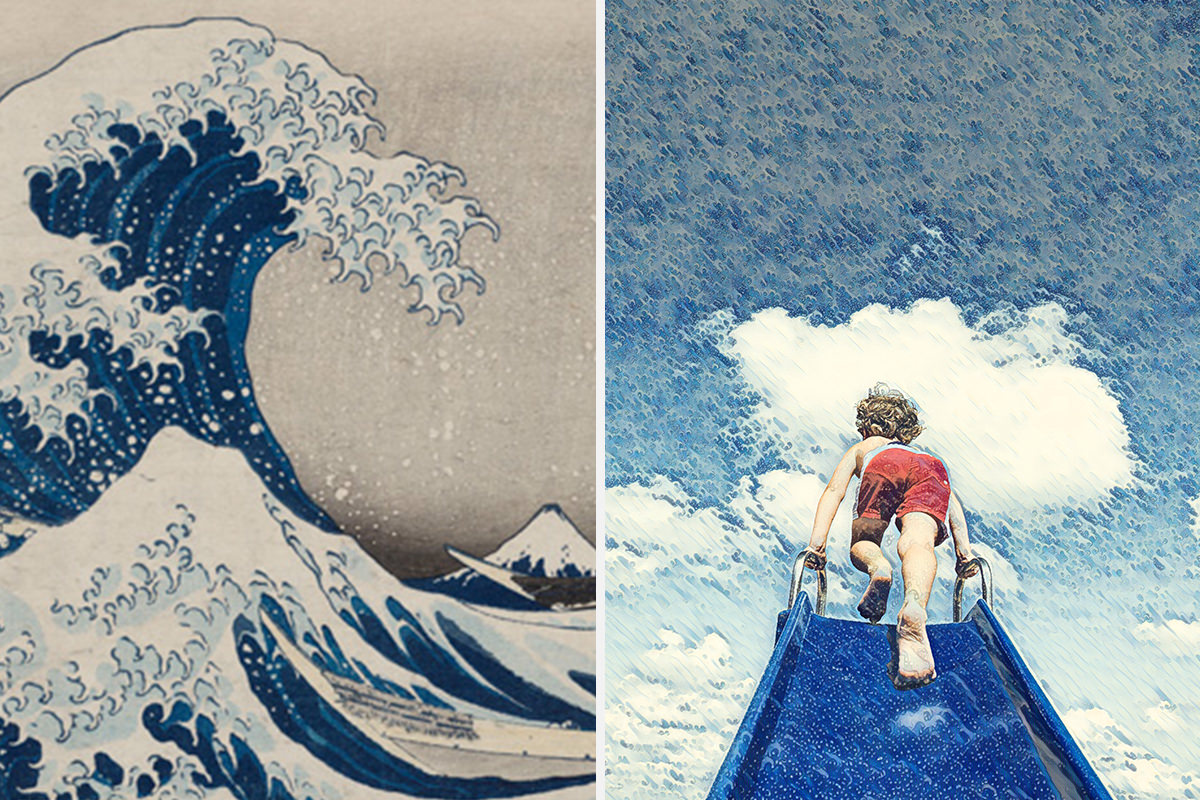
Photoshop’s Neural Filters panel includes a Style Transfer filter that can push a photo toward the look of a painting — brushstroke texture, color palette, and all — without you touching a single brush tool. It works by borrowing the visual character of a chosen artwork and applying it to your image, and every part of the effect (how strong it is, how much of the original color survives, how much detail comes through) is adjustable after the fact.

Turning On the Style Transfer Neural Filter
Style Transfer lives inside the same Neural Filters panel as Photoshop’s other AI-driven filters, and it needs to be switched on before it does anything to your image.
-
Open the Neural Filters Panel
Go to Filter > Neural Filters to open the panel.
-
Enable Style Transfer
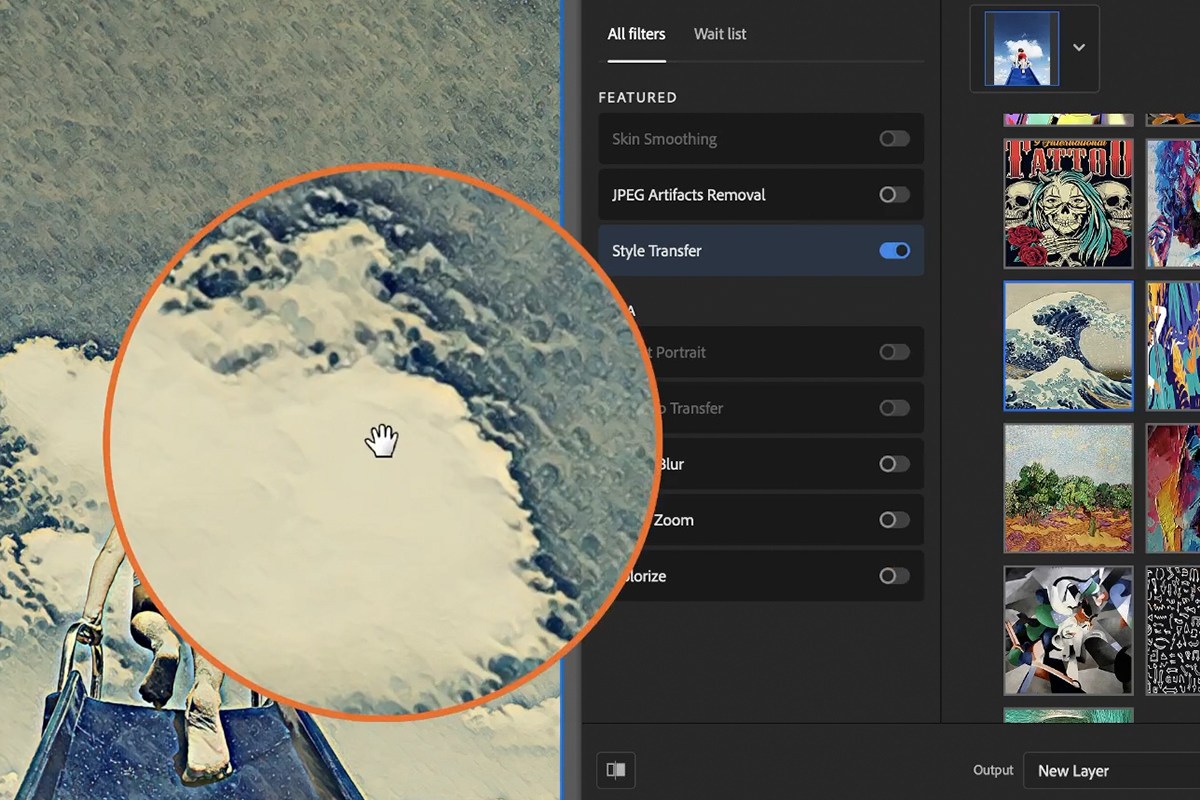
Find Style Transfer in the list of filters and toggle it on. The panel updates to show a set of style thumbnails you can browse and apply.

Browsing the Featured and Additional Styles
Rather than starting from a blank slate, Style Transfer ships with a set of preset style thumbnails pulled from existing artwork — a quick way to see a range of very different looks applied to your own photo before settling on one.
-
Try a Featured Style
Click through the featured thumbnails to preview each one on your photo. One of the presets applies a loose, wave-like painterly texture; another leans toward the bold color and brushwork of a Van Gogh-style painting.
-
Check the Additional Styles
Click Show More under the thumbnails to load more styles. Click through these as well to compare results before picking a direction.
You Can’t Upload a Custom Style Image Yet
As of this version of Photoshop, Style Transfer only works with its built-in library of preset styles — there’s currently no option to upload your own reference image and transfer its look onto a photo. You’re choosing from the presets Adobe has included, not building a custom style from an artwork of your choice.

Preserving Your Original Photo’s Color
Applying a style can shift your image toward that style’s own color palette, which isn’t always what you want if the photo’s original colors are part of what makes it work.
-
Turn On Preserve Color
Check the Preserve Color box in the panel. This keeps your photo’s original colors in place while still applying the style’s texture and brushwork on top.
Texture Versus Color
With Preserve Color off, the filter reshapes both the texture and the color of your image to match the chosen style. Turning it on separates those two effects — you keep the photo’s real colors and only pick up the painterly texture, which tends to look more like a stylized photo and less like a full repaint.

Running Multiple Passes for a Stronger Effect
A single application of a style can look fairly subtle, especially on a busy or high-detail photo.
-
Raise Passes for More Intensity
Choose a higher number in the Passes setting inside the filter to build up a stronger, more obvious effect. Each additional pass pushes the texture and brushwork further; on the second example in the video, raising Passes visibly adds detail as the preview updates.

Adjusting Style Opacity and Detail
Two sliders control how strongly the style comes through and how much fine detail from the original photo survives underneath it.
-
Set the Style Opacity Slider
Drag Style Opacity to blend between your untouched original image and the fully styled result. Lower values keep more of the original photo showing through.
-
Set the Detail Slider
Drag Detail to control how much of the photo’s fine detail remains visible under the applied style. Higher detail keeps edges and texture from the original photo more recognizable.

Fine-Tuning Brightness and Saturation
Beyond the style-specific controls, two familiar sliders let you adjust the overall look of the result once the style has been applied.
-
Adjust Brightness
Use the Brightness slider to lighten or darken the styled image.
-
Adjust Saturation
Use the Saturation slider to make the styled colors more vivid or more muted.

Using Background Blur and Focus Subject
Style Transfer also includes two options aimed specifically at portraits and subject-focused photos, letting the styled effect sit differently on the subject than on the background.
-
Turn On Background Blur
Enable Background Blur to soften the background of the styled image. This option is processed in the cloud rather than locally on your machine.
-
Turn On Focus Subject
Enable Focus Subject to let the filter use artificial intelligence to find the main subject, putting a little more detail on it and removing some detail from the background.

Background Blur Runs in the Cloud
When you turn on Background Blur, a loading icon appears at the top right of the panel: the image is processed in the cloud and sent back to your machine, so stay online. It keeps the subject in focus and blurs the background, but you lose a bit of the style there; on this photo Aaron prefers it off, so the same effect runs through the whole image.
Outputting the Result to a New Layer
Because Style Transfer offers so many different presets, it’s worth setting up your output so you can compare more than one before committing to a final look.
-
Set the Output To a New Layer
Before clicking OK, set the filter’s output option to a new layer rather than applying directly on top of your existing layer.
-
Try a Second Style on Another New Layer
Click the Background layer again, reopen Neural Filters, pick a different style, and output it to another new layer. With each style on its own layer, you can toggle visibility back and forth to compare them side by side, or adjust individual layer opacity to blend two styles together.


Common Mistakes to Avoid
The most common misstep is judging a style from a single, unadjusted pass — the Passes, Style Opacity and Detail settings can change a style’s look dramatically, so a preset that looks too weak or too aggressive at first glance is often just one slider adjustment away from working. It’s also easy to forget Preserve Color when the goal is a stylized version of the photo’s own palette rather than the style artwork’s palette, and to leave the output set to apply directly to your layer instead of a new one, which makes it harder to compare presets afterward.


Why This Approach Works
Style Transfer separates a photo’s texture and color from its content in a way that hand-painting an effect never really can — the filter is analyzing the visual patterns of an artwork like The Great Wave off Kanagawa and mapping that pattern onto your photo’s structure, rather than laying a flat texture overlay on top of it. That’s why Preserve Color, Detail, and Style Opacity each control something genuinely different: color, fine structure, and overall blend strength are handled as three separate layers of the same effect instead of one all-or-nothing filter. Sending each attempt to its own layer matters for the same reason it matters elsewhere in Photoshop — once you’ve tried a few styles, from a wave-painting texture to something closer to recoloring a black-and-white photo with the Colorize filter, you can blend or swap between them nondestructively instead of committing to the first result you liked. And because Background Blur and Focus Subject run as their own step, you can pair a strong stylized texture on a subject with a softened, less distracting background — closer to what you’d get by creating a realistic depth of field effect separately, but built into the same filter pass.
Final Thoughts
Style Transfer is worth treating as a starting point rather than a one-click final answer — the built-in presets give you a wide spread of looks, but the real control comes from raising the number of Passes, dialing in Style Opacity and Detail, and deciding per photo whether Preserve Color should be on or off. Sending different attempts to their own layers costs nothing and means you’re never locked into the first style you tried. If you’re building out a broader AI-assisted portrait workflow, this pairs naturally with tools like changing facial expressions in a portrait for finer, more targeted control once the overall style and mood of the image are settled.
Quick Reference: Menus and Settings
- Open the filterSelect the Background layer, Filter > Neural Filters, toggle Style Transfer
- Choose a styleClick a thumbnail; Show More loads extra styles
- Keep your colorsPreserve Color on; off brings in the artwork’s color
- StrengthPasses up for a stronger effect; Style Opacity down to mix the original back; Detail up a little
- FinishBrightness and Saturation, small moves by eye
- Blur and focusBackground Blur (processed in the cloud) and Focus Subject
- OutputOutput: New Layer, then OK; one layer per style to compare
No keyboard shortcuts are used in this tutorial.

Free Downloads
Follow Along on the Same Photo
Get the photo of the child on the blue slide, the sample PSD and the 3-page PDF guide to every setting in the filter. Free with a PHLEARN account.
Style Transfer Neural Filter: Common Questions
Where is Style Transfer in Photoshop?
Click the Background layer, go to Filter > Neural Filters and toggle on Style Transfer. Click Fit Screen in the options bar so you can see the whole image.
How do I see more styles?
Click Show More under the thumbnails to load extra styles. Trying one is as simple as clicking its thumbnail; Aaron’s pick for this photo is the wave painting.
Can I use my own painting as a style?
Not at the time of the tutorial. You choose from the styles preloaded with Photoshop.
How do I keep my photo’s original colors?
Check Preserve Color below the styles. You keep the style’s texture with your photo’s color; turn it off to bring in the color of the artwork itself.
How do I make the effect stronger?
Raise the number of Passes inside the filter. More passes make the effect stronger and add detail to the painted look.
How do I mix some of the original photo back in?
Lower Style Opacity a little. With Preserve Color off, this is how you find a mid-ground between the artwork’s color and your own. Raise Detail if you want more of it in the result.
Does Style Transfer need an internet connection?
Some options are processed in the cloud. When Background Blur is on, a loading icon appears at the top right of the panel while the image is sent off and back, so stay online.
Should I turn on Background Blur or Focus Subject?
Background Blur keeps the subject sharp but you lose some of the style in the background, so Aaron leaves it off on this photo. Focus Subject puts a little more detail on the subject and removes some from the background.
How do I compare two different styles?
Set Output to New Layer and click OK. Click the Background layer again, apply a different style to another new layer, then turn the layers off and on.
Are the sample files free?
Yes, with a free PHLEARN account. You get 1 sample image, 1 sample PSD and 1 PDF guide: the photo of the child on the blue slide, the PSD and a 3-page guide.
Master Photoshop, Lightroom and Photography
Join PHLEARN PRO for $12.99 a month or $99.99 a year. Cancel anytime, with a 100% money-back guarantee.





