Photoshop Tutorials

Learn how to swap faces in Photoshop using AI Generative Fill, even in tricky areas like hair and overlaps, and how to fix common challenges encountered when editing group photos.
Photoshop | Retouching | Medium | 30 mins | 1 video
2 Sample Images | 1 Sample PSD

Fix warped perspectives in your photos with Photoshop. Use the Transform and Perspective Warp tools to straighten vertical lines and make your images look perfect!
Photoshop | Photo Editing | Easy | 30 mins | 1 video
3 Sample Images | 3 Sample PSDs
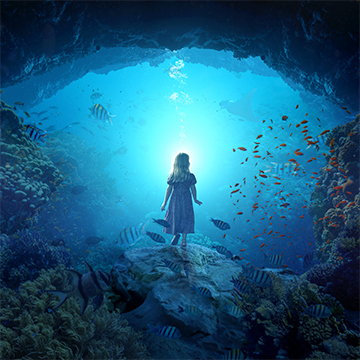
Ready to dive into the world of creating conceptual artwork in Photoshop? Our tutorial covers everything you need to know, from mastering subject cutouts and harmonizing color and lighting in multiple images to even crafting a captivating parallax animation in After Effects.
Photoshop, After Effects | Compositing | Advanced | 4.5 hours | 8 videos
15 Sample Images | 1 Sample PSD | 1 Sample AE Project File

Learn how to create a breathtaking Northern Lights composite in Photoshop by blending different images, matching colors and light, and using essential tools like Levels, Clipping Masks, Smart Objects, and Custom Photoshop Brushes.
Photoshop | Compositing | Advanced | 3.25 hours | 8 videos
7 Sample Images | 1 Sample PSD | 1 Photoshop Brush

Learn how create a unique artistic effect by combining a portrait with splatter effects in Photoshop. Using channels for precise selections, we select darker areas of the image and fill them with color.
Photoshop | Compositing | Easy | 15 mins | 1 video
Stock Image Links Included

Learn how to composite graphics and text into photos to create stunning advertisements, marketing images, social media graphics, and more.
Photoshop | Graphics & Text | Medium | 1.5 hours | 5 videos
8 Sample Images | 4 Sample PSDs

Learn how to use Photoshop’s newest Adobe Camera Raw feature: AI masking!
Photoshop | Photo Editing | Medium | 15 mins | 1 video
1 Sample Image | 1 Sample PSD

Learn to combine graphics and photos to create beautiful visual effects. In this tutorial, you will learn to transform graphics in perspective to fit photos and use displacement maps to make graphics interact with images.
Photoshop | Retouching | Medium | 15 mins | 1 video
1 Sample Image | 1 Sample PSD

Learn how to warp graphics to match photos and add depth with displacement maps.
Photoshop | Compositing | Advanced | 45 mins | 1 video
3 Sample Images | 1 Sample PSD
Learn how to bring images to life using the Puppet Warp tool and the timeline video editor.
Photoshop | Visual Effects | Advanced | 1.75 hours | 1 video
5 Sample Images | 1 Sample GIF | 1 Sample PSD

Learn how to remove backgrounds from graphics and illustrations accurately and professionally. Plus, we’ll show you how to change the colors of any graphic or illustration, making sure that the edges are smooth and clean.
Photoshop | Photo Editing | Advanced | 1 hours | 1 video
2 Sample Image | 2 Sample PSDs

Learn to remove distractions and create a cleaner image in Photoshop.
Photoshop | Photo Editing | Easy | 30 mins | 1 video
1 Sample Image | 1 Sample PSD
Learn how to create product labels and place them into photographs for mockups.
Photoshop | Compositing | Easy | 45 mins | 1 video
2 Sample Images | 2 Sample PSDs

Create a fun photo collage with stock photos.
Photoshop | Compositing | Easy | 15 mins | 1 video
8 Sample Images | 1 PSD File

Learn to get the most out of the new Replace Sky feature in Photoshop by choosing your own skies!
Photoshop | Compositing | Easy | 15 mins | 1 video
4 Sample Images | 1 Sample PSD

Use the included Frequency Separation Action to remove any blemishes from skin
Photoshop | Retouching | Easy | 30 mins | 1 video
1 Sample Image | 1 Sample PSD | 1 Photoshop Action

Discover the secrets of sky replacement and color grading to enhance the drama and impact of your photos.
Photoshop | Photo Editing | Easy | 15 mins | 1 video
2 Sample Images | 1 Sample PSD

Learn to create realistic shadows for compositing, product mock-ups, product placements, e-commerce and graphic layouts.
Photoshop | Compositing | Medium | 3.25 hours | 7 videos
8 Sample Images | 6 Sample PSDs | 1 Photoshop Action

Learn to remove color and light glare from glasses in Photoshop
Photoshop | Retouching | Easy | 15 mins | 1 video
1 Sample Image | 1 Sample PSD

If you love Lightroom tools, you may be surprised to learn they are available in Photoshop!
Photoshop | Photo Editing | Easy | 15 mins | 1 video
1 Sample Image | 1 Sample PSD

Learn to remove even the toughest objects with this brush tool hack!
Photoshop | Photo Editing | Easy | 30 mins | 1 video
1 Sample Image | 1 Sample PSD

Learn to most powerful tools in Photoshop to improve any photo! Follow along and download the included frequency separation photoshop action.
Photoshop | Photo Editing | Medium | 2 hours | 3 videos
2 Sample Images | 2 Sample PSDs | 1 Photoshop Action

Learn how to fix clothing issues with the clone stamp and liquify tool
Photoshop | Photo Editing | Easy | 30 mins | 1 video
1 Sample Image | 1 Sample PSD

Learn to change background colors quickly!
Photoshop | Photo Editing | Easy | 15 mins | 1 video
1 Sample Image | 1 Sample PSD

Learn how to use advanced selections tools in Photoshop, like the Object Selection Tool, to cut people out of complicated backgrounds!
Photoshop | Photo Editing | Easy | 30 mins | 1 video
2 Sample Images | 1 Sample PSD

Learn how to use advanced selections tools in Photoshop, like the Object Selection Tool, to cut people out of complicated backgrounds!
Photoshop | Photo Editing | Easy | 30 mins | 1 video
1 Sample Image | 1 Sample PSD
Learn how to create stunning and realistic lighting effects in Photoshop 2022! Create custom lens flares, sun rays, glows, blooms, and more.
Photoshop | Visual Effects | Easy | 1.5 hours | 6 videos
9 Sample Images | 5 Sample PSDs | 1 Photoshop Brush

Learn all about how selections work in Photoshop as we use some simple selection tools to replace the sky in a landscape image.
Photoshop | Free Tutorials | Easy | 30 mins | 1 video
2 Sample Images | 1 Sample PSD

Learn how to master Layer Masks in Photoshop with these helpful keyboard shortcuts!
Photoshop | PHLEARN Quick Tips | Easy | 15 mins | 1 video
1 Sample Image | 1 PDF Guide
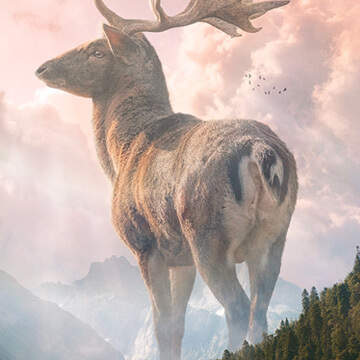
Learn how to create stunning nature composite using only free stock image assets and some Photoshop savvy.
Photoshop | Compositing | Advanced | 2.75 hours | 6 videos
6 Sample Images | 1 Sample PSD | 2 Photoshop Brushes

Learn how to create realistic light rays in Photoshop using Levels, Radial Blur, Layer Masks and more!
Photoshop | Visual Effects | Easy | 15 mins | 1 video
1 Sample Image | 1 Sample PSD