


Download Assets
This tutorial includes 8 sample images and 1 PDF guide. Downloads are free with a PHLEARN account.
- Download the sample images and PSDs from every free tutorial on PHLEARN
- New free tutorials published every week
- One free account — sign up once, then download anything
Free PDF Guide · 3 Pages
This Tutorial as a Step-by-Step PDF
The 3-page guide explains ISO as the camera’s computer brightening the image, how doubling the number doubles the brightness, the microphone comparison, a rough noise guide from ISO 100 to above 1600, finding your native ISO, and the TIE fighter shoot step by step, ending at f/11 and ISO 800. Keep it in your camera bag.
description
Aperture and shutter speed are physical controls; ISO is the camera’s computer brightening what those two already captured, which is why pushing it adds noise. This tutorial covers how ISO numbers work, what raising it actually costs, how to find a camera’s native ISO, and a real shoot of a LEGO TIE fighter where raising ISO bought both a faster shutter and a deeper depth of field, before the final shot settled on f/11 and ISO 800.
Enjoying This Free Tutorial?
We publish a new free tutorial every week, each one with sample images and PSDs you can download and follow along with. Sign up and they land straight in your inbox, along with early word on sales, events and subscriber-only offers.

What Is ISO? The Basics Explained
ISO is one of the three fundamental settings, alongside aperture and shutter speed, that control the brightness of a photo. Unlike the other two, which are physical, mechanical controls, ISO works differently, and understanding that difference is key to using it well.
ISO Is the Digital Half of Exposure
Aperture and shutter speed are both physical controls: aperture sets the size of the opening in the lens that lets light through, and shutter speed sets how long the sensor stays exposed to that light. ISO works differently because it’s a computer function rather than a physical one — every modern digital camera has a computer inside that can take the information already captured through the aperture and shutter speed and brighten it further, essentially applying a form of post-production directly inside the camera before the shot is even finished.
How ISO Numbers Work
ISO values are displayed as whole numbers, and most cameras start at a base value of ISO 100. Doubling the ISO number doubles the brightness of the image: going from ISO 100 to 200 doubles the brightness, and going from 200 to 400 doubles it again. That simple doubling relationship makes ISO one of the more intuitive settings to reason about once it clicks, since the math involved is just repeated doubling rather than anything more complex.
The Trade-off Is Noise
Raising ISO comes at a real cost: image quality goes down as the number goes up. Increasing ISO introduces signal noise, also called grain, causes colors to render less accurately, and reduces the camera’s dynamic range.
The Microphone Comparison
A useful way to think about this is comparing a camera to a microphone. Recording something very quiet and wanting it louder means raising the microphone’s input levels, which brings in ambient noise and electronic hiss from the microphone itself along with the intended sound — and the louder that gain is pushed, the worse that noise gets. A camera works the same way: taking a photo that isn’t very bright and pushing it brighter with ISO introduces that same kind of noise, just visually instead of audibly.
Finding and Using Your Camera’s Native ISO
To keep image quality as clean as possible, shoot at the camera’s native ISO whenever conditions allow it. For most cameras, that native value is 100 or 200, though it varies by model — searching the specific camera model along with “native ISO” will turn up the exact value for that camera.
A Rough Noise Guide by ISO Range
As a general guide for most modern digital cameras, an ISO range between 100 and 400 produces almost no visible noise. Moving up to somewhere between 800 and 1600 starts to introduce a little noise, but the results are still usable in most situations. Anything above ISO 1600 is where noise really becomes a noticeable factor in the final image.
Why Raise ISO At All
If raising ISO degrades image quality, it’s worth asking why anyone would ever want to do it. The answer comes down to what aperture and shutter speed can and can’t do on their own: both are creative decisions that shape the image directly, aperture controlling how much is in focus and shutter speed controlling whether motion freezes or blurs, but neither one can manufacture light that simply isn’t present in the scene. When there isn’t enough available light to get the exposure needed with the aperture and shutter speed settings actually wanted for the shot, ISO is the tool that steps in to brighten the image the rest of the way.
A Real Example: Photographing a TIE Fighter in the Dark
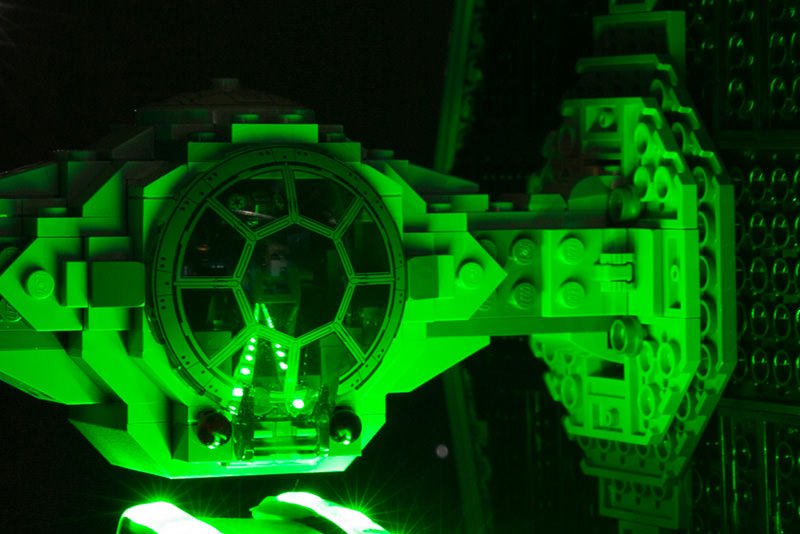
A practical example makes this trade-off concrete. The goal was photographing a LEGO TIE fighter against a black background with visible stars, achieved by punching a bunch of small holes into a sheet of black seamless paper and shining a light through it from behind. Because the scene itself was so dark, getting a proper exposure without touching ISO meant relying on a wide-open aperture and a long shutter speed, which created two separate problems to solve.
Solving Motion Blur First
The first problem was motion blur, caused by either the subject or the camera moving during a long exposure. Switching to a faster shutter speed fixes that by freezing motion, but a faster shutter speed also lets in less light. To compensate for that lost light and still reach a proper exposure, ISO was raised to 1600.
Fixing Depth of Field Next
Raising the ISO solved the motion blur problem but revealed a second one: shooting at an aperture of f/2.8 produced a depth of field so shallow that the TIE fighter itself wasn’t fully in focus. Since the goal was having the entire model sharp, the fix was closing down the aperture from f/2.8 to f/8 or f/11 (the final shot uses f/11), trading some of that wide-open light-gathering ability for a much wider zone of focus.
Put together, raising the ISO made it possible to use both a faster shutter speed, which eliminated the motion blur, and a smaller aperture, which produced a wide enough depth of field to keep the entire TIE fighter sharp.
ISO 1600 was a step along the way, not the final setting. The lasers coming out of the bottom of the TIE fighter are strips of green light, placed below the model so they look realistic, and they called for a compromise in the camera settings. The final shot used a little longer shutter speed, and because nothing in the scene was really moving, that still gave a great exposure without a very high ISO. The video shows the final settings as f/11, a shutter speed of 2.5 and ISO 800. Every one of those three settings was adjusted deliberately in response to what the other two were doing, which is really the whole point of understanding how aperture, shutter speed, and ISO interact rather than treating any one of them in isolation.
When a Little Noise Is Worth It
The cleanest possible image isn’t always the right priority. A photo shot at a low ISO that ends up blurry or out of focus is a worse result than one with a bit of visible grain, since blur and missed focus are far more distracting flaws than mild noise. In situations where a high ISO genuinely can’t be avoided, converting the final image to black and white in post-production is a useful trick — a bit of noise in a black-and-white photo often reads as a deliberate, stylized grain effect rather than a technical flaw, and can end up looking great rather than like a compromise.
Why Understanding ISO Matters
ISO completes the exposure triangle by covering exactly the gap that aperture and shutter speed can’t fill on their own: real, physical light that simply isn’t present in the scene. Aperture and shutter speed are both trade-offs between two creative outcomes each, depth of field versus light, and motion blur versus light, while ISO is a trade-off between brightness and image cleanliness. Seeing all three settings as one interconnected system, the way the TIE fighter example demonstrates, changing one to solve a problem while adjusting the others to compensate, is what separates deliberate exposure decisions from simply leaving a camera on full auto and hoping for the best.
Final Thoughts
ISO shouldn’t be treated as a setting to avoid at all costs, or as one to raise without thinking about the consequences — it’s a genuinely useful tool the moment aperture and shutter speed alone can’t get the shot. Knowing a specific camera’s native ISO and roughly where noise starts to become noticeable on that camera gives a clear, practical baseline for deciding, shot by shot, how far it’s worth pushing ISO in exchange for a faster shutter speed or a smaller aperture. For the other two settings, see the companion Star Wars LEGO episodes on aperture and shutter speed.
Quick Reference: Settings and Tips
- Read the numbersMost cameras start at ISO 100; double the number to double the brightness (100, 200, 400)
- Cleanest settingYour native ISO, usually 100 or 200; search your camera model plus “native ISO”
- Rough noise guide100 to 400 almost none; 800 to 1600 a little, usable; above 1600 a factor
- Stop motion blurFaster shutter speed, then raise ISO for the light (ISO 1600 in the shoot)
- Get it all in focusClose down the aperture from f/2.8 to f/8 or f/11
- Final TIE fighter shotf/11, shutter speed 2.5, ISO 800 (as shown in the video)
- Stuck with high ISOConvert to black and white in post-production

Free Downloads
Follow Along on the Same Photos
Get the 8 sample images from the Star Wars LEGO ISO tutorial and the 3-page PDF guide to ISO, noise and the TIE fighter shoot. Free with a PHLEARN account.
Camera ISO: Common Questions
What is ISO on a camera?
ISO is one of the three settings that control the brightness of your image, with aperture and shutter speed. Those two are physical; ISO is the computer inside the camera brightening what they captured, a bit like post-production inside your camera.
What happens when I double the ISO?
You double the brightness. Most cameras start at ISO 100; going to 200 doubles the brightness, and going from 200 to 400 doubles it again.
Why does a high ISO make my photos grainy?
It works like turning up a microphone to record something quiet: the boost brings in noise along with the signal. Raising ISO adds signal noise, also known as grain, colors don’t render properly and the dynamic range drops.
What is native ISO and how do I find mine?
It is the setting that keeps your image quality as clean as possible, 100 or 200 for most cameras. Search for your camera model plus “native ISO” to find the value for your camera.
How high can I set ISO before noise shows?
On most modern digital cameras, ISO 100 to 400 produces almost no noise. 800 to 1600 adds a little but should be usable in most situations, and above ISO 1600 noise becomes a factor.
Why raise ISO at all?
Aperture and shutter speed are creative choices: what is in focus, and whether motion freezes or blurs. When there isn’t enough light for the exposure you need with the settings you want, ISO brightens the image the rest of the way.
What settings did the TIE fighter shoot use?
A faster shutter fixed the motion blur, ISO 1600 brought the exposure back, and closing down from f/2.8 got the whole model in focus. With green light strips below it for the lasers, the final shot was a compromise with a little longer shutter: f/11, 2.5 and ISO 800 on screen.
How were the stars made?
A black piece of seamless paper with a bunch of holes punched into it, and a light shining through it from behind.
What can I do with a photo that has too much noise?
Try converting it to black and white in post-production, where a little noise can come off as a stylized effect. And a little grain beats a photo that is blurry or out of focus.
Are the sample files free?
Yes, with a free PHLEARN account. You get 8 sample images and 1 PDF guide: photos from the Star Wars LEGO ISO tutorial and the 3-page ISO guide.
From the Magazine View all
Stories, interviews and guides for photographers, new every week.
 EditingLightCraft vs Lightroom: I Edited the Same RAW Files in BothThe free clone on the same RAW files: what matches, what breaks and who should switch.
 InspirationRare Historical Photos: 13 of the Rarest Pictures Ever TakenFrom the earliest surviving picture of a person to the last passenger pigeon: who took each one and why it survives.
 EditingArtCraft: Photoshop Cloned by AI in Two Weeks. Is It Legal?ArtCraft cloned Photoshop and Lightroom with AI and gave them away. Any good? Legal? Safe?
Master Photoshop, Lightroom and Photography
Join PHLEARN PRO for $12.99 a month, or $99.99 a year (save 36%). Cancel anytime, with a 100% money-back guarantee.





