

How to Connect Claude to Photoshop and Lightroom: 3 Ways
Claude can already work in Photoshop and Lightroom. Here are the three ways to use Claude with Photoshop, from a free connector to Claude working on your own computer, and what I do and don’t hand it.
On stage at Adobe MAX in Miami this month, Claude cleaned up five messy poster files open in Photoshop, naming and grouping every layer. Then it built each poster again as an Instagram square, a Story, a web banner and a 14 by 48 foot billboard. Twenty layered files with live type, in about a minute and a half.
“Claude in Photoshop” means three different things right now, and they don’t do the same job. Below is each of them, from easiest to most powerful, then the jobs we’ve handed Claude, where I draw the line, and what Adobe announced at MAX: outside agents like Claude working inside Photoshop files directly, in private beta early next year.
I’m not a programmer. I studied industrial design at NC State and have worked as a designer, photographer and educator for over fifteen years, with just enough HTML and CSS to get by. About four months ago I downloaded Claude for a little help with my website, and a friend suggested Claude Code. Gemini had given me a lot of bad advice, because it couldn’t see my site well enough to make good decisions. I didn’t think of it this way at the time, but a website is code.
I always saw coding and development as something that didn’t really apply to me. Now my perspective has completely changed.
Aaron Nace
The first time I watched Claude clicking, moving things around and typing in Chrome for me, it honestly blew my mind. Since then I’ve rebuilt my portfolio site in about a day, a friend’s nonprofit site in a couple of days, and now I’m rebuilding my company’s site myself. Then I started to see if I could design things with Claude, beginning with thumbnails for the PHLEARN YouTube channel. When I just said “design a YouTube thumbnail”, the result was horrible. It needs information. Once I uploaded thumbnails I’d made in Photoshop and gave it our brand guidelines, we came up with a series that actually works, and Claude can rebuild those designs in Photoshop with fully editable layers.
Claude with Photoshop: Three Ways at a Glance
| Works on | Claude plan | Best for | |
|---|---|---|---|
| 1. Adobe connector | Photos you upload, and your Creative Cloud files | Free or paid | Quick edits and batches of JPEGs |
| 2. A script Claude writes | The file open in your own Photoshop | Any | Jobs you do every week |
| 3. Claude on your computer | Photoshop and Lightroom on your Mac or PC | Pro, Max or Ultra | Whole jobs across many files |
Way 1: Add the Adobe Connector to Claude
The quickest start is Adobe’s own connector. You upload an image and describe the change. According to Adobe’s help page, it can adjust color, light and tone, apply Lightroom presets, remove or blur a background, crop, resize and expand an image, and open and render a Photoshop file, on one photo or a batch.
- In Claude on the web or the desktop app, choose Customize in the left sidebar.
- On the Discover view, open the Plugins tab and install Adobe.
- On its Connectors tab, click Connect, then sign in to Adobe or continue as a guest.
- Type /Adobe in a new chat, attach your photos and say what you want.
It works on files you upload, in Adobe’s cloud, plus files in your Creative Cloud storage. It doesn’t touch the Photoshop open on your computer or the PSDs on your disk. For real project files, read on.
Way 2: Ask Claude to Write You a Photoshop Script
This is the one I’d start with. Photoshop has run scripts for more than twenty years, little JavaScript files ending in .jsx that can do almost anything you can do with the mouse. Now you describe the tool in plain words, Claude writes the script, and Photoshop runs it. Here’s one we made for this article:
Claude wrote a 38-line script. We saved it as Save for Client.jsx, opened one of the posters from our MAX session, and chose File > Scripts > Browse.
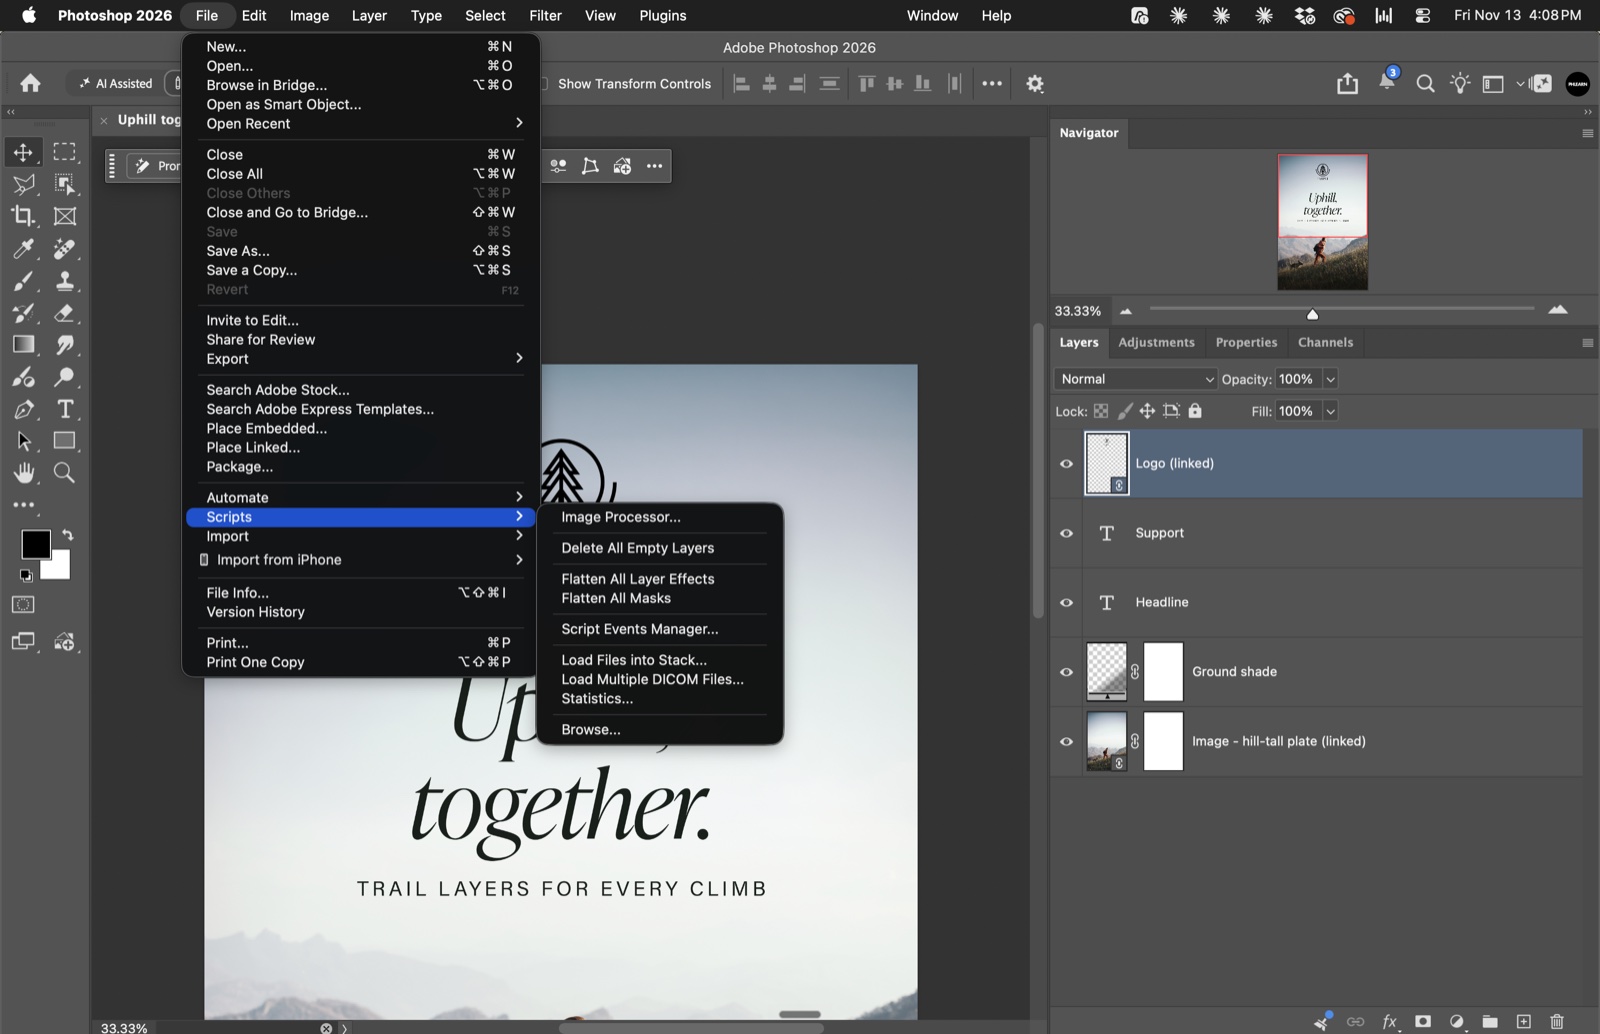
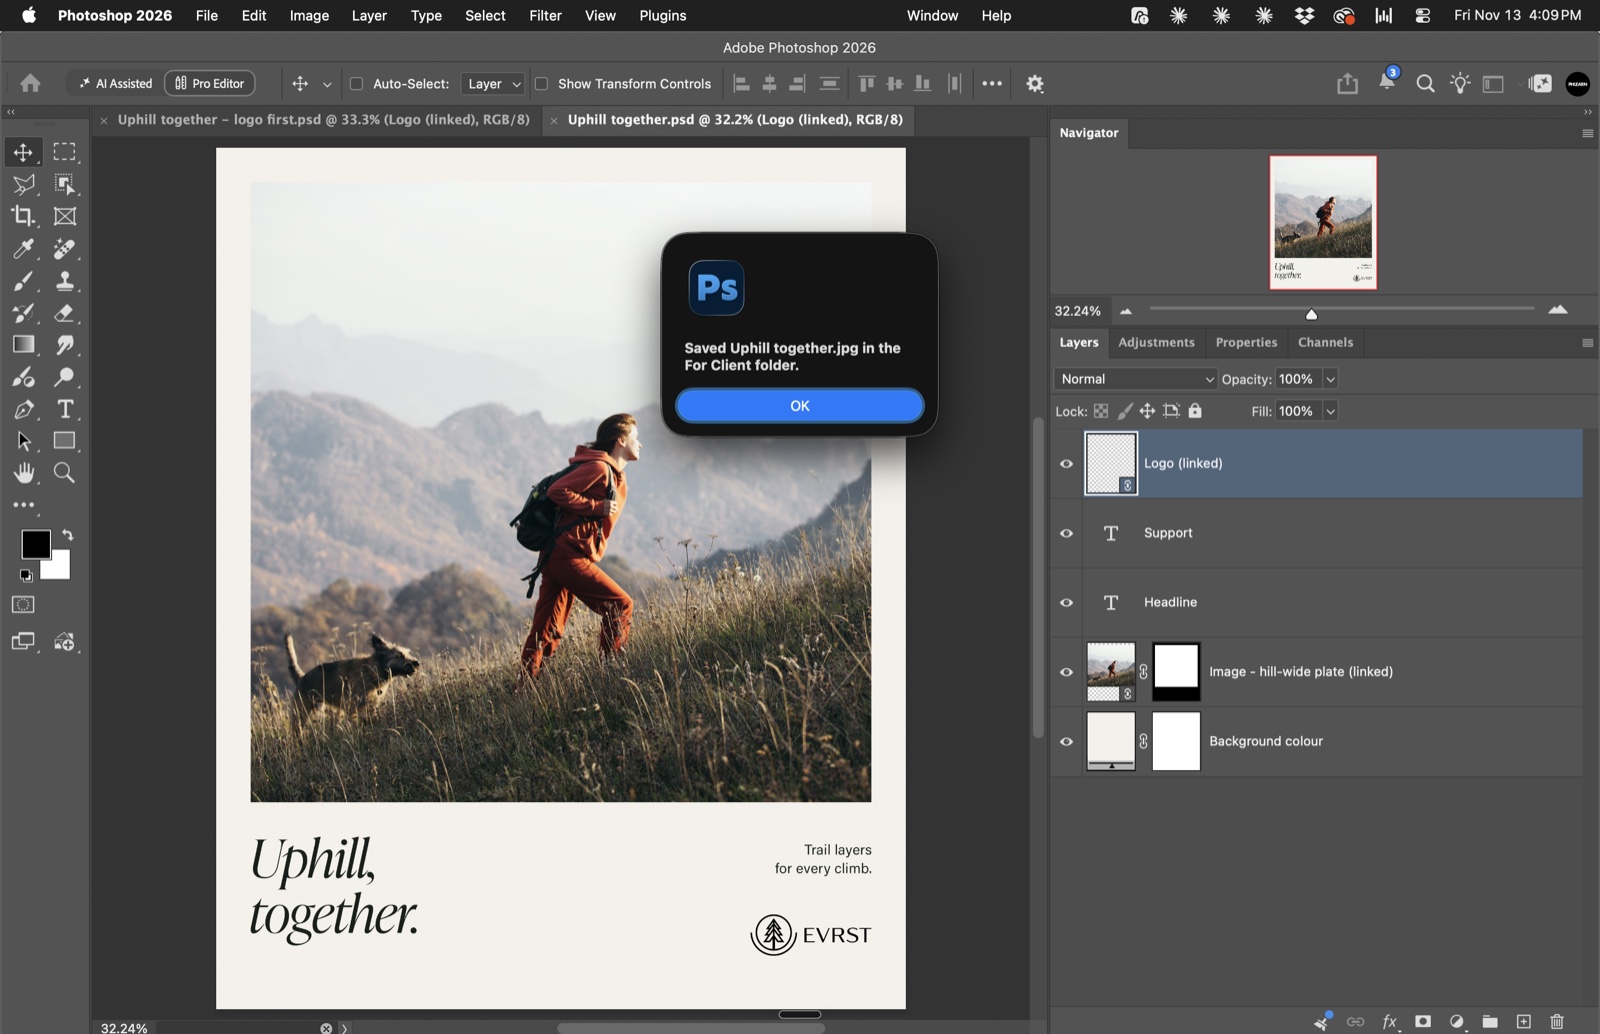
It worked the first time, with one small flaw: on our first test file, the message at the end called it “Forest%20Fog.jpg”, with the space spelled out the way a web address does it. We told Claude, it changed one line, and the second run said it properly. The first version usually works, the second one is right, and you should always test on a copy.
Then the script is yours. Put it in Photoshop’s Presets > Scripts folder (on a Mac, Applications > Adobe Photoshop 2026 > Presets > Scripts; your Mac will ask for your password), restart Photoshop, and it shows up in the File > Scripts menu like a built-in command. Give it a shortcut in Edit > Keyboard Shortcuts and it’s one keystroke from then on, with no AI involved and no subscription needed to keep running it. The three tools we showed at MAX each started as one paragraph to Claude:
| Tool | What it does | In our test |
|---|---|---|
| Shrink My PSD | Saves a smaller copy of a heavy file without changing how it looks, and names the heaviest layers | A 273-layer composite went from 2.8 GB to 1.1 GB in 25 seconds |
| Export Sizes | Saves a folder of PSDs as email, website and Instagram JPEGs, each at the best quality under its size limit, in sRGB | 12 JPEGs from four posters in 26 seconds |
| Save as Next Version | Saves Poster_v02 as Poster_v03 and never overwrites anything | Claude’s first 13-line version worked on the second try; the first used a variable called “name”, which Photoshop already uses |

Way 3: Connect Claude to Photoshop and Lightroom on Your Computer
This is what we used at MAX, and it’s a bigger step. The Claude desktop app for Mac and Windows includes Claude Code, which can run commands on your computer when you allow it, and computer use, which lets Claude look at your screen and click. Together, Claude does the whole job instead of handing you a script.
Getting connected is easier than it sounds. With computer use switched on, you ask Claude whether it can do the job in Photoshop, and it comes back with a request to start using Photoshop. Once you give it access, in my experience it can do just about anything you would do in Photoshop, within the limits further down.
Today it mostly works through scripts and by clicking. On a Mac it sends scripts straight to Photoshop to open a file, read every layer, make a change and check the result. Where there’s no scripting route, like Camera Raw’s Remove panel, it clicks through the window itself, looking at the screen before every click.
- A paid plan. Claude Code comes with Pro, Max, Ultra, Team and Enterprise. Computer use is in beta for Pro, Max and Ultra only.
- The Claude desktop app, with the Code tab for Claude Code.
- Computer use switched on in Settings > Capabilities (on some versions, Settings > System). Claude asks before it uses each app, and you approve Photoshop by name.
- A folder of copies. Anthropic’s help article says there’s no sandbox between Claude and your apps. Keep your originals somewhere else and watch it work until you trust it.
Lightroom Classic can’t be scripted from outside, so our way in was a small plug-in Claude wrote, which we call Claude Bridge. Claude passes it instructions (read the selected photos, set stars and labels, make a collection, export the picks), and it refuses to write to any catalog whose name doesn’t start with a word we chose. That one took a full day of building and testing. If you’re new to this, start with Way 2.
What We’ve Handed Claude
Start with the job from the stage. This is exactly the kind of thing Claude is great at. I design a poster or an asset first myself. Then Claude looks at it, redesigns it at every aspect ratio, horizontal, vertical and square, and recreates those designs in Photoshop, so I end up with fully editable PSD files in every aspect ratio, all built from one original.
At MAX we showed the last step. The design work was done before the session: five poster designs, with the layout for each size planned in advance. On stage Claude built the rest live, every file a layered PSD with live type. Where a format needed more picture, Photoshop’s Generative Fill had already extended the scene. Twenty files took 81 to 87 seconds in our rehearsals, and saving all twenty at their file-size limits took another 37.

Every job took Claude seconds, not hours
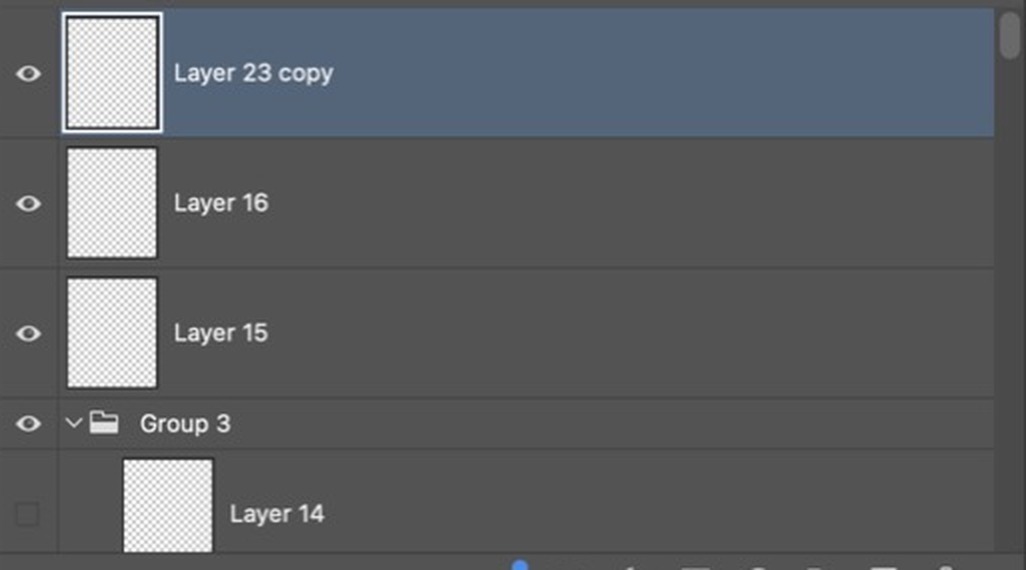
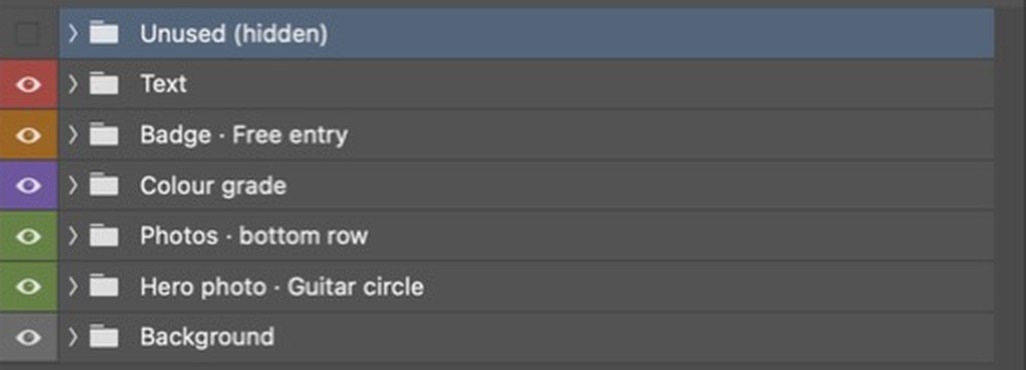
Cleaning up a PSD someone else made. The prompt: “Clean up this PSD. Name every layer for what it is, group and colour-code them, delete the junk, and don’t change a single pixel.” Claude looked at a picture of every layer, made the change as one undo step, and checked that the flattened result was pixel for pixel the same. On one event poster, 46 layers became 7 named groups. It also spotted three adjustments clipped to the wrong layer and left them alone, which was the right call.
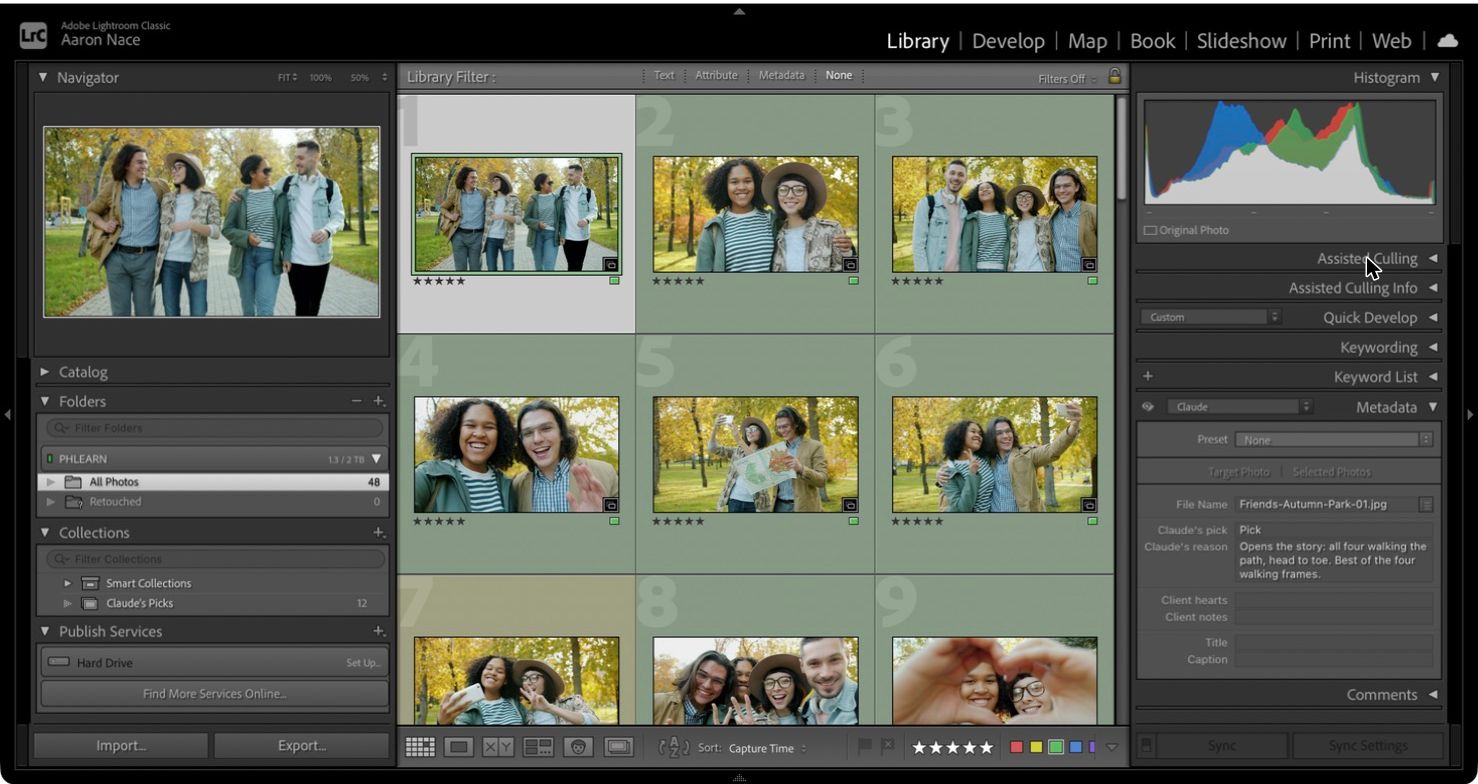
Picking the best photos, with reasons. Lightroom’s Assisted Culling knows which frames are sharp and whose eyes are open; on a 48-frame shoot it flagged 47 as selects. It can’t tell you which ones are good. Claude looked at a contact sheet, picked 12 plus 3 backups, and wrote each reason into Lightroom’s Metadata panel, as a first pass for me to check. On frame 11, which Lightroom had marked eyes likely closed, its note said she was mid-laugh, with frame 10 as the backup.
Removing blemishes on a whole shoot with Camera Raw. This isn’t Claude retouching. It’s Claude running Adobe’s own Remove tool on twelve photos at once. Lightroom Classic couldn’t do this automatically when we built it (version 16, released at MAX, adds Blemish Removal), so Claude opened the 12 picks together in Camera Raw, ran Remove > Blemishes on all of them, and brought the results back into a Retouched collection in Lightroom.


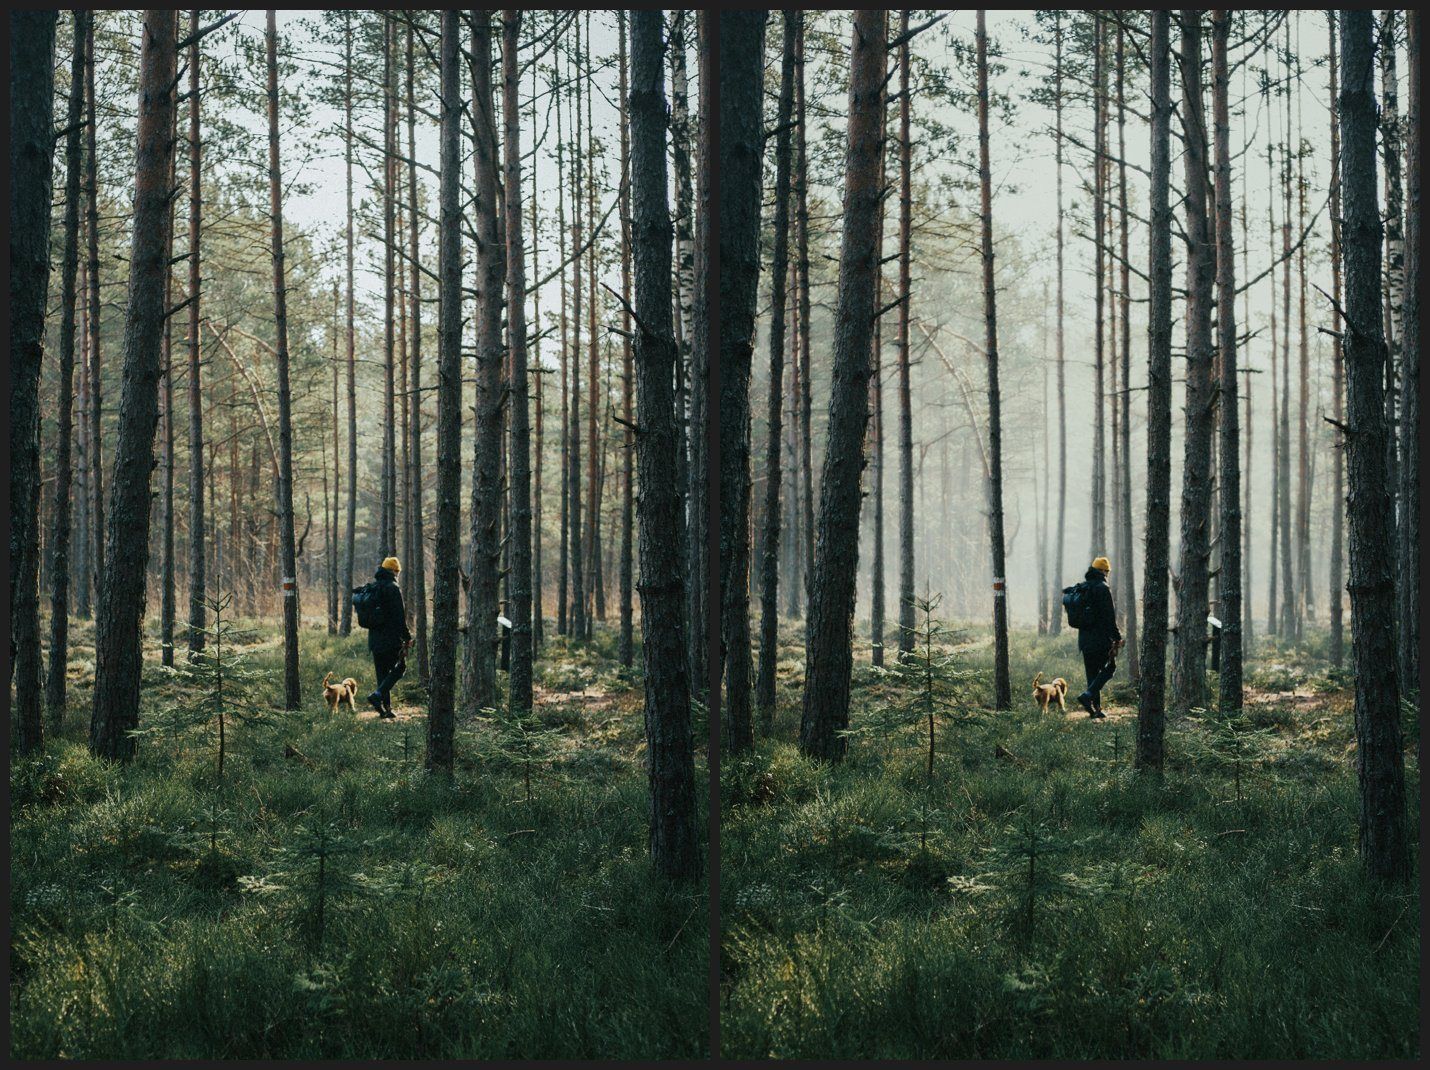
Fog that knows what’s near and far. Claude made a depth map of the forest with Depth Anything V2, a free depth model that runs on the Mac (not a Photoshop feature), cut it into four slices and painted four fog layers, each masked by its own slice, in under a minute. Photoshop has depth tools of its own, too: here’s how to use AI depth masking in Photoshop.
What I Hand Claude, and What I Don’t
I don’t really give Claude creative decisions, and I’m not having it edit my photos at this point. I wouldn’t have it retouch a photograph right now. Maybe I could train it to do a good job; honestly, I just haven’t tried.
What it’s great at is anything done automatically or in bulk, and anything where I can use Photoshop and Adobe’s AI tools together with Claude’s. That’s the perfect workflow. And you only teach it once.
Once you train Claude on how to do this once, that’s a skill that you now have forever, that you can use over and over again.
Aaron Nace
In practice that means saving what worked, as a script or as a skill Claude can load, so the next job starts from it instead of from scratch.
What’s Coming, and What It Can’t Do Yet
The day before our session, Adobe announced its own version. In its Creative Cloud announcement on November 10, Adobe said it’s previewing local MCP integrations, a standard way for an outside AI agent to plug into an app, that will let you “direct their preferred third-party agents to work locally in Photoshop, Illustrator, Premiere and After Effects.” The agent works in the real project file on your computer, and layers stay editable so you can take over by hand.
Agents won’t have to rely on scripts and clicking; they’ll work with the apps directly, which I think is incredible. Adobe says it will be in private beta in early 2027. Lightroom isn’t on the list, and Adobe hasn’t said which features agents will reach. For the bigger picture, see The Future of Photo Editing.
Until then, a few limits:
- Taste is still yours. Claude’s picks were good, and we still changed some.
- Some windows are out of reach. Lightroom’s plug-in system can’t start Assisted Culling, and some Photoshop dialogs can’t be scripted.
- Generative steps cost credits and need an internet connection, the same as when you click Generative Fill yourself.
Common Questions
Do I need to know how to code? No. For Way 2 you describe the tool in a sentence and test what Claude gives you. Knowing where File > Scripts > Browse is matters more than knowing JavaScript.
Are my photos uploaded? With the Adobe connector, yes. A script Claude writes runs entirely in your own Photoshop. When Claude runs Photoshop on your computer, your files stay there, but the screenshots it looks at are sent to Claude, the same as anything you show it in a chat.
Does this work on Windows? The connector works anywhere Claude does, the desktop app runs on Mac and Windows, and Photoshop scripts run on both. Everything in Way 3 we’ve only done on a Mac.
Where to Start
Getting up and running is really quite simple. My advice is to ask: see what’s possible and make requests. Start with one small tool from Way 2 this week, test it on a copy, and build from there. I think you’ll find that anything you need, you can build yourself.
Poster and billboard images from Aaron Nace’s Adobe MAX 2026 session, made with licensed Adobe Stock photos; the street scene behind the billboard was made with Google AI. Group photos by Vitaly Gariev and forest photo by Rūta Celma, both on Unsplash. Adobe product screenshots reprinted with permission from Adobe. Adobe, Photoshop and Lightroom are either registered trademarks or trademarks of Adobe in the United States and/or other countries.
In this article
- Claude with Photoshop: Three Ways at a Glance
- 1. Add the Adobe Connector to Claude
- 2. Ask Claude to Write You a Photoshop Script
- 3. Connect Claude to Photoshop and Lightroom on Your Computer
- What We’ve Handed Claude
- What I Hand Claude, and What I Don’t
- What’s Coming, and What It Can’t Do Yet
- Common Questions
- Where to Start
Free with PHLEARN







Join the conversation