Photo Styling Tutorials: Give Any Image a Signature Look
Learn to control the look and feel of a photo in Photoshop and Lightroom: tone, mood, contrast, texture, and the finishing choices that make a set of images read as yours. More than 100 free video tutorials from Aaron Nace on building a consistent, recognizable style.
What You’ll Learn
Style is what is left after correction: the deliberate choices about contrast, color, texture, and finish that make two photographers’ edits of the same RAW file look different. These tutorials break style into decisions you can make on purpose.
- Tone and contrast. Matte blacks, lifted shadows, punchy midtones, soft highlights, and how each one changes the mood of a photo.
- Mood with color. Warm and cool palettes, muted versus saturated, cinematic and vintage looks, and keeping skin natural inside a strong grade.
- Texture and finish. Grain, film borders, glows, halation, overlays, and light leaks, applied so they support the image instead of decorating it.
- Consistency. Building a look once and applying it across a shoot or a feed with presets, actions, and LUTs.
- Drama and restraint. Adding drama with light and contrast, and knowing when a photo needs less, not more.
Where to Start
The Coloring Learning Path is the foundation, because most style choices are color choices. From there, the cinematic and film-look tutorials in this category are the fastest way to see how a full look is built, and the Lightroom presets and LUTs let you apply those looks in one click while you learn the technique behind them.
Free and PRO Tutorials
Free tutorials are complete lessons, not previews. PRO tutorials go deeper and longer, and they include the sample images, RAW files, actions, and presets used in the lesson so you can follow along on the exact same file. A PHLEARN PRO membership unlocks every PRO tutorial on the site, including all of the ones in this category.
Frequently Asked Questions
How do I develop my own editing style?
Pick two or three decisions and keep them consistent across every photo: a contrast curve, a color palette, and a finish. The tutorials here show what each decision does so you can choose deliberately instead of by accident.
Should I use presets or edit from scratch?
Both. A preset is a starting point that keeps a shoot consistent; the edit from scratch is where you learn what the preset is doing. Most of these tutorials show the manual version, then how to save it.
Does style work the same in Lightroom and Photoshop?
The decisions are the same. Lightroom is faster for applying a look to many photos; Photoshop gives more control over local areas, textures, and layered effects. Several tutorials here show the same look built both ways.
Where to Go Next
Styling overlaps with Color Grading, which goes deeper on the tools, and with Visual Effects for glows, light, and atmosphere. For the correction that should come before any style, see Photo Editing, and for painterly and illustrative looks, see Art & Style.
Build a Look
The Coloring Learning Path teaches the color decisions that most editing styles are made of.
On This Page
PHLEARN PRO
Every PRO tutorial in this category, with sample and RAW files, plus the full PRO library.

Everyone wants a beautiful out of focus Background once in a while, but what if you can’t achieve the look in-camera? In today’s episode, we show you how to fake Depth of field in Photoshop!

Everyone wants a beautiful out of focus Background once in a while, but what if you can’t achieve the look in-camera? In today’s episode, we show you how to fake Depth of field in Photoshop!
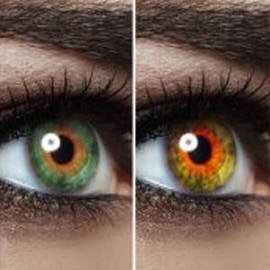
You’ve seen it everywhere, but how is it done?? Today we show you how to change the color of eyes in Photoshop!

Have you ever wondered if it is possible to create snow from scratch? In today’s episode, we show you that all you need is a custom Brush and some blurs to create your own winter wonderland!

In this episode we show you how to select the green Color Range and define a Layer Mask with the selection. This technique will allow you to cut your subject out from the Background quickly and accurately.
Sample Images Included

How to edit a sky photo to make it look more dramatic and how to add a city, altering the Light Levels to match it with the sky.
Sample Images Included

Photoshop is an amazing Tool that can help you with more than just Retouching photographs; it can be used to create illustrations as well! In today’s episode, we show you how to turn a photo into what looks like a hand-drawn illustration.

Shooting later in the day gives you the opportunity to add a warm “sunset Style” to your image in Photoshop. In today’s episode we show you how to Color your image to give it that warm “sunset” feel.

The Liquify Tool is one of the most powerful image editing Tools in Photoshop. It will allow you to “push and pull” pixels any way you’d like.

Here’s a quick tip for making colors pop in Photoshop. This technique is perfect for a photo that is dominated by one or two Colors, especially if those Colors are complimentary.

There are many things that go into making an image appear vintage in Photoshop and this episode Highlights all the techniques you may need to make your photos look aged. In this episode, we’ll show you how to create a Vintage photo in Photoshop.

If you’re wondering how to replace a sky in Photoshop, choosing the correct sky to Composite into your photo is the most important step in Compositing a sky. There are a few different factors you will want to keep in mind when looking for a new sky.

In this episode we show you how to turn a photo into a magazine cover by integrating the “V” Logo with the subject.

A double Exposure is traditionally done using a film camera by taking two different photos on the same Exposure of film. The images will combine in unique ways, giving you the “double exposure” effect.

An image with a pure white background will blend perfectly into web pages, mailers, graphics, and anything else that combines images with text.

In today’s episode we will show you how to use the new blur gallery in Photoshop cc 2014.
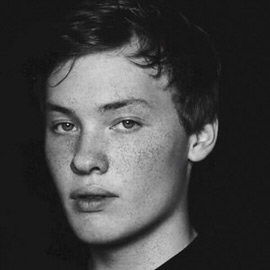
In order to make freckles look real when applied in Photoshop we have to start with a Texture that is organic and random. In this episode we will show you how to create freckles in Photoshop using a photo of granite as our base for creating freckles.
Sample Images Included

In How to Make Beer Look Amazing in Photoshop (Part 2) we show you how to take a normal photo of a Guinness and make it really stand out.

You will learn how to cut the beer out from the Background, how to create Highlights on the glass, how to give the beer a proper “head”.

In this episode we show you how to master the motion blur in Photoshop using these techniques and give some Insights on how to make Motion Blurs look real.

Become a Digital Makeup Artist! Whether you can do makeup in real life or not, everyone can learn to do it digital!

In this episode we cover a special technique we created to help blur the edges of a photo while keeping your subject in focus. Prepare to learn about drawing attention to your subject using radial focus blur!

In this episode we show you how to correct Color and Exposure at the same time and we also go over an awesome method for sharpening landscapes.

In this episode we show you how to unlock the secrets to the Lens Flare in Photoshop, getting around the limitation of the Filter.

If you have ever seen amazing eyes in a photo there is a good chance that it has been edited in Photoshop. Enhancing a person’s eyes in Photoshop is a quick way to make an image really stand out.

Sometimes you find yourself wanting to add some interest to a backdrop in Photoshop and this episode is perfect for showing you how it is done. There are many ways to add interest to a Background, but this is one of the simplest and most effective.

Getting your white balance exactly right can be tricky. We show you a quick method using Color Balance to correct Skin tones and get a nice base for further editing.

The Step and Repeat command is one of the coolest secrets Photoshop has to offer. You won’t need this feature every time you open Photoshop, but when you are creating Patterns, there is no better Tool.

In Part II of this tutorial we show you how to put the splatter Brush (created in Part 1) to good use.

In this episode we teach you how to use the Pen Tool to cut your subject out of their Background. The Pen Tool is a vital part of Photoshop and is used to create accurate selections.
Sample Images Included

We are going behind the scenes on our Pop Art shoot, and sharing some Insights on how to create this stylized image in a fun way.