
Watch the Full Series
description
Lightroom Classic can feel daunting at first, and even experienced users keep finding features tucked away in its menus and panels.
On Day 1 of 30 Days of Lightroom Classic we build your first catalog, walk through every option in the Import window, and tour the Library and Develop modules.
This is Day 1 of our 30 Days of Lightroom Classic series. Follow along with all 30 episodes as we explore the magic of Lightroom together!
Continue Watching 30 Days of Lightroom Classic
JOIN 30 DAYS OF LIGHTROOM (FOR FREE!)
Ready to jump in? Sign up and we’ll email you a printable calendar and daily class schedule so you can get started right away!
Image Source

Set Yourself Up For Success
Lightroom Classic is not a difficult program to use. It is a difficult program to start using. Open it for the first time and you are looking at seven modules across the top, a dozen collapsed panels down both sides, and an Import window offering four choices that all sound more or less identical. Most people click something, get their photos in somehow, and never quite work out what happened to their files.
Day 1 is about removing that uncertainty before you make a single edit. We are going to build a catalog from scratch, walk through every meaningful decision in the Import window, and then tour the Library and Develop modules so that everything in the next 29 days has somewhere to live.
What a Lightroom Catalog Actually Is
The catalog is the single biggest source of confusion for new Lightroom users, and almost every panicked “where did my photos go” moment traces back to misunderstanding it.
A catalog is not a folder, and it does not contain your pictures. It is a database file that records where each photo sits on your drive and everything you have done to it. The image files themselves stay exactly where they are. The catalog holds the pointer, plus every flag, star, keyword and slider move you make.
This is also why Lightroom Classic is completely non-destructive. Nothing in the Develop module ever rewrites your original file. Every adjustment is stored as an instruction in the catalog, which is why you can return any photo to the way it came out of the camera at any point, no matter how far you have taken it.
You can run more than one catalog, and a self-contained project like this series is a fair reason to make a second one. For everyday work, though, most photographers are better served by a single catalog that holds everything.
-
Open Lightroom Classic
If you have never launched it before, Lightroom quietly creates a default catalog for you. That works, but making your own from the start is a better habit and leaves you in no doubt about where the file lives.
-
Choose File > New Catalog
Your Pictures folder is a sensible home for it. Keep it somewhere you will not accidentally move, because this is the file that knows about all of your edits.
-
Name it and click Create
Lightroom Classic closes and reopens on the new, empty catalog. An empty grid at this stage is exactly what you should be seeing.
Getting Your Photos Into Lightroom
With a catalog in place, everything else is a matter of telling Lightroom which files to track and what to do with them on the way in.
-
Click Import in the bottom left
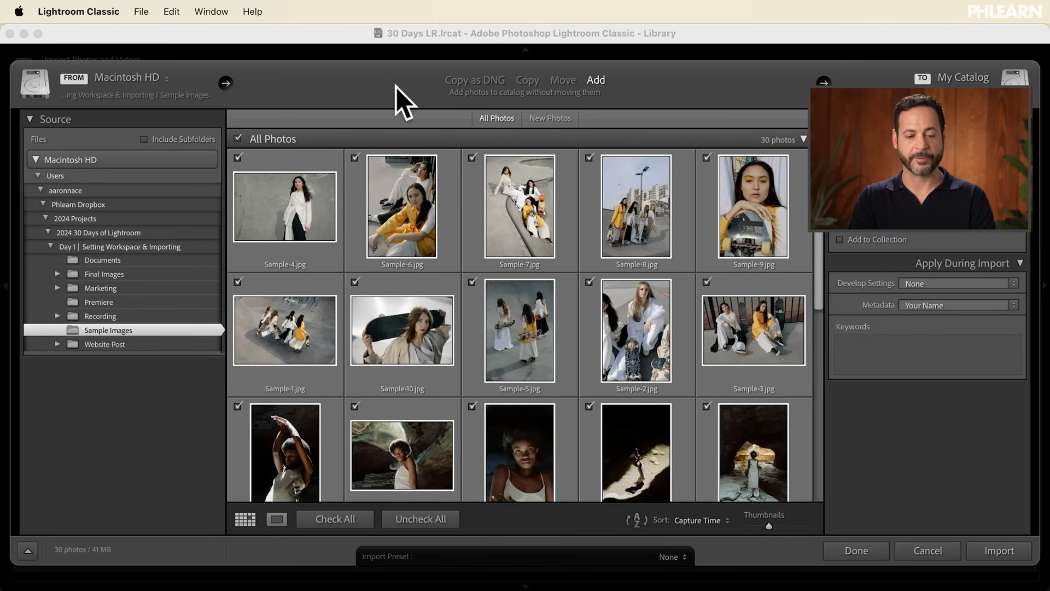
The Import window reads left to right: sources on the left, a preview of what you are about to bring in through the middle, and your destination and settings on the right.
-
Drag your files in from Finder or Explorer
The source panel lists your internal drive, any external drives and any memory card you have connected. It works, but it is a clumsier file browser than the one already built into your operating system. Dragging a selection straight onto the Import window is quicker, and a large green plus appears when Lightroom accepts them.
-
Pick your import method across the top
This is the one choice people routinely get wrong, and it is worth understanding properly before you click anything.
-
Uncheck anything you already know is unusable
Frames that are hopelessly out of focus or badly underexposed can be deselected here so they never reach your drive at all. Be conservative about it. This is for obvious rejects only, and real culling happens later with flags and stars.
The Four Import Options, Explained
The four options along the top of the Import window are not interchangeable. The difference between them is entirely about what happens to the original file.
Copy as DNG
Copies the files onto your computer and converts them to Adobe DNG along the way. DNG is a raw format, it takes up slightly less space than most manufacturer raw files, and it is not proprietary, which matters if you want your archive to still open in a decade. This is the option to reach for when you are pulling raw files off a memory card.
Copy
Copies the files to your chosen destination and leaves the originals untouched, with no format conversion. If the card is currently the only copy of a shoot, this is the safe, boring, correct choice.
Move
Moves the files out of wherever they are and into your destination folder, leaving nothing behind. Useful for tidying up files already scattered across your drive, and a bad idea when the source is a card you have not backed up yet.
Add
Leaves your files exactly where they are and simply points the catalog at them. Nothing is copied and nothing is moved. This is what you want when your photos already sit where you intend to keep them.
Previews, Smart Previews and File Handling
Build Previews decides how much rendering happens now rather than later. Standard previews are enough for browsing and viewing images full screen. One-to-one previews render at full resolution so you can zoom to 100% without waiting, at the cost of a slower import and a larger catalog on disk.
Build Smart Previews is the setting worth turning on. A smart preview is a small, lightweight copy of the file stored inside the catalog itself. Because it lives in the catalog, you can keep the full-resolution originals on an external drive, unplug it, and carry on editing. Reconnect the drive to export and every adjustment applies to the full-size file automatically. If you work off external storage at all, this one checkbox will save you a great deal of frustration.
Below that, Do not import suspected duplicates is worth leaving on, Make a Second Copy To writes a backup to a second location as it imports, and Add to Collection drops everything straight into a collection. Collections are the subject of Day 2, so you can leave that one alone for now. File Renaming sits underneath and is a matter of taste; most people can safely skip it.
Add Your Copyright While You Import
Apply During Import is the panel most beginners scroll straight past, and it has the best return on thirty seconds of effort anywhere in this window. A metadata preset embeds your name and copyright into every file as it lands, so the information travels with the image wherever it ends up.
-
Open the Metadata dropdown and choose New
This creates a reusable preset, so it is a one-time job rather than something you repeat on every shoot.
-
Fill in your name and your copyright fields
Enter your name at the top, then scroll down to the copyright section and enter it again as the copyright holder. Set Copyright Status to Copyrighted. Everything else on that panel is optional.
-
Click Create
From this point the preset appears in the dropdown and is applied to every image you import.

Choosing Where Your Files Land
The Destination panel decides the folder structure on your drive, and it is worth being deliberate here, because Lightroom mirrors whatever you choose exactly. This is the structure you will be living with.
Setting Organize to By Date creates a year folder and dated subfolders inside your chosen destination. It is not the only sane system, but it is consistent, it never runs out of names, and it means any photo can be found from the date it was taken. If you would rather build a shoot-based structure, the Ultimate Guide to Lightroom Classic Workflow works through the alternatives in depth.
-
Pick your destination folder and date format
Check the folder tree preview before you commit. Lightroom shows you exactly which folders it is about to create.
-
Click Import
Your files are copied, renamed if you asked for it, stamped with your metadata and added to the catalog in a single pass.
For a deeper look at import strategy and metadata specifically, How to Import and Organize Photos in Lightroom Classic covers the professional workflow end to end.
A Tour of the Library Module
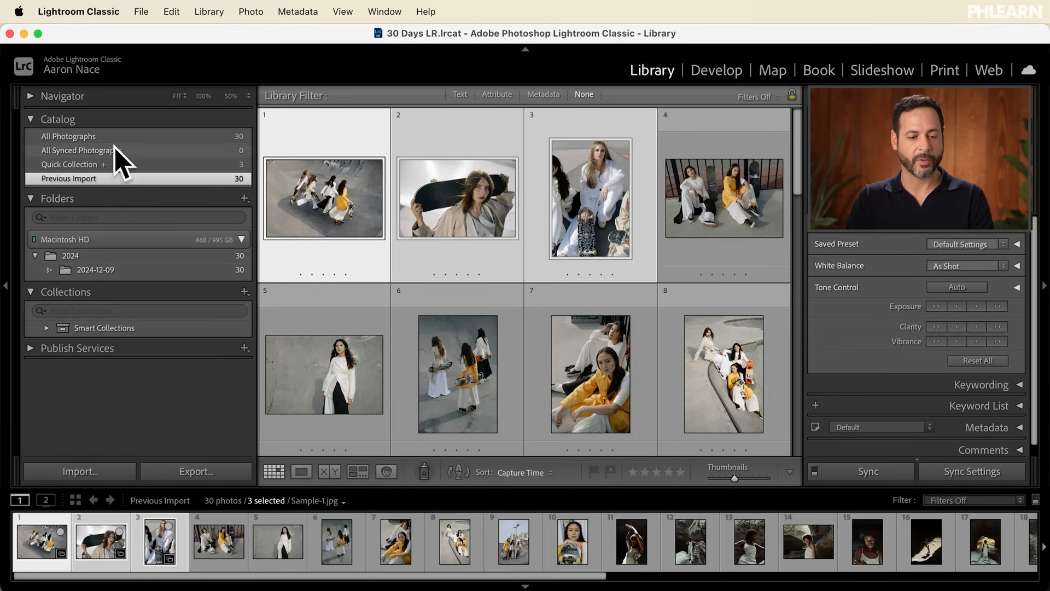
Library and Develop are where you will spend virtually all of your time, Library for viewing, sorting and choosing, Develop for editing. Map, Book, Slideshow, Print and Web exist, but they see very little use in most modern workflows and this series will not spend much time in them.
The Left Panel
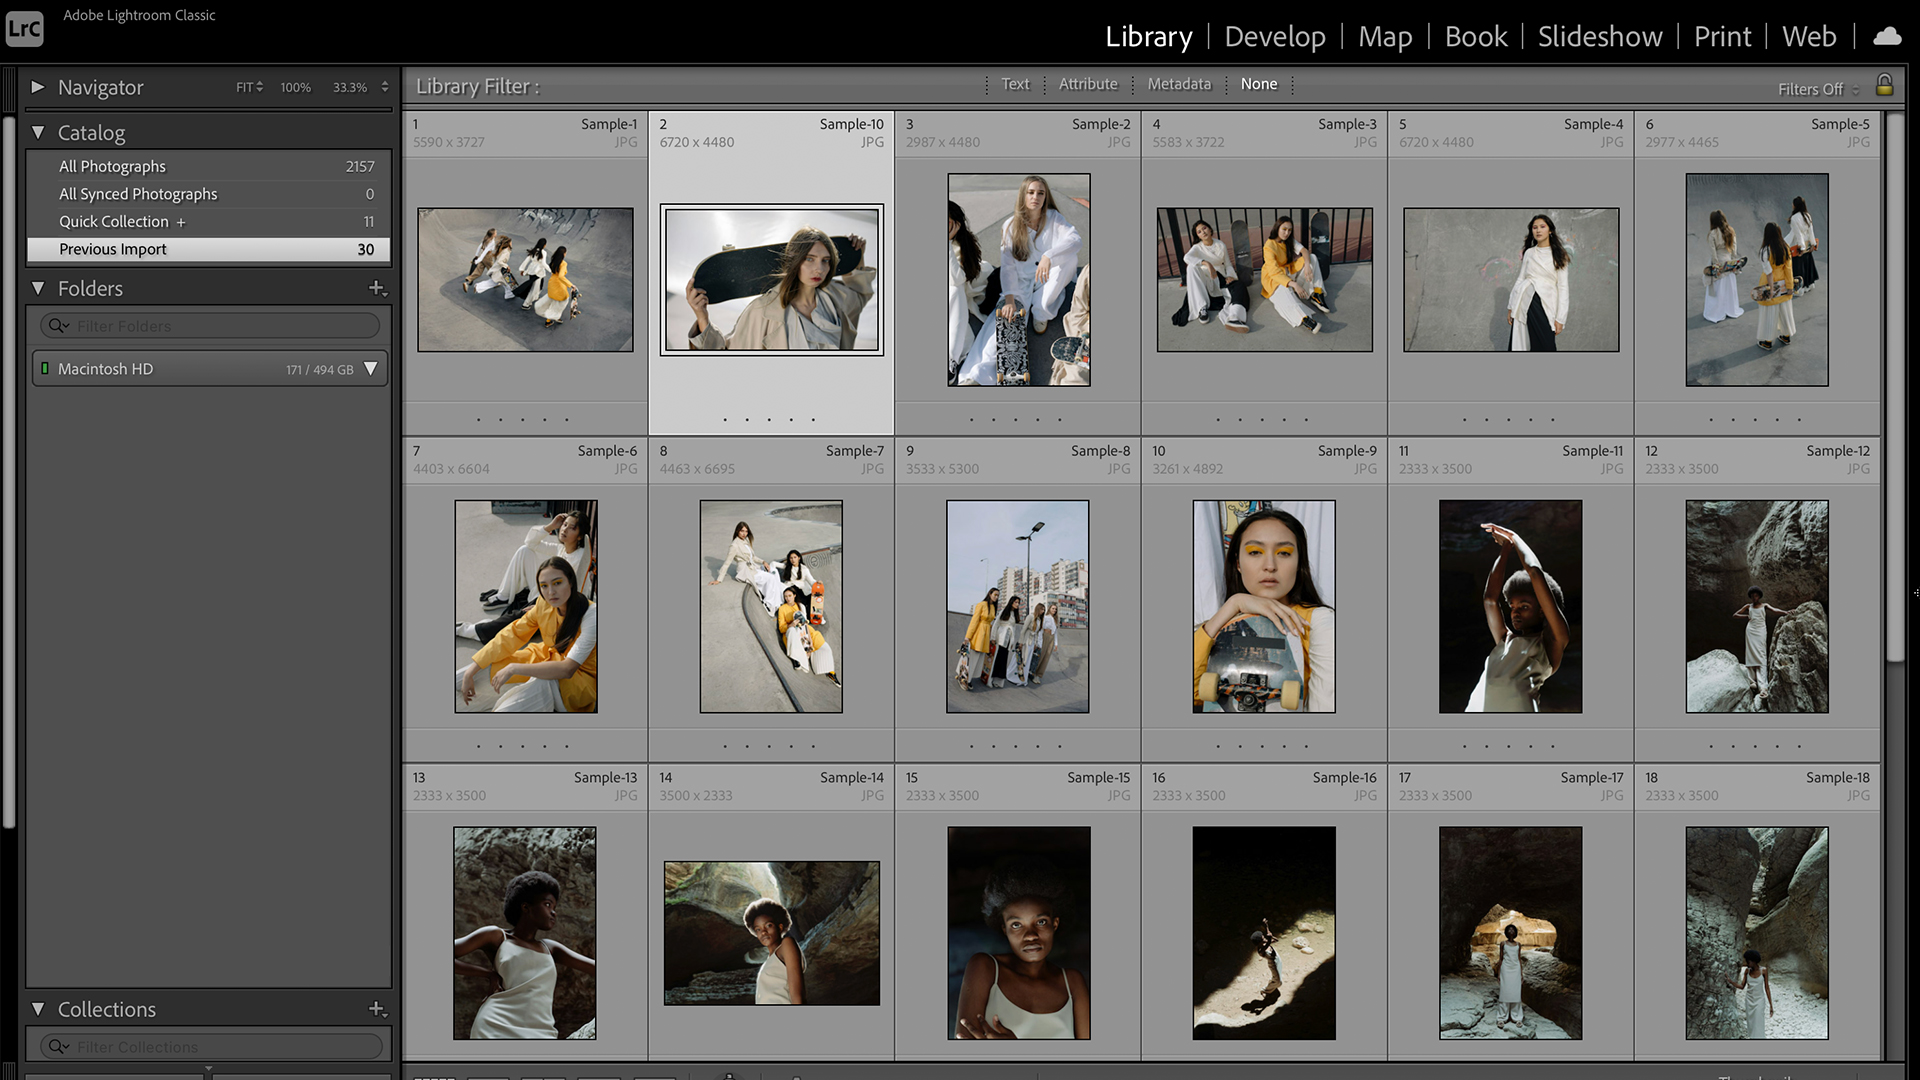
Navigator sits at the top and controls zoom. Click to jump to 100%, use the dropdown to choose a level, and drag the small preview to move around the frame. Below it, Catalog holds every photo in the catalog, your previous import, and Quick Collection, a scratch pad you can drag images into when you want to gather a handful of frames temporarily. Folders mirrors the real folder structure on your drive, Collections is the flexible alternative to folders, and Publish Services can upload straight to online platforms if you would rather not export by hand.
View Modes and the Library Filter
The Library Filter bar above your images searches by Text, Attribute or Metadata. Text finds a filename or keyword, Attribute filters by flag, star rating or color label, and Metadata narrows by camera, lens, shutter speed or aperture. Click None to clear it.
The icons at the bottom left switch view modes. Grid shows everything at once, Loupe fills the window with one image, and Compare puts two side by side, with the arrow keys moving through candidates and the up arrow promoting the current favorite. That last one is a genuinely fast way to work a series down to its single best frame. Survey holds several images on screen so you can eliminate them one at a time, and People finds and groups faces.
The Right Panel and the Filmstrip
The histogram shows the tonal distribution of the selected image and updates as you click through your photos, which makes a badly under or overexposed frame obvious at a glance. Quick Develop offers a stripped-down set of adjustments, useful for nudging exposure across several images at once, though real editing belongs in the Develop module. Keywording lets you tag images by hand, although AI tagging and assisted culling are steadily making manual keywording less necessary. Metadata at the bottom is where the copyright preset you built earlier shows up.
The filmstrip runs along the bottom and keeps every photo in the current view within reach whichever module you are in. Two shortcuts are worth learning immediately: Tab hides both side panels, and Shift + Tab hides everything including the filmstrip for a clean, full-screen look at your image. Press it again to bring it all back.
A First Look at the Develop Module
Switch to Develop and the left panel changes. Presets stores looks you can apply to any image in one click, and you will build your own in our guide to creating Lightroom presets. Snapshots saves alternate versions of an edit so you can flip between two directions and decide later. History records every move you have made, all the way back to the original import, and clicking any line returns you to that exact moment.
The right panel holds the editing tools, grouped from the top down: Basic, Tone Curve, Color Mixer, Color Grading, Lens Corrections, Lens Blur and Effects. Above them sits the tool strip for cropping, object removal, red eye and masking. Every one of these gets its own day later in the series, so there is nothing to learn here yet beyond where things live.
Where Beginners Trip Up on Day One
Moving files outside of Lightroom. Drag a folder to a new location in Finder or Explorer and the catalog loses track of it, leaving question marks on your thumbnails. Move folders inside Lightroom’s Folders panel instead and the catalog follows along.
Choosing Add when the files are still on a card. Add points the catalog at the source without copying anything, so your photos vanish the moment you eject the card. Use Copy or Copy as DNG whenever the card is the source.
Skipping the copyright preset. It takes half a minute once and then applies to everything you ever import. Going back to add it to several thousand existing images is a far worse afternoon.
Creating a new catalog for every shoot. Lightroom cannot search across catalogs. A handful of them quickly becomes a filing system you have to remember rather than one you can search. One well-organised catalog is almost always the better answer.
Keep Exploring Lightroom
If you want to look further ahead than tomorrow, these free Lightroom tutorials pick up where Day 1 leaves off:
- Master Masking in Lightroom Classic
Where local adjustments really begin once you are comfortable in the Develop module. - Advanced Masking in Lightroom Classic
Combining and intersecting masks for precise, targeted edits. - Turn Your Favorite Looks Into Lightroom Presets
Save an edit you love and apply it across an entire shoot. - How to Use the Lens Blur Tool in Lightroom Classic
Adding believable depth of field long after the shot was taken.
Take It From Here
Everything you set up today, a catalog you actually understand, files in a predictable place, your copyright embedded and a rough map of where the tools live, is the part of Lightroom most people skip and then quietly fight for years. It is worth the twenty minutes.
Tomorrow we get into organization properly: folders, collections and the structure that keeps a growing library searchable instead of overwhelming.







Enjoying This Free Tutorial? Go Further with PRO.
Unlock Full Sample Files, PSDs, and Hundreds of Masterclasses!

Download full project assets, original PSDs, and RAW images for every lesson
Unlimited access to our complete library of PRO Photoshop & Lightroom courses
Instant 4K Ultra HD streaming on all devices, anytime, anywhere
Full access to our entire library of Photoshop Actions, Presets, and LUTs
Flexible monthly and annual membership plans
Cancel anytime with zero hassle or commitments