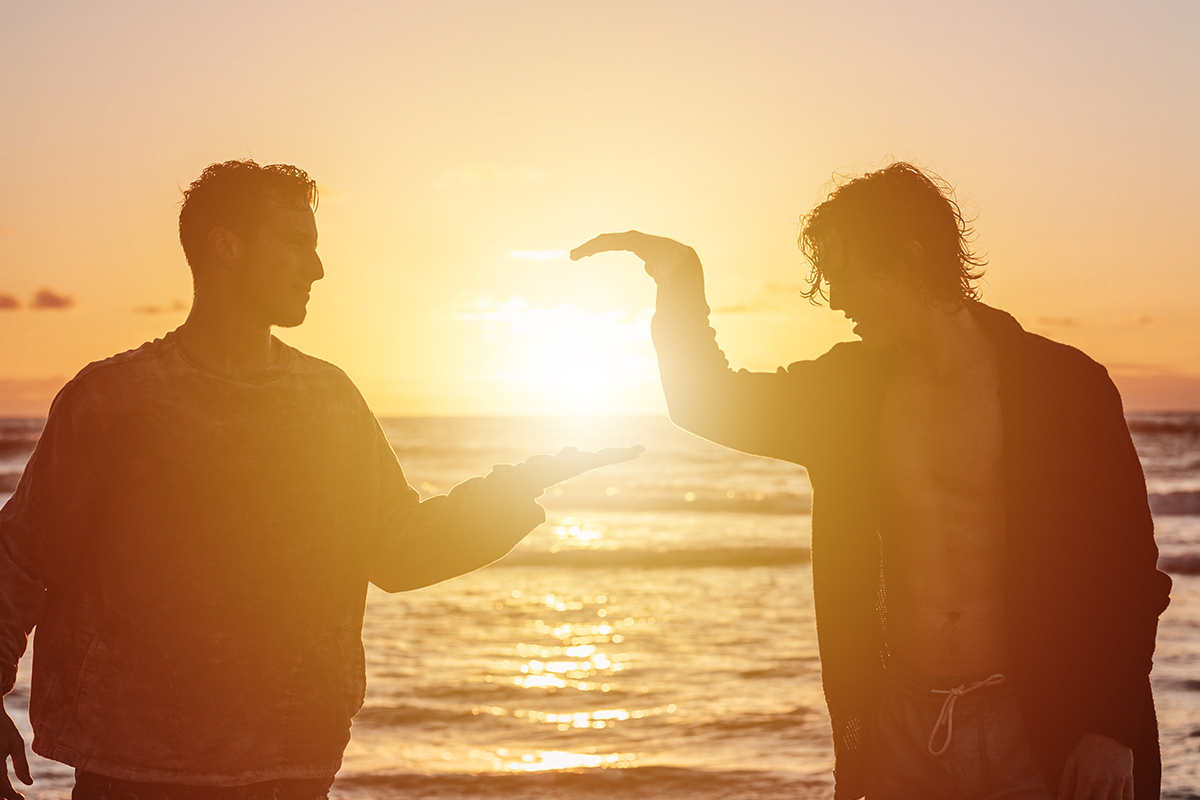

Download Sample Images
Download Assets
This tutorial includes 5 sample images, 1 GRD gradient file and 1 PDF guide. Downloads are free with a PHLEARN account.
- Free sample files with every tutorial on PHLEARN
- New tutorials published every week
- Unlimited downloads with your free PHLEARN account
Free PDF Guide · 5 Pages
This Tutorial as a Step-by-Step PDF
The guide covers Gradient Fill layers and their options, building your own gradient, a radial sunset glow on Screen, Foreground to Transparent on two Curves masks, a Magic Wand background with Contiguous off, a light blue sky at -90 on Multiply, and noise-gradient light rays with Levels, Iris Blur and a mask. Keep it next to your keyboard.
description
Gradients may sound simple and out of place in a photo editing workflow, but there are actually a ton of great uses for gradients you may never have heard of! You can add light rays to your image, brighten your subject, create interesting backgrounds, add color to your sky, and create sunset effects and colorings. In this video, Aaron will show you how to do all of that with just the gradient tool, gradient noise, and gradient fill effect in Photoshop.
We can create a bunch of cool effects with just gradients. Effects like:
- Sunset Coloring
- Image Brightening
- Background Coloring
- Enhancing Sky Detail
- Creating Light Rays
Enjoying This Free Tutorial?
We publish a new free tutorial every week, each one with sample images and PSDs you can download and follow along with. Sign up and they land straight in your inbox, along with early word on sales, events and subscriber-only offers.
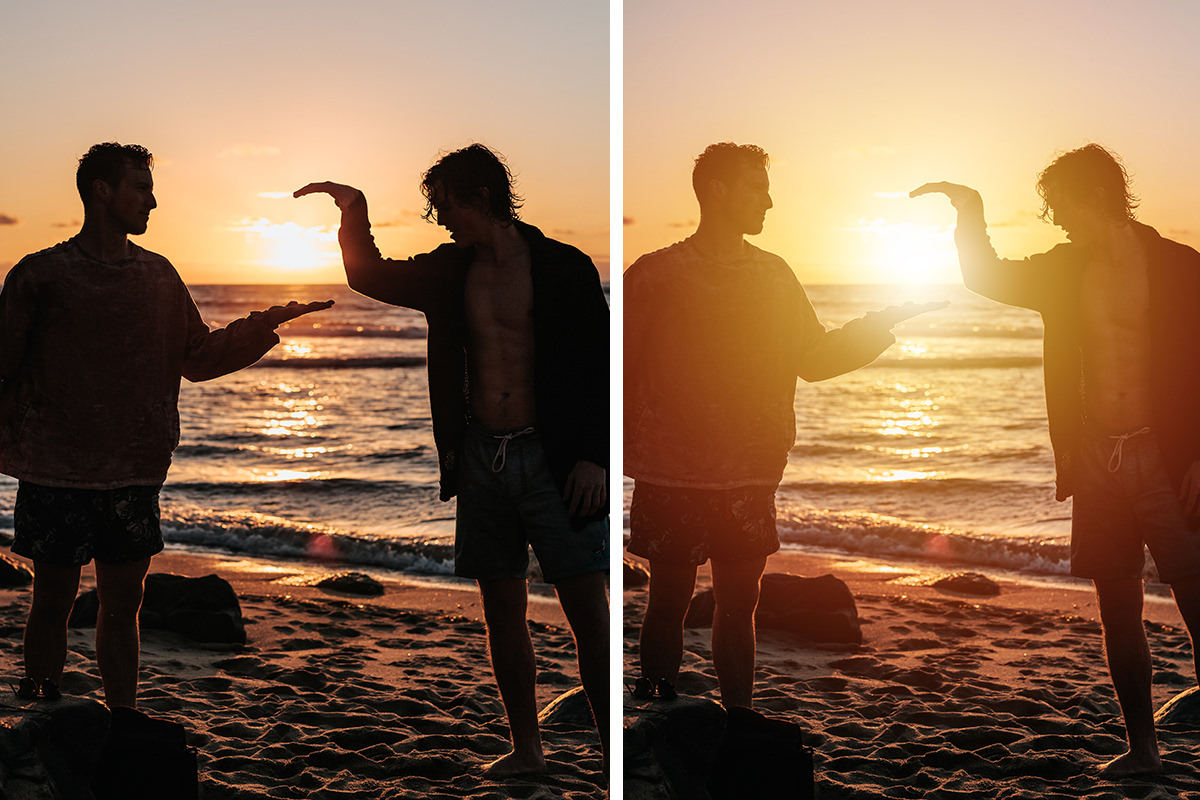
EPIC SUNSET & LIGHTING EFFECTS
5 Beautiful Effects with Gradients in Photoshop
Photoshop has several tools related to gradients, and this tutorial uses three of them to build five effects: a sunset color wash, subject brightening through a masked Curves layer, background recoloring, sky detail recovery, and light rays made from gradient noise.
Sunset Coloring with the Gradient Tool
The first is the aptly named Gradient Tool, in the Toolbox on the left side of the screen. It’s very powerful, and it’s the right tool for the radial gradient used here to enhance the image’s sunset.
Linear vs. Radial Gradients
The Gradient Tool has 5 modes in the Tool Options at the top of the screen. Each has its uses, but in practice it’s usually Linear or Radial. The difference is simply the shape your colors fade along: think of Linear as a line and Radial as a circle.
Why a Gradient Fill Layer Beats the Tool
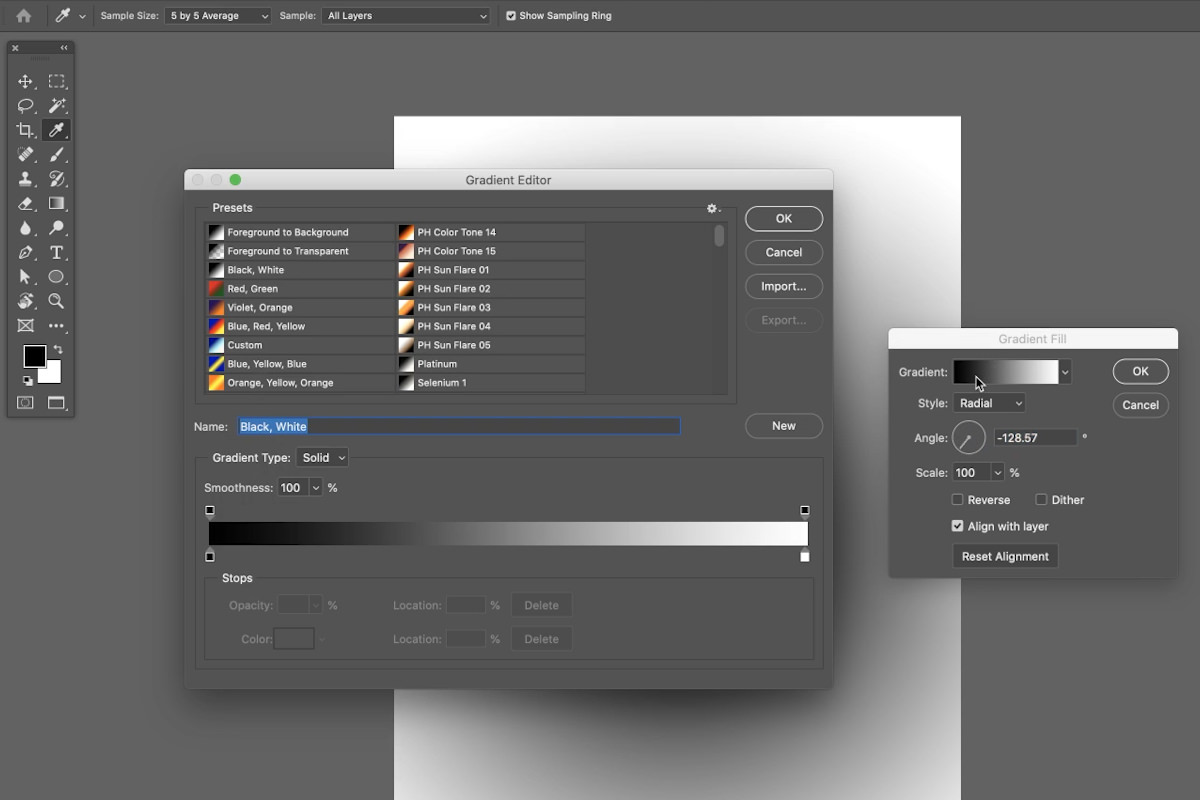
Say you draw your radial gradient and it looks great, then later realize one of the colors is a bit too dark or not quite saturated enough. Because the Gradient Tool draws directly onto the layer, you have to start over. That’s why a Gradient Fill Layer is the better habit: it’s the same as the Gradient Tool except the gradient stays adjustable at any point.
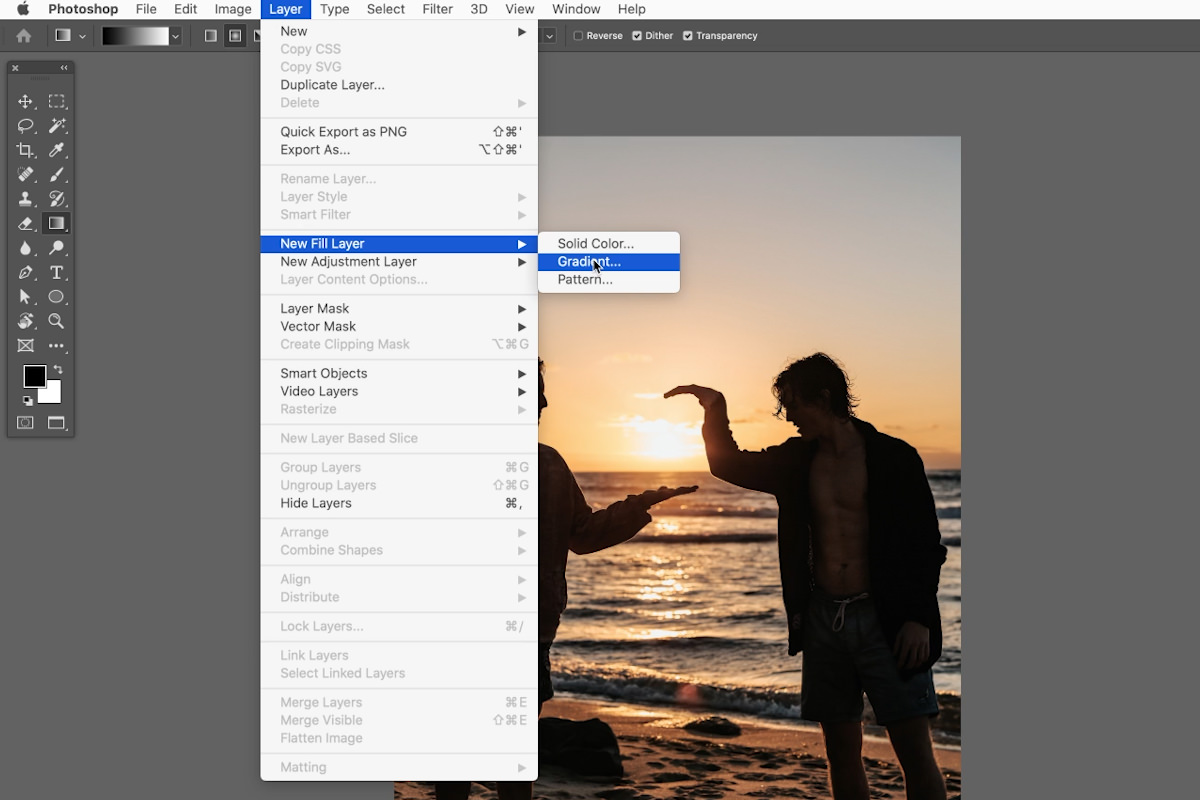
Create one by going to Layer, New Fill Layer, then Gradient. The settings look like the Gradient Tool’s, and Radial is the one to select. Clicking the gradient itself lets you choose from Photoshop’s built-in gradients, import more, or build your own, and it doesn’t matter much which you start from because you’ll be adding your own colors at the bottom of the window.
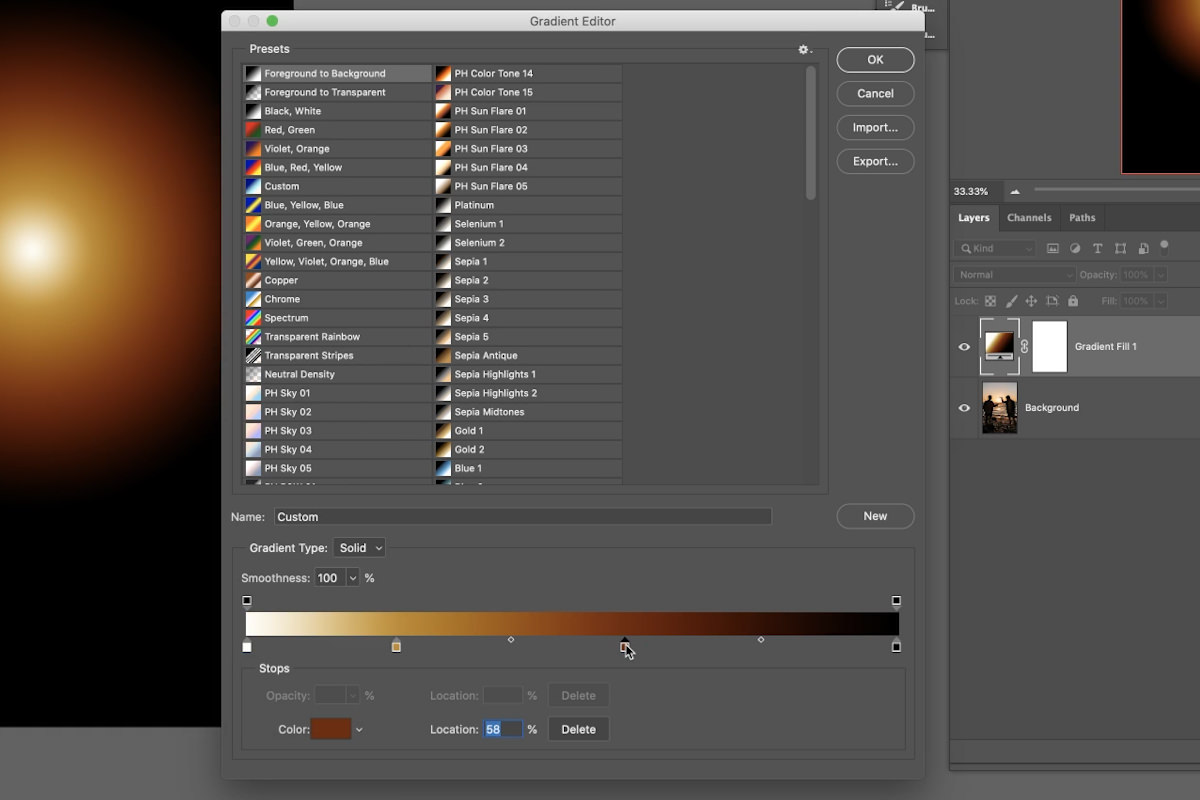
Click a color swatch to change it, drag swatches to adjust how quickly colors fade, and click the line itself to add more colors. This example starts with a really light yellow, adds an orange and then a deep red, and ends in black.
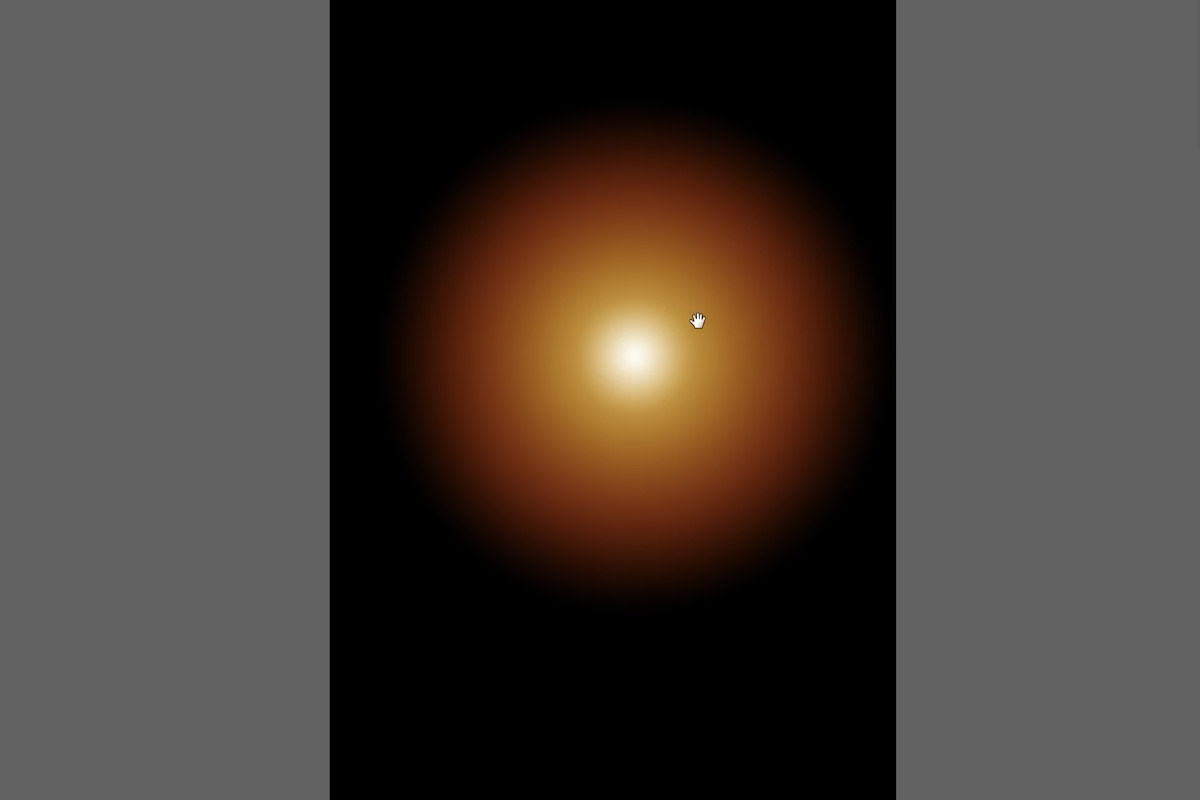
Screen Mode Removes the Black
Blending modes change how two layers are combined, and they’re enormously useful in effects work: you can tell Photoshop to ignore the whites, blend only the colors, or never darken. Here the brights matter and the black background doesn’t, which makes Screen the right mode.
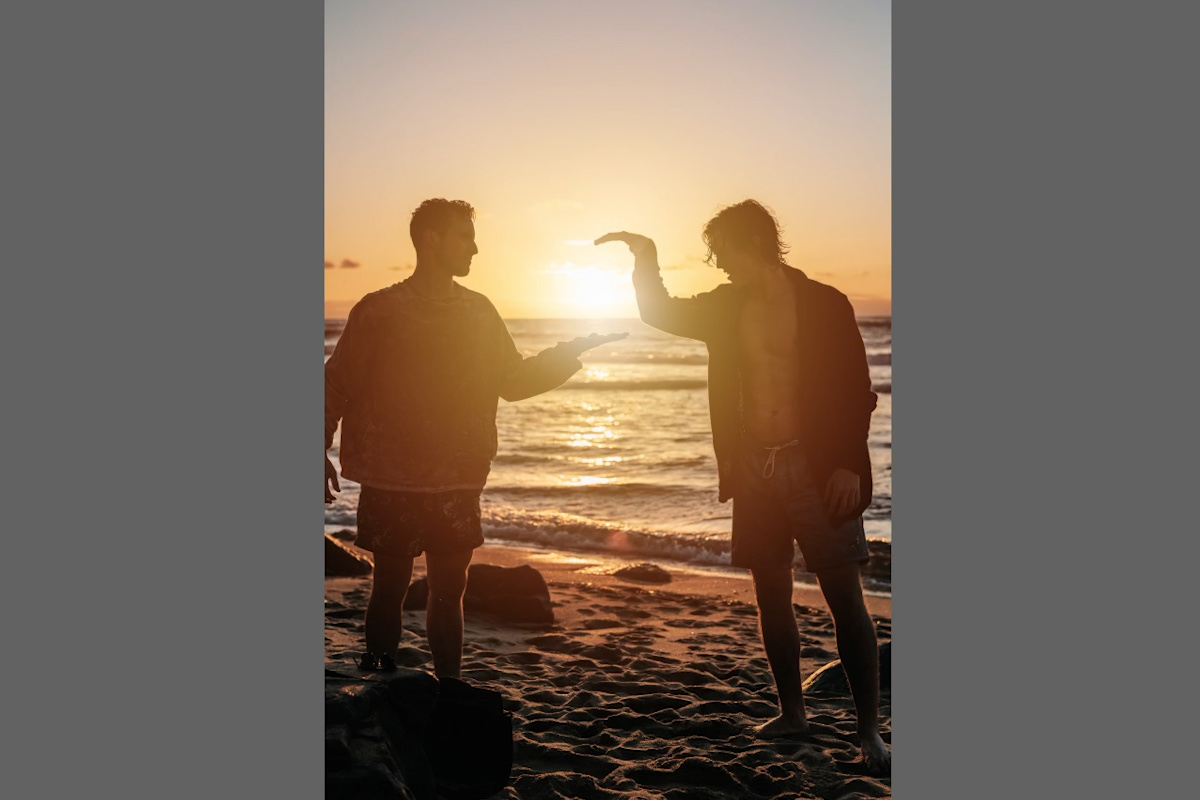
The black disappears. Double-click the layer, drag the gradient right onto the sun and set its Scale, lower the opacity a little, and the sunset effect is done.
Brightening with Gradients on Layer Masks
Gradients aren’t only for coloring. Combined with layer masks they handle lighting too. This example uses a Curves adjustment layer to both brighten and darken, with the Gradient Tool masking each effect, which darkens the background and draws focus to the subject.
Understanding Curves
Curves is a great tool for adjusting light levels, and we use it constantly. For a deep dive, see The Amazing Power of Curves. The basics: with a new Curves adjustment layer, click the middle of the diagonal line to create a point, then drag it toward the bottom right to darken the image or the top left to brighten it.
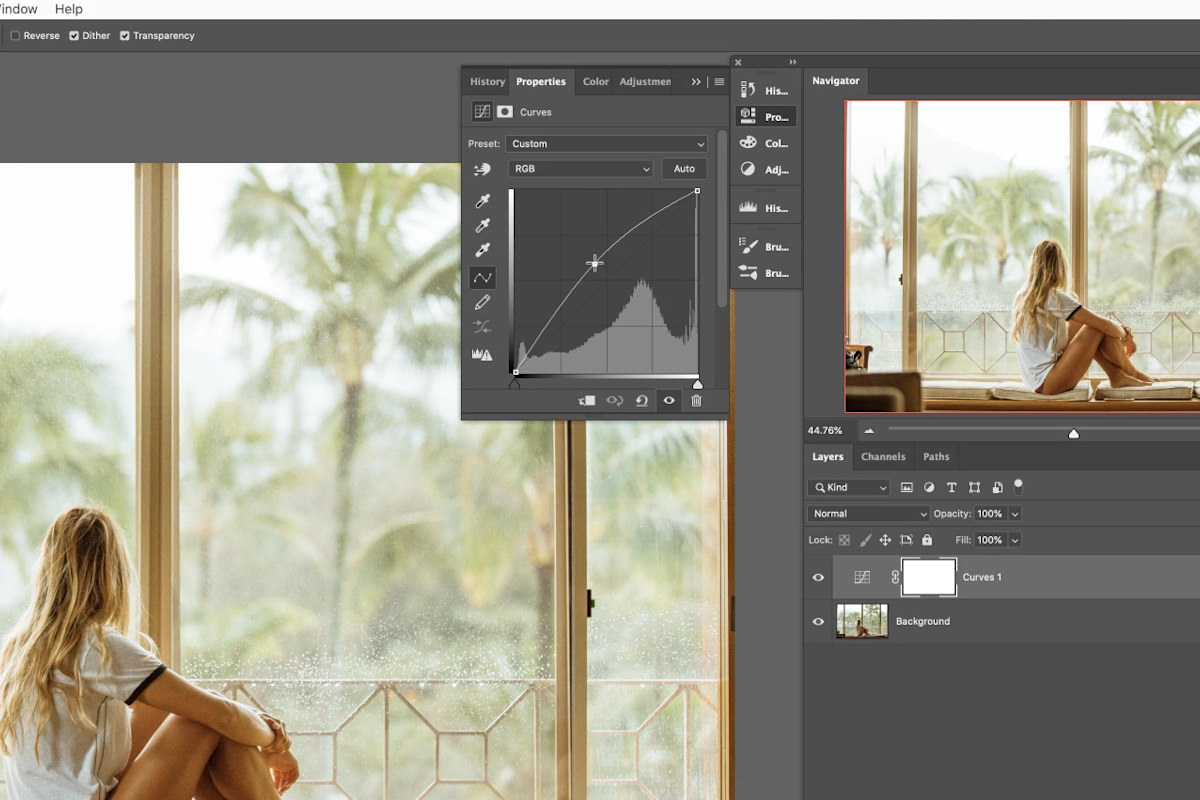
Start with a brightening Curves layer by dragging the center point to the top left. Click its mask in the Layers panel and invert it with CTRL or CMD + I. The adjustment disappears, which is what we want. Now press G for the Gradient Tool, choose the Foreground to Transparent gradient (white as the foreground color) and the Radial shape, and drag out from the subject on the mask. Alt or Option clicking the mask shows it fullscreen if you need to see it: white reveals the Curves layer, black hides it.
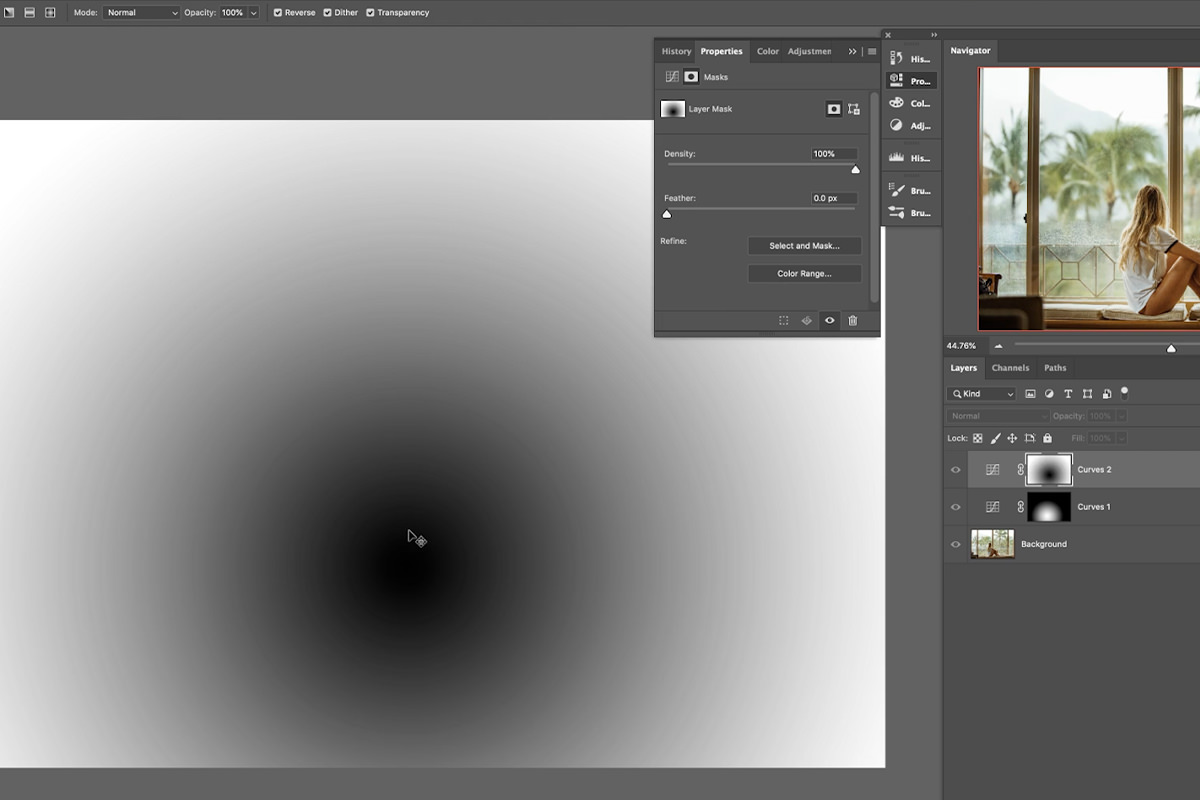
The subject is now naturally brightened. Repeat the process with a darkening Curves layer, this time selecting Reverse on the Gradient Tool. Draw a large circle centered on your subject so only the corners of the image pick up any gray, then Alt or Option click the mask again to return to the image.
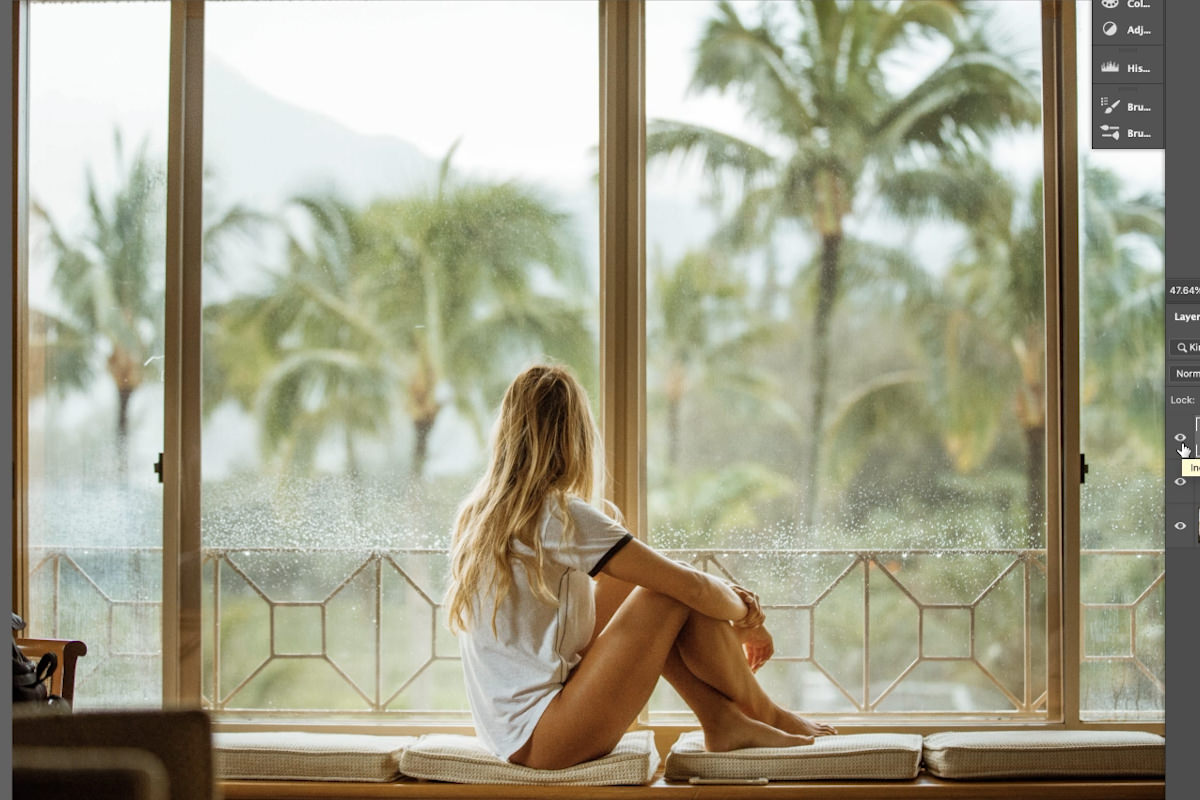
Background Coloring with Gradient Fill
The most straightforward of the five: select the background, turn that selection into a layer mask, then fill it with whatever gradient you like.
Selecting the Background
This is easiest with a clean background, which this image has. For something more complex, see How to Remove Backgrounds in Photoshop. Here the Magic Wand Tool does it: click anywhere on the background and it selects adjacent pixels of the same color. Turn off Contiguous and it selects every matching pixel in the image. Leave Contiguous off and bring the Tolerance down a little so it doesn’t grab the plants. If an area is still missed, hold Shift and drag over it with the Marquee Tool to add it to the selection.
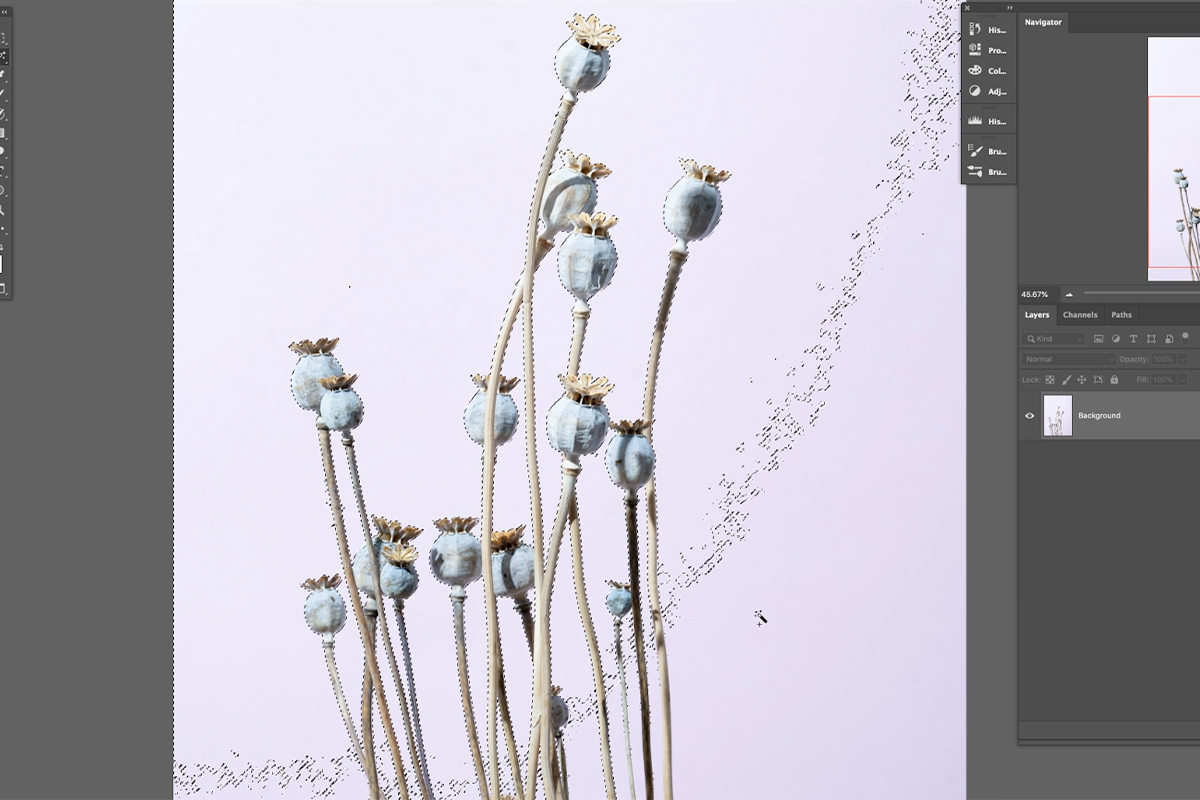
With the selection active, create a new Gradient Fill layer and Photoshop applies the selection as its mask automatically. From there the gradient is yours to edit. This example runs purple to light blue, but any combination is fair game.
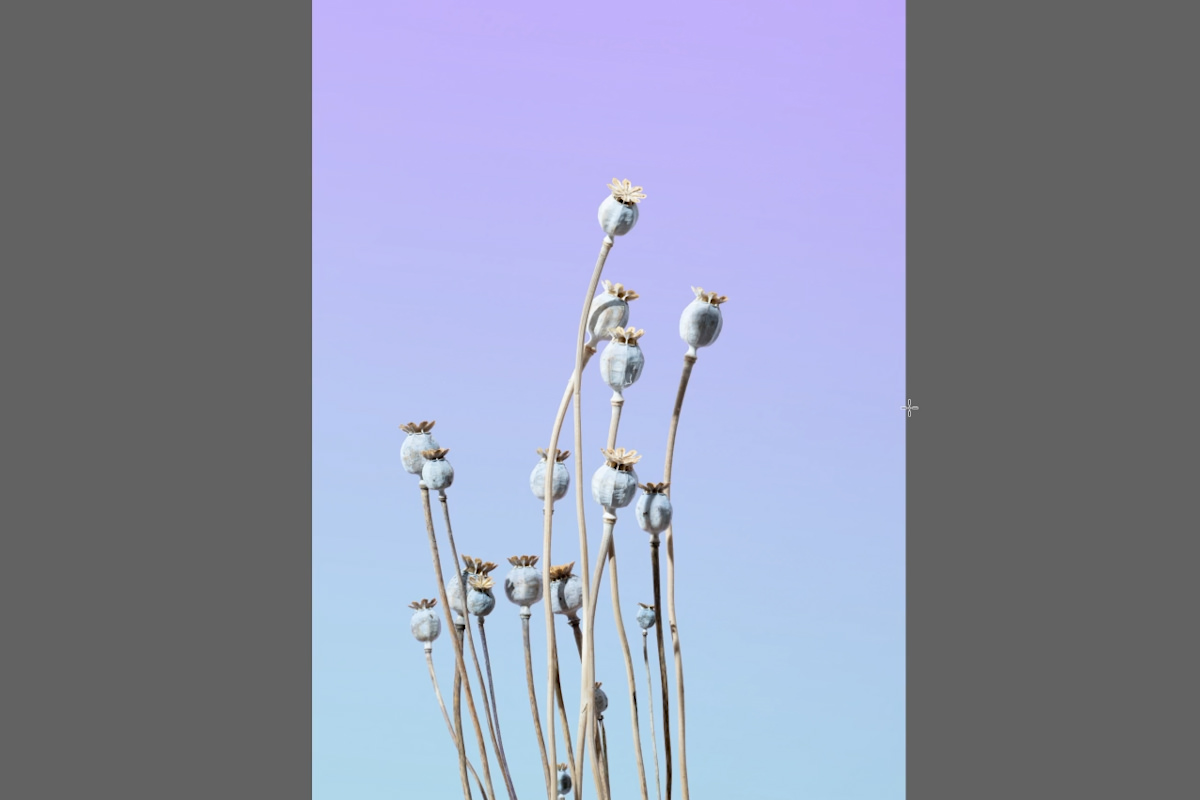
Recovering Sky Detail with Gradient Fill
Detail in the sky is often hard to photograph, since exposing for the ground tends to blow the sky out. A quick gradient fill brings color back into it.
The Transparency Swatches
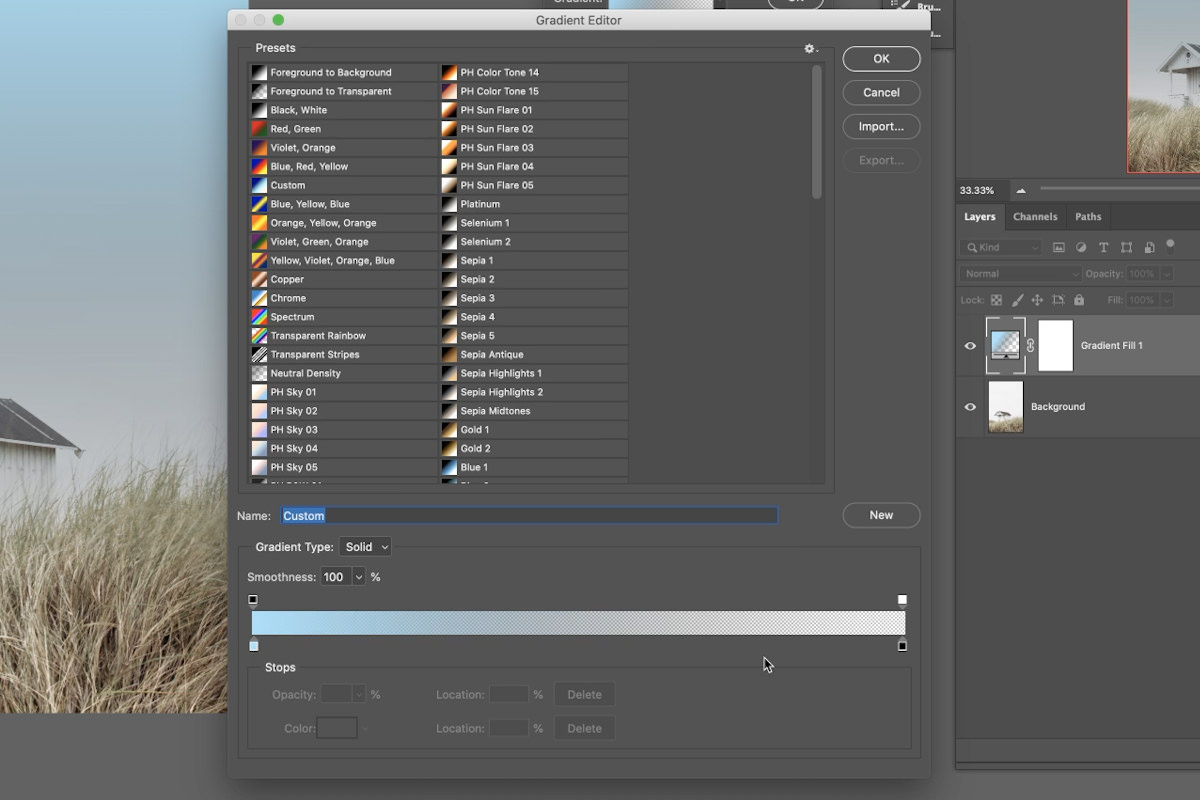
Lay a gradient fill over the entire image, type -90 for its Angle so the color sits at the top, then click the gradient to open the editor. Use a color-to-transparent gradient and set the color to a nice light blue. Everything so far has used the swatches below the gradient preview, but there are swatches above it as well, and those control transparency. The rightmost one is fully transparent, which gives a fade from blue at the top into the image below. If the fade goes blue, then gray, then clear, the transparent end is still black underneath: click the color stop below it and change it to white. Pay attention to the colors at both ends.
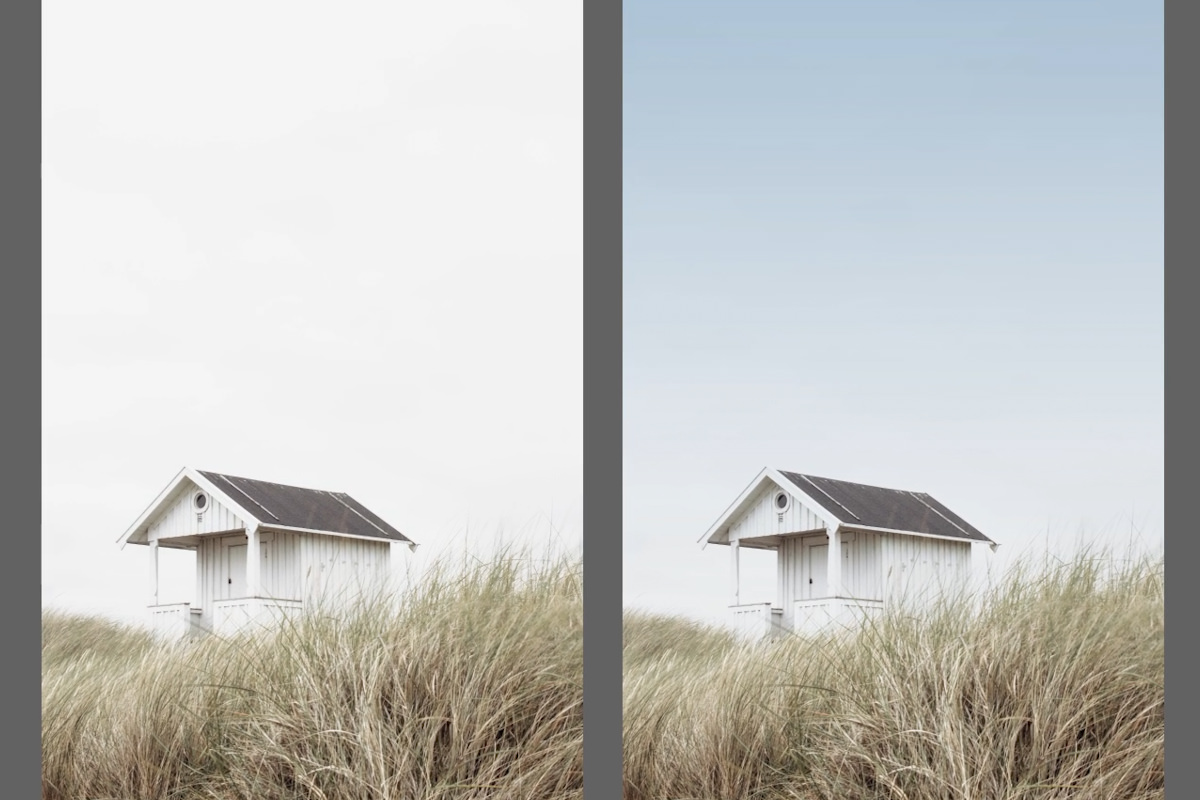
If the gradient lightens part of the image, switch its blending mode to Darken or, better, Multiply, which tends to blend in more naturally. Double-click the layer and drag the gradient up into the sky. The sky now has color without masking or selecting anything at all.
Light Rays with Gradient Noise
The most impressive of the five uses a gradient type we haven’t touched yet: Gradient Noise. Create a new gradient fill and, in the gradient editor under Gradient Type, select Gradient Noise. Your first reaction will be that this can’t possibly be useful, but a few settings turn it into realistic light rays.
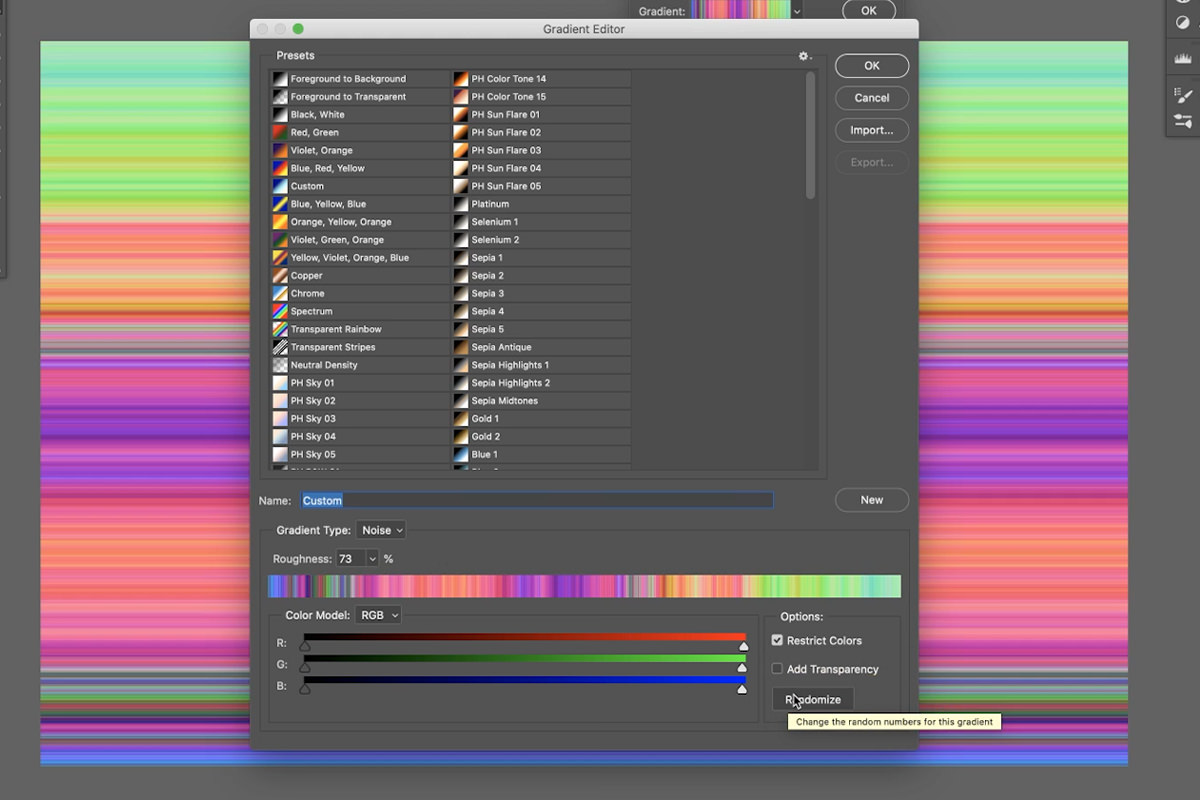
Randomize the pattern until you get something you like, aiming for as much variation as possible. Exit the editor and change the Style to Angle. Angle doesn’t have many applications, which is why it hasn’t come up yet, but it spreads all those little lines out from a single point. Next the lines need desaturating, which means clipping masks.
Clipping Masks
A clipping mask is easy to make: click the clip icon in the adjustment layer’s Properties panel (or right-click the adjustment layer and choose Create Clipping Mask). An arrow appears pointing at the layer below, meaning the adjustment now affects only that layer rather than everything beneath it. Here it’s a Hue/Saturation adjustment layer, clipped to the gradient rather than the background. For more on them, see How to Use Clipping Masks in Photoshop.

You should now have black and white lines radiating from a point, which is where blending modes come in again. Only the brights of the gradient noise should show over the image, not the darks, so Screen is the mode.
It’s still too bright. For more contrast, add a Levels adjustment layer and clip it to the gradient as well. It now controls how many rays show: remove more of the darks for fewer rays, go the other way for far too many, and the middle simply adds contrast. Because this is a gradient fill, double-clicking the layer reopens the rays for adjustment at any time. Double-click it now and move the center of the fan to sit about where the real light source in the photo is.
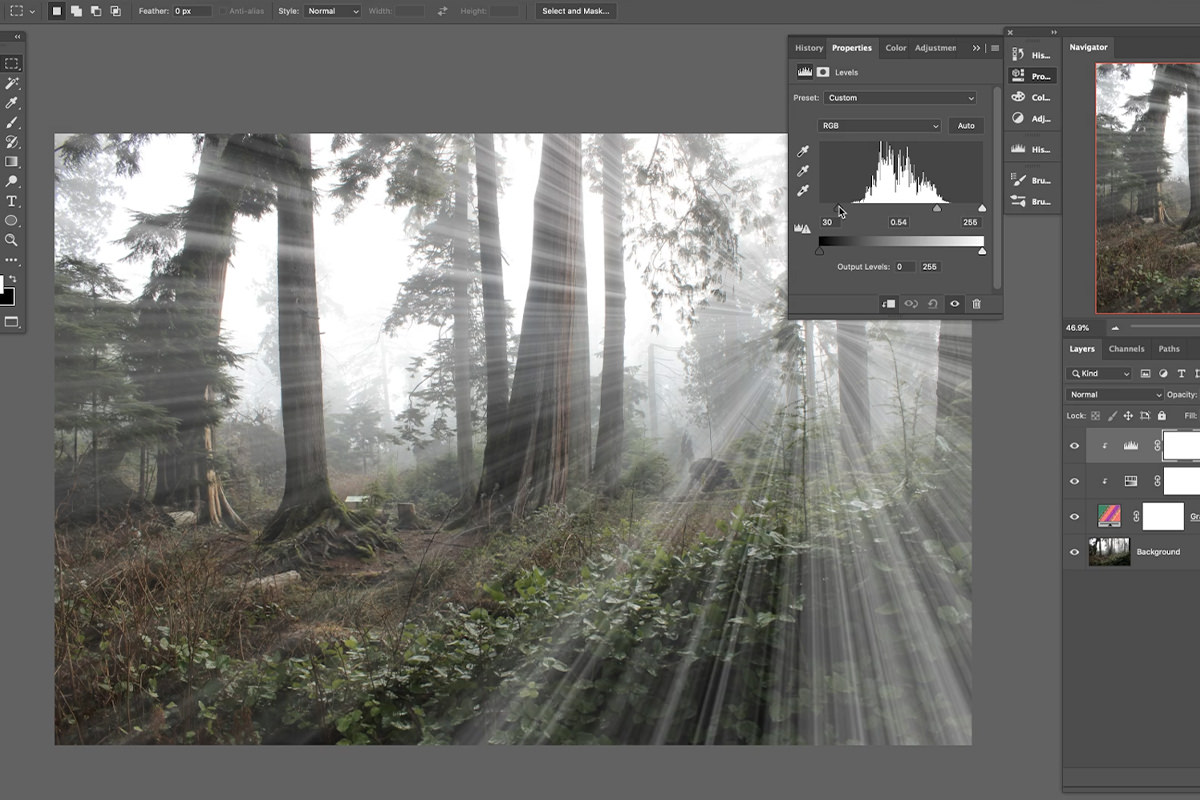
Converting to a Smart Object
The next step involves filters, which makes this the moment to group the gradient fill with its clipped adjustments and convert the group into a Smart Object. A Smart Object is something like a Photoshop file inside a Photoshop file, and it allows Smart Filters, which keeps the whole thing non-destructive and adjustable later.
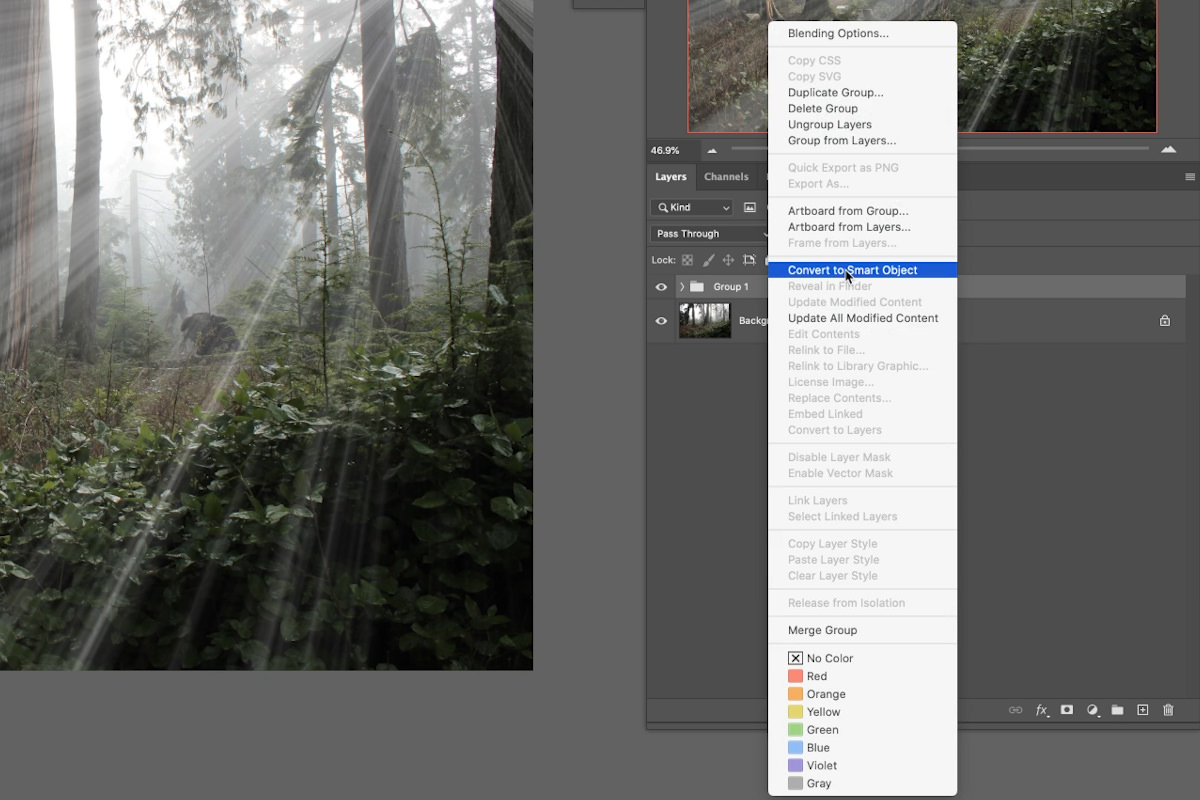
Select the fill and its two clipped adjustment layers, press Cmd/Ctrl + G to group them, then right-click the group and choose Convert to Smart Object. The new Smart Object comes in at Normal, so set it back to Screen. Double-clicking the Smart Object at any point takes you back inside the group to adjust the gradient.
Iris Blur Sells the Effect
What really makes these read as light rays is a blur that increases the further from the center the rays travel, and Iris Blur does exactly that. Go to Filter, Blur Gallery, then Iris Blur, drag the center of the blur over the center of the rays, expand the edges to fit their overall shape, and use the radial slider to set the amount. The center stays in focus while the blur increases outward, just like real light.
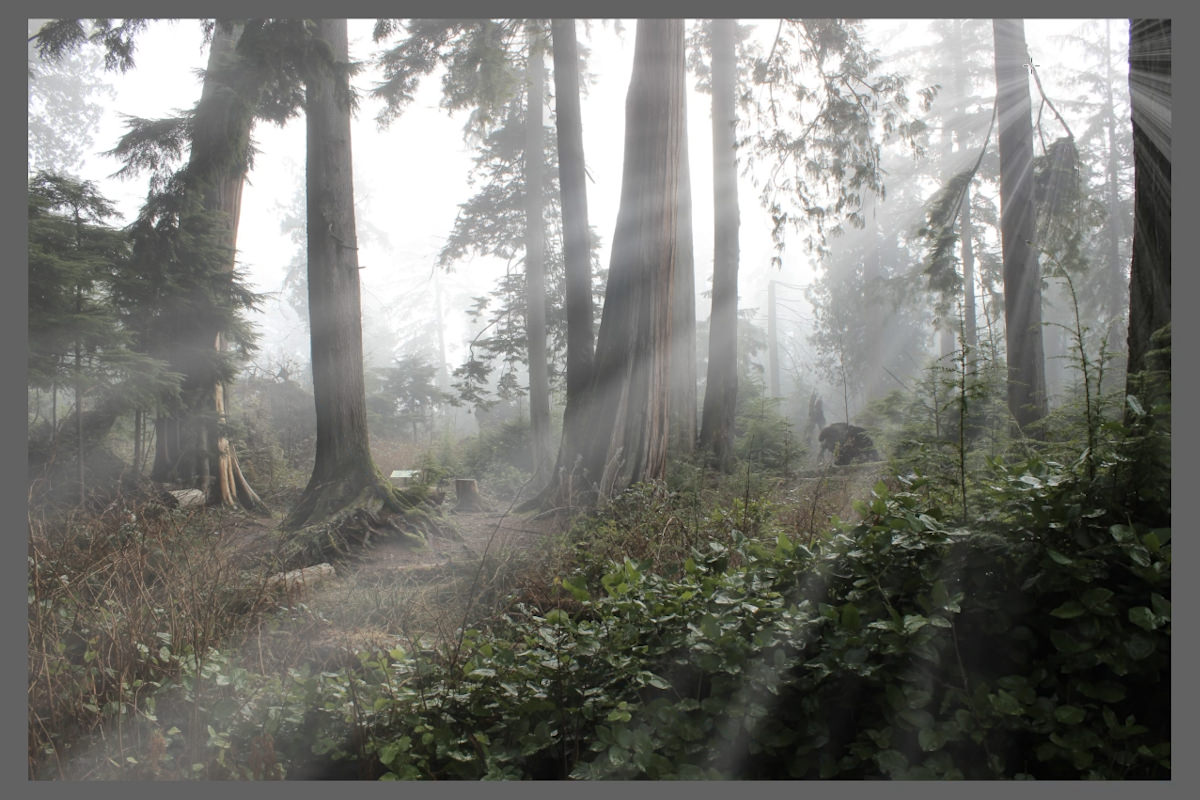
If the whole thing needs more softness, a simple Gaussian Blur on top handles it. Then add a layer mask and paint black over any rays that don’t look good, keeping it relatively random. For more on blurs, see 5 Awesome Effects with Blurs.
What Ties These Five Together
Every effect here is the same two decisions in a different order: what shape the gradient takes, and which blending mode decides what survives. Radial plus Screen gives you light added to a scene; white-to-transparent on a mask gives you an adjustment that fades; Gradient Noise on Angle plus Screen gives you rays. Using Gradient Fill layers rather than the Gradient Tool is what keeps all of it reversible, which matters more here than in most techniques because gradients are almost never right on the first attempt.
Final Thoughts
Gradients handle far more than color fades. A radial Gradient Fill on Screen mode builds a sunset, a white-to-transparent gradient painted onto a Curves mask brightens a subject, a Magic Wand selection turns a Gradient Fill into a recolored background, transparency swatches restore blown-out sky, and Gradient Noise set to Angle, desaturated and blurred with Iris Blur, produces convincing light rays.
Quick Reference: Keys, Menus and Settings
- Gradient Fill layerLayer > New Fill Layer > Gradient; Style Radial, Angle -90 for the sky, Scale, Reverse
- Keep only the lightBlend mode Screen for the sunset and rays; Multiply (or Darken) for the sky
- Invert and view a maskCmd/Ctrl + I inverts it; Alt/Option-click the mask to see it
- Gradient on a maskG, Foreground to Transparent, Radial; Reverse for the darker Curves layer
- Select the backgroundMagic Wand with Contiguous off and Tolerance lowered; Shift + Marquee to add
- Light raysGradient Type: Noise, Randomize, Style: Angle; clip Hue/Saturation and Levels
- Group and blurCmd/Ctrl + G, Convert to Smart Object, set to Screen, Filter > Blur Gallery > Iris Blur
No AI, no generative credits.
Free Downloads
Follow Along on the Same Photos
Get the five sample images, the PHLEARN gradient file with its sun flare gradients and the 5-page PDF guide. Free with a PHLEARN account.
Gradients in Photoshop: Common Questions
Should I use the Gradient Tool or a Gradient Fill layer?
A Gradient Fill layer. Visually it does the same thing, but you can double-click it and change the colors, size or scale at any time. The Gradient Tool just puts pixels on a layer, so in this tutorial it is only used on layer masks.
How do I make my own gradient?
Click the gradient bar to open the Gradient Editor. Click a stop under the bar to change its color, click where the hand icon appears to add one, drag stops to shape the blend and drag a stop straight down to delete it. The stops above the bar control opacity.
How do I add a sunset glow with a gradient?
Add a radial Gradient Fill from a really light yellow through orange and a deep red to black, then set the layer to Screen so the black disappears. Double-click it, drag the glow onto the sun, set the Scale and lower the opacity.
Why can’t I drag my Gradient Fill to move it?
In the Photoshop version shown, a brand new Gradient Fill will not move while its dialog is first open. Click OK, double-click the layer, then drag it on the image. Aaron calls it a bug.
How do I brighten my subject with a gradient?
Add a brighter Curves layer, click its mask and press Cmd/Ctrl + I to invert it. Press G, choose Foreground to Transparent with white as the foreground color and the Radial shape, and drag out from the subject. A second, darker Curves layer with Reverse checked darkens the edges.
How do I put a gradient behind a subject?
Select the background with the Magic Wand, Contiguous off and Tolerance lowered a little, and Shift-drag with the Marquee Tool to add anything it missed. Add a Gradient Fill layer and the selection becomes its mask automatically.
Why does my sky gradient fade through gray?
The transparent end of the gradient is still black underneath, so the fade passes through gray. Change that stop’s color to white.
Which blend mode should the sky gradient use?
In Normal it lightens parts of the image. Darken works, but Aaron prefers Multiply because it tends to blend better. The sky gets its color with no masking at all.
How do I make light rays from a gradient?
Set a Gradient Fill to the Noise gradient type and click Randomize, change Style to Angle, then clip a Hue/Saturation layer to desaturate it and set the fill to Screen. Clip a Levels layer to control the rays, group and convert to a Smart Object set back to Screen, then add Filter > Blur Gallery > Iris Blur and a mask.
Are the sample files free?
Yes, with a free PHLEARN account. You get 5 sample images, 1 GRD gradient file and 1 PDF guide: the five photos, a PHLEARN gradient set that includes the PH Sun Flare gradients and the 5-page guide.
Master Photoshop, Lightroom and Photography
Join PHLEARN PRO for $12.99 a month or $99.99 a year. Cancel anytime, with a 100% money-back guarantee.





