
add shine to skin photoshop
  • Add Shine to Skin in Photoshop

  • by Aaron Nace
    September 21, 2021
  • Add to
    favorites

Download Sample Images

This tutorial includes 1 sample image. Downloads are free with a PHLEARN account.

Download

description

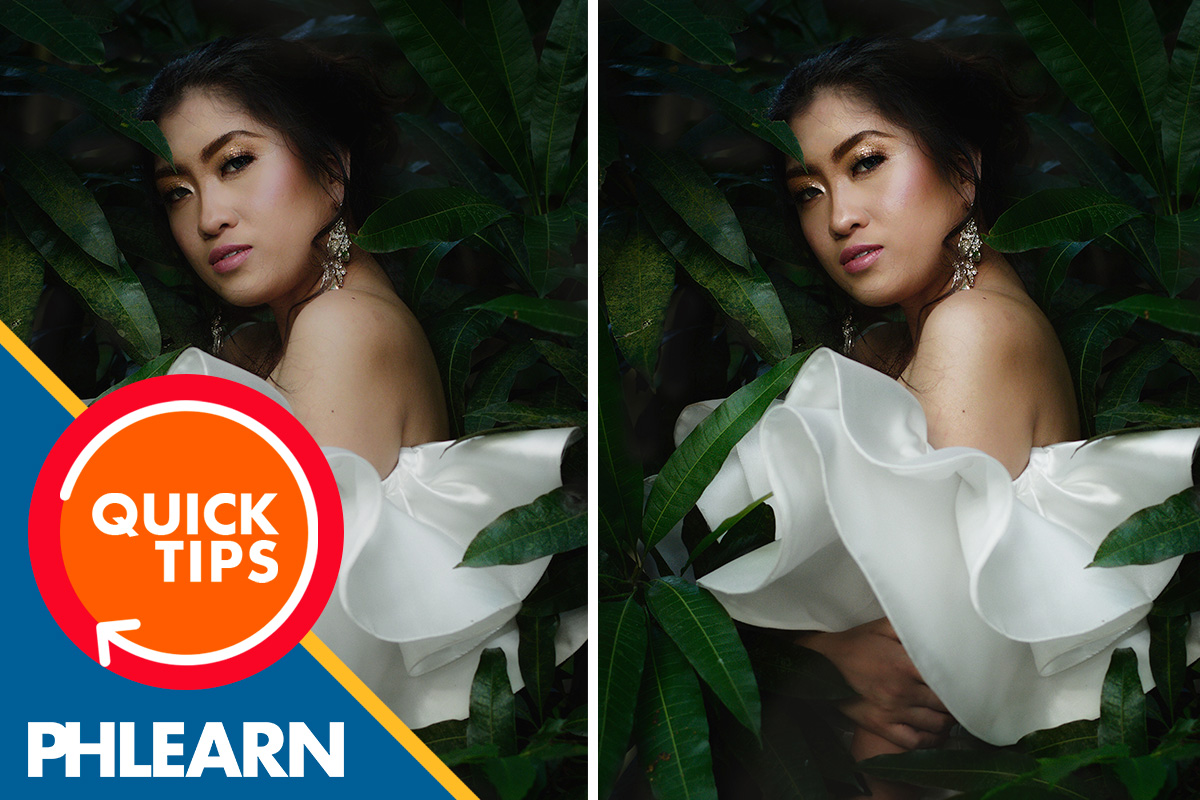
Learn how to add realistic shine to skin in Photoshop using Blend If, so the highlights land only where the light already is. We’ll paint white on a Hard Light layer, then use the Blend If sliders to hold the glow to the bright areas, and add a second pass for eyes, lips and anything reflective.

This tutorial is part of our Quick Tips series — short, focused Photoshop techniques you can pick up in a couple of minutes.

Image Source

Photo by
Paul Kerby Genil
via Pexels
Close-up portrait of a woman with gold eyeshadow and drop earrings among green leaves, wearing a white ruffled off-shoulder top
GIVE SKIN A BEAUTIFUL GLOW

Put the Light Back on Skin, Without Painting It On

Shine on skin is not a layer of white paint. It is the light that is already in the photograph, coming back up where the surface is glossy — a cheekbone, a brow, a lower lip. The trick is to add brightness and then tell Photoshop to only let it land where the picture is already bright.

That is exactly what Blend If does, and it is why this takes two layers and about a minute rather than an hour of careful dodging.

Everything here is manual: a brush, a blend mode, and one slider. No AI, no generative credits, no plugins.

Why Blend If Does the Work

Paint white on a layer over a portrait and you get exactly what you would expect — a white smear. Set that layer to Hard Light and it starts interacting with the tones underneath instead of covering them.

The Blend If sliders then decide which of those underlying tones the layer is allowed to affect at all. Drag the black slider on Underlying Layer to the right and the paint stops applying to the darker parts of the photo, surviving only in the highlights. The shine ends up where the light already was.

The Skin Pass

  1. Add a new layer above your subject.

    A plain empty layer, sitting directly on top of the Subject layer.

  2. Pick a large, soft-edged brush.

    B for the Brush Tool. Size it generously and keep the edge soft — hardness is what makes this look painted.

  3. Paint white over the skin.

    Do not be delicate. Cover the forehead, cheeks, nose and shoulders in broad strokes. It will look wrong, and that is fine, because the next two steps throw most of it away.

  4. Double-click the layer to open Layer Style.

    Double-clicking to the right of the layer name opens Blending Options.

  5. Set the Blend Mode to Hard Light.

    Leave Opacity and Fill Opacity at 100%. The white immediately stops covering and starts brightening.

  6. Drag the Underlying Layer slider until only the highlights show.

    In the Blend If section, with Gray selected, drag the left-hand black slider on Underlying Layer to the right. In the tutorial it lands around 141. Watch the shine retreat out of the shadows and settle on the bright planes of the face.

  7. Split the slider to fade the transition.

    Hold Alt or Option and drag one half of that slider away from the other. Splitting it turns a hard cutoff into a gradual falloff, which is the difference between shine that looks like light and shine that looks like a sticker.

The Second Pass, for Eyes and Lips

Skin and wet surfaces do not catch light the same way. Eyes, lips and jewelry want a brighter, tighter highlight than a cheekbone does, so they get their own layer with its own threshold.

  1. Create another layer and set it to Hard Light.

    Same blend mode, separate layer, so the two passes stay independently adjustable.

  2. Shrink the brush right down.

    Still soft, much smaller. You are aiming at features now, not planes.

  3. Paint over the eyes, the lips, and anything reflective.

    Catchlights in the eyes, the wet edge of the lower lip, earrings, anything glossy.

  4. Open Blending Options again and use a much lower threshold.

    Double-click the layer and drag the Underlying Layer black slider again — but only slightly. In the tutorial this one sits near 7, which keeps almost all of the paint. That is deliberate: these surfaces are meant to read brighter than skin.

What Trips People Up

The shine looks like white paint

Either the blend mode is still Normal, or the Blend If slider has not been split. A hard cutoff reads as an edge, and an edge reads as paint.

Nothing happens when you move the slider

You are probably dragging This Layer instead of Underlying Layer. The lower pair is the one that reads the photo beneath.

The whole face glows

The threshold is too low for the skin layer. Push it further right until the effect abandons the shadows entirely.

When to Use It, and When Not To

Use it when the lighting in the shot is already doing something and you want to lift it — a portrait with real modeling, a beauty shot, anything with a defined key light.

Don’t expect it to invent light that was never there. On a flat, evenly lit frame there are no highlights for Blend If to find, so the effect has nothing to attach to.

More Free Photoshop Tutorials

Download the Practice File

Grab the sample image and follow along. Everything in this tutorial uses standard Photoshop tools — no AI, no generative credits, no plugins.

200+
PRO COURSES & MASTERCLASSES
1,000+
DOWNLOADABLE PSDs & RAW FILES
4K
ULTRA HD VIDEO QUALITY
93%
FIVE STAR RATINGS
2M+
SUBSCRIBERS & STUDENTS

Enjoying This Free Tutorial? Go Further with PRO.

Unlock Full Sample Files, PSDs, and Hundreds of Masterclasses!

Download full project assets, original PSDs, and RAW images for every lesson

Unlimited access to our complete library of PRO Photoshop & Lightroom courses

Instant 4K Ultra HD streaming on all devices, anytime, anywhere

Full access to our entire library of Photoshop Actions, Presets, and LUTs

Flexible monthly and annual membership plans

Cancel anytime with zero hassle or commitments