

Download Sample Images
Download Assets
This tutorial includes 1 sample image and 1 PDF guide. Downloads are free with a PHLEARN account.
- Free sample files with every tutorial on PHLEARN
- New tutorials published every week
- Unlimited downloads with your free PHLEARN account
Free PDF Guide · 2 Pages
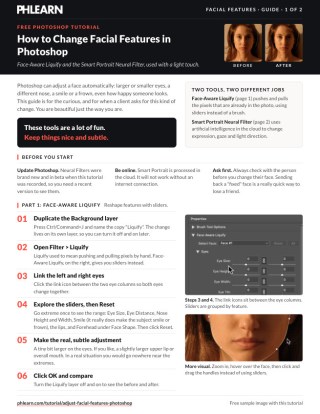
This Tutorial as a Step-by-Step PDF
The 2-page guide walks through both tools: duplicate the Background with Ctrl/Command+J, open Filter > Liquify, link the eyes and nudge Eye Size up a little, then Filter > Neural Filters > Smart Portrait with Happiness at 6 and Output set to Current Layer. Keep it next to your keyboard.
description
Learn how to use the Face-Aware Liquify Tool and the new Smart Portrait Neural Filter to make subtle adjustments to facial features and facial expressions in Photoshop.
Enjoying This Free Tutorial?
We publish a new free tutorial every week, each one with sample images and PSDs you can download and follow along with. Sign up and they land straight in your inbox, along with early word on sales, events and subscriber-only offers.
How to Change Facial Features in Photoshop
Photoshop has two separate systems for adjusting a person’s face, and they work in completely different ways. Face-Aware Liquify physically pushes pixels around — it makes eyes larger, moves a nose, widens a mouth. Smart Portrait Neural Filters do something stranger: they use AI trained on other photographs to generate an expression that was never in your frame, changing where someone is looking or how happy they appear.
Both are remarkably capable and both are very easy to overdo. This tutorial covers what each one can do, how to keep the results believable, and the output settings that let you back out of any of it later.
Two Tools, Two Different Jobs
It helps to be clear about the distinction before you start:
Face-Aware Liquify reshapes what is already in the photograph. Nothing new is invented — pixels are stretched and compressed. It processes on your machine, it is predictable, and it has been in Photoshop for years.
Smart Portrait Neural Filters generate new content. When you change someone’s gaze direction, Photoshop is synthesizing eyes based on what it has learned from a large number of other photographs. It runs in the cloud, which means you need an internet connection, and it is considerably less predictable.
For most retouching work, Liquify is the tool you want. The neural filters are worth knowing about, and there are situations where a small gaze correction saves a shot, but they are the more aggressive option by a wide margin.
Set Up Non-Destructively First
-
Duplicate the background layer
Press Ctrl or Cmd + J.
-
Name it Liquify
You are going to end up with more than one adjustment layer here, and naming them now saves confusion later.
This matters more than usual with facial work. Retouching a face is subjective, opinions change, and the person in the photograph may want it dialed back. Keeping each adjustment on its own named layer means you can toggle any of it off instantly rather than starting over.
Face-Aware Liquify
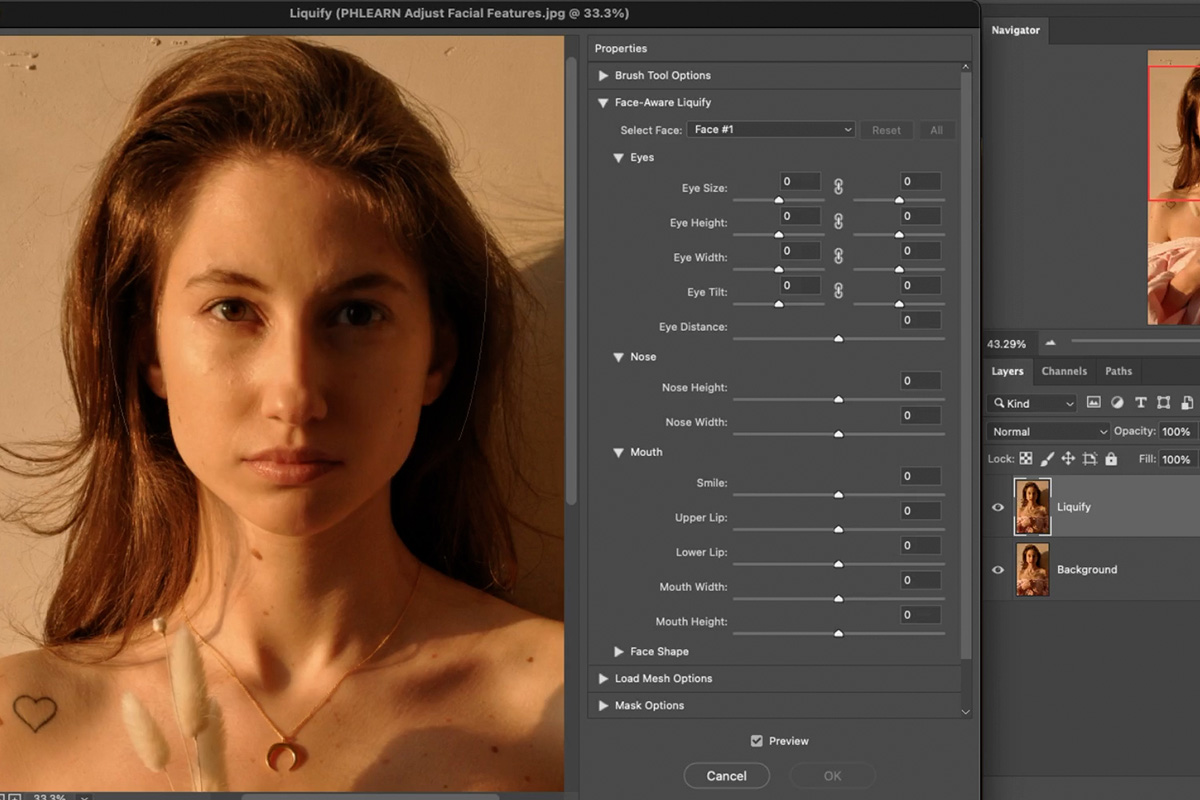
Go to Filter, then Liquify. If you have used Liquify before, you probably know it as the smudge-style tool for manually pushing and pulling pixels — grab an eye, drag it outward, and it moves. That still works, and it is covered in more depth in our Liquify Tool tutorial.
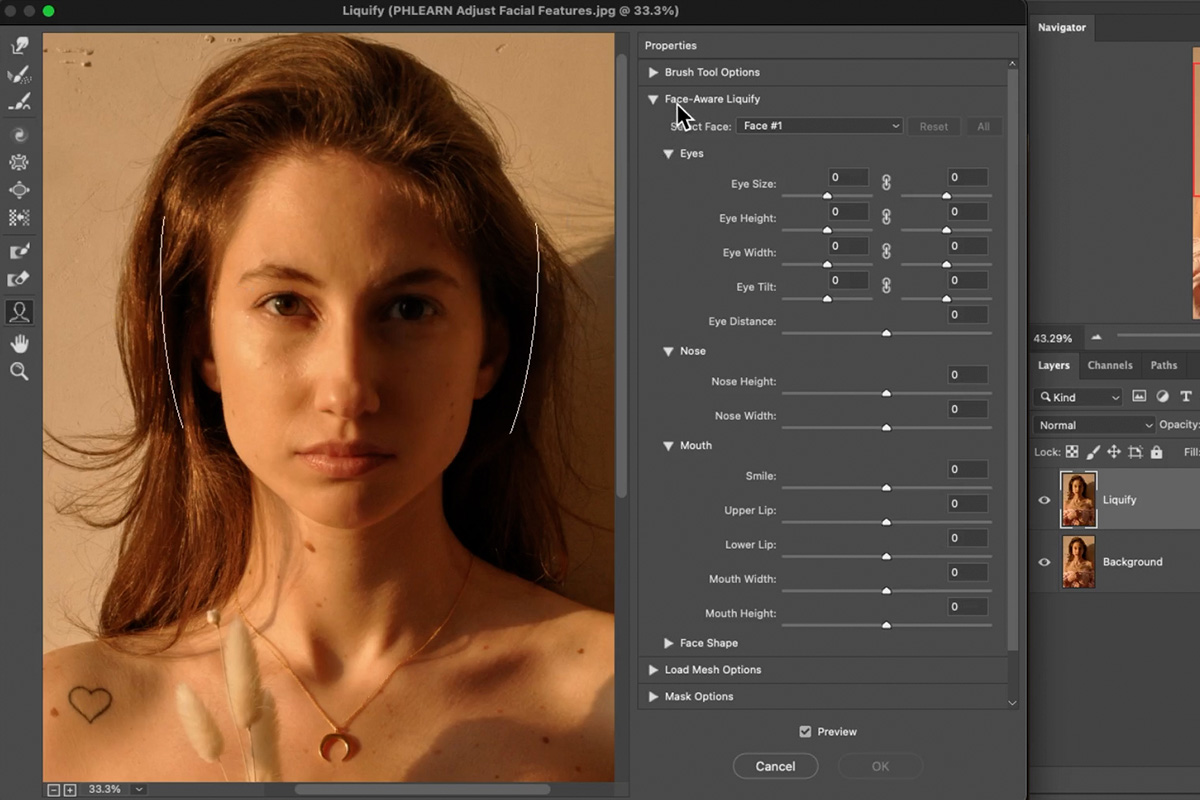
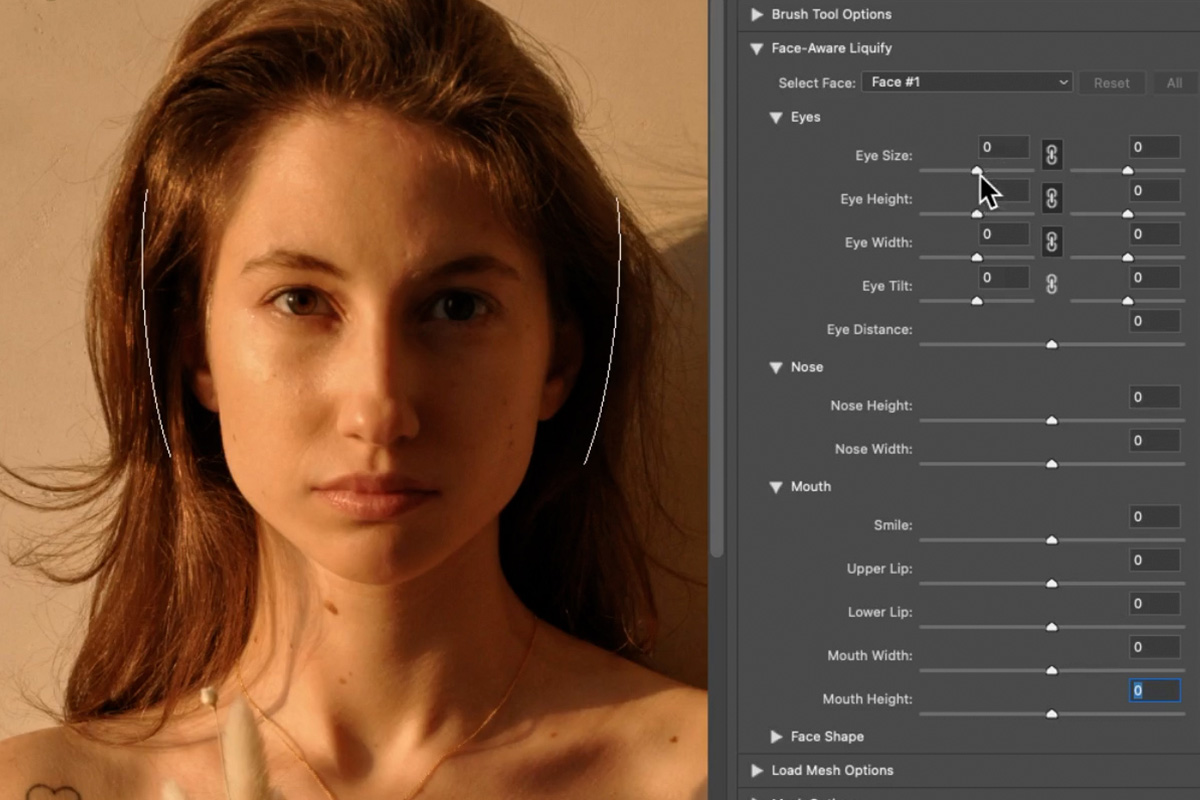
What changed things is the Face-Aware Liquify panel on the right-hand side. Photoshop detects the face automatically and gives you sliders instead of a brush. The results are cleaner than hand-pushing because Photoshop understands the structures it is moving.
Eyes
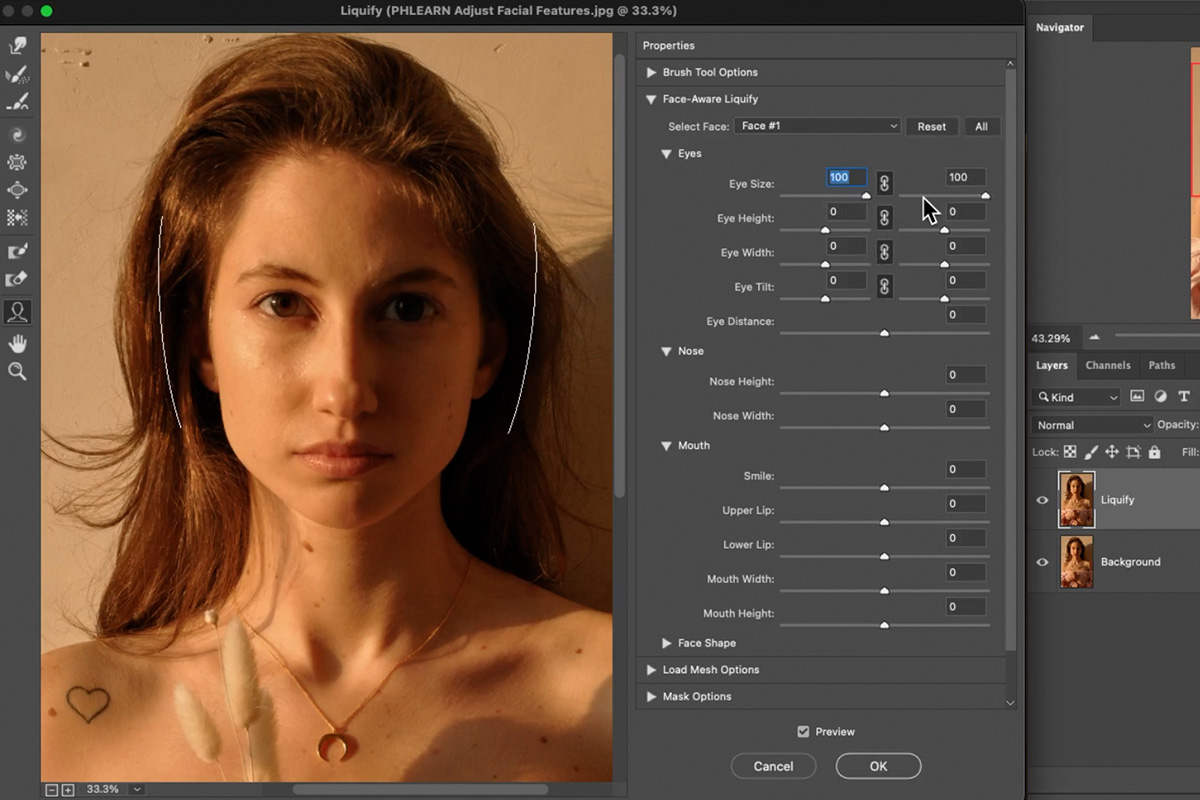
Start by linking the left and right eyes using the link icon between them. Almost nobody wants only one eye adjusted, and unlinked eyes are the fastest way to produce something unsettling.
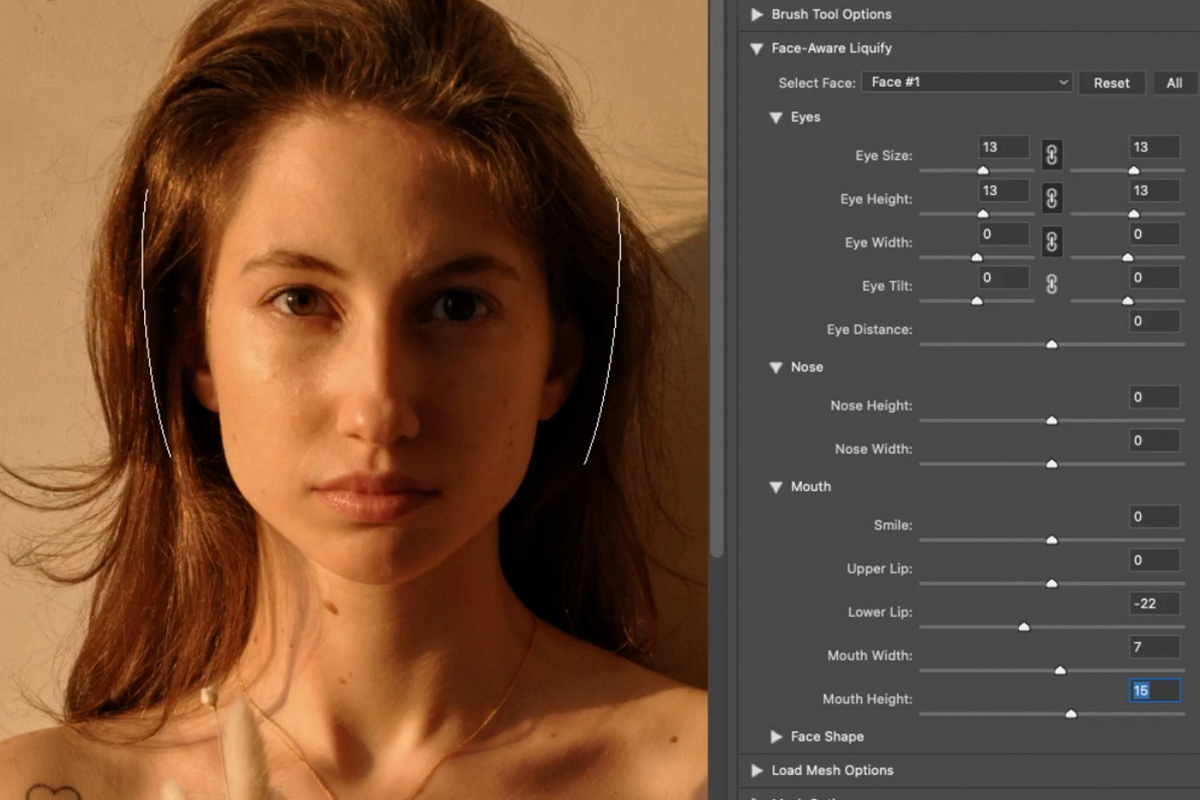
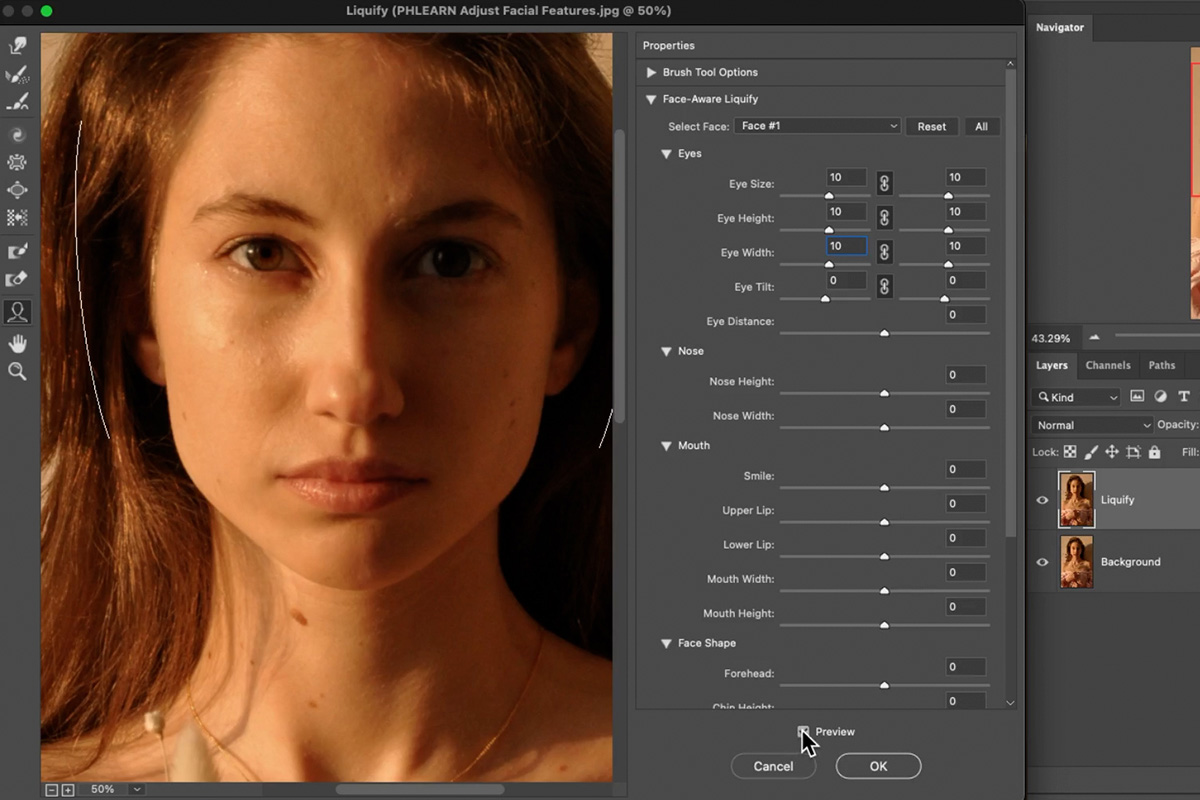
You get eye size, eye height and width, tilt, and distance between the eyes. Eye size is the one people reach for. Pushed hard it is obviously cartoonish — useful to see once so you know the range, and then to back well away from.
Nose
Nose height and nose width. These are subtle in effect and easy to push too far, largely because the nose sits at the center of the face and everything around it reads as a reference point. Small values only.
Mouth and expression
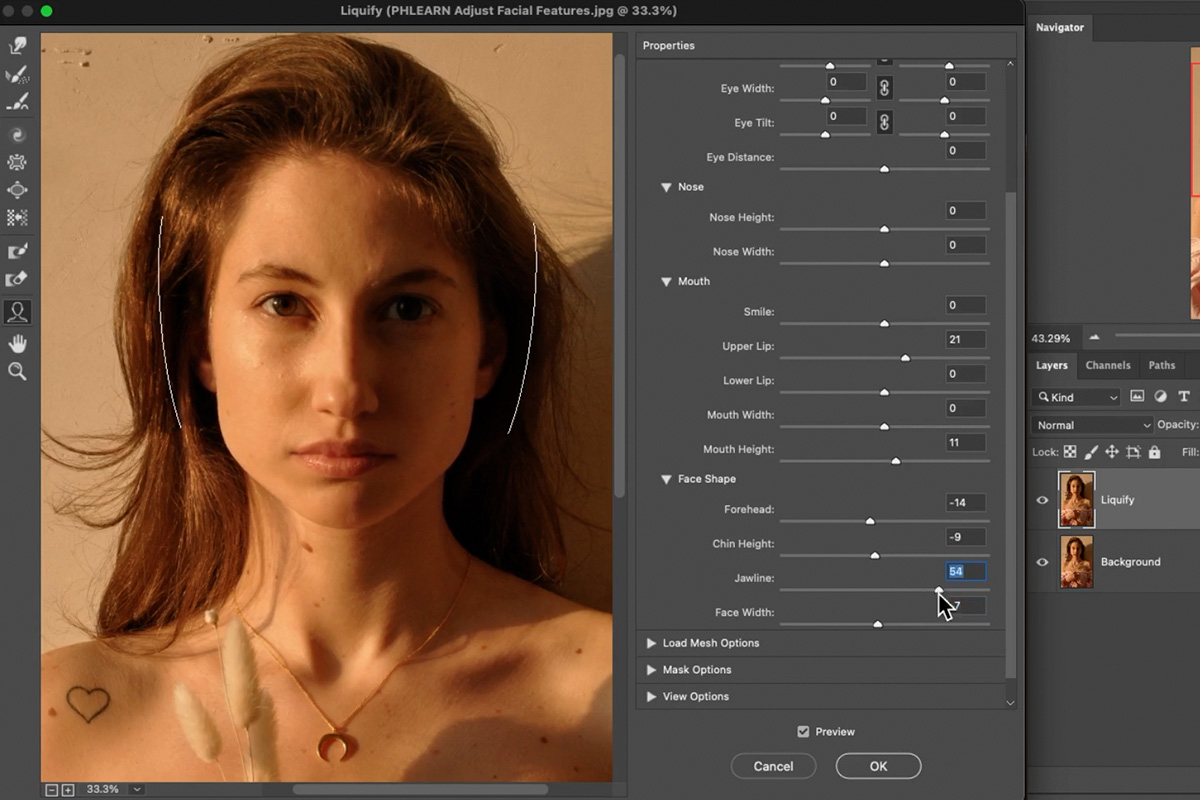
This is the section that surprises people. Alongside upper lip, lower lip, mouth width and height, there is a smile slider. Drag it one way and your subject smiles; drag it the other and they frown. Photoshop is reshaping the mouth and the surrounding facial structure to sell it.
Lip size is a popular adjustment and one where restraint pays off most obviously. A small increase to the upper lip is often all that is needed and reads as nothing more than good lighting.
Face shape
Forehead height, chin height, jawline and face width. Forehead height in particular can transform a face, which is exactly why it should be handled carefully.
The on-canvas handles
If sliders feel abstract, hover over a feature directly on the image. Photoshop shows small handles you can click and drag — the same adjustments, made visually. Zoom in and work this way if it suits you better; many people find it far more intuitive than watching numbers.
Click OK when done. Because the work is on its own layer, you can toggle it off and on to check that the result still reads as the same person.
Smart Portrait Neural Filters
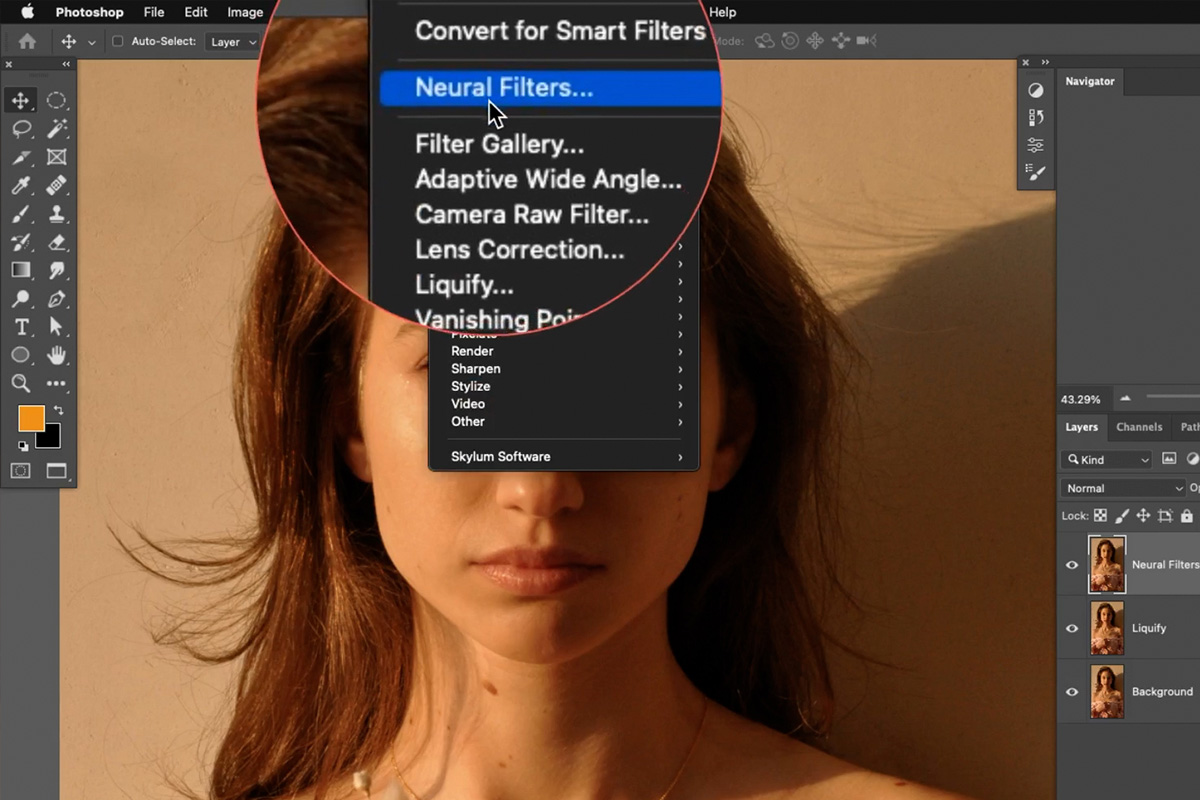
Duplicate the background layer again, move the copy to the top, and name it Neural Filters. Then go to Filter, then Neural Filters.
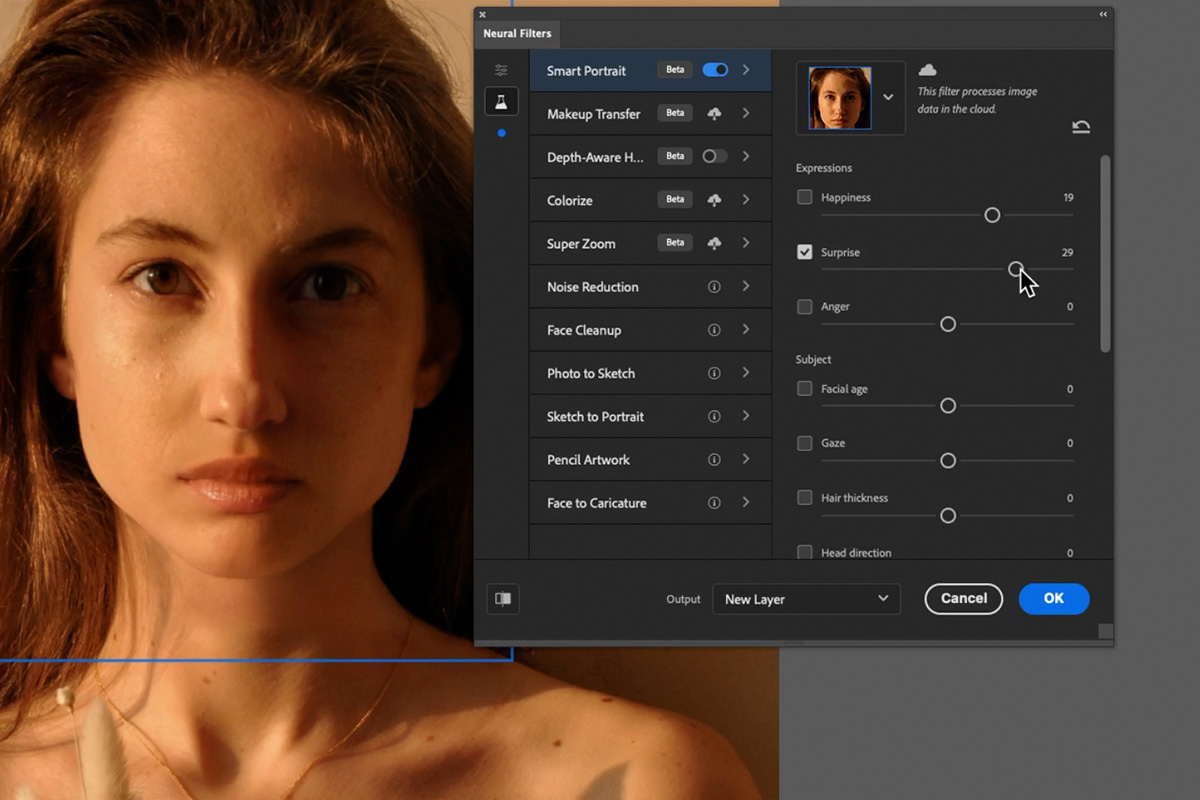
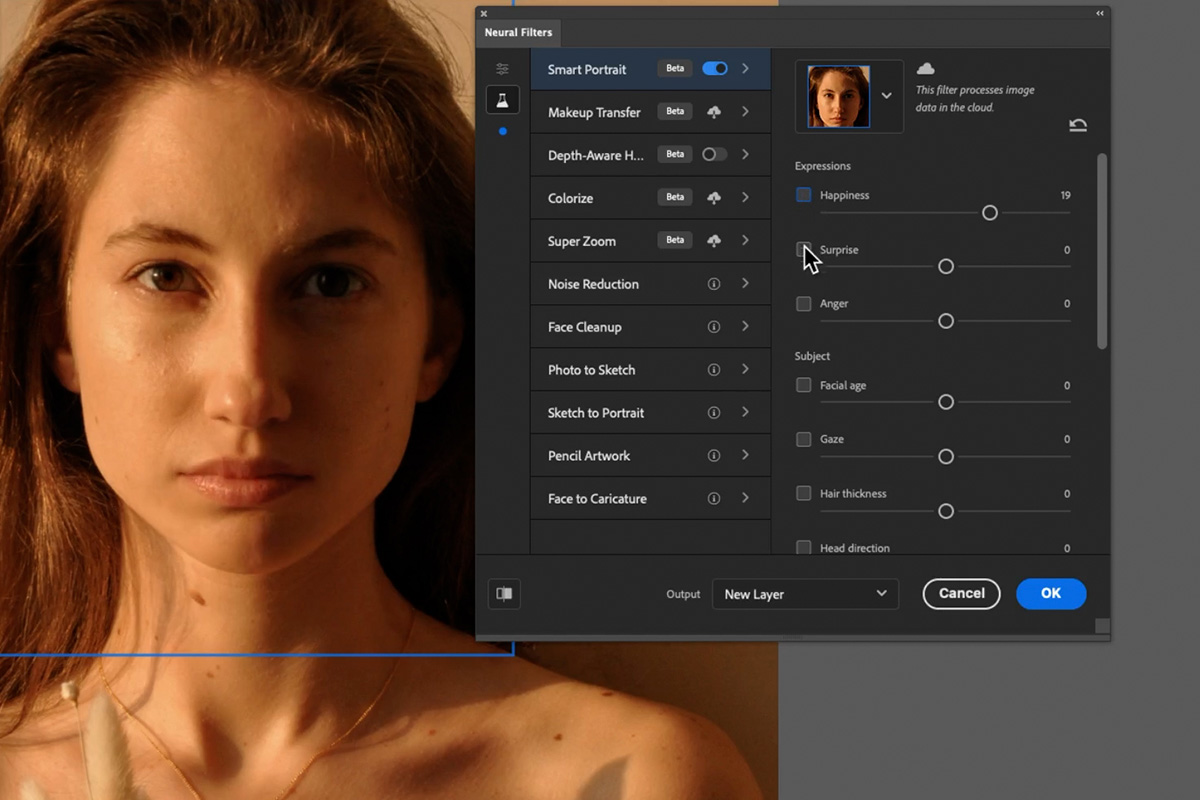
These filters process in the cloud. Your image is uploaded to Adobe’s servers, processed, and returned — so an internet connection is required, and there is a visible loading pause after each slider change while the result comes back. Turn on Smart Portrait and Photoshop detects the face automatically.
Happiness, surprise and anger
Three expression sliders. Move happiness up and, after a short wait, the face genuinely changes — not just the mouth, but the eyes and cheeks along with it. Surprise and anger work the same way. Anger kind of works: the subject really does look angry, which is exactly why changing someone else’s expression can feel a little creepy.
Keep these low. A value of around six on happiness is enough to warm up an expression. Anything more starts to drift.
Gaze direction
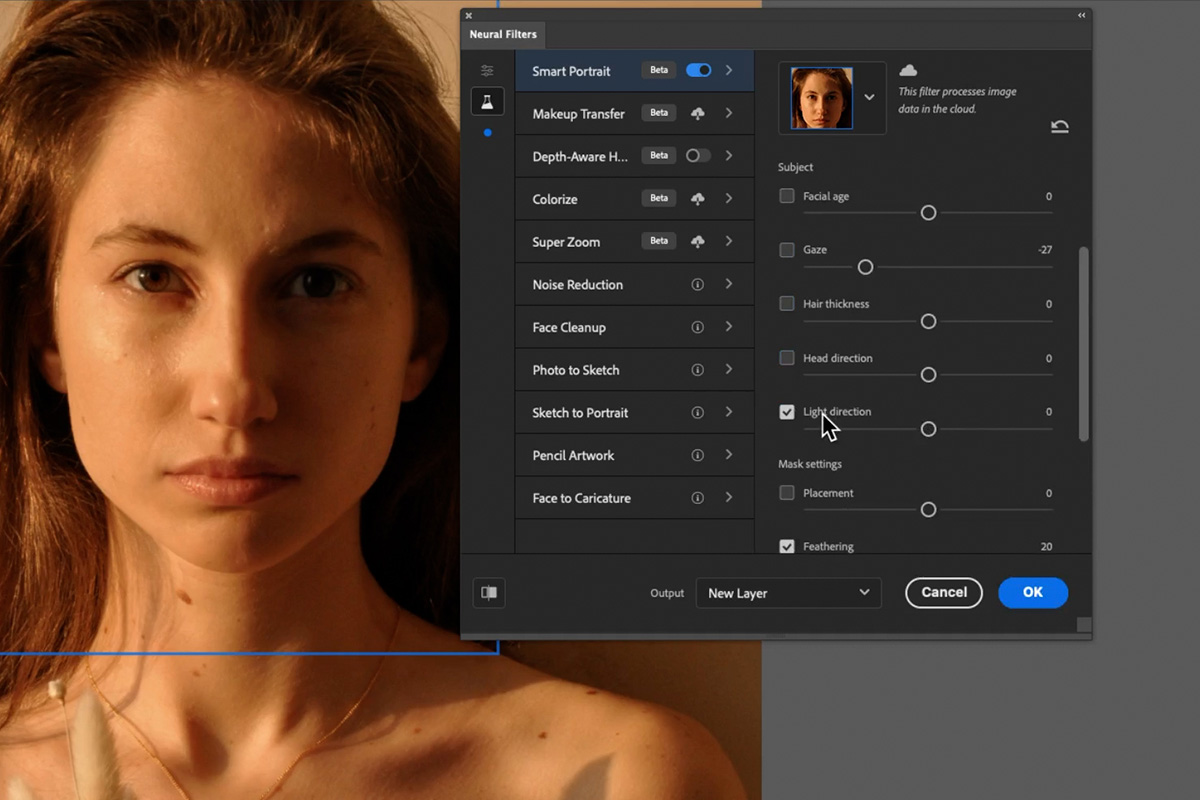
The most practically useful control here. Slide it and your subject looks further left or right. Photoshop is generating eyes to do this, drawing on what it has learned from other photographs, which is a genuinely strange thing to sit with — but on a shot where someone glanced slightly off-camera at the wrong moment, it can rescue the frame.
Light direction
Changes which side of the face carries the highlight. Push it to the right and a highlight appears on the right side of the subject, added automatically. Useful for nudging a portrait toward matching a composite background.
Output Options
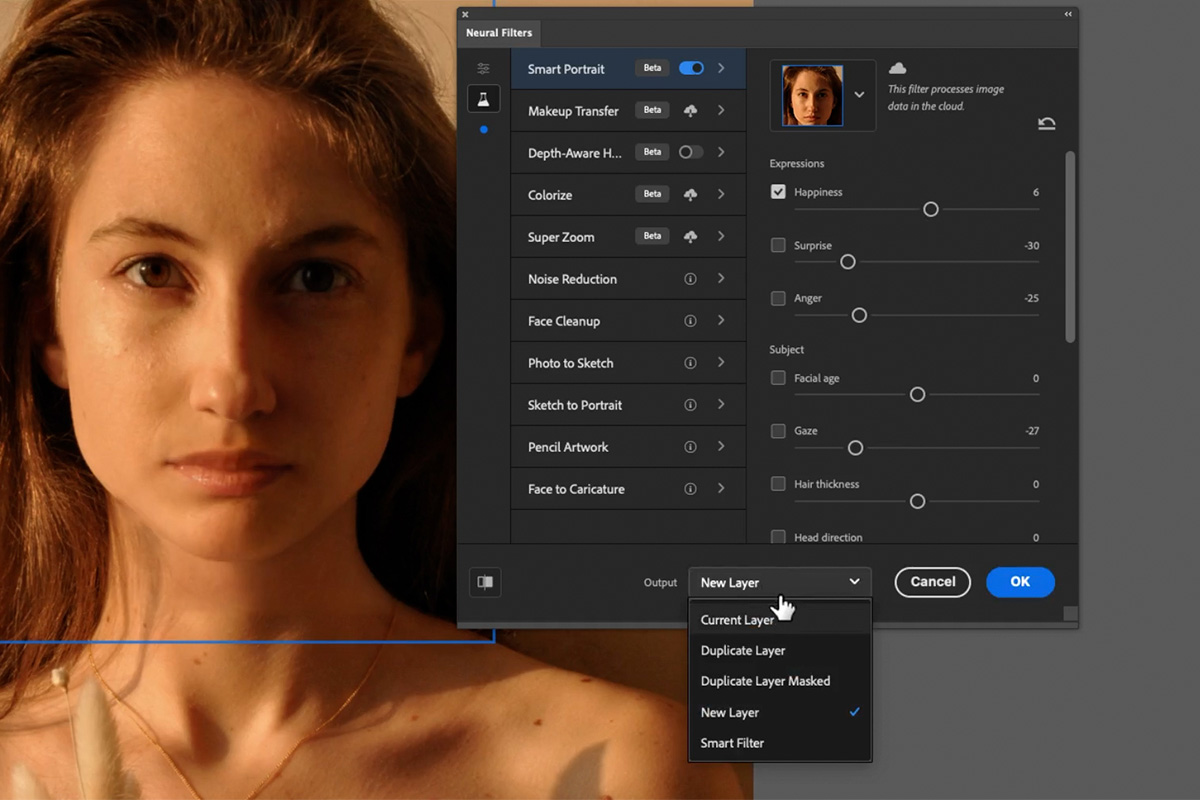
At the bottom of the Neural Filters panel is an output dropdown offering the current layer, a new layer, a duplicate, a masked duplicate, or a smart filter. If you already created and named a dedicated layer as described above, outputting to the current layer is fine. If you did not, choose a new layer or a smart filter so the effect stays reversible.
The masked-duplicate option is the one worth remembering for difficult images. It hands you an editable layer mask, so you can paint the effect back off any area the filter handled badly.
Combining Both, and Knowing When to Stop
The two tools stack. A subtle Face-Aware Liquify pass for eye size, plus a small happiness adjustment from Smart Portrait, produces a portrait that looks like a good frame rather than a retouched one.
The neural filters are not perfect, and it is worth saying so plainly. Expression changes can leave soft or slightly wrong areas around the mouth and eyes that need cleaning up afterward. The technology is astonishing for what it is, but it is not a finishing tool — treat its output as a starting point that still needs a retoucher’s eye.
The test that actually matters
Toggle your layers off and on. If the before and after look like two different people, you have gone too far. If they look like the same person on a better day, that is the target. Zooming out to a small preview helps here — problems that are invisible at 100% often become obvious at thumbnail size, and thumbnail size is how most people will see the photo anyway.
A Note on Consent
These tools raise a question that has nothing to do with technique. Changing the shape of someone’s face, or manufacturing an expression they never made, is not the same as adjusting contrast.
The practical rule is simple: talk to the person first. Do not reshape someone’s face and send it back as an improvement — that is a good way to hurt someone who trusted you with their photograph. If a client asks for these adjustments, that is their call to make about their own image. If they have not asked, do not assume.
It is worth knowing how these tools work, both so you can use them when they are genuinely asked for and so you can recognize when you are looking at an image where they have been used. Most of the time, the honest answer is that the person looked fine to begin with.
For beauty and fashion retouching taught in order, our PRO Beauty & Fashion Retouching Learning Path is where to go next.
Quick Reference: Keys, Menus and Settings
- Duplicate the layerCmd/Ctrl + J, name it Liquify
- Face-Aware LiquifyFilter > Liquify; sliders in the panel on the right
- Undo a manual pushCmd/Ctrl + Z
- Both eyes at onceClick the link icon between the eyes, then Eye Size up a little
- Smart PortraitDuplicate the Background again, name it Neural Filters; Filter > Neural Filters > Smart Portrait
- ExpressionHappiness: 6; Surprise, Anger, Gaze and Light Direction sliders
- Keep it reversibleOutput: Current Layer (on the named copy), then OK
Face-Aware Liquify works on your own pixels; Smart Portrait is processed in the cloud and needs an internet connection.
Free Downloads
Follow Along on the Same Photo
Get the portrait from the video and the 2-page PDF guide to Face-Aware Liquify and the Smart Portrait neural filter. Free with a PHLEARN account.
Changing Facial Features: Common Questions
What is the difference between Face-Aware Liquify and Smart Portrait?
Face-Aware Liquify pushes and pulls the pixels already in the photo, using sliders instead of a brush. The Smart Portrait neural filter uses AI in the cloud to change expression, gaze and light direction.
Where is Face-Aware Liquify in Photoshop?
Go to Filter > Liquify. Photoshop finds the face automatically, and the Face-Aware Liquify sliders sit in the panel on the right.
How do I change both eyes at the same time?
Click the link icon between the left and right eye controls. Eye Size, distance and the other eye sliders then change both eyes together.
Can Photoshop make someone smile?
Yes. Face-Aware Liquify has a Smile slider that makes the subject smile or frown, and Smart Portrait has a Happiness slider that changes the whole expression.
Can I drag the features instead of using sliders?
Yes. Zoom in and hover over the face in the Liquify window. Handles appear that you can click and drag to move each feature, which is more visual.
Why does Smart Portrait show a loading sign and need the internet?
Neural Filters send your image to the cloud, process it there and send the result back. You have to be connected to the internet, and each change takes a moment to appear.
Can I change where someone is looking or where the light comes from?
Yes. In Smart Portrait, the Gaze slider makes the subject look more to the left or right, and Light Direction pushed to the right adds a highlight on that side of the face.
How much should I change a face?
Keep it subtle. Aaron goes extreme only to show the range, then makes the eyes a tiny bit larger in Liquify and sets Happiness to 6 in Smart Portrait. Always check with the person first.
Which output should I choose in Neural Filters?
The Output menu at the bottom can send the result to several kinds of layer. Aaron uses Current Layer because he already duplicated the Background and named the copy Neural Filters.
Is the sample file free?
Yes, with a free PHLEARN account. You get 1 sample image and 1 PDF guide: the portrait from the video and a 2-page guide to both tools.
Master Photoshop, Lightroom and Photography
Join PHLEARN PRO for $12.99 a month or $99.99 a year. Cancel anytime, with a 100% money-back guarantee.





