
Download Assets
This tutorial includes 5 sample images, 1 sample RAW file, 1 sample PSD and 1 PDF guide. Downloads are free with a PHLEARN account.
- Download the sample images and PSDs from every free tutorial on PHLEARN
- New free tutorials published every week
- One free account — sign up once, then download anything
Free PDF Guide · 5 Pages
This Tutorial as a Step-by-Step PDF
The 5-page guide covers the light bulb and spray bottle shoot, Camera Raw lens corrections, a black Solid Color layer for the edges, Blend If on the raindrops, white eyes on a Lighten layer with 1.5% noise, a blue Gradient Map, a Gaussian Blur title glow and a paper texture on Screen. Keep it next to your keyboard.
description
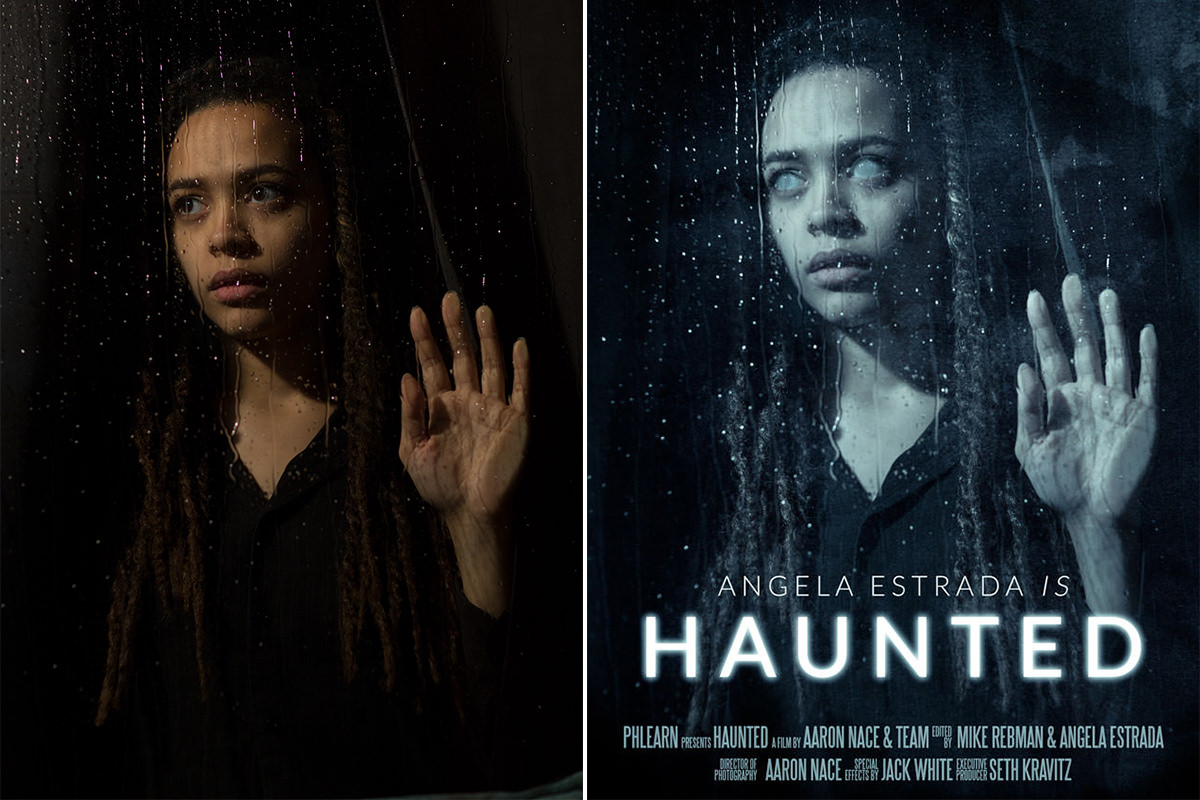
The third poster in the series is built almost entirely in post. This tutorial covers shooting through glass with a bare bulb and a spray bottle, then brightening raindrops with the Blend If Underlying Layer slider so the paint lands only on the water, whiting out a subject eyes on a Lighten layer, matching noise so painted areas hold up, and grading the result with a Gradient Map.
Enjoying This Free Tutorial?
We publish a new free tutorial every week, each one with sample images and PSDs you can download and follow along with. Sign up and they land straight in your inbox, along with early word on sales, events and subscriber-only offers.
Create a DIY Horror Movie Poster in Photoshop: Rain, Eyes and Color
The third poster in the series is built almost entirely in post: brightening raindrops with Blend If so the paint only lands on the water, whiting out a subject’s eyes convincingly, matching noise so painted areas don’t betray themselves, and color grading the whole thing with a Gradient Map.
This tutorial is part of the Horror Movie Poster Collection, and the contest it originally ran alongside has finished.
Use References When Ideas Won’t Come
This poster was based on an image found for the film The Eye (2008, starring Jessica Alba). Coming up with a completely original idea is often the biggest obstacle in the creative process, and when you’re stuck, finding an image that inspires you and recreating the elements that make it stand out is a perfectly good way forward. Recreating that poster meant three things: a subject, a window or pane of glass to look through, and a way to make rain on the surface of the glass.
The Photoshoot
The setup was very close to the first horror episode: a bare light bulb and some Cinefoil to prevent glare, shot in the studio using a window built into one of the offices. Angela, a member of the PHLEARN team and our champion video editor, channelled her inner evil for the picture. The last requirement was a brave soul with strong forearms to man the spray bottle and make the rain on the outside of the glass, and Jack was up to the task.
Angela stood inside the office looking out. Outside, the bulb lit her face while Jack sprayed water onto the glass. Because the environment was dark, the aperture went to f/2.0 and the ISO up to 800, which kept the shutter speed fast enough to avoid motion blur. The shoot was tethered: with the camera connected by USB, Lightroom’s File > Tethered Capture > Start Tethered Capture shows each frame full screen, which beats the camera’s LCD.
Starting in Adobe Camera Raw
Open the image of your subject in Adobe Camera Raw. Most of the work happens in Photoshop, but Camera Raw’s tools give you a stronger foundation to build on. In Lens Corrections, turn on Remove Chromatic Aberration and Enable Profile Corrections. If the water drops show purple fringing, go to Manual and drag Purple Amount to the right. Then make minor Basic adjustments: lift Shadows, add Clarity, drag Temperature left to cool the image, brighten it slightly, and add some Contrast and a little Vibrance. Click Open Image and the RAW file becomes a 16-bit image in Photoshop.
Darkening the Distracting Edges
Lighter areas along the edges and corners pull the eye. Create a Solid Color Adjustment Layer filled with black, select its layer mask and invert it with CTRL or CMD + I. Then select the Brush Tool, B, and paint white on that mask over the areas you want gone, using a low flow of around 20%.
Tip: To crop the image and adjust composition, use the Crop Tool and hold Alt/Option while dragging an edge to bring the top and bottom in together, then move the subject up a little. Its shortcut is C.
Brightening the Raindrops with Blend If
The raindrops are an important element, so they can’t be allowed to disappear. Create a new layer and paint white with the Brush Tool wherever you want highlights, avoiding the subject’s face so her highlights stay untouched. You’ll end up with a large white blob surrounding your subject. Perfect, we’re all done here.
LOL. JUST KIDDING.
Making the Paint Land Only on the Water
You need to change that layer’s blending options before anyone sees it. Blend If is an extremely powerful tool that makes a layer appear only in highlights or only in shadows. Open Blending Options for the white paint layer and find the Blend If sliders at the bottom of the menu, then adjust the Underlying Layer slider: click the slider under the shadows and, holding ALT or OPTN, drag it from left to right until only the water drops are affected.
If you painted over your subject a little, add a layer mask to the white paint layer and paint black over anything that shouldn’t be highlighted.
Whiting Out the Eyes
Zoom in with CTRL or CMD + +. Create a new layer, select the Brush Tool and use a low flow again, which you can set with SHIFT + 0-9; around 20% works, so SHIFT + 2. Sample a color right around the eye by holding ALT or OPTN, then carefully paint over each eye to remove the iris and pupil.
Switch the layer’s Blending Mode to Lighten so some of the underlying detail comes back through, and lower the Opacity if it’s still too strong.
Matching Noise So Painted Areas Blend
Any time you paint with the Brush Tool, adding noise that matches the original image helps those areas read as real. Select the layer you want to treat, go to the Filter menu, choose Noise and then Add Noise. Stay zoomed in while you do this so you can compare against the noise in the original, and adjust the slider until it matches. On the eye layer here that was 1.5%, Gaussian, Monochromatic.
Color Grading with a Gradient Map
Create a new Gradient Map Adjustment Layer at the top of the layer stack. The Gradient Map lets you assign colors to shadows, midtones and highlights. Here the shadows stayed black, a couple of shades of blue went into the midtones, and the highlights stayed white. Adjust the opacity to taste.
Brightening the Face and Finishing the Poster
As a rule you want your subject’s face to be the brightest part of the image. Create a Curves Adjustment Layer above your subject’s layer, select its layer mask, and paint white on that mask over the face with a large soft brush.
Next comes the type. Type your own with the Type Tool, or drag the ready-made text files into the image and press Enter to place each one; the credits come from a credit block PSD where you just type in the names. To center each line on the document, press Ctrl/Cmd + A to select the whole image, choose the Move Tool, click a text layer and click the center alignment button in the options bar. Hold Shift while dragging to move a layer only straight up, down, sideways or at 45 degrees, or nudge it with the arrow keys. If a line is hard to read, paint a little more white on the black Solid Color layer’s mask behind it.
For the title glow, press Ctrl/Cmd + J to duplicate the title, make sure the copy is a Smart Object, and go to Filter > Blur > Gaussian Blur. As a Smart Filter, the blur can be reopened and changed at any time. Then drag the Gradient Map to the very top of the layer stack: below the text, the glow is not colored; on top, it takes the same color as the photo.
Last, a texture for grit. Drag in the tan stained paper texture, scale it up, keep it under the Gradient Map and set it to Screen. Press Ctrl/Cmd + L and darken its darks so it fades back, then press Ctrl/Cmd + U and drag Saturation all the way down so its warm color doesn’t fight the cool image. Both land as Smart Filters you can reopen later.
Finally, set the reading order zoomed out: the face first, the title second. Select the credits and press V, then 6 for 60% opacity, and lower the tagline’s opacity too. Ctrl/Cmd + H hides the bounding box while you nudge things into place. Use this as inspiration, or do something strange and original of your own.
The Rest of the Series
- Create a DIY Horror Movie Poster in Photoshop (Part I)
- Create a DIY Horror Movie Poster in Photoshop (Part II)
Why Blend If and Noise Do the Convincing
Painting white over raindrops is easy; making it look like light rather than paint is the hard part. Blend If solves it by restricting the layer to the tones that were already bright, so the brightening follows the water exactly instead of following your brush. The noise step does the equivalent job for the eyes: a painted area is always cleaner than the photograph around it, and matching the grain is what removes that tell. The Gradient Map then sits on top of everything, which is what pulls the retouched and untouched parts of the frame into one image.
Final Thoughts
Shoot through glass with a bare bulb and a spray bottle, start in Camera Raw, then in Photoshop paint white highlights and confine them to the water with the Blend If Underlying Layer slider. White out the eyes on a Lighten layer, add matching noise to that eye layer, grade with a Gradient Map, brighten the face with a masked Curves layer, then add the type, a blurred title glow and a paper texture, all under the Gradient Map.
Quick Reference: Keys, Menus and Settings
- Camera RawLens Corrections: Remove Chromatic Aberration, Enable Profile Corrections; Manual > Purple Amount
- Darken the edgesBlack Solid Color layer, Cmd/Ctrl + I on its mask, paint white at 20% Flow; C, Alt/Option-drag to crop
- RaindropsBlending Options > Blend If > Underlying Layer, Alt/Option-drag the dark slider right
- White eyesB, Shift + 2 for 20% Flow, Lighten blend mode; Filter > Noise > Add Noise 1.5%, Gaussian, Monochromatic
- Center the textCmd/Ctrl + A, Move Tool, align centers; Shift-drag or arrow keys to move
- Title glowCmd/Ctrl + J, Smart Object, Filter > Blur > Gaussian Blur; Gradient Map to the top
- Texture and finishScreen, Cmd/Ctrl + L, Cmd/Ctrl + U Saturation down; V then 6 for 60%; Cmd/Ctrl + H hides extras
No AI, no generative credits.

Free Downloads
Follow Along on the Same Photos
Get the RAW portrait behind rainy glass, 5 sample images with the texture and text, a credits PSD and the 5-page PDF guide. Free with a PHLEARN account.
Rain and White Eyes Poster: Common Questions
How do I photograph rain on a window?
Put the subject behind a pane of glass with the camera and a bare light bulb in front, and spritz the glass with water from a spray bottle. Block the bulb from the lens with black foil or a black t-shirt to avoid glare.
What camera settings work with a single light bulb?
A bulb is not much light, so the shot uses a wide aperture of f/2.0 and ISO 800. That lets in enough light to keep the shutter speed fast enough to avoid motion blur.
How do I remove purple fringing on the water drops?
In Camera Raw’s Lens Corrections, turn on Remove Chromatic Aberration and Enable Profile Corrections, then under Manual drag Purple Amount to the right.
How do I brighten the raindrops without lightening everything?
Paint white on a new layer, open Blending Options and, under Blend If, Alt/Option-drag the dark Underlying Layer slider to the right. The white stays only on the light areas, which are the drops.
What if I painted white over the face?
Blend If lets the white through on the face’s highlights too. Add a layer mask to the paint layer and paint black wherever the effect should not show.
How do I make the eyes white?
On a new layer, use the Brush Tool at 20% Flow (Shift + 2), Alt/Option-click to sample a color right around the eye and paint over it. Set the layer to Lighten so the highlight in the eye stays.
Why does the painted eye look fake up close?
The photo has noise and brush paint has none. Go to Filter > Noise > Add Noise; this image used 1.5%, Gaussian, Monochromatic on the eye layer.
Why move the Gradient Map to the top?
A Gradient Map colors everything below it. With it above the text, the title glow and the texture, they all take the same blue color as the photo.
How do I make the title glow?
Press Cmd/Ctrl + J to duplicate the title, make sure the copy is a Smart Object and go to Filter > Blur > Gaussian Blur. As a Smart Filter, the blur can be changed any time by double-clicking it.
Are the sample files free?
Yes, with a free PHLEARN account. You get 5 sample images, 1 sample RAW file, 1 sample PSD and 1 PDF guide: the poster’s texture and text pieces, the RAW portrait behind rainy glass, the credits PSD and a 5-page guide.
Master Photoshop, Lightroom and Photography
Join PHLEARN PRO for $12.99 a month or $99.99 a year. Cancel anytime, with a 100% money-back guarantee.





