
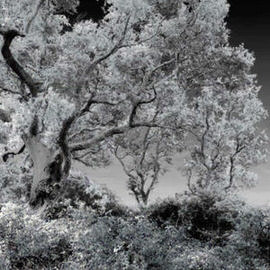

True infrared needs a converted camera, but the look is really a set of tonal relationships: foliage near white, sky heavy and dark, clouds separating hard out of it. Learn how a Black and White adjustment sets that base, how two Color Range selections let you darken the sky with a gradient and brighten leaves without flattening them, and how to kill the dark halo that gives the edit away.
We publish a new free tutorial every week, each one with sample images and PSDs you can download and follow along with. Sign up and they land straight in your inbox, along with early word on sales, events and subscriber-only offers.

How to Create a Digital Infrared Effect in Photoshop
Infrared photographs are unmistakable. Foliage glows almost white, the sky goes deep and heavy, and clouds separate out of it with a brightness they never have in an ordinary exposure. The look comes from a camera recording light your eye cannot see, which normally means buying a dedicated infrared body or having an existing one converted.
You can get most of the way there in Photoshop instead, using a photograph you already have. It will not be a true infrared capture and it is not trying to be. What it will do is reproduce the tonal relationships that make infrared images striking: bright greens, dark sky, and strong separation between the two.
What Actually Makes an Image Read as Infrared
Before touching a slider it helps to know what you are aiming at. In a real infrared photograph, foliage reflects strongly and renders bright, close to white. The sky renders dark. Clouds stay bright against it, so the contrast between sky and cloud is far greater than normal. Everything is monochrome. That is the whole target, and every step below serves one of those three relationships.
This Works on Landscapes, Not on People
Worth saying early, because it saves a wasted afternoon: the technique looks good on trees, fields and skies, and looks distinctly strange on portraits. Skin does not behave the way foliage does. Pick a landscape.
Start With a Black and White Adjustment Layer
The conversion is where most of the effect is won or lost, because it decides how bright each color becomes once the color is gone.
-
Add a Black and White Adjustment Layer
Work through the presets first, including the blue filter and the high contrast red filter, to see how differently each treats the same scene. There is even one named Infrared, though it rarely gives the most convincing result on a given image.
-
Raise the Greens
This is what lifts foliage toward white.
-
Lower the Cyans and the Blues
Both live in the sky. Dropping them is what produces the heavy, dark sky the effect depends on.
-
Raise the Yellows
There is usually more yellow in leaves than expected, and it adds to the brightness.
-
Lower the Reds
Reds tend to sit in bark and branches, which should stay dark against the bright leaves.
This gets you a credible base. It will not be finished, and it is not meant to be. The remaining work is done by treating the sky and the foliage separately.
Select the Sky With Color Range
The sky needs its own treatment, which starts with isolating it while the image still has color in it.
Hide the Conversion Before You Select
This trips people up. You cannot sample a color range while the Black and White adjustment layer is visible, because there is no color left to sample. Switch the adjustment layer off and click the background layer first. The blue may look weak on screen; it is still perfectly selectable.
-
Open Select > Color Range
With the background layer active and the Black and White layer hidden, open the Color Range dialog.
-
Sample the Sky With the Eyedropper
Click directly on the sky to set the color the selection is built from.
-
Raise Fuzziness Until the Whole Sky Is Included
Color Range favors lighter tones, so light areas of the sampled color are selected and dark ones largely are not. Fuzziness widens the range until the selection covers what you need.
Darken the Sky With a Gradient
A flat darkening reads as fake. Real skies are not evenly toned.
-
Create a New Layer With the Selection Active
Keep the sky selection loaded and add a new empty layer to paint the gradient onto.
-
Press G for the Gradient Tool and Choose the Linear Gradient
Set the foreground color to black and pick the linear gradient style.
-
Drag Black From the Top of the Frame Downward, Holding Shift
Shift constrains the gradient to vertical so it does not drift sideways. Drag a second time for a darker sky. If it goes too dark, redo the gradient a little higher until the falloff looks natural.
Why Skies Get Lighter Toward the Horizon
Looking straight up you see through relatively little atmosphere. Looking toward the horizon you are looking through far more of it, stacked, with more water particles in the way, so the sky lightens as it approaches the horizon. Building that gradient in is what makes a darkened sky read as real, and the same principle is worth carrying into any composite you build.

Brighten the Foliage, Selectively
The foliage gets the opposite treatment, and the restraint you show here decides whether it reads as leaves or as a white shape.
-
Return to the Background Layer and Open Select > Color Range Again
Switch the Black and White layer off again so there is color to sample.
-
Sample the Greens
Click on a representative area of foliage with the eyedropper.
-
Be Deliberately Restrained With the Selection
Selecting every green in the frame produces a flat blanket of white with no detail left in it. Aim to catch the leaves while leaving the trunks and branches out.
-
Make a New Layer and Fill the Selection With White
Use Cmd + Delete on Mac or Ctrl + Delete on PC, with white as the background color.
-
Lower the Layer Opacity
Full white is almost always too much. Back it off until the foliage is bright but still has structure.
-
Mask Out Anything That Should Have Stayed Dark
Branches and trunks will usually catch some of the fill. Paint them back out on a layer mask, since in a real infrared photograph the limbs stay dark while the leaves go bright, and honoring that is most of what sells the result.
Fix the Dark Halo Around the Edges
At this point a thin dark fringe often appears where the bright foliage meets the dark sky. It comes from a slight color shift right at those boundaries, and it is the most obvious tell that the image was built rather than captured.
-
Select the Background With Color Range Again
Load a fresh selection of the sky area.
-
Fill That Selection With a Light Color on a New Layer
Any light color works; white is fine.
-
Go to Select > Modify > Contract and Enter About 2 Pixels
This shrinks the active selection inward by a couple of pixels.
-
Press Delete
You filled the whole selection, then shrank it and deleted the middle, so what remains is a thin band of light tracing every edge.
-
Lower the Opacity Until It Blends
That band of light cancels the band of dark, and the boundary stops announcing itself.
Darken the Foreground to Add Depth
One last adjustment separates foreground from background and pushes attention where you want it.
-
Add a Curves Adjustment Layer and Pull the Curve Down
Darken the whole image for now; the mask will control where it lands.
-
Invert Its Layer Mask
Press Cmd/Ctrl + I. The darkening is now hidden everywhere.
-
Paint White on the Mask Over the Foreground
Grass and ground at the base of the frame. Darkening them pulls attention up toward the tree and the sky, and separates foreground from background. A little over the tree trunk keeps it dark too.
What Trips People Up
Trying to sample a color range with the Black and White layer switched on is the most common stall, since there is no color there to select. After that it is over-selecting the greens, which flattens the foliage into a shape rather than leaves. Ignoring the edge halo is the one that quietly ruins otherwise good results, because the eye reads that fringe as an edit even when it cannot name it. And a sky darkened evenly, with no gradient, never quite looks like sky.
What Makes the Illusion Hold
The effect is convincing because it reproduces relationships rather than colors. Infrared is recognizable by bright foliage against a dark sky with clouds separating strongly out of it, and every one of those is a tonal relationship, which is precisely what a Black and White conversion lets you control directly. Working without color removes a whole dimension from the problem. That is not the same as saying black and white is easy; it means the variables you are left with are the ones that matter here.
Try It on Your Own Landscapes
Nothing in this process is expensive or irreversible. It is an adjustment layer, two color-range selections and a few masks, all of which stay editable. The real skill is in restraint: how much white to leave in the leaves, how far to take the sky, and how much of the halo fix to let through. Those are judgment calls that improve with a second and third attempt on the same frame, which is exactly why every step here lives on its own layer.
Quick Reference: Keys, Menus and Settings
- ConvertBlack and White adjustment layer: Greens and Yellows up; Cyans, Blues and Reds down
- Select a colorHide the Black and White layer, click the background, Select > Color Range, raise Fuzziness
- Darken the skyG for the Gradient Tool, Linear, black from the top holding Shift
- Brighten leavesNew layer, Cmd/Ctrl + Delete fills with white (background color), lower opacity, mask the branches
- Fix the haloFill the sky selection light, Select > Modify > Contract 2 pixels, Delete, lower opacity
- Add depthCurves pulled down, Cmd/Ctrl + I to invert the mask, paint white over the foreground
- Before and afterAlt/Option-click the background layer’s eye icon to hide every other layer
No AI, no generative credits.
Infrared Effect in Photoshop: Common Questions
Can I make an infrared photo without an infrared camera?
You can get close in Photoshop. It won’t be a true infrared capture, but a Black and White adjustment layer plus a few selections reproduces the look: bright foliage, a dark sky and bright clouds.
What makes a photo look infrared?
Greens in the trees go very bright, close to white, while the sky goes dark and the clouds stay bright against it. The image is black and white.
Which Black and White sliders should I move?
Raise Greens and Yellows to brighten the leaves, lower Cyans and Blues to darken the sky, and lower Reds to keep the bark dark.
Isn’t there an Infrared preset in Black and White?
There is, and it’s worth trying along with the blue and high contrast red filter presets. In the video it didn’t give the best result, so the sliders were set by hand.
Why can’t Color Range select the sky?
The Black and White layer is still visible, so there is no color to sample. Hide that layer, click the background layer, then go to Select > Color Range and raise Fuzziness until the whole sky is included.
How do I darken the sky so it looks natural?
With the sky selected, make a new layer, press G for the Gradient Tool, choose Linear and drag black down from the top while holding Shift. Skies are lighter near the horizon, so a gradient looks real where a flat fill doesn’t.
How do I brighten the leaves without losing detail?
Select only some of the greens with Color Range, fill the selection with white on a new layer (Cmd/Ctrl + Delete fills with the background color) and lower the opacity. Mask the branches and trunk back to dark.
How do I get rid of the dark edges around the trees?
Select the sky with Color Range, fill it with a light color on a new layer, then Select > Modify > Contract by about 2 pixels and press Delete. The thin light border left behind cancels the dark one; lower its opacity to blend.
Does the infrared effect work on portraits?
Not well. Infrared looks really strange on people, but it looks great on landscapes with trees and sky.
From the Magazine View all
Stories, interviews and guides for photographers, new every week.
 EditingLightCraft vs Lightroom: I Edited the Same RAW Files in BothThe free clone on the same RAW files: what matches, what breaks and who should switch.
 InspirationRare Historical Photos: 13 of the Rarest Pictures Ever TakenFrom the earliest surviving picture of a person to the last passenger pigeon: who took each one and why it survives.
 EditingArtCraft: Photoshop Cloned by AI in Two Weeks. Is It Legal?ArtCraft cloned Photoshop and Lightroom with AI and gave them away. Any good? Legal? Safe?
Master Photoshop, Lightroom and Photography
Join PHLEARN PRO for $12.99 a month, or $99.99 a year (save 36%). Cancel anytime, with a 30-day money-back guarantee.





