


Download Assets
This tutorial includes 1 sample image, 4 glitter textures, 1 Photoshop brush and 1 PDF guide. Downloads are free with a PHLEARN account.
- Download the sample files from every free tutorial on PHLEARN
- New free tutorials published every week
- One free account: sign up once, then download anything
Free PDF Guide · 4 Pages
This Tutorial as a Step-by-Step PDF
The guide walks through placing four glitter textures with File > Place Linked, setting them to Screen, masking each one with a rough Lasso selection, darkening the photo with Levels, recoloring with Hue/Saturation Colorize, reusing masks, and painting with the scatter and single sparkle brushes. Keep it next to your keyboard.
description
Learn how to create a glitter sparkle effect in Photoshop by layering glitter texture images over your photo with the Screen blending mode and masking each one to the areas you want it to hit. This tutorial covers rough Lasso selections turned into layer masks, darkening the background for contrast, unlinking a layer from its mask, recoloring textures with Hue/Saturation, reusing masks between layers, and painting extra detail with the included custom sparkle brushes.
Enjoying This Free Tutorial?
We publish a new free tutorial every week, each one with sample images and PSDs you can download and follow along with. Sign up and they land straight in your inbox, along with early word on sales, events and subscriber-only offers.
Image Source
Photo by KoolShooters via Pexels

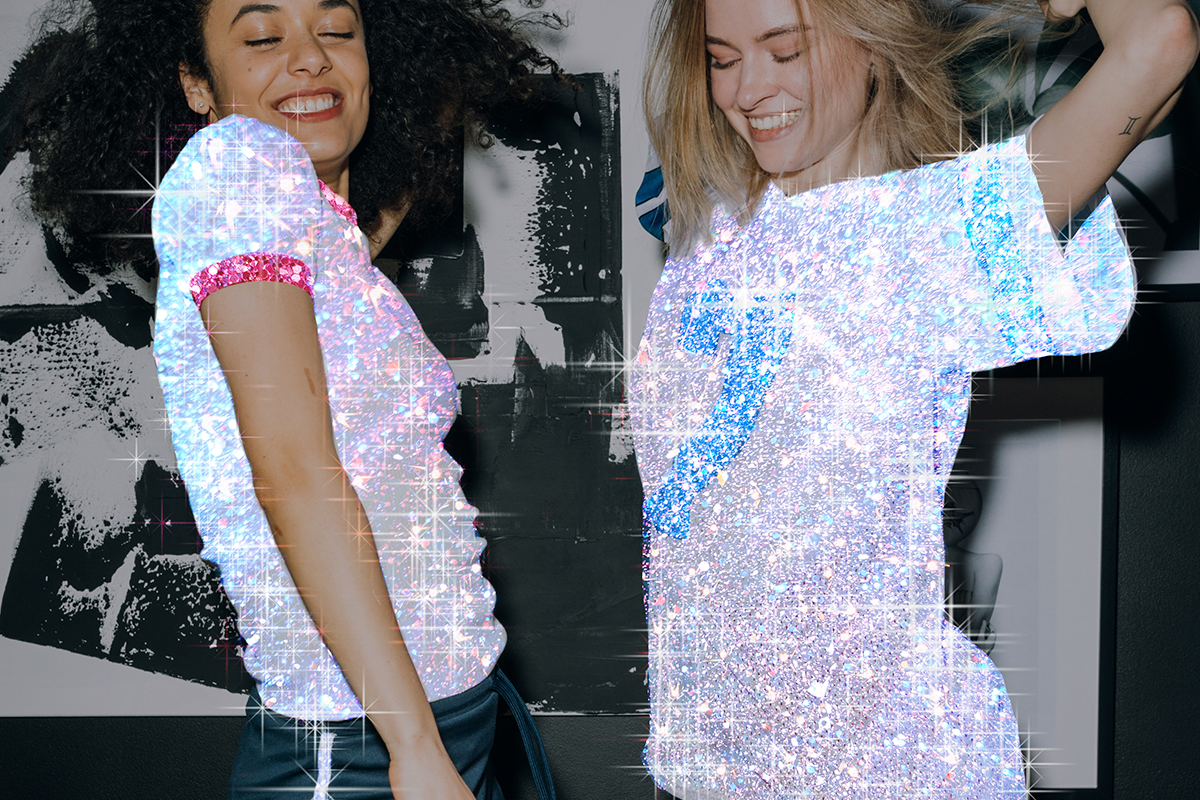
How to Create a Glitter Sparkle Effect in Photoshop
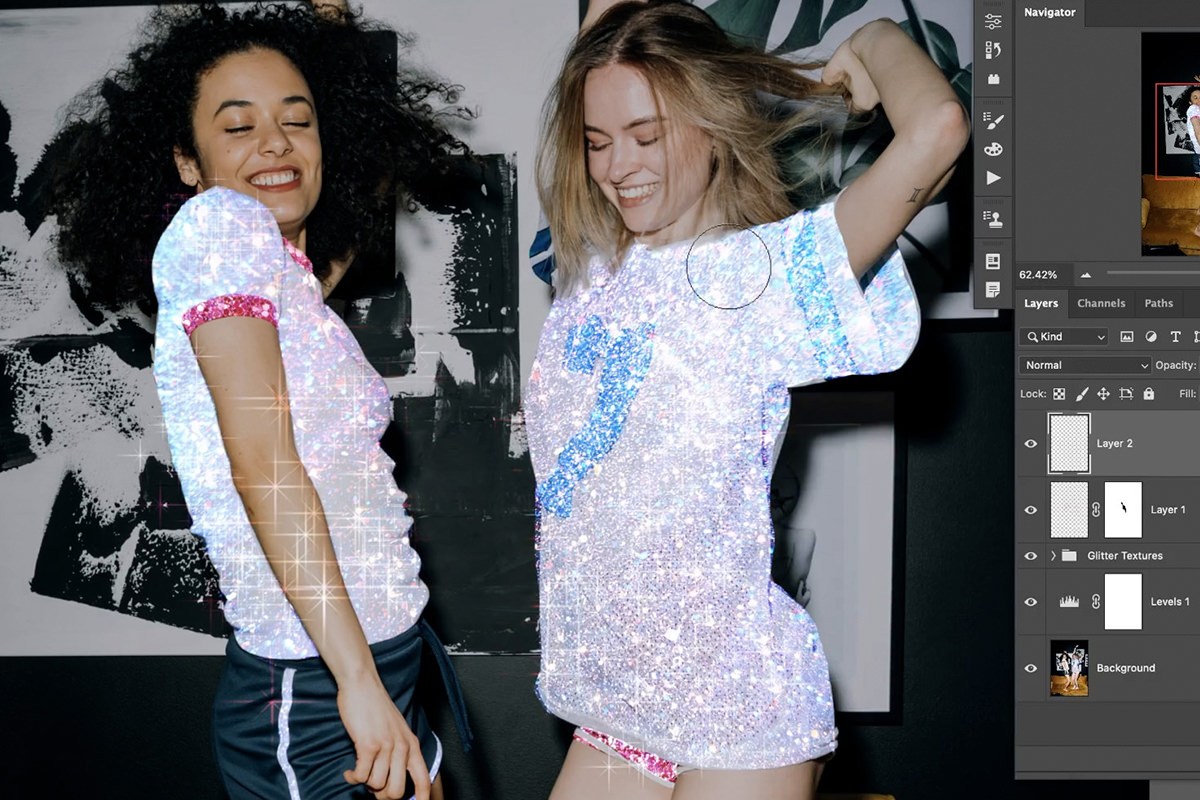
That glowing glitter-and-sparkle look that shows up everywhere in fashion and portrait photography isn’t hand-painted pixel by pixel — it’s built by layering a handful of glitter texture images over your photo with a blend mode, masking each one to the areas you want it to hit, and then finishing with a custom sparkle brush for the fine detail. None of the individual steps are complicated; the effect comes from how many layers you’re willing to stack.
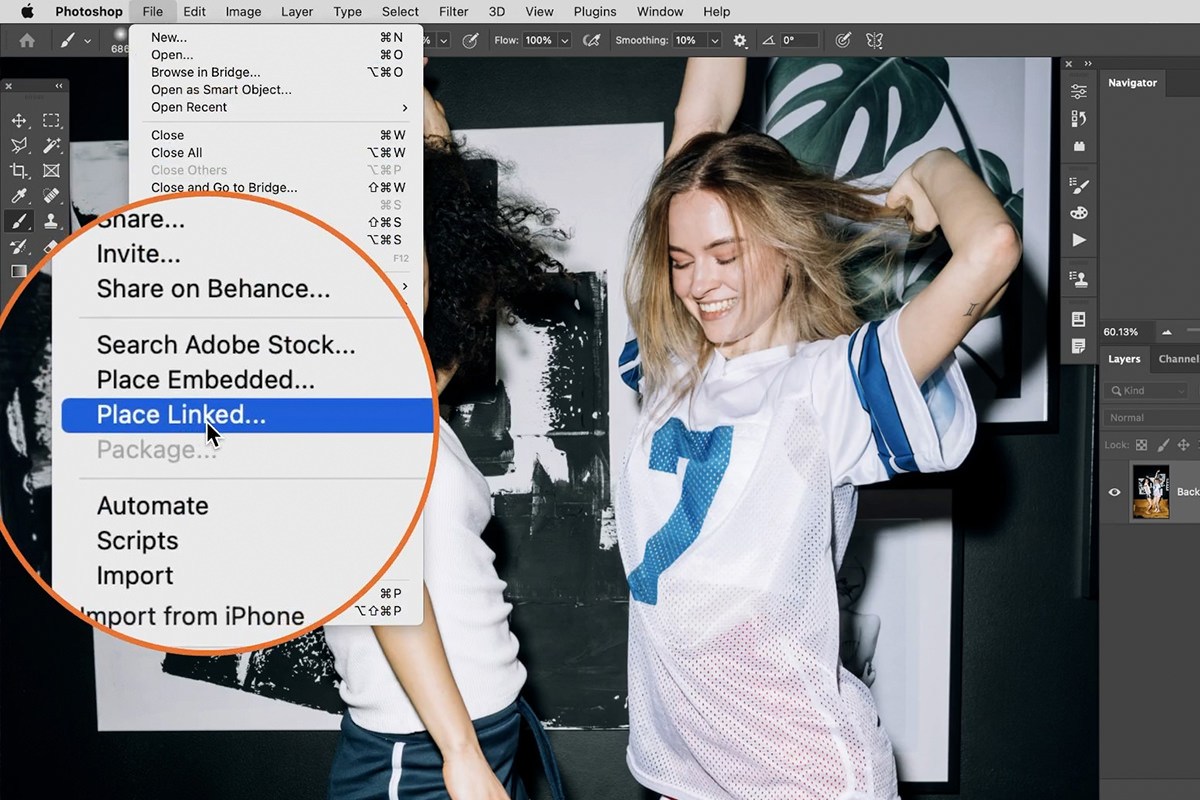
Placing Your Glitter Texture Images
The glitter itself comes from separate texture images that get placed into your document as their own layers, on top of your main photo.
-
Place Your Glitter Textures as Smart Objects
Go to File > Place Linked and choose a glitter texture image. Repeat this for each texture you want to use — four different textures is a good range to work with, each landing as its own Smart Object layer on top of your subject.
-
Change the Blending Mode to Screen
Shift-click to select all of your texture layers at once, then change their blending mode from Normal to Screen. Screen mode drops out the dark background of each texture image and leaves only the bright glitter visible.

Masking the First Texture to Your Subject
With Screen mode applied, each texture is covering your whole image — the next job is limiting each one to just the areas where you want the sparkle to show.
-
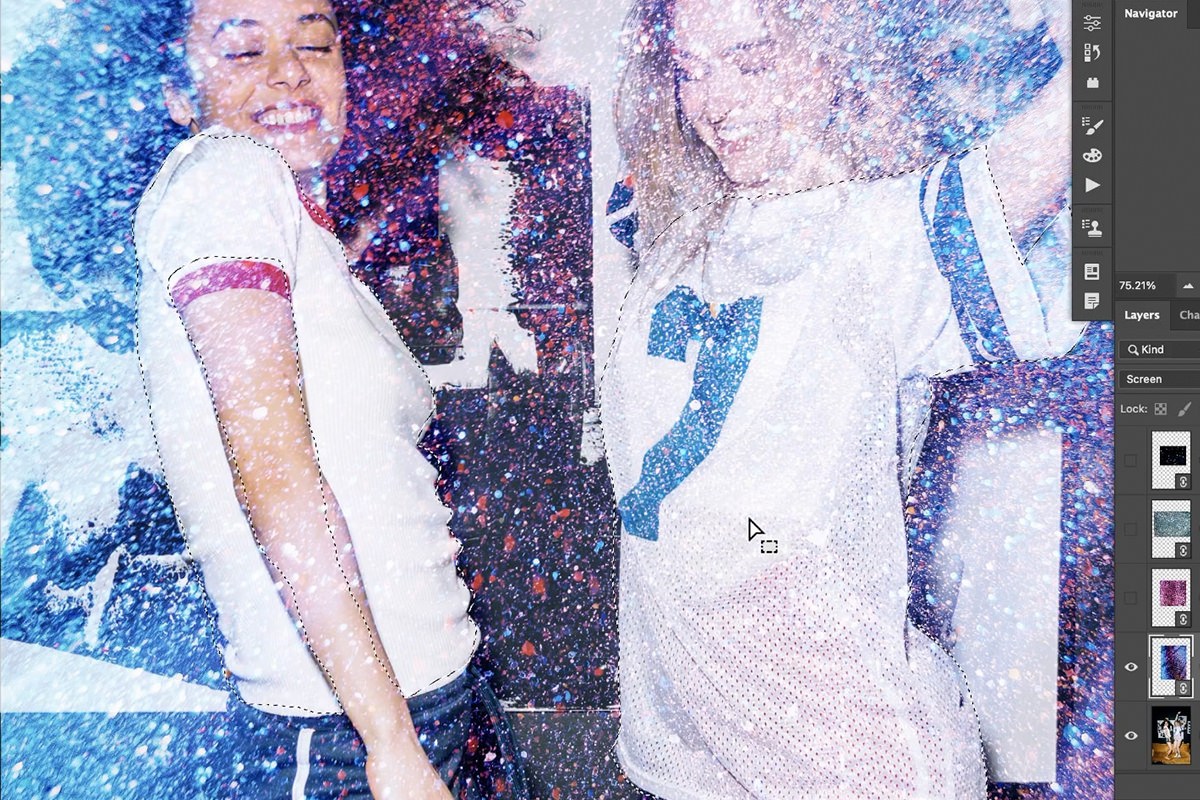
Rough-Select Your Subject with the Lasso Tool
Press L for the Lasso tool and draw a loose selection around the areas of your subject where you want the first texture visible — hold Shift to add additional areas to the selection. This doesn’t need to be precise; it’s just the starting point for a layer mask.
-
Turn the Selection into a Layer Mask
With the selection active, click the layer mask icon at the bottom of the Layers panel. Photoshop loads your selection directly into a mask, making the texture visible only inside it.
-
Refine the Mask with the Brush Tool
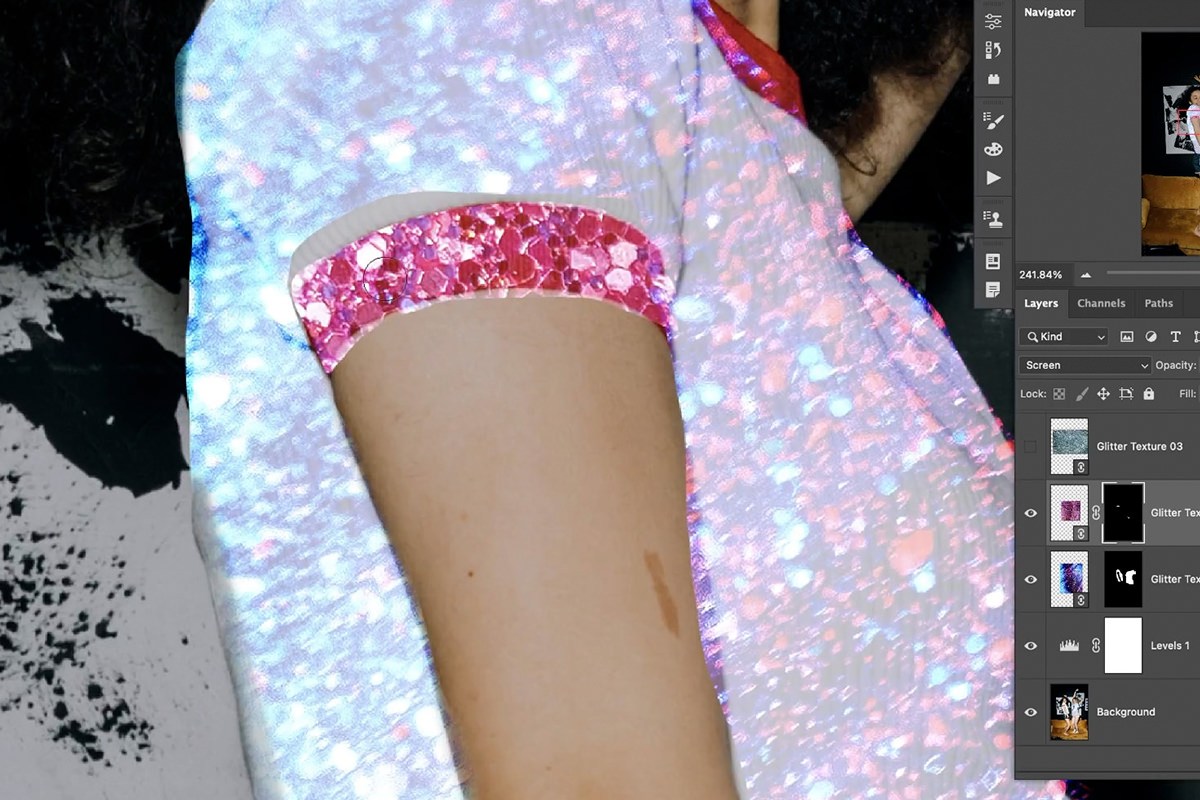
Press B for the Brush tool and paint black on the mask to hide the texture anywhere it spilled over, or white to reveal more of it. Because the mask is fully editable, the rough selection from the previous step doesn’t need to have been perfect.
Why the Selection Doesn’t Need to Be Precise
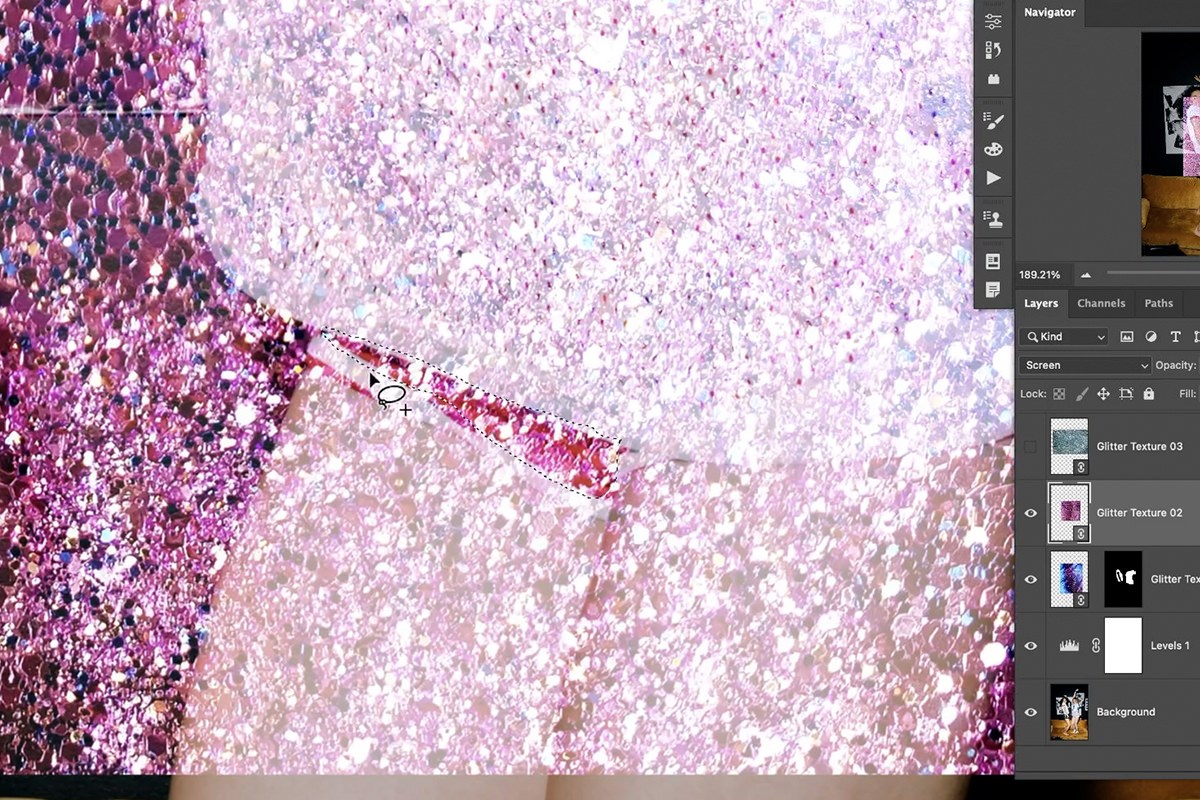
A layer mask can be repainted at any time, so a rough Lasso selection is really just a fast way to get most of the way there. Cleaning up stray edges — around hair, or where the sparkle bleeds onto skin you don’t want it on — is a normal part of the process, done afterward with a plain brush directly on the mask.
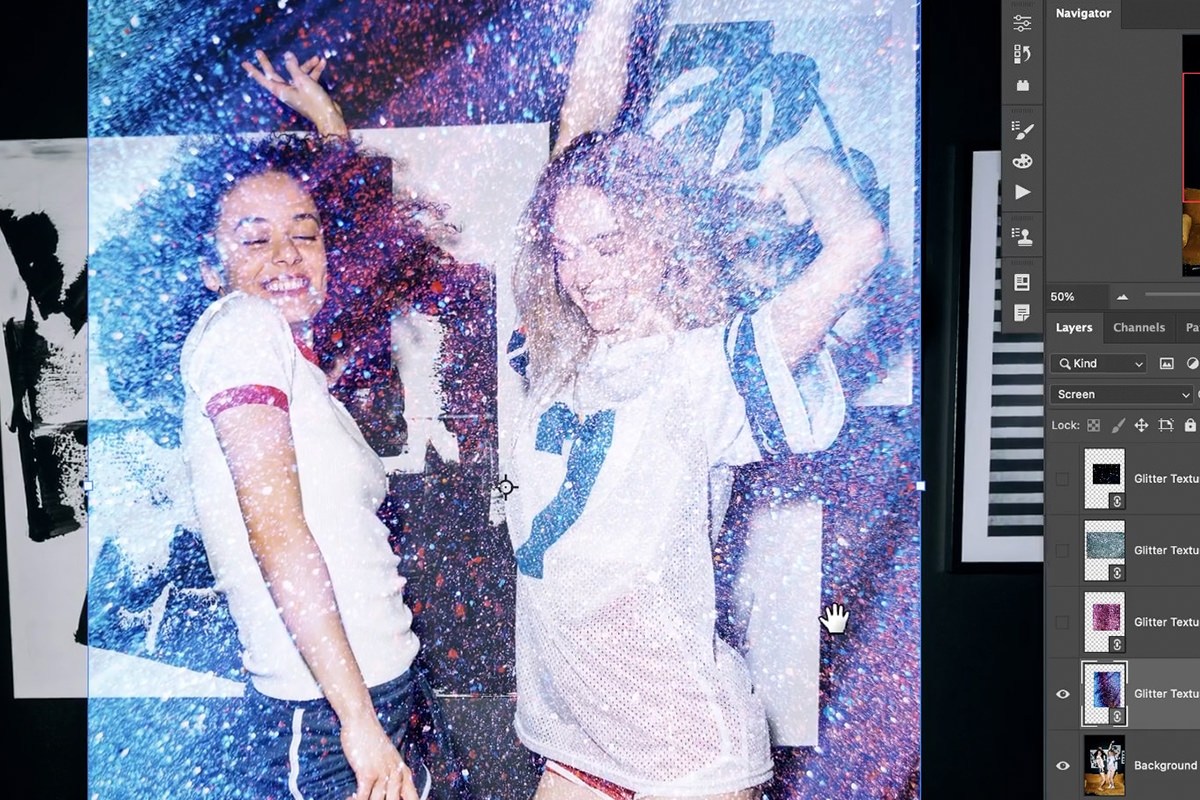
Darkening the Background for Contrast
The sparkle effect reads more strongly against a slightly darker backdrop, so before adding more textures it helps to dim the base image a touch.
-
Add a Levels Adjustment Layer to the Background
Select your background layer, then add a Levels adjustment layer and pull the highlights down slightly. This darkens the overall image just enough to make the glitter layers pop by comparison.
-
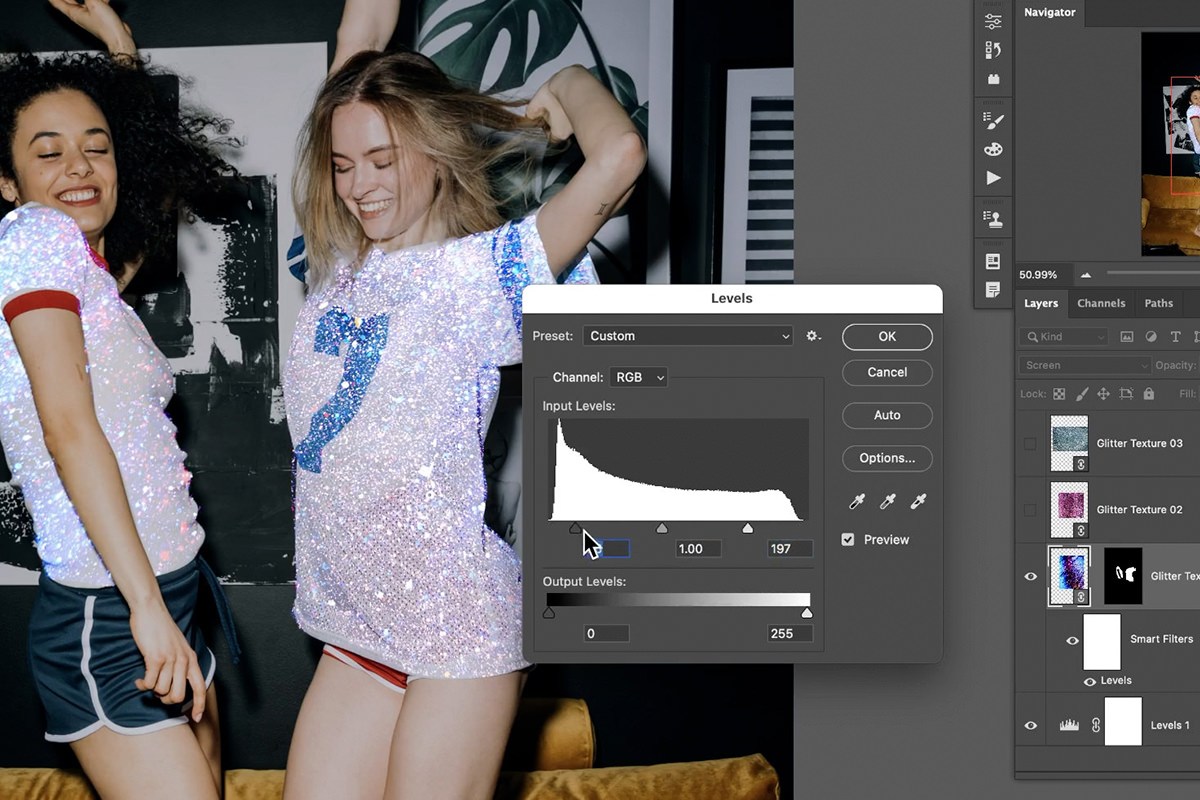
Boost Contrast on the Glitter Layer Itself
For an even more contrasty sparkle, press Ctrl/Cmd + L with a glitter layer selected to add a Levels Smart Filter directly to that texture, and raise both the shadows and highlights to punch up its contrast.
Unlinking a Layer from Its Mask
Sometimes you’ll want to move a glitter texture around without disturbing the mask that’s already shaping where it shows.
-
Unlink the Layer and Mask
Click the small chain-link icon between a layer’s thumbnail and its mask thumbnail to unlink them. With them unlinked, pressing Ctrl/Cmd + T lets you move or resize the texture layer freely while the mask stays exactly where it is, so the sparkle is still only visible in the same masked area.

Recoloring Glitter Textures with Hue/Saturation
None of the glitter textures are locked to their original color — a Hue/Saturation adjustment can push any of them toward whatever color best matches your image.
-
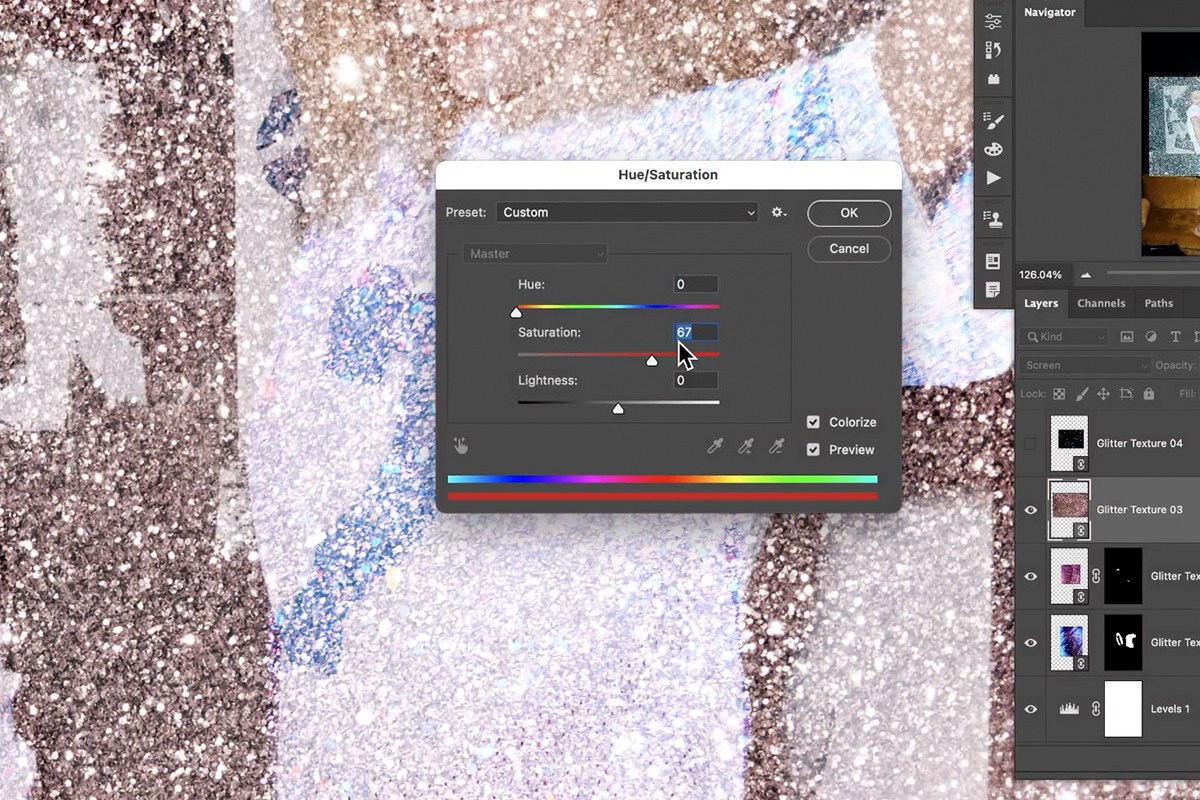
Colorize a Texture Layer
Press Ctrl/Cmd + U on a glitter texture layer to open Hue/Saturation, then check the Colorize box and drag the Hue slider to pick a new color. This works regardless of what color the original texture image was shot in.
-
Mask the Recolored Texture to a New Area
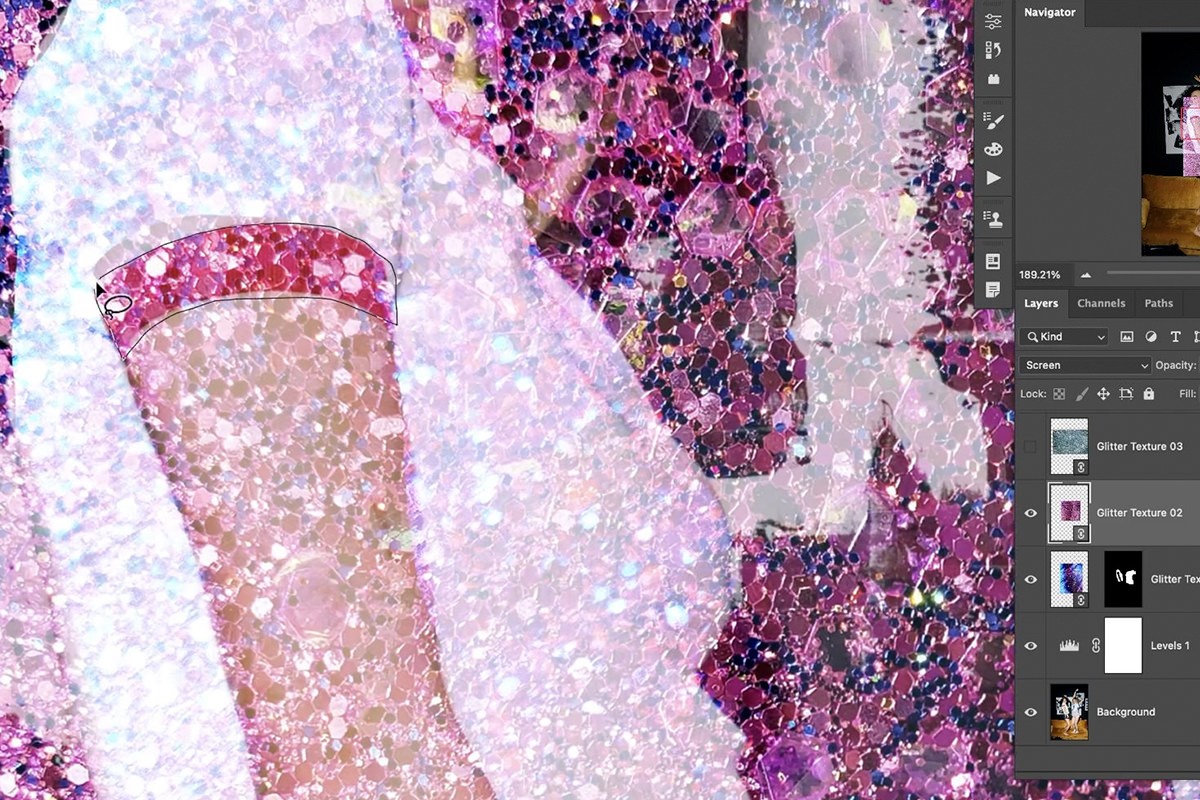
Use the Lasso tool again to select a different area of your subject, then click the layer mask icon to make this newly colored texture visible only there.
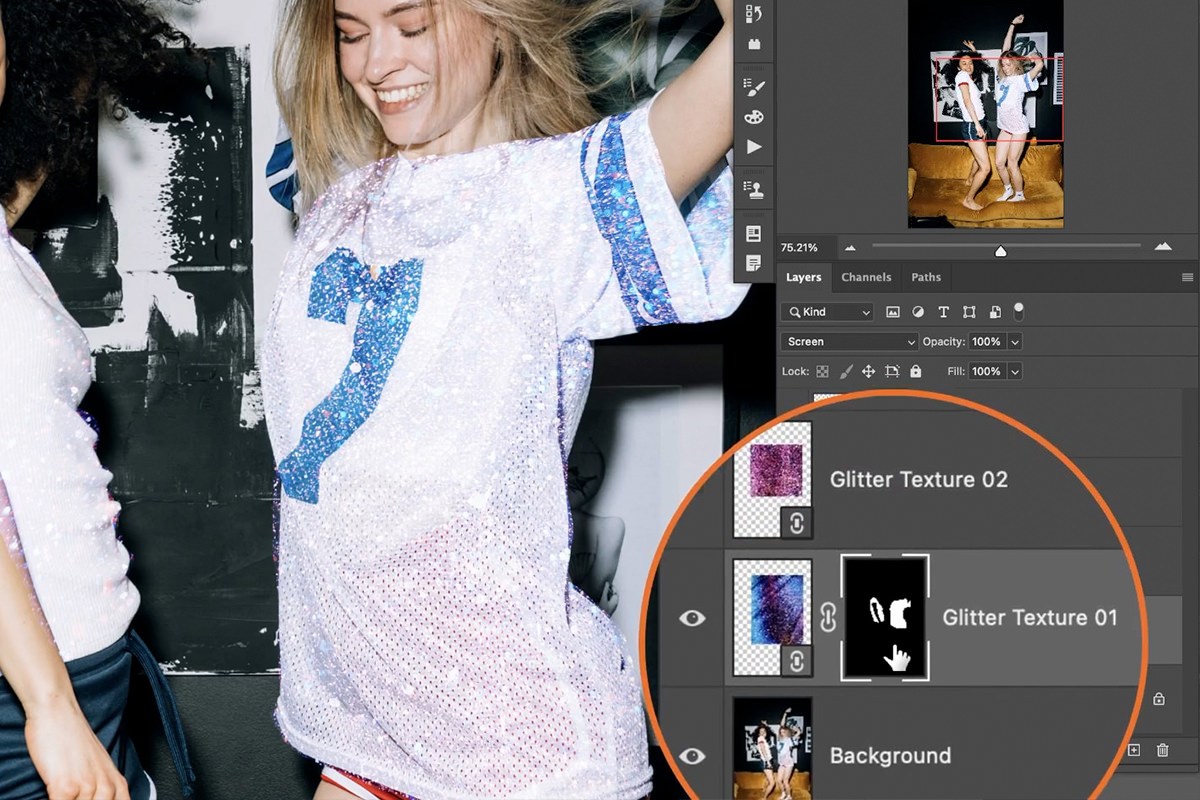
Duplicating a Texture for a New Color and Area
Rather than placing another fresh texture image every time you want a new color of glitter somewhere else in the photo, you can duplicate a texture you’ve already added and simply recolor the copy.
-
Duplicate the Texture Layer
Press Ctrl/Cmd + J on an existing texture layer to duplicate it, then double-click its Hue/Saturation Smart Filter to change the hue on the copy independently of the original.
-
Fill the New Mask and Paint In the Area
Disable the duplicated layer’s copied mask, fill a fresh mask with white, then use the Lasso tool to select the new area (socks, an accessory, anything else) and invert the mask so the color is visible only there.
-
Adjust Lightness for Subtlety
Reopen Hue/Saturation on the duplicated layer and pull the Lightness down slightly if the new color reads as too strong next to the rest of the effect.
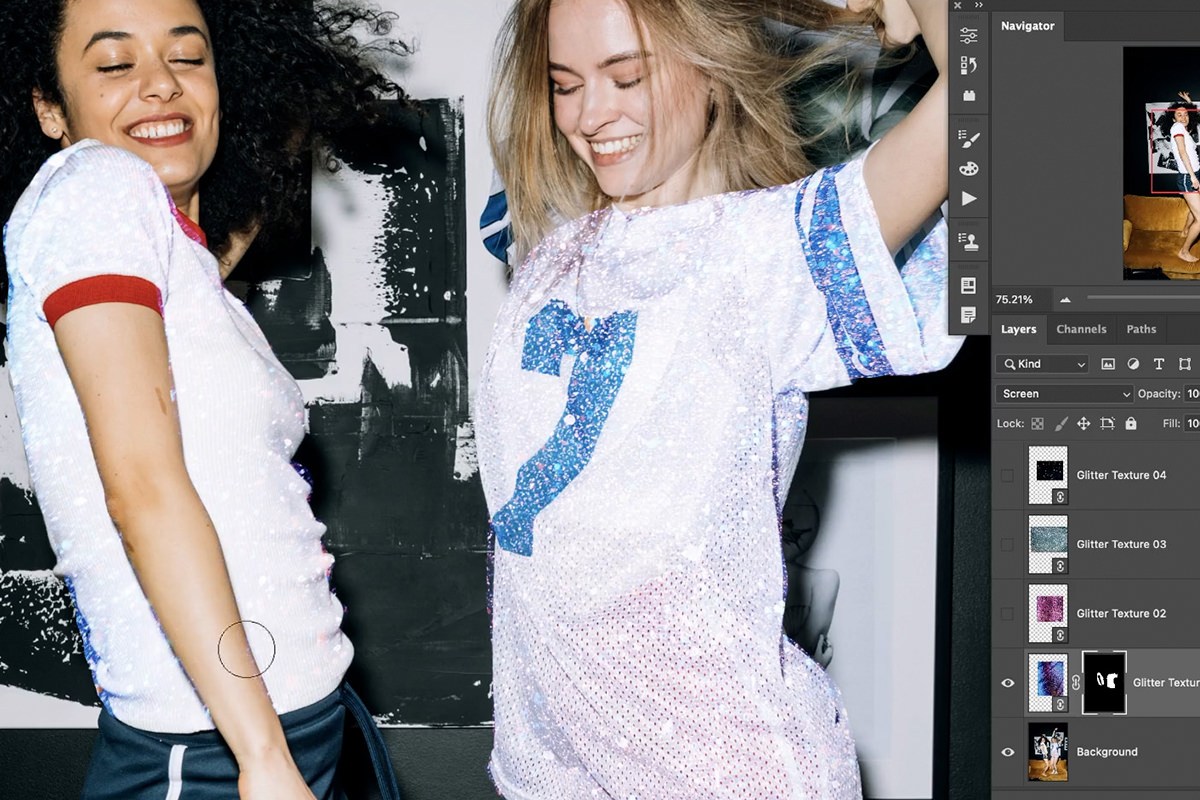

Reusing an Existing Mask on a New Texture
If you already have a mask shaped the way you want — matching the outline of a shirt, for instance — there’s no need to redraw that selection for every new texture you want to place in the same spot.
-
Drag an Existing Mask onto a New Layer
Hold Alt/Option and drag a layer mask thumbnail from one texture layer up onto a different texture layer. The new layer instantly picks up the same mask shape, so it’s visible in exactly the same area as the original.

Painting Extra Sparkles with a Custom Brush
Once the texture layers are in place, a custom Photoshop sparkle brush adds finer, more targeted glitter detail that the texture images alone can’t reach.
-
Group Your Texture Layers
Select all your glitter texture layers and group them together, naming the group something like “Glitter Textures” to keep the layer stack organized.
-
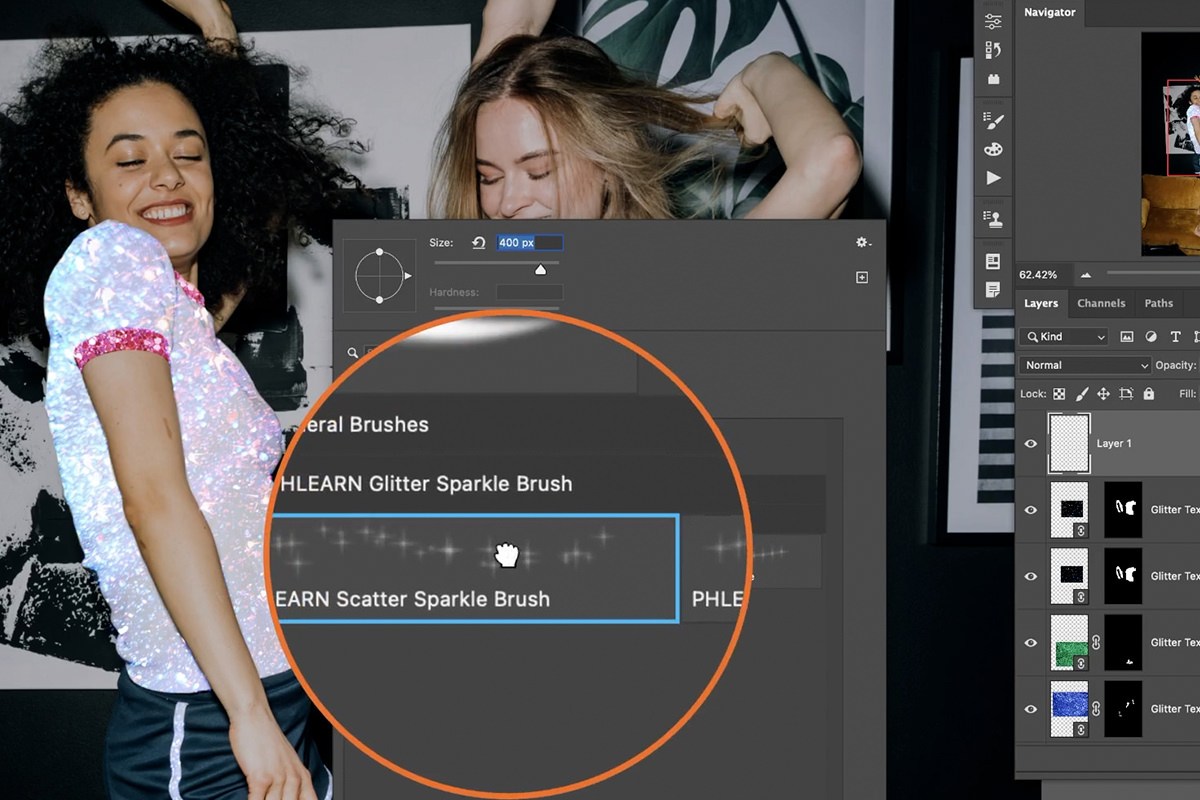
Load the Sparkle Brush and Paint on a New Layer
Press B for the Brush tool, right-click to open the brush picker, and select the scatter-style sparkle brush. On a new layer set above your texture group, paint with white anywhere you want extra sparkle to appear — the brush scatters multiple small sparkle marks with each stroke.
-
Paint with Color for a Tinted Sparkle
Hold Alt/Option and click on any color in your image to sample it as your brush color, then set that layer to a blending mode like Color Dodge for a bright, tinted sparkle that matches a specific hue in your photo.
-
Mask Out Unwanted Sparkle
If sparkle shows up somewhere you don’t want it, click the layer mask icon, choose a regular brush, and paint black over that area to hide it.
-
Use the Single-Sparkle Brush for Precise Placement
Switch to the second brush in the same set, built to place one sparkle per click rather than a scattered cluster. This is the one to reach for when you want a sparkle in an exact spot, such as catching the light on a subject’s teeth.


Scatter Brush Versus Single-Click Brush
The two brushes serve different purposes: the scatter brush is built for covering broader areas quickly with a naturally randomized cluster of sparkles, while the single-click brush places one deliberate sparkle exactly where you click, with no randomization. Reaching for the wrong one is the difference between a scattered field of glitter and one clean, isolated highlight.

If You Don’t Have Your Own Subject Photo
This effect works on any portrait or fashion-style photo with clear areas of clothing or skin to mask into. If you don’t have a suitable image of your own on hand, free stock photo sites like Pexels and Unsplash are good places to find a portrait to practice the technique on before applying it to your own work.

Common Mistakes to Avoid
The most common issue is skipping the background-darkening step — without it, the glitter layers have to fight much harder for visibility against a brighter backdrop. It’s also easy to forget that a layer and its mask can be unlinked before repositioning, which leads to accidentally dragging a texture’s visible area along with the layer instead of keeping the mask fixed. And because Screen mode already removes dark backgrounds from each texture, there’s rarely a need to manually erase anything from a texture layer — masking, not erasing, is how visibility should be controlled throughout this whole effect.




Why This Effect Works
Screen blending mode is doing most of the heavy lifting here: because it mathematically brightens rather than replaces pixels, only the light glitter specks in each texture image ever show up, while the dark background of that same texture image drops away automatically — no manual erasing or selecting-and-deleting required. Layer masks then take over the job of deciding where each texture is allowed to appear, which is what makes it possible to stack four, five, or more textures and brush layers without any of them stepping on each other. Building the effect this way, with each texture and brush pass as its own masked layer, keeps everything editable after the fact — if you want a glitter texture image or two of your own instead of the ones used here, or if you decide the sparkle should sit somewhere else, you’re adjusting a mask rather than starting over. That same layered, mask-driven approach is what makes an effect like a bloom lighting effect or a stylized light effect hold up under revision instead of needing to be rebuilt from the ground up.
Final Thoughts
What makes this glitter effect so flexible is that every piece of it is independent and reusable: the number of textures, their colors, where they’re masked, and how much extra detail comes from the sparkle brush are all separate decisions you can revisit at any point. Start with just one or two textures and a rough mask to get the placement right, then build up color variation and brush detail once the base effect is reading the way you want. If you want to keep pushing the same layered, mask-based way of thinking into other styled effects, pairing this with something like a 3D text effect is a natural next step for building out a more complete stylized composite.
Quick Reference: Keys, Menus and Settings
- Place the texturesFile > Place Linked for each one, then Shift-click them all and set the blending mode to Screen
- Mask a textureL for the Lasso, Shift to add, then the layer mask icon; B to paint black or white on the mask
- Add contrastLevels adjustment layer on the photo, lights darker; Cmd/Ctrl + L on a glitter layer
- Move inside the maskClick the chain link to unlink, then Cmd/Ctrl + T
- Recolor or copyCmd/Ctrl + U, check Colorize, drag Hue; Cmd/Ctrl + J to duplicate
- Reuse a maskAlt/Option-drag the mask onto another texture layer
- Paint sparklesB, right-click for the brush picker, Alt/Option-click to sample a color, layer on Color Dodge
No AI, no generative credits.

Free Downloads
Follow Along on the Same Photo
Get the sample photo, the four glitter textures, the PHLEARN sparkle brush and the 4-page PDF guide, each type in its own download. Free with a PHLEARN account.
Glitter Effect: Common Questions
Why set the glitter textures to Screen?
Screen drops out the dark background of each texture and keeps only the bright glitter. There is nothing to erase or cut out.
Does my Lasso selection need to be precise?
No. It is only a fast start for the layer mask. Press B and paint black on the mask to hide glitter where it spills, like over an arm or around the hair, and white to show more.
Why doesn’t my glitter stand out?
Darken the photo underneath: click the Background layer, add a Levels adjustment layer and make the lights a little darker. For more contrast in the glitter itself, press Cmd/Ctrl + L on the glitter layer and bring up the darks and the lights a little.
How do I move a texture without moving where it shows?
Click the chain link between the layer and its mask to unlink them, then press Cmd/Ctrl + T to move or resize the texture. The mask stays put, so the glitter still only shows inside it.
Can I change the color of the glitter?
Yes. Press Cmd/Ctrl + U for Hue/Saturation, check Colorize and change the Hue. It does not matter what color a texture starts as; any of them can become any color.
How do I add a different color somewhere else?
Duplicate a texture with Cmd/Ctrl + J, double-click its Hue/Saturation Smart Filter and change the hue. Give the copy a fresh mask for the new area, like the socks, and lower Lightness a little if it looks too strong.
Can I reuse a mask I already made?
Yes. Hold Alt/Option and drag the mask from one texture layer onto another. The new texture shows in exactly the same area, such as the shirts.
How do I load the sparkle brush?
Double-click PHLEARN Glitter Sparkle Brush.abr in the download and it loads into Photoshop automatically. Then press B, right-click and pick a brush from the PHLEARN Glitter Sparkle Brush folder.
What is the difference between the two sparkle brushes?
The scatter brush paints a cluster of sparkles wherever you paint. The single sparkle brush places one sparkle per click, for exact spots like a subject’s teeth. Alt/Option-click a color in the photo and set the layer to Color Dodge for tinted sparkles.
Are the sample files free?
Yes, with a free PHLEARN account. You get 1 sample image, 4 glitter textures, 1 Photoshop brush and 1 PDF guide, each type in its own download. The brush file holds both the scatter and the single sparkle brush.
From the Magazine View all
Stories, interviews and guides for photographers, new every week.
 EditingLightCraft vs Lightroom: I Edited the Same RAW Files in BothThe free clone on the same RAW files: what matches, what breaks and who should switch.
 InspirationRare Historical Photos: 13 of the Rarest Pictures Ever TakenFrom the earliest surviving picture of a person to the last passenger pigeon: who took each one and why it survives.
 EditingArtCraft: Photoshop Cloned by AI in Two Weeks. Is It Legal?ArtCraft cloned Photoshop and Lightroom with AI and gave them away. Any good? Legal? Safe?
Master Photoshop, Lightroom and Photography
Join PHLEARN PRO for $12.99 a month, or $99.99 a year (save 36%). Cancel anytime, with a 100% money-back guarantee.





