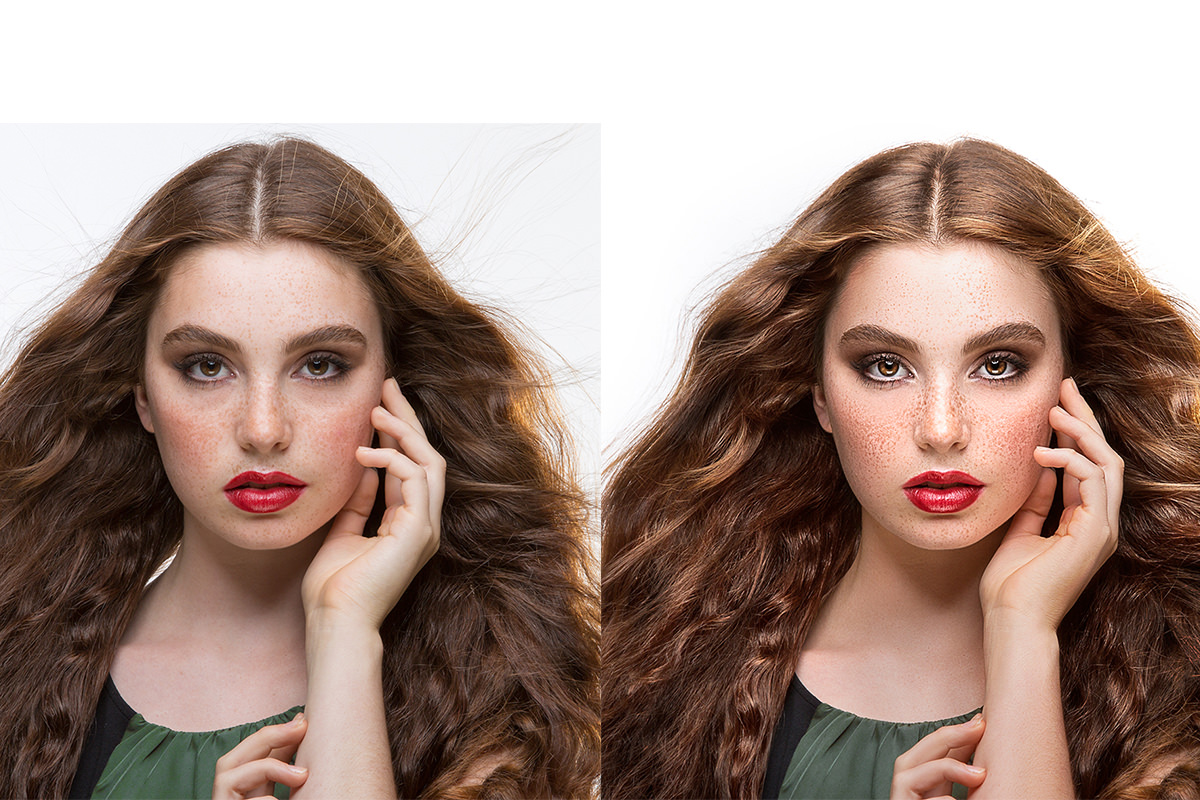

description
A looping before and after sells retouching work in a way a single still cannot. This tutorial stamps an “after” snapshot with Apply Image, moves both states into a square document aligned together, builds a two-frame timeline animation set to loop forever, and exports it twice — a GIF for the web and an H.264 video for Instagram.
Enjoying This Free Tutorial?
We publish a new free tutorial every week, each one with sample images and PSDs you can download and follow along with. Sign up and they land straight in your inbox, along with early word on sales, events and subscriber-only offers.
Showing off retouching work often means more than a single finished photo, and a looping before and after is one of the most effective ways to display it. This tutorial builds a before and after from a finished PSD, animates it in Photoshop’s timeline, exports it as both a GIF and a video, and walks through the extra steps needed to get that video onto Instagram.
Creating an “After” Snapshot With Apply Image
Apply Image flattens every visible layer onto a single new layer without merging the original file, which is exactly what’s needed to create a clean “after” snapshot on top of the untouched “before.”
-
Start With a Finished, Layered Retouch
Open a finished PSD with all of its retouching layers intact, such as frequency separation, color work, dodging and burning, and sharpening.
-
Create a New Layer on Top of Everything
Add a new, empty layer above every existing layer in the document.
-
Use Apply Image to Flatten a Copy Onto It
Go to Image > Apply Image, set Layer to Merged, Channel to RGB, Blending to Multiply, and Opacity to 100, then click OK to stamp a flattened copy of everything onto the new layer.
Moving the Before and After Layers Into a New Document
Dragging just the original background layer and the new flattened layer into a fresh square document keeps the before and after isolated from the rest of the retouching layers.
-
Create a New Square Document
Press Cmd/Ctrl+N and create a new 1,000 by 1,000 pixel document, a square format that fits Instagram.
-
Select the Background and Flattened Layers
Cmd/Ctrl-click to select both the original background layer and the new flattened “after” layer in the source document.
-
Drag Both Layers Into the New Document
Click and drag both selected layers from the original document over into the new square document.
Aligning the Before and After Layers Together
Moving and scaling the before and after layers together, rather than one at a time, keeps them perfectly aligned so the animation doesn’t shift position when it switches between them.
-
Select Both Layers Before Adjusting
Hold Shift and click to select both layers together before making any position or size changes.
-
Move or Scale Both Layers Simultaneously
Press Cmd/Ctrl+T to transform both selected layers at once, resizing or repositioning them identically.
Why Both Layers Must Move Together
Moving or resizing only one of the two layers would cause the image to visibly shift or change size the moment the animation switches between before and after, breaking the illusion of a clean comparison. Keeping both layers selected and transformed together guarantees they stay perfectly registered to each other throughout the animation.
Creating a Frame Animation From the Layers
Photoshop’s Timeline panel can build an animation directly from existing layers, turning the before and after layers into individual frames automatically.
-
Open the Timeline Panel
Go to Window > Timeline to open the Timeline panel at the bottom of the screen.
-
Choose Create Frame Animation
Click the dropdown in the Timeline panel and choose Create Frame Animation.
-
Select Both Layers, Then Make Frames From Layers
With both the before and after layers selected, open the Timeline panel’s menu and choose Make Frames From Layers to turn each layer into its own animation frame.
-
Delete Any Extra Background Frame
Delete any leftover extra frame created from a background layer that isn’t needed, leaving just the two before and after frames.
Setting Frame Duration and Looping Forever
Each frame’s duration and the animation’s overall looping setting control how the before and after switch back and forth once exported.
-
Select Both Frames
Shift-click to select both frames in the Timeline panel together.
-
Set Each Frame’s Duration to 2 Seconds
Click the duration dropdown beneath the frames and choose 2 seconds so each frame displays for that long.
-
Change Looping From Once to Forever
Click the looping dropdown, currently set to Once, and change it to Forever so the animation repeats indefinitely.
Exporting the Animation as a GIF
Save for Web exports the finished timeline animation as a looping GIF file suitable for a website or blog.
-
Open Save for Web
Go to File > Save for Web, or File > Export > Save for Web in newer versions of Photoshop.
-
Choose GIF as the Format
Set the file format option to GIF to preserve the animation.
-
Confirm Looping Is Set to Forever
Check that the looping option at the bottom of the dialog is set to Forever, then preview the animation with the play button.
-
Save the GIF File
Click Save and choose a location, such as the desktop, to export the finished animated GIF.
Why the GIF and Video Come From the Same Timeline
Building a second animation from scratch for the video export would mean redoing the frame timing and looping settings all over again. Because both the GIF and the video are rendered from the exact same underlying frame animation, all of that setup only has to happen once, no matter how many export formats end up being needed.
Exporting a Video Instead, Since Instagram Doesn’t Accept GIFs
Instagram doesn’t support animated GIFs, so the same frame animation gets rendered out as a video file instead, using the frames and timing already set up.
-
Go to Render Video
Go to File > Export > Render Video to open Photoshop’s video export options.
-
Name the File and Keep Default Settings
Give the file a name, keep the default H.264 format and the document’s 1,000 by 1,000 pixel size, and click Render.
Getting the Video Onto a Mobile Device to Post
Instagram doesn’t accept video uploads from a desktop computer, so the rendered video has to be transferred to a phone or tablet before it can be posted.
-
Email the Video File to Yourself
Compose an email, attach the rendered video file from the desktop, and send it to an email address that can be checked on a mobile device.
-
Open the Email and Save the Video
Check the email on a phone or tablet, then tap and hold the video attachment and choose to save it to the device.
Why Emailing the File Is the Simplest Transfer Method
Instagram’s mobile app only allows posting content that already lives on the device itself, so a video created on a desktop computer has no direct path onto a phone without some kind of transfer step. Emailing the file to an address that’s checked on the phone is a simple, universal way to get it there, since downloading an email attachment works the same way on virtually any device.
Posting the Saved Video to Instagram
With the video saved to the device’s own library, Instagram can load it directly from there like any other photo or video.
-
Open Instagram and Start a New Post
Open the Instagram app and tap the button to create a new post.
-
Select the Saved Video From the Library
Choose the video that was just downloaded from email out of the device’s photo and video library.
-
Add a Filter, Caption, and Post
Apply an optional filter, write a caption, and tap Post to publish the before and after video.
More Free Photoshop Tutorials
To build on the retouching and animation techniques used here, check out these free tutorials:
- How to Select Subjects and Refine Edges in Photoshop
- Three Ways to Use Blend If in Photoshop
- Curves vs Levels in Photoshop: What the Difference Actually Is
Why This Approach Works
Using Apply Image to flatten a snapshot instead of duplicating and merging the whole file keeps the original layered PSD intact while still capturing a complete “after” state. Building the animation from just two isolated layers in a fresh document, moved and scaled together, is what keeps the before and after perfectly aligned once they start switching back and forth. Exporting both a GIF and a video from the same timeline, rather than building two separate animations, covers both a website and Instagram from a single piece of setup work, since Instagram’s own limitations are the only reason a second export format is needed at all. If a before and after animated GIF is the whole goal, check out the linked Animated Gif tutorial for that process on its own.
Final Thoughts
A looping before and after does more to show off retouching work than a single static image ever could, and once the timeline and export settings are set up, the same workflow can be reused on any finished edit going forward. The extra step of emailing the file to a phone is the one slightly clunky part of the process, but it’s a small price for getting a polished before and after in front of an Instagram audience.
Related Tutorials






Enjoying This Free Tutorial? Go Further with PRO.
200+ PRO courses. 1,000+ practice files. One membership.

Unlimited access to every PRO course
New PRO courses every month
Layered PSDs and RAW files to follow along
100+ Lightroom Presets, LUTs, Actions and Brushes
Stream in up to 4K, with captions and chapters
Watch on any device: desktop, tablet or phone
4.93 average from 3,900+ reviews · 2M+ students