


Download Assets
This tutorial includes 2 sample images, 1 sample PSD, 1 Photoshop brush and 1 PDF guide. Downloads are free with a PHLEARN account.
- Download the sample images and PSDs from every free tutorial on PHLEARN
- New free tutorials published every week
- One free account — sign up once, then download anything
Free PDF Guide · 4 Pages
This Tutorial as a Step-by-Step PDF
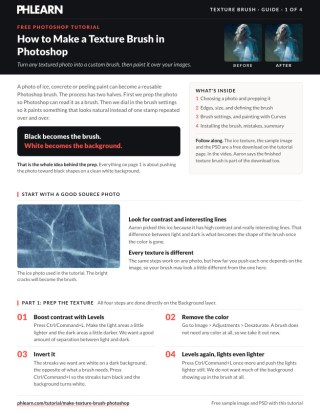
The 4-page guide walks through prepping the ice photo with Levels, Image > Adjustments > Desaturate and Invert, painting the edges white, resizing to 1500 pixels, Edit > Define Brush Preset, Shape Dynamics and Scattering, saving a new preset and painting the texture through two Curves layers. Keep it next to your keyboard.
description
Learn how to make a texture brush in Photoshop from any photographed surface, like ice, concrete, or peeling paint, and use it to add subtle grit and depth to your own photos. This tutorial covers prepping the source image with Levels, Desaturate, and Invert, feathering the edges before you define the brush preset, dialing in Shape Dynamics and Scattering, saving the .abr file, and painting the texture through Curves adjustment layer masks.
Looking for more Photoshop brush inspiration? Check out our collection of custom Photoshop brushes and effects!
Enjoying This Free Tutorial?
We publish a new free tutorial every week, each one with sample images and PSDs you can download and follow along with. Sign up and they land straight in your inbox, along with early word on sales, events and subscriber-only offers.
Image Source
Photo by Masha Raymers via Pexels
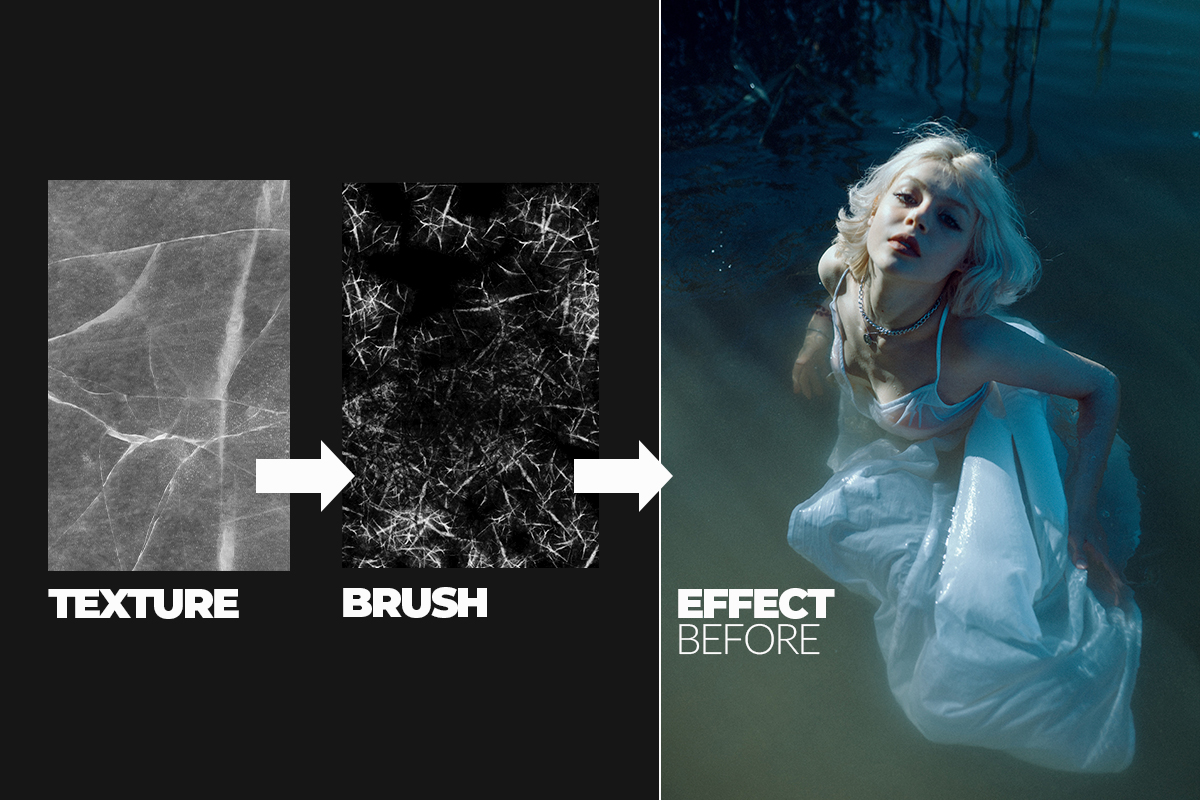
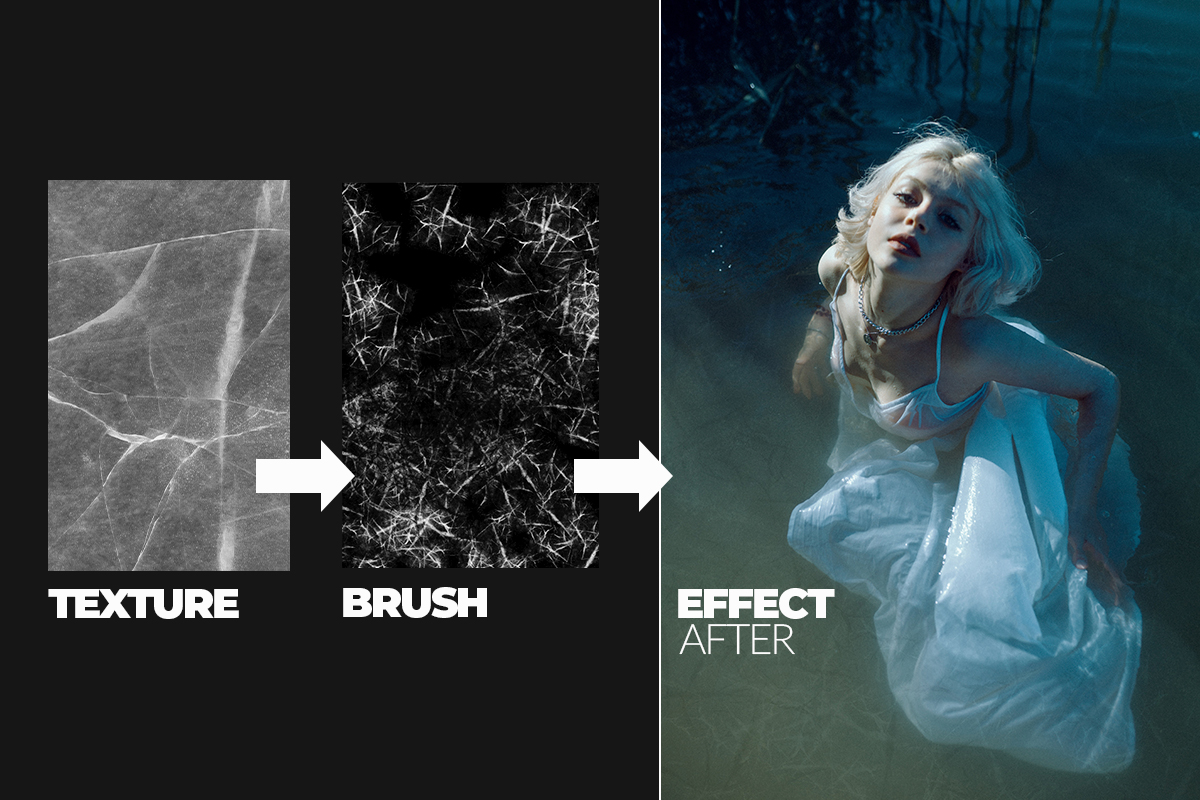
How to Make a Texture Brush in Photoshop
A textured photo — ice, concrete, peeling paint, anything with real contrast between light and dark — can be turned into a reusable Photoshop brush, then used to add a subtle layer of grit and depth to almost any other photo. The process has two halves: prepping a source image so Photoshop can read it as a brush, and then dialing in the brush settings so it paints something that actually looks natural rather than a single stamped texture.
Getting Started with a Good Source Photo
Not every textured photo makes a good brush. Look for one with real contrast between its lightest and darkest areas — something like ice, cracked paint, or rough concrete — because that contrast is what becomes the brush’s shape once the color is stripped out.

Prepping the Image for a Brush
A Photoshop brush is read as pure black shapes on a white background, so the source photo needs to be pushed toward that before it can be defined as one.
-
Boost the Contrast with Levels
Press Ctrl + L on PC (Cmd + L on Mac) to open Levels on your background layer, and push the lights lighter and the darks darker. You want a strong separation between light and dark areas — that separation is what defines the brush’s texture.
-
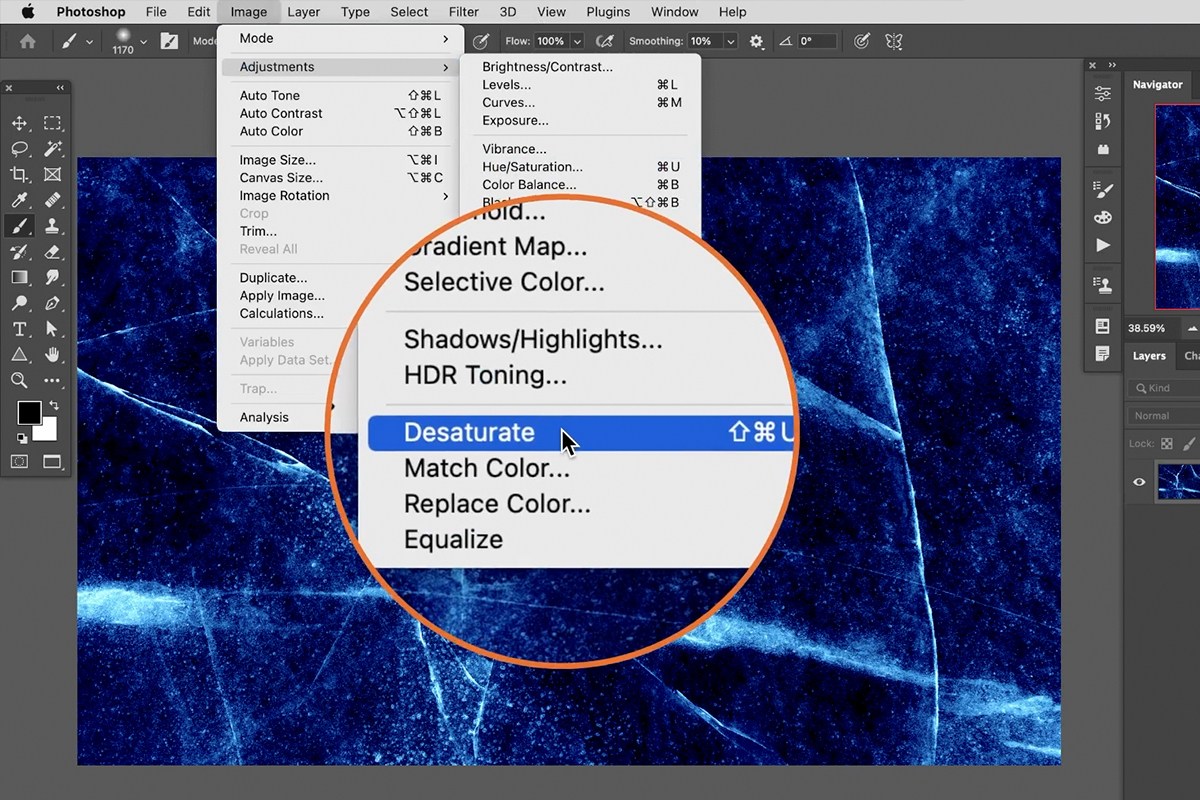
Desaturate the Image
Go to Image > Adjustments > Desaturate. Color plays no role in a Photoshop brush, so removing it now avoids any confusion later.
-
Invert the Image
Press Ctrl + I on PC (Cmd + I on Mac) to invert the image. A brush needs to be black on white, so if your bright texture is currently white on a dark background, inverting flips it to the black-on-white relationship Photoshop expects.
-
Increase Contrast Again with Levels
Open Levels once more (Ctrl/Cmd + L) and push the lights even lighter, so as little of the background shows through as possible. The goal is a clean, high-contrast black shape with almost no gray noise left in the white areas.



Feathering the Edges and Resizing Before Defining the Brush
Two housekeeping steps make a big difference in how natural the finished brush looks once it’s painting onto a new image.
-
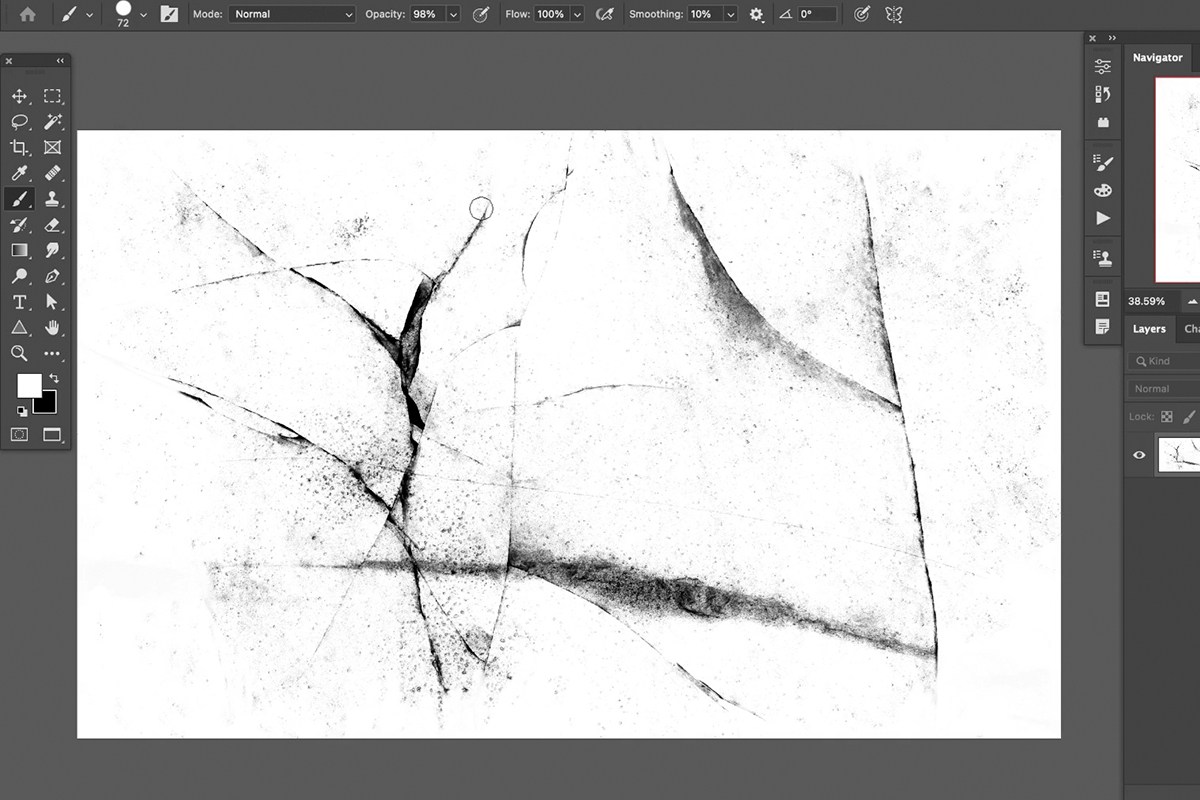
Feather the Edges with a Soft Brush
Using the Brush Tool (Keyboard Shortcut “B”) with a soft, white brush, paint out any texture that runs all the way to the edge of the canvas, especially in the corners. If texture touches the edge, Photoshop’s brush preview will show a visible square outline around every stamp, which immediately gives away that it’s a repeated texture rather than something organic.
-
Resize the Image to 1500 Pixels Wide
Go to Image > Image Size and set the width to around 1500 pixels. Photoshop brushes work best at a manageable size — there’s no benefit to keeping the full-resolution source image once you’re just defining a stamp shape from it.
Why Edges Matter for a Realistic Brush
Photoshop reads whatever falls inside your canvas as the brush tip, square edges included. A texture that runs to the border becomes a texture with a visible rectangular boundary every time it’s stamped, which is the fastest way to make a hand-painted effect look obviously repeated and synthetic.

Defining and Testing Your Custom Brush
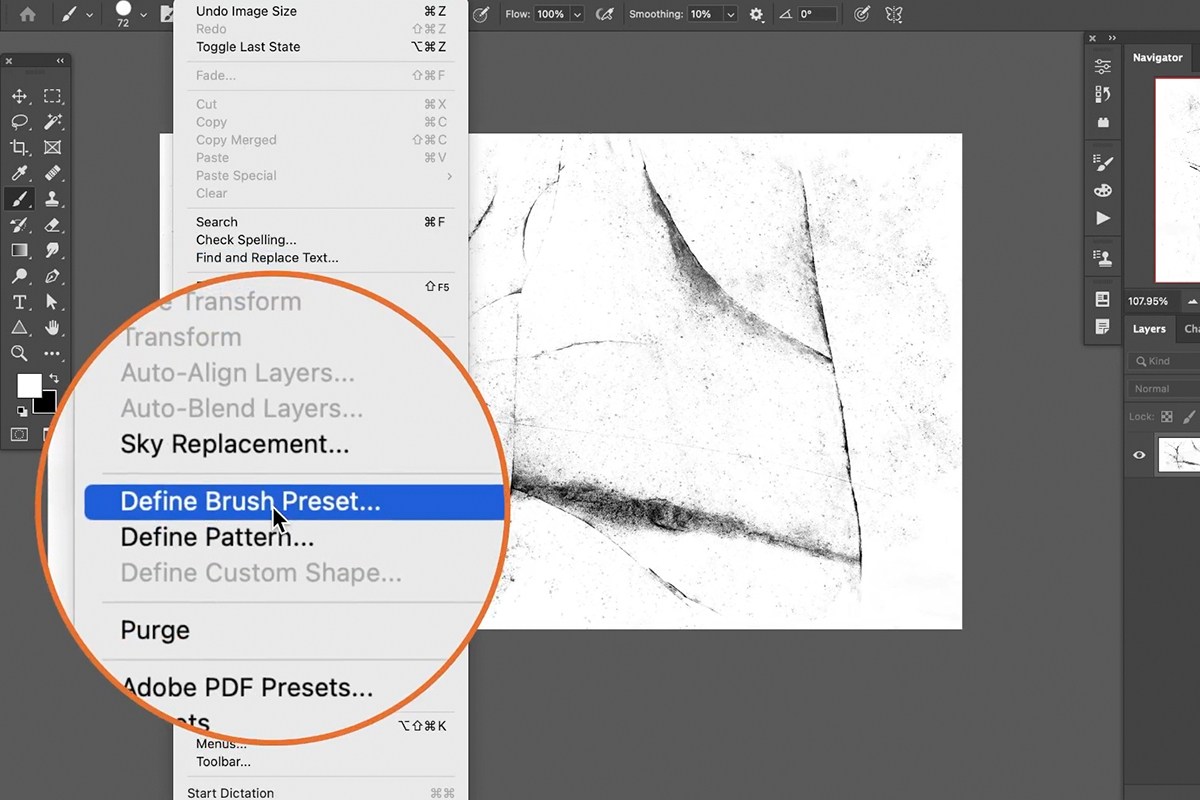
With the source image prepped, turning it into an actual usable brush takes one menu command.
-
Define the Brush Preset
Go to Edit > Define Brush Preset, give it a name (something like “Texture 01”), and hit enter. Photoshop shows a small preview thumbnail of the new brush once it’s created.
-
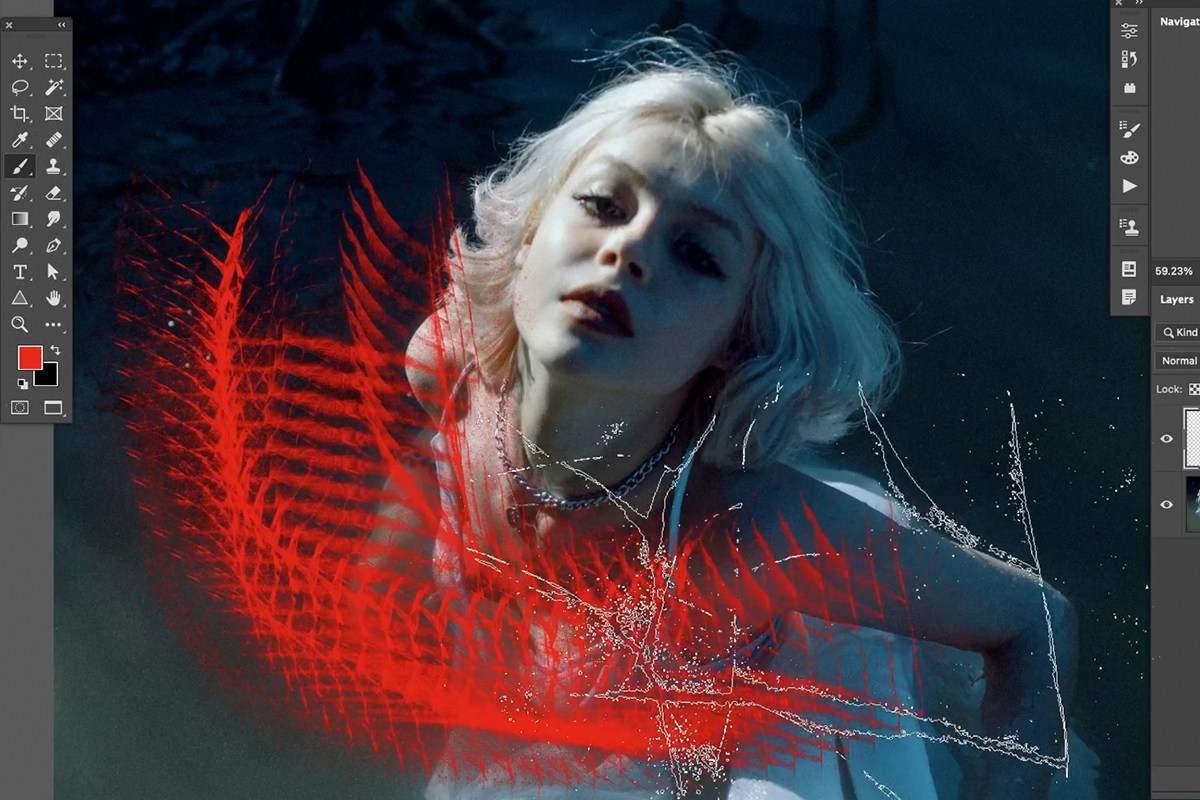
Test the Brush on a New Layer
Switch to a sample image, create a new layer, pick a visible color, select the Brush Tool, and choose your new brush from the brush picker. Paint a bit to see the raw result before adjusting anything — on its own, a freshly defined brush usually looks serviceable but flat.

Dialing In Shape Dynamics and Scattering
The Brush Settings panel is what turns a flat, repetitive stamp into something that reads as organic and varied.
-
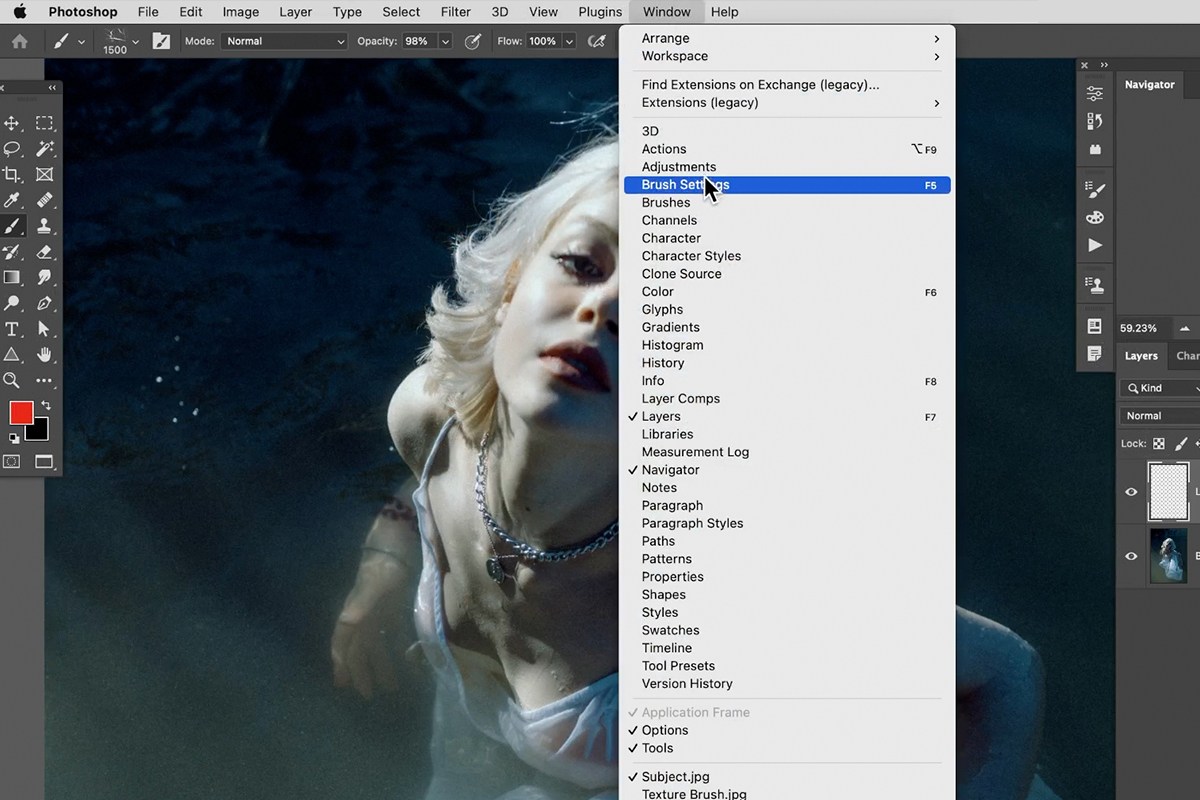
Turn On Shape Dynamics
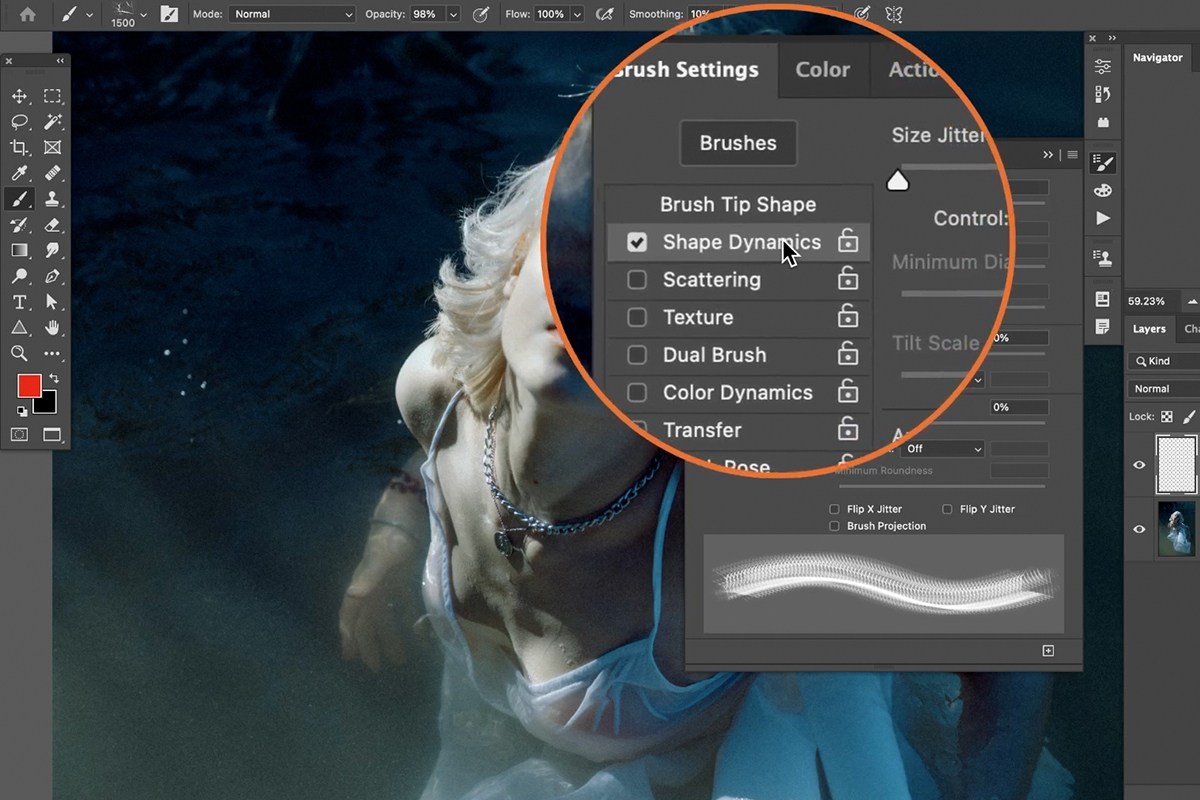
Go to Window > Brush Settings and enable Shape Dynamics. Push Size Jitter all the way up so each stamp varies in size, and push Angle Jitter up as well so each stamp rotates randomly — both settings break up the obvious repetition of a single fixed shape.
-
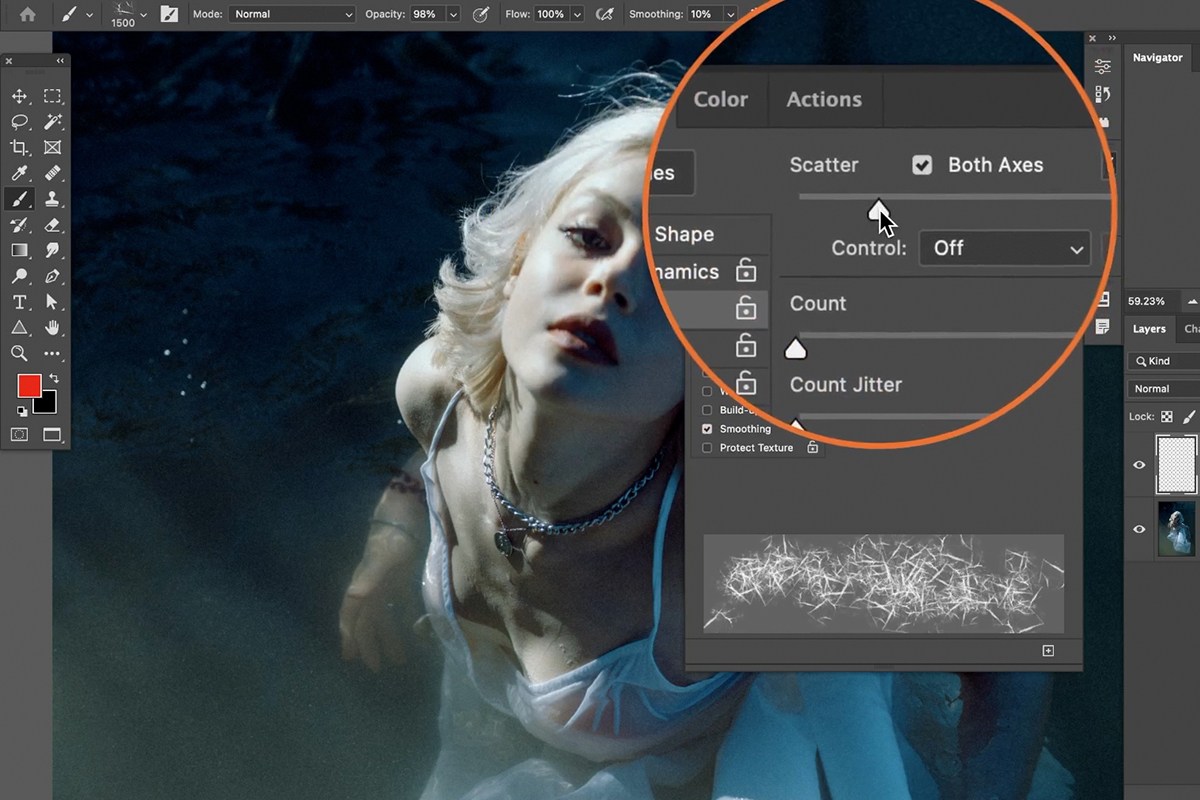
Turn On Scattering
Enable Scattering and set it to Both Axes, then increase the scatter amount. This spreads the individual texture stamps out across the stroke instead of laying them in a single line, which is what makes the result look more like a naturally distributed texture.
Controlling Density with Spacing
If the brush feels too dense once Scattering is on, go to Brush Tip Shape and increase the Spacing value. Higher spacing puts more room between each stamp along the stroke, giving you a lighter, more open texture without changing anything else about the brush.

Saving and Reinstalling Your Brush
Once the shape, size, angle, and scattering settings all feel right together, save that entire configuration so you don’t have to rebuild it from scratch next time.
-
Save the Brush as a New Preset
Click the New Brush icon at the bottom of the Brush Settings panel, choose New Brush Preset, and name it. This preset saves the shape dynamics and scattering settings along with the brush tip itself, so the whole configuration comes back together every time you select it.
-
Install the Brush File on Another Computer
To load a saved .abr brush file on a different machine, go to Window > Brushes, open the panel menu, and choose Import Brushes. Select the .abr file and click Open — the brush appears at the bottom of your brush list and is ready to paint with immediately.

Applying the Texture with Curves Adjustment Layers
A texture brush is most useful not as a heavy effect painted directly onto a photo, but as a subtle addition to contrast, layered in through Curves adjustment layers so it stays fully editable afterward.
-
Create a Curves Layer to Brighten the Image
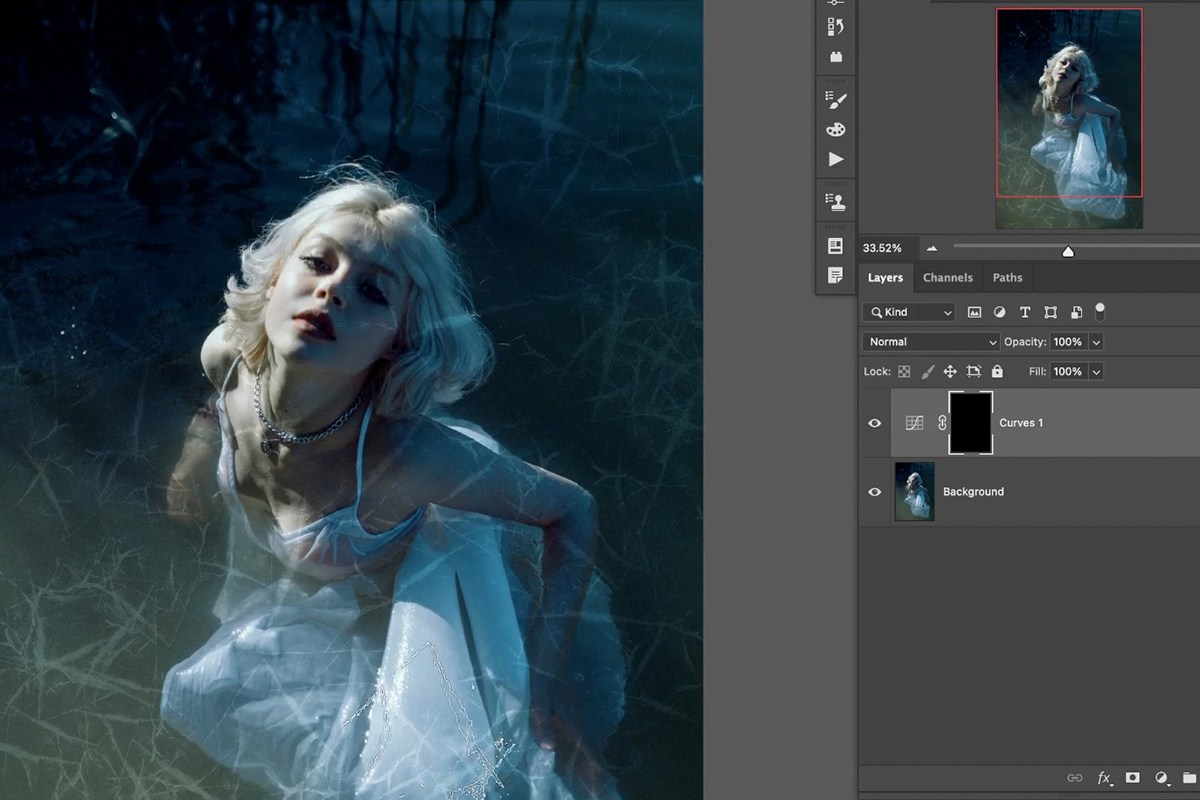
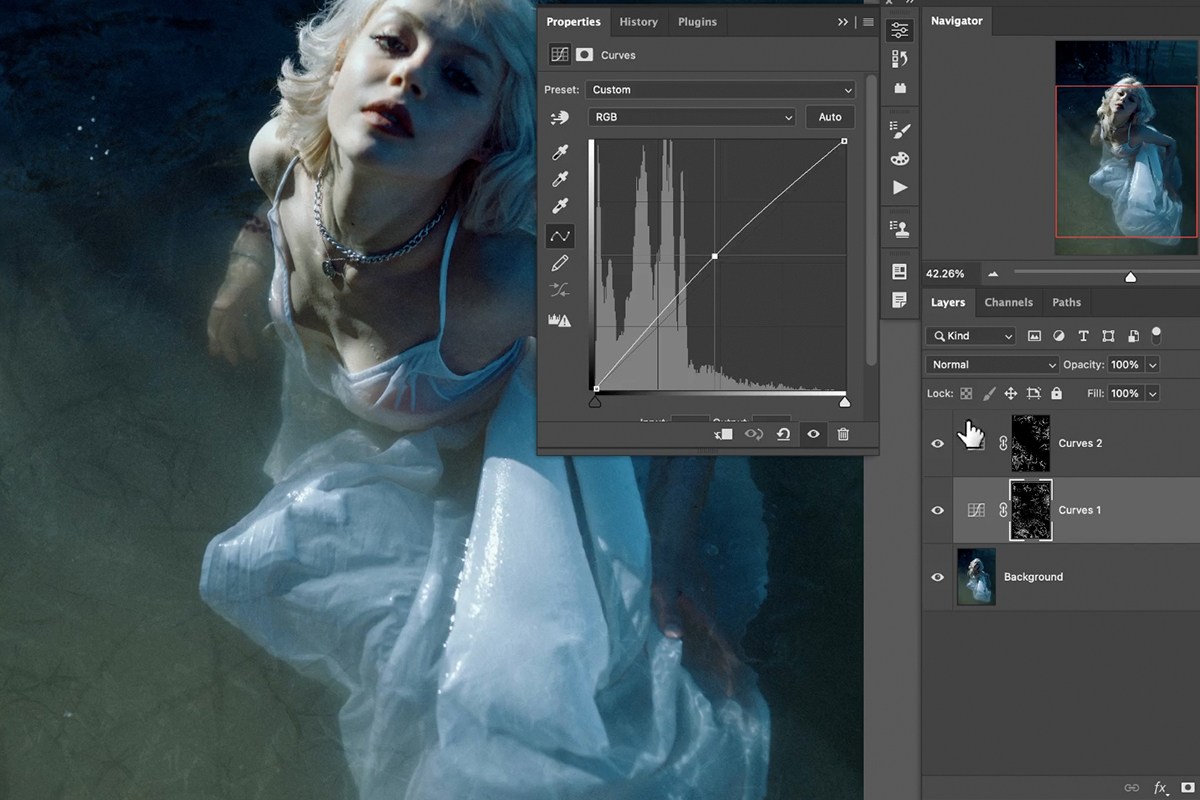
Add a Curves adjustment layer and drag the curve up slightly to brighten the overall image.
-
Invert the Layer Mask and Paint With the Texture Brush
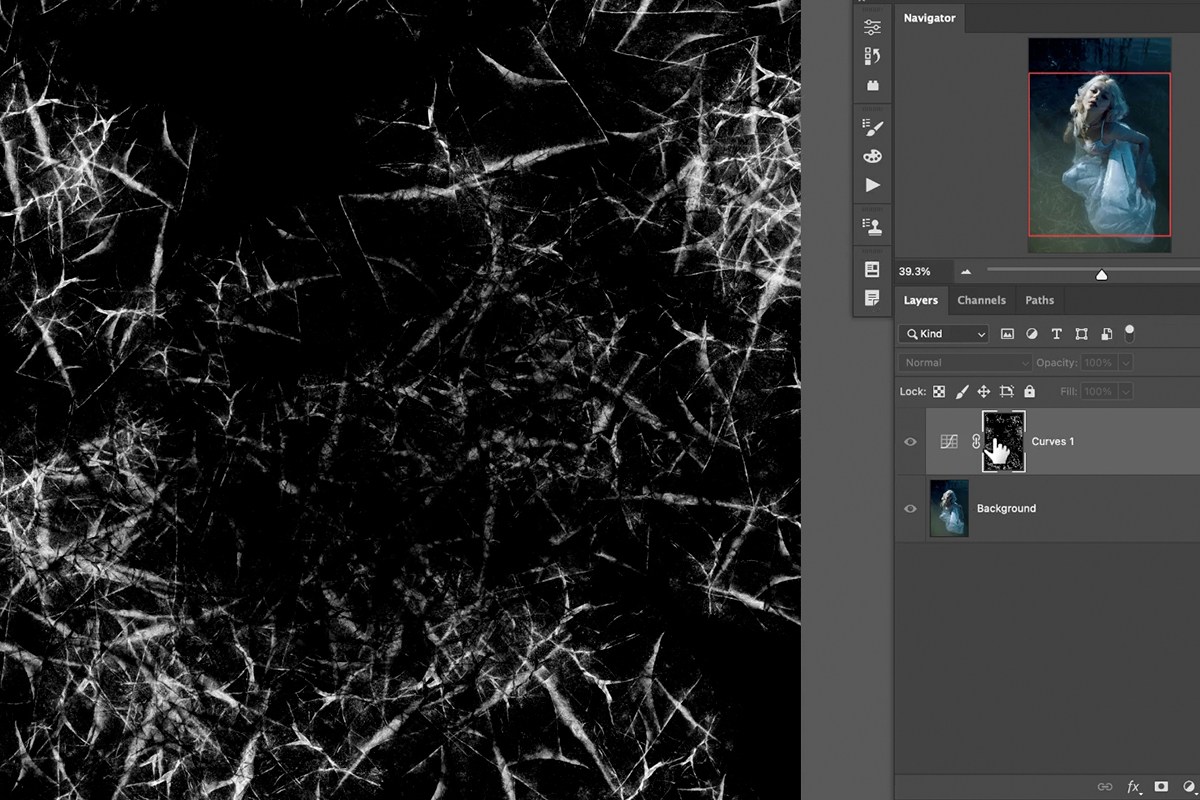
Press Ctrl + I on PC (Cmd + I on Mac) on the layer mask to make it fully black, which hides the brightening effect everywhere. Then select your texture brush, set white as your foreground color, and paint on the mask — wherever you paint, the brightened texture becomes visible.
-
Adjust the Curves Strength
Double-click the Curves adjustment layer’s thumbnail at any point to reopen it and push the effect stronger or pull it back subtler. Because the texture lives on a mask, you can turn the whole effect off and on, or restrengthen it later, without repainting anything.
Painting Visibility On and Off with the Layer Mask
Painting white on the mask reveals the effect, and switching your foreground color to black (press X to swap) and painting again hides it. That two-way control — paint to reveal, paint to hide — is what makes it easy to correct an area where the texture went somewhere it shouldn’t have.


A second, darker pass adds depth alongside the brightened one:
-
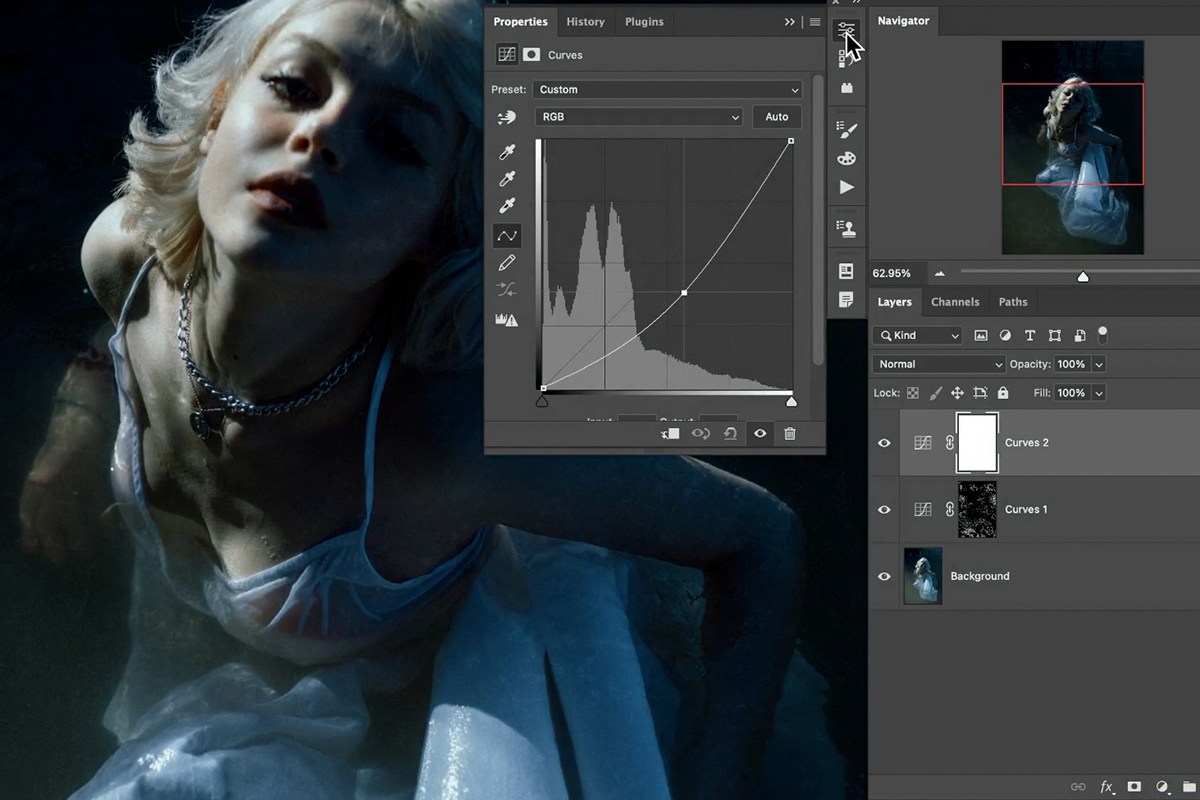
Create a Second Curves Layer to Darken the Image
Add another Curves adjustment layer, this time dragging the curve down to darken the image instead of brightening it.
-
Invert Its Mask and Paint the Darker Texture
Invert this new layer’s mask to black the same way as before, then paint with the texture brush to bring the darkening effect back in selectively. Keep the strength subtle on both the light and dark layers — pushed too far, either one starts to look like an obvious filter rather than natural texture.
Where to Apply (and Avoid) the Texture
A good rule of thumb is to keep the texture away from a subject’s face and concentrate it on the surrounding parts of the image — clothing, background, negative space. Combining a light pass and a dark pass in different areas tends to read as more dimensional than relying on just one.

Common Mistakes to Avoid
The most common problem is skipping the edge-feathering step, which leaves a visible square outline every time the brush stamps. A close second is applying the texture too strongly in a single pass instead of building it up gradually across two subtle Curves layers — a heavy-handed texture tends to look like noise rather than depth. It’s also worth choosing a source photo with enough natural contrast to begin with; a flat, low-contrast image will still make a brush, but that brush won’t have much texture to offer once it’s stamped.

Why This Effect Works
The reason this technique holds up is that the texture never touches the photo directly — it’s always mediated through a layer mask on a Curves adjustment layer. That indirection means the effect is completely reversible and completely adjustable after the fact: you can repaint where it appears, turn its strength up or down, or remove it entirely without ever touching the original pixels. It’s the same principle used for precise selective work like cutting out fine detail such as hair — painting on a mask with a brush gives you pixel-level control that a single global filter never could. Combining a lighter pass and a darker pass, each painted independently, is also what gives the final result a sense of dimension rather than a flat, uniform grain laid over the whole photo.
Final Thoughts
Once you understand the underlying process — boost contrast, strip color, invert to black-on-white, feather the edges, and define it as a brush — you can turn almost any textured surface you photograph into a custom Photoshop tool. The real payoff comes from the second half of the process: dialing in Shape Dynamics and Scattering so the brush doesn’t look like a single repeated stamp, and then applying it through Curves adjustment layers so the effect stays subtle, reversible, and fully under your control. Keep a small library of these custom brushes on hand, built from different textures, and you’ll have a fast way to add believable depth and grain to future edits.
Quick Reference: Keys, Menus and Settings
- Prep the textureCmd/Ctrl + L Levels; Image > Adjustments > Desaturate; Cmd/Ctrl + I to invert; Levels again
- Clean the edgesB, soft brush, paint white over the edges and corners
- ResizeImage > Image Size, Width 1500 pixels
- Define the brushEdit > Define Brush Preset; right-click with the Brush Tool to find it at the bottom
- Brush settingsWindow > Brush Settings: Size Jitter and Angle Jitter up, Scattering on Both Axes, Spacing up if too dense; New Brush Preset
- Paint with CurvesCurves up, Cmd/Ctrl + I on the mask, paint white; X swaps to black; repeat with Curves down
- Install an .abrWindow > Brushes > panel menu > Import Brushes
No AI, no generative credits.
Free Downloads
Follow Along on the Same Photos
Get the ice texture, the underwater portrait, the sample PSD, the finished PHLEARN Texture Brush and the 4-page PDF guide. Free with a PHLEARN account.
Making a Texture Brush: Common Questions
What kind of photo makes a good texture brush?
One with high contrast and interesting lines, like the ice in this tutorial. The difference between light and dark is what becomes the shape of the brush once the color is gone.
Why does my brush paint the background instead of the texture?
A brush paints the black areas and treats white as background. If your texture is white on dark, press Cmd/Ctrl + I to invert it, then use Levels again to push the lights lighter.
Why does my brush leave a square outline?
The texture touches the edge of the canvas. Press B, pick a soft brush and paint white over any texture that reaches the edges, mostly in the corners, before you define the brush.
How big should the brush image be?
About 1500 pixels wide at most. Go to Image > Image Size and set Width to 1500 pixels.
How do I turn the image into a brush?
Go to Edit > Define Brush Preset, give it a name and press Enter. With the Brush Tool, right-click the image and the new brush is at the very bottom of the list.
Why does my new brush look like one stamp repeated?
Open Window > Brush Settings, turn on Shape Dynamics and drag Size Jitter and Angle Jitter all the way up, then check Scattering with Both Axes. If it is too dense, raise Spacing in Brush Tip Shape.
How do I keep those settings with the brush?
Click the new brush icon at the bottom of the Brush Settings panel and choose New Brush Preset. The preset keeps the Shape Dynamics and Scattering settings with the brush tip.
How do I install the .abr brush file?
Go to Window > Brushes, open the panel menu and choose Import Brushes. Select the .abr file and click Open; the brush appears at the very bottom of the list.
How do I add the texture to a photo without painting on it?
Add a Curves layer and drag the curve up, press Cmd/Ctrl + I on its mask to make it black, then paint white with the texture brush. Repeat with a second Curves layer dragged down, keep both subtle and keep the texture off the face.
Are the sample files free?
Yes, with a free PHLEARN account. You get 2 sample images, 1 sample PSD, 1 Photoshop brush and 1 PDF guide: the ice texture, the underwater portrait, the PSD, the PHLEARN Texture Brush and a 4-page guide.
From the Magazine View all
Stories, interviews and guides for photographers, new every week.
 BusinessHow to Compete With AI: Give Your Clients MoreEveryone has the same tools now, and your clients know it. The way to compete is to give them more.
 EditingLightCraft vs Lightroom: Is the Free Clone Any Good?The free clone on the same RAW files: what matches, what breaks and who should switch.
 EditingHow to Tell If a Photo Is AI, and Prove Yours Is RealThe tells that still work in 2026, why detectors disagree, and how to prove your own photos.
Master Photoshop, Lightroom and Photography
Join PHLEARN PRO for $12.99 a month, or $99.99 a year (save 36%). Cancel anytime, with a 100% money-back guarantee.





