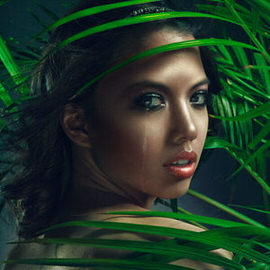
Learn the intricacies of how light falls on the human face and five different methods to shape and enhance it in Photoshop. We cover dodging and burning, skin coloring, advanced sharpening, adding realistic makeup, and more.
Photoshop | Retouching | Medium | 2.5 hours | 1 video
2 Sample Images | 1 Photoshop Brush
Shooting later in the day gives you the opportunity to add a warm “sunset Style” to your image in Photoshop. In today’s episode we show you how to Color your image to give it that warm “sunset” feel.
The white Background has become a standard in the photography world and for good reasons. You can pick up a white seamless background for less than $100, turning any space into a photo studio.
Photoshop Actions are created by manually performing a series of steps and recording them in an ATN file. You can replay those steps on any image by hitting the play button in the action dialog.

The Liquify Tool is one of the most powerful image editing Tools in Photoshop. It will allow you to “push and pull” pixels any way you’d like.
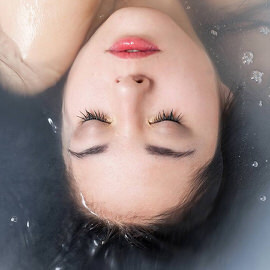
In today’s episode we show you how to add fish to an image of a girl in a bathtub. The Compositing process is simple as long as you keep in mind how Color, Light and Depth work.
Here’s a quick tip for making colors pop in Photoshop. This technique is perfect for a photo that is dominated by one or two Colors, especially if those Colors are complimentary.
There are many things that go into making an image appear vintage in Photoshop and this episode Highlights all the techniques you may need to make your photos look aged. In this episode, we’ll show you how to create a Vintage photo in Photoshop.

If you’re wondering how to replace a sky in Photoshop, choosing the correct sky to Composite into your photo is the most important step in Compositing a sky. There are a few different factors you will want to keep in mind when looking for a new sky.
Learn how to properly save and export your images so they display perfectly on the Web and allow for easy changes later.
We have found that learning a few Tools will allow you to do 90% of your Photo Editing. Here’s what they are!
These are the proper settings and preferences to get Photoshop working well.

Just as a painter may turn his canvas for an easier brush stroke, turn your image for easier editing! This is especially useful when using a pen and tablet.
Photoshop | Photo Editing | Medium | 1 video
1 Sample Image

Need to get precise? Zoom in! Images are getting more and more detailed as new cameras are released, so zoom in and get to the details.
Photoshop | Photo Editing | Easy | 1 video
1 Sample Image

The Quick Mask Tool is great whenever you are working with selection tools. It helps clearly define what you do and do not have selected.
Photoshop | Photo Editing | Medium | 1 video
1 Sample Image

Add creative and artistic effects to your images using the Filter Gallery.
Photoshop | Photo Editing | Easy | 1 video
1 Sample Image

Save yourself the hassle of trying to eyeball it and use The Alignment Tool. You can even align objects within the confines of a selection.
Photoshop | Photo Editing | Easy | 1 video
1 Sample Image

Rounding the corners of a rectangle can give you a much softer look that’s easier on the eye. Great for creating buttons or icons, we’ll teach you all the ways to use this versatile shape.
Photoshop | Photo Editing | Easy | 1 video
1 Sample Image

Not happy with the changes you made? Go back in time using History. Photoshop records all of your actions and allows you to go back to previous versions of your image.
Photoshop | Photo Editing | Easy | 1 video
1 Sample Image
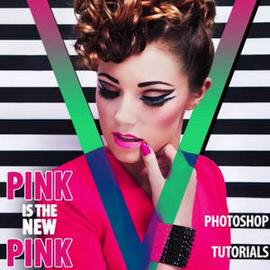
In this episode we show you how to turn a photo into a magazine cover by integrating the “V” Logo with the subject.

A double Exposure is traditionally done using a film camera by taking two different photos on the same Exposure of film. The images will combine in unique ways, giving you the “double exposure” effect.

Learn to make perfect selections of shapes with straight edges like architecture, products, and landscapes. Master the tool that has the precision of the Marquee Tool and the flexibility of the Lasso Tool!
Photoshop | Photo Editing | Easy | 1 video
1 Sample Image

The Polygon Tool allows you to create a shape with as many sides as you want. Best of all, they are vector based objects, so they can be scaled up and down without losing quality.
Photoshop | Photo Editing | Easy | 1 video
1 Sample Image

Learn to use the Patch Tool to replace minor blemishes and distractions or use it to duplicate any object or area in your photos.
Photoshop | Photo Editing | Medium | 1 video
1 Sample Image

Learn all of the tricks that the Eyedropper Tool has to offer. Select the colors you need with precision, safe your favorite colors for later use, and even grab colors from external programs!
Photoshop | Photo Editing | Easy | 1 video
1 Sample Image

One of the most essential tools in Photoshop, the Crop Tool can help you remove empty space from a photo, adjust composition, or change aspect ratio.
Photoshop | Photo Editing | Easy | 1 video
1 Sample Image

Red eye is not as much of a problem as it once was, but if you do find yourself editing an image with red eye, this is the perfect tool to use.
Photoshop | Photo Editing | Easy | 1 video
1 Sample Image

For irregular shapes and objects, you can freely draw with the Lasso Tool to get the selection you need. Learn to adjust your selections, add borders, and add feathering!
Photoshop | Photo Editing | Easy | 1 video
1 Sample Image

Get anything out of the way with the Content-Aware Move Tool! Move an object in an image, while Photoshop fills the gap by automatically sampling surrounding areas.
Photoshop | Photo Editing | Easy | 1 video
1 Sample Image

There are several tools in Photoshop that will help you get accurate measurements, but the easiest one to use is the Ruler tool.
Photoshop | Photo Editing | Easy | 1 video
1 Sample Image

When cropping isn’t enough, try the Perspective Crop Tool! Not only can you adjust composition and aspect ratio but you can also straighten objects in an image that might be slightly distorted.
Photoshop | Photo Editing | Medium | 1 video
1 Sample Image