

Download Assets
This tutorial includes 1 sample image and 1 PDF guide. Downloads are free with a PHLEARN account.
- Download the sample images and PSDs from every free tutorial on PHLEARN
- New free tutorials published every week
- One free account — sign up once, then download anything
Free PDF Guide · 2 Pages
This Tutorial as a Step-by-Step PDF
Every step from the video in order: Image > Image Size to check the pixels, the 4096-pixel ceiling and how to shrink under it, Image > Generative Upscale at 4x, the new document with both versions, and what to look for at 100%. Keep it next to your keyboard.
description
Generative Upscale is a new AI tool in Photoshop Beta that effortlessly upscales low-resolution images in no time! This one-click feature is perfect for making small images print-ready with significantly improved quality and size.
Enjoying This Free Tutorial?
We publish a new free tutorial every week, each one with sample images and PSDs you can download and follow along with. Sign up and they land straight in your inbox, along with early word on sales, events and subscriber-only offers.
Image Source
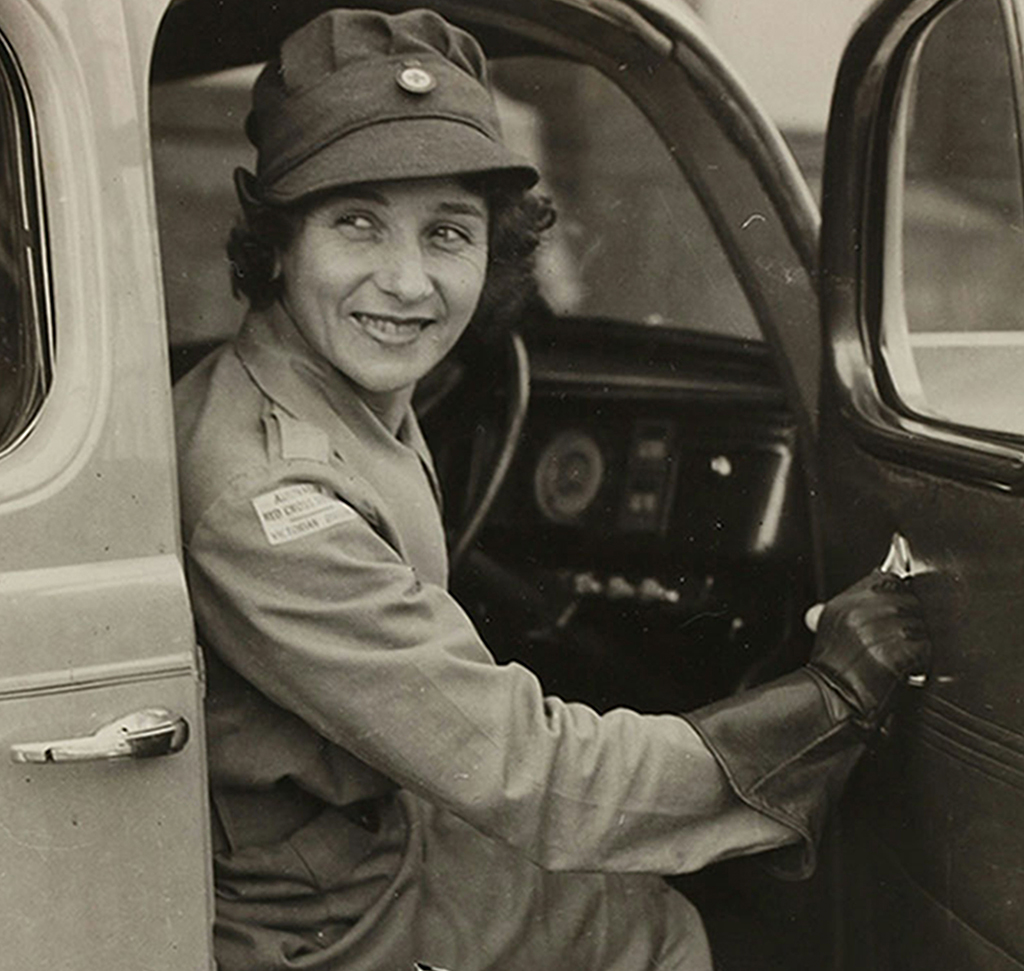
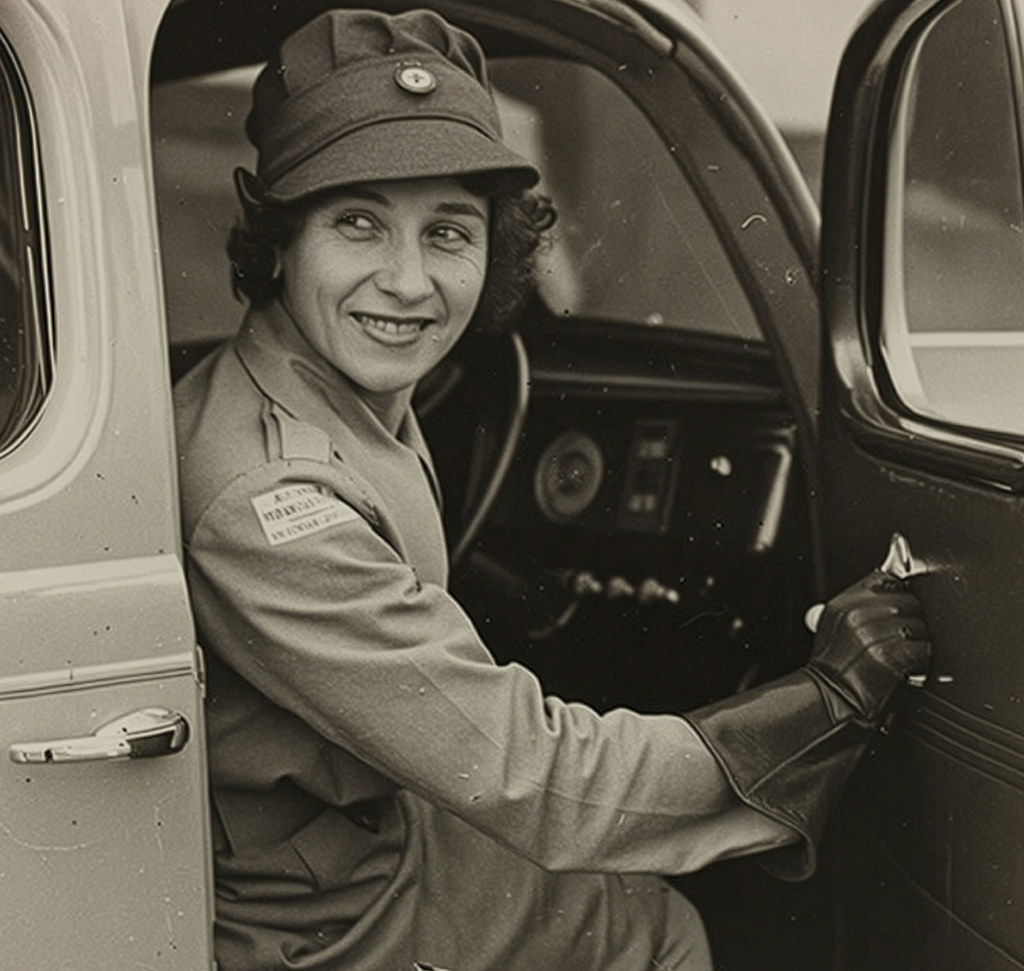
How to Use Generative Upscale in Photoshop Beta
Nearly everyone has one of these: a small, low-resolution photograph of a family member that exists in only one version. Scanned from a print, or saved off a phone a decade ago, or pulled from a website that no longer exists. You want to print it properly, and there is not enough resolution to do it.
Generative Upscale is built for exactly that. One menu command increases an image up to four times its dimensions using AI, and the results are far beyond what dragging a corner handle has ever given you.
It is also worth understanding what it actually does, because the answer affects when you should and should not use it. That is covered below.
Check Your Starting Size First
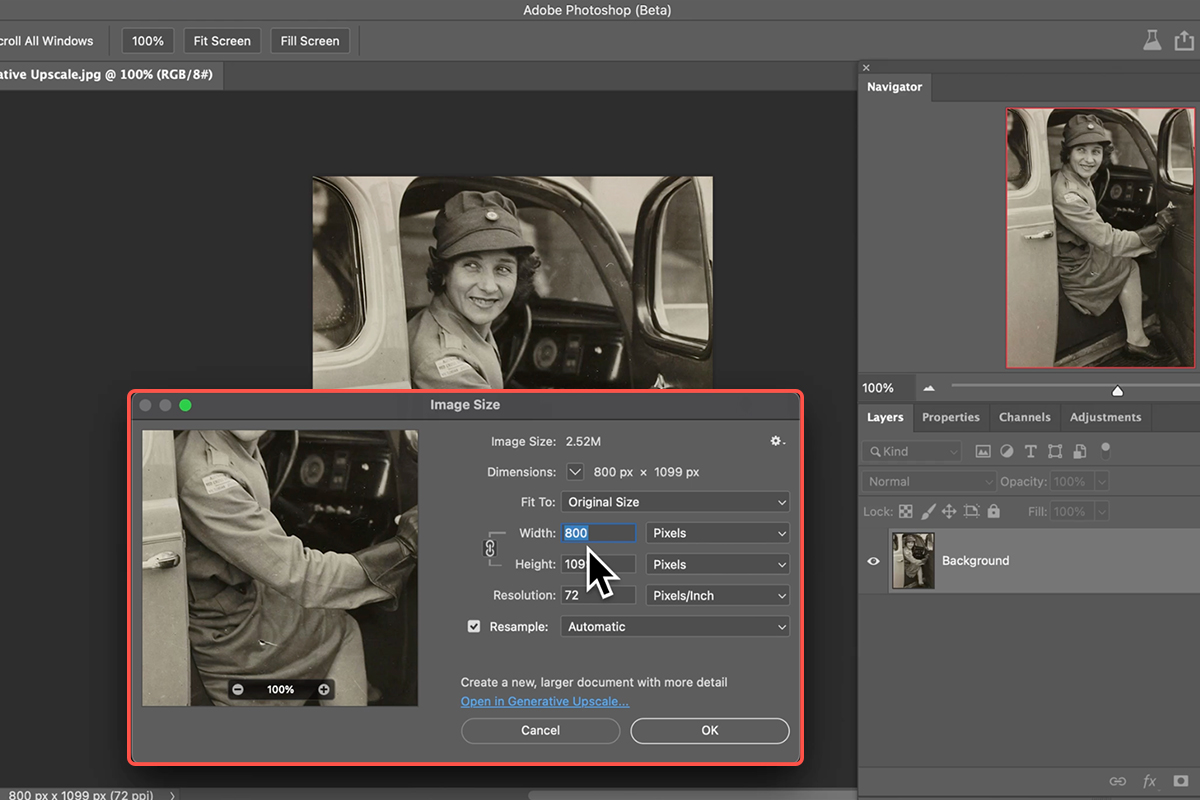
Before anything else, go to Image ? Image Size and note the dimensions.
This matters because of a limit in the beta: the output cannot exceed 4096 pixels on either side. At 4x, that means your input has to be under roughly 1024 pixels in its longest dimension.
If You Hit the Limit
An image at 800 × 1099 pixels will refuse to upscale at 4x, because 1099 × 4 is 4396 — over the ceiling. Photoshop tells you so and suggests a smaller scale or a smaller image.
You have two options. Drop to a lower scale factor, or go back to Image Size and reduce the original slightly — taking that image down to around 700 pixels brings the 4x output back under the limit.
Reducing an image so you can enlarge it does feel backwards. It is a beta constraint rather than a deliberate design, and it may well be gone by the full release.
Run the Upscale
-
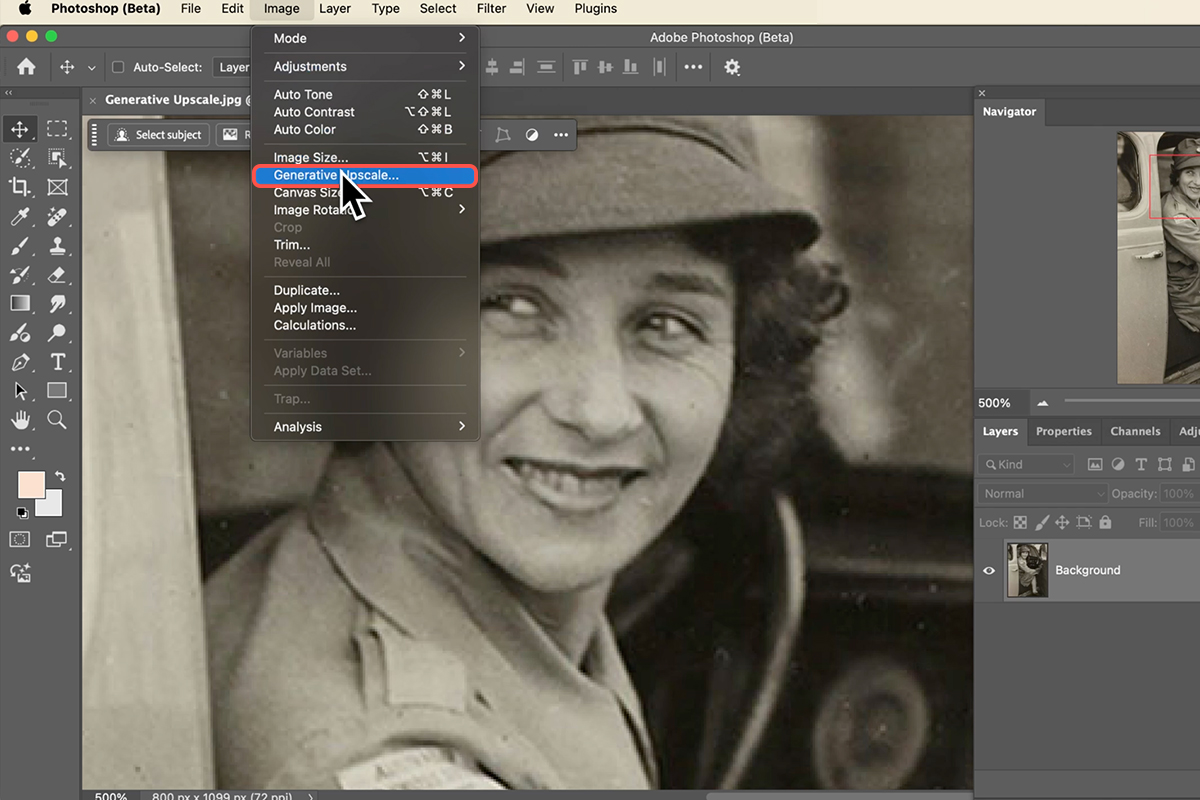
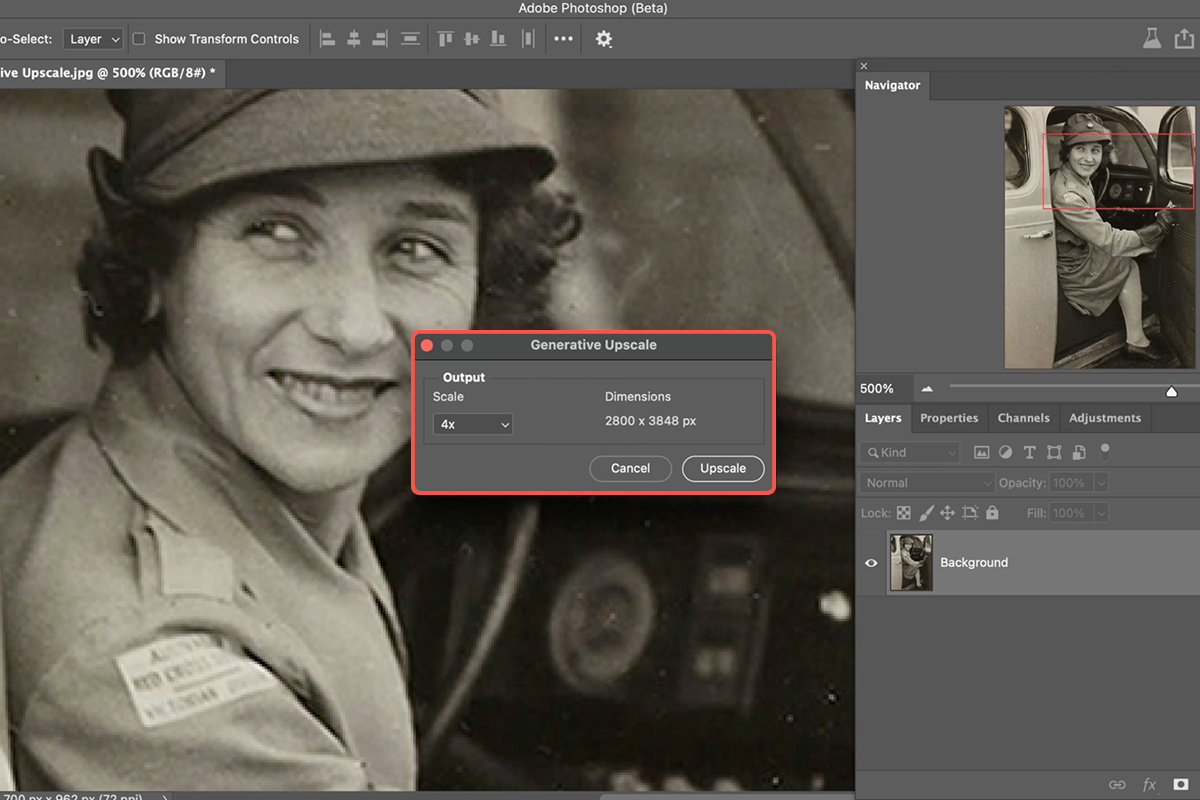
Go to Image ? Generative Upscale
It sits in the Image menu, not the Contextual Task Bar. You need Photoshop Beta — install it from Beta Apps in the Creative Cloud installer.
-
Choose your scale
4x is the maximum currently offered.
-
Click Upscale
It uses a generative credit and runs on Adobe’s servers, so you need an internet connection.
The result opens in a new document — your original file is untouched.
The New Document Contains Both Versions
This is a genuinely useful detail. The new document has the upscaled result and the original, as separate layers. Toggle the top layer’s visibility to compare them directly at the same zoom level, with no need to arrange two windows.
Set the zoom to 100 percent and flip between the two. The difference is substantial: the plain enlargement is soft and blocky where the generated version holds real detail. For printing, that gap is the whole point.
What It Is Actually Doing
This is the part worth understanding before you use it on anything that matters.
Generative Upscale is not sharpening your photograph or interpolating between existing pixels. It feeds the image to an AI model, which then regenerates it entirely at the larger size. It preserves the overall content faithfully — and it even keeps incidental character like dust, speckles, and scratches, which is why the results still read as an old photograph rather than a clean digital render.
But underneath, every pixel is new.
Details Do Change
Compare the two layers closely and you will find differences. A reflection in a door handle disappears. A shadow that was there is no longer. A line in someone’s face falls slightly differently. Teeth change shape a little.
These are small, and at normal viewing distance almost nobody would notice. But they are real, and on a photograph of a person they are worth knowing about. The face in the upscaled version is a very close reconstruction of the face in your photograph — not the same face rendered larger.
When That Matters and When It Does Not
For a landscape, a building, a car, or a texture, the changes are invisible in every practical sense. Use it freely.
For a portrait meant as a keepsake, the result is still excellent — just be aware you are printing a reconstruction. Most people would consider that a fair trade for a photograph that can finally be printed at size.
For anything that has to be evidentially accurate — documentation, identification, legal or journalistic use — do not use it. The output looks authoritative and contains invented detail, which is the worst combination for that kind of work.
The Best Use for It
Old family photographs, without much competition.
The common situation is a single small print, or a low-resolution scan of one, and no negative anywhere. Traditional upscaling could not do much with it, and the file was effectively stuck at screen size forever.
Scan the print, run Generative Upscale, and you have a file with enough resolution to print at 8×10 — enough to frame it, and enough to send copies to the rest of the family. Turning one fragile print into something reproducible is a real thing to be able to do.
Current Limits
4x is the ceiling today, and the 4096-pixel output cap is the practical constraint you will run into first. Higher factors would open up more of these cases — a genuinely tiny scan still cannot reach print size in one pass.
Being a beta feature, both the limits and the menu location may change before it ships in the full release. The behavior to remember is the one that will not change: it regenerates rather than enlarges, which makes it outstanding for most photographs and wrong for a few.
Quick Reference: Keys, Menus and Settings
- Check the sizeImage > Image Size (the sample is 800 × 1099 px)
- Run itImage > Generative Upscale > Scale 4x > Upscale
- “Output is too large”Width or height would pass 4096 px; shrink the image first (Image Size, 700 px wide in the video) or pick a smaller scale
- Where it landsA new document with the original layer and the 4x layer; toggle the eye to compare at 100% (Cmd/Ctrl + 1)
- CostGenerative credits; one run per upscale
- Limits at recording4x maximum, Photoshop Beta only
Recorded in Photoshop Beta; the tool later shipped in the full release.

Free Downloads
Follow Along on the Same Photo
Get the small vintage photo from the video and the PDF guide, and run the same 4x upscale. Free with a PHLEARN account.
Generative Upscale: Common Questions
What does Generative Upscale do?
It enlarges a small image up to four times using AI, in one click under Image > Generative Upscale. The video takes an 800-pixel scan of an old photo to a size you could print.
It says the output is too large. What now?
In the beta, neither side of the result can pass 4096 pixels. Reduce the image in Image > Image Size (the video drops it to 700 pixels wide) or choose a smaller scale, then run it again.
Where does the result go?
Into a new document with two layers: the original and the 4x version. Set the zoom to 100% and toggle the top layer to compare.
Is it the same photo, just bigger?
Not exactly. It keeps the overall information, including scratches and dust, but regenerates the pixels underneath. In the video a reflection in a door handle disappeared and the teeth changed slightly. Faces stay close, but it’s a new AI rendering.
What is it best for?
Old family photos where the only copy is small. Scan it, upscale it, print it and share it. Objects and scenes fare best; look closely at people before printing.
Does it use generative credits?
Yes, each upscale spends credits.
Do I need Photoshop Beta?
At recording, yes, and the 4x and 4096-pixel limits were beta behavior. The tool has since come to the full release; see the newer upscale tutorial under Keep Learning.
Is the sample file free?
Yes, with a free PHLEARN account. You get the small vintage photo and the PDF guide.
Master Photoshop, Lightroom and Photography
Join PHLEARN PRO for $12.99 a month or $99.99 a year. Cancel anytime, with a 100% money-back guarantee.





