
- Photoshop BetaSoftware
- 10-Minute VideoFree to watch
- 2 Sample ImagesJPGs to practice on
- 1 Layered PSDFollow along
- PDF Guide6 printable pages
- 20 StepsIn this tutorial
Free Download · Practice Files
The Hiker Composite Files
This tutorial includes 2 sample images, 1 sample PSD and 1 PDF guide. Follow along on the same composite, or open the PSD and change the light yourself.
Create a free account to download
It’s free: sign up for a PHLEARN account, or log in if you already have one, to download the files. One account gets you the practice files for every free tutorial on PHLEARN.
Free PDF Guide · 6 Pages
This Tutorial as a Step-by-Step PDF
Every step from the video in order, with the light settings, the credit costs and the Relight and Harmonize comparison, on six printable pages.
description
Learn how to use Relight in Photoshop, the new layer in Photoshop Beta that lets you move the light after a photo is taken. We’ll relight a cut-out hiker to match the sun on a mountain top, set everything up in the free preview so you only pay the 30 credits once, and bring back lost detail with one blend mode. Then we compare the result with Harmonize and give an honest verdict on whether it’s worth the credits.
Enjoying This Free Tutorial?
We publish a new free tutorial every week, each one with sample images and PSDs you can download and follow along with. Sign up and they land straight in your inbox, along with early word on sales, events and subscriber-only offers.
Image Source
Photos by Tom Allport and Hayato Shin via Unsplash


Photoshop Can Now Move the Light After the Photo Is Taken. Here Is What 30 Credits Gets You
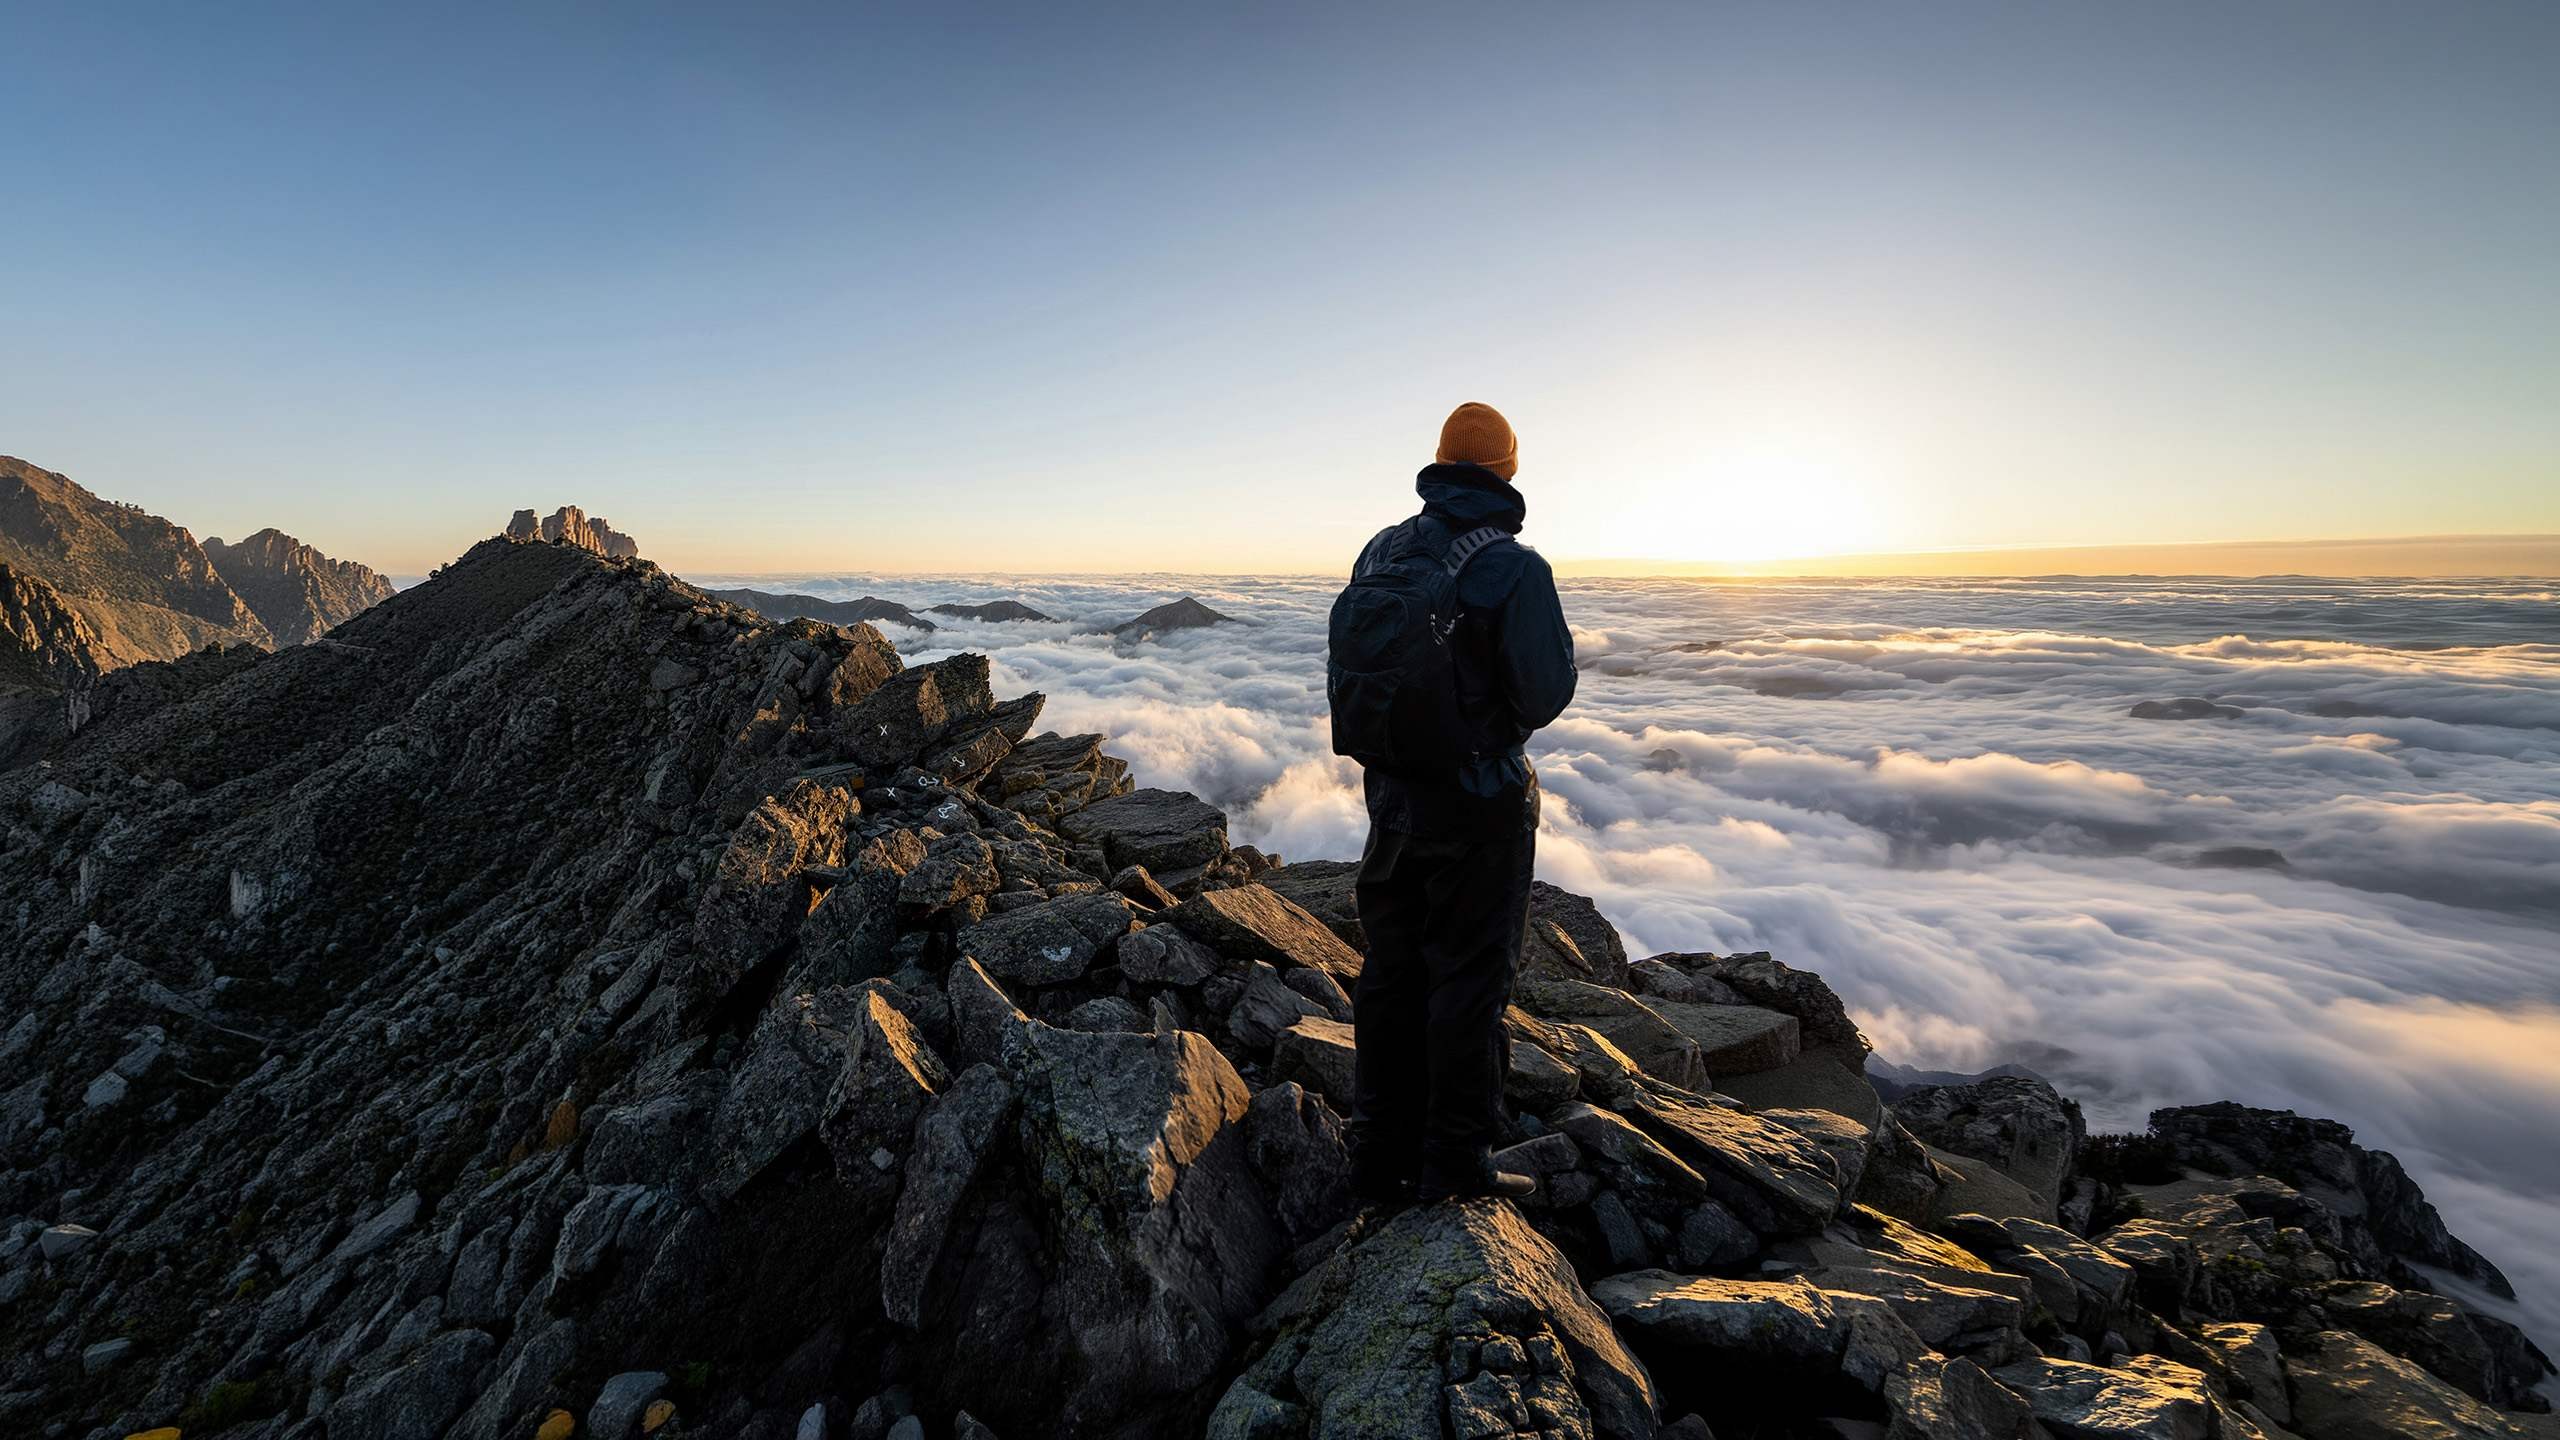
Relight in Photoshop is a new kind of layer that lets you place a light in a photo after it was taken, then choose where it sits, how far away it is, how bright and soft it is and what color it is. In this tutorial we test it on a composite: a cut-out hiker who has to match the sun in a new background.
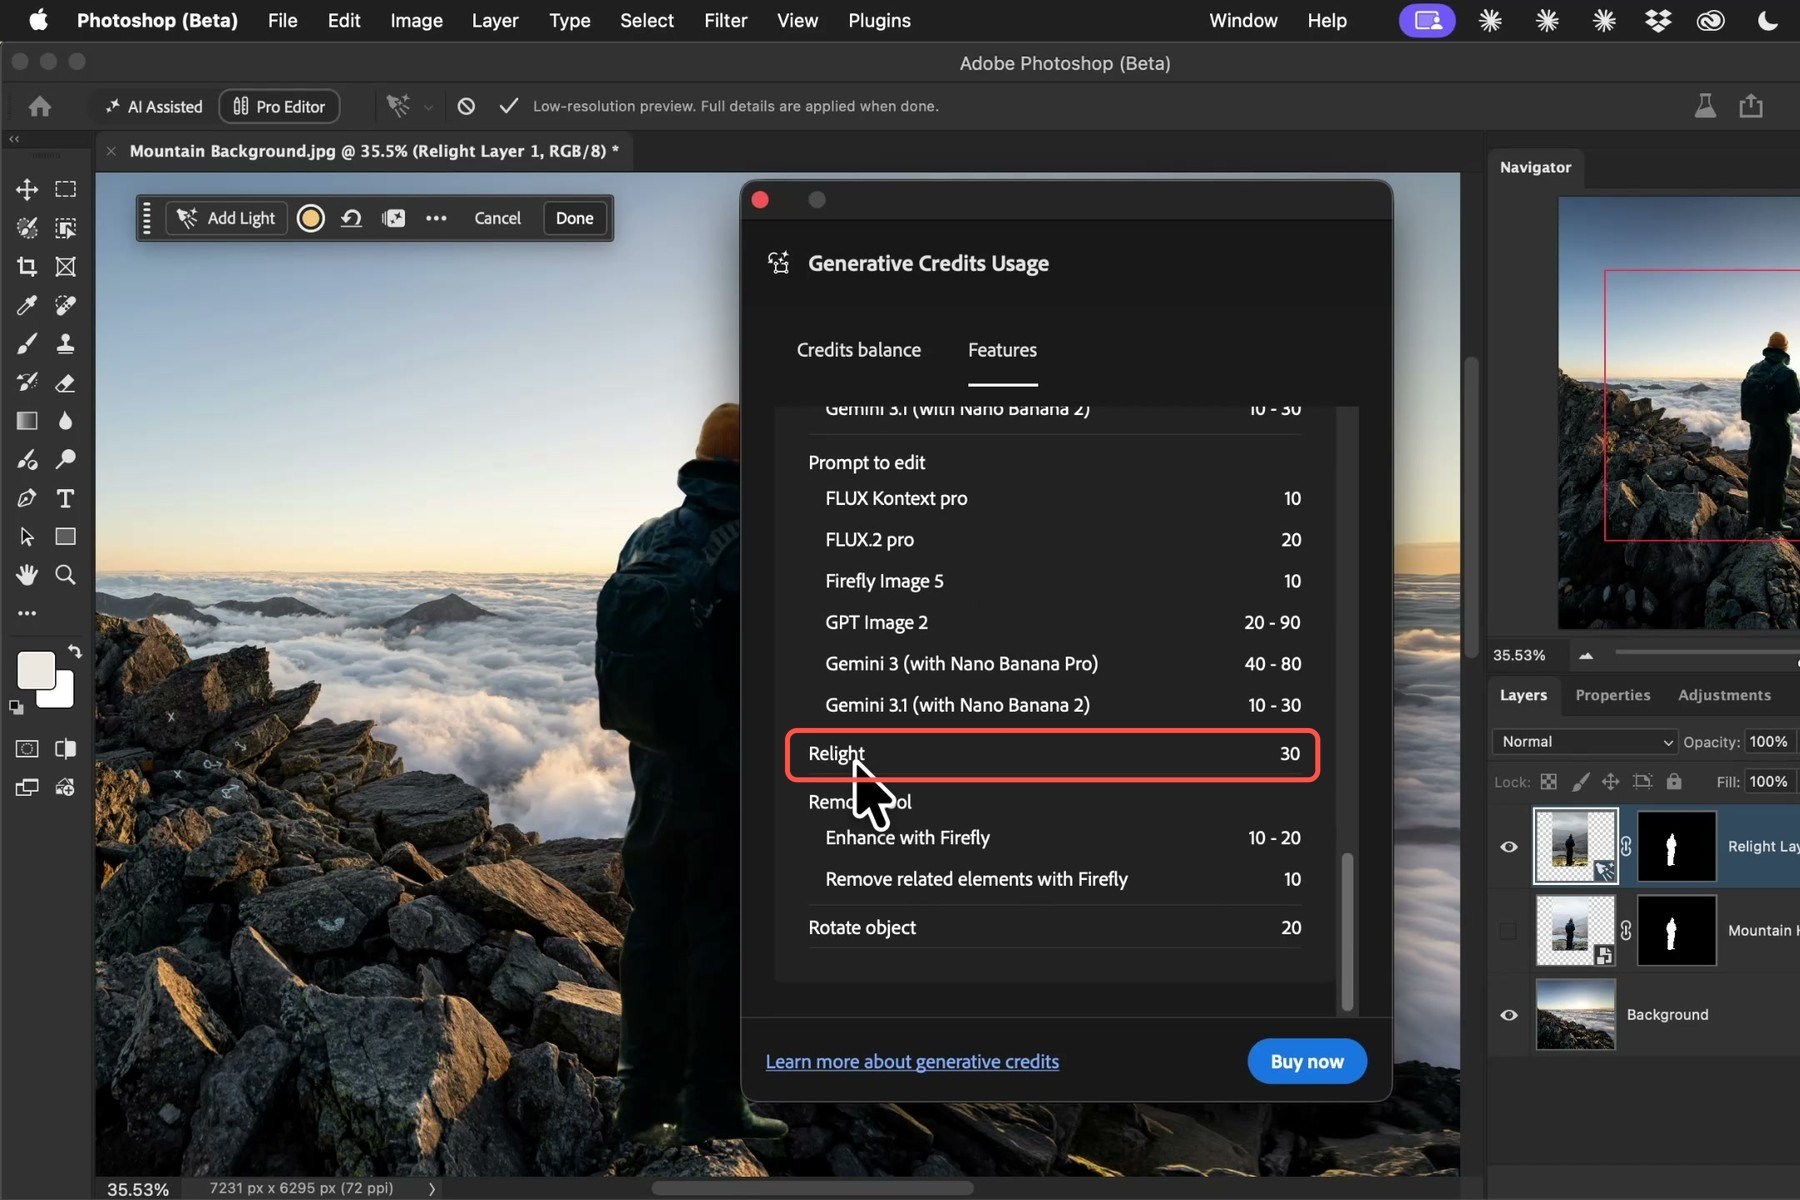
There is a catch, and it is the reason for the question in the title. In the current Photoshop Beta, Relight uses 30 generative credits every time you click Done. The preview costs nothing, so the plan is simple: set everything up first, then pay once. Our guide to generative credits explains how credits work across Photoshop.
We also look closely at the result, compare it with Harmonize, which costs 5 credits, and finish with the workflow Aaron recommends for using the two together. Relight is still in beta, so the price, the quality and the controls may change before the full release.
Set Up the Composite and Add a Relight Layer
The hiker was photographed on a cloudy day. The new scene is a mountain top with the sun low on the horizon.
-
Start with both photos in one document.
The hiker photo sits on its own layer above the mountain background. Both photos are in the free download if you want to follow along on the same images.
-
Cut out the hiker.
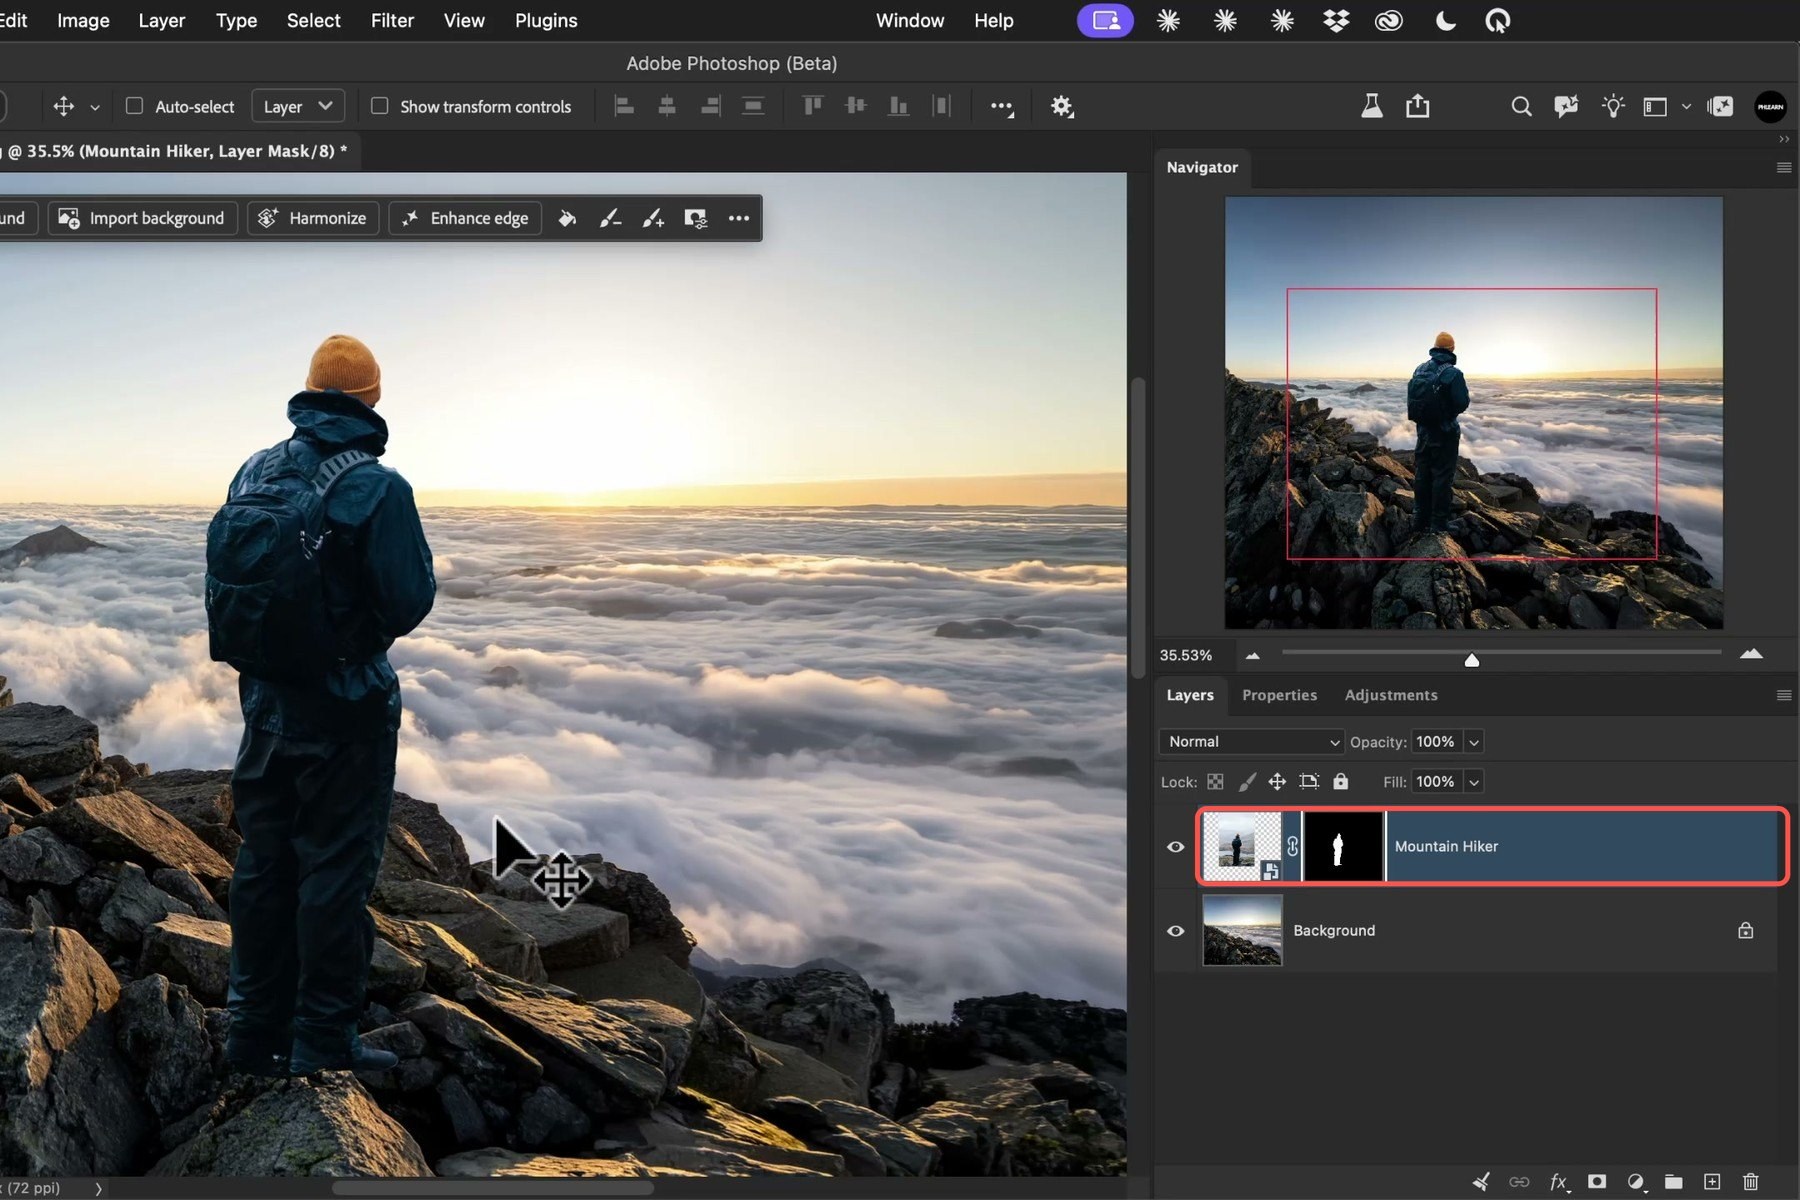
Select the hiker layer and click Remove Background, then move him onto the rock.
-
Select the layer you want to relight.
Relight does not work on the whole image. It works layer by layer, so click the hiker layer first. To tidy the edge of a cut-out before you light it, see Enhance Edge and color fringing.
-
Get Photoshop Beta.
Right now Relight is only in Photoshop Beta. Download the Beta and make sure you have the latest version.
-
Add the Relight layer.
Go to Layer > New Relight Layer. Photoshop prepares a lighting preview, duplicates the layer you were on and turns the copy into a Relight layer. Your original layer stays underneath.
Match the Light to the Sun in Your Scene
You are copying a light that is already in the background, so every setting has an answer you can read off the photo. For the manual version of this idea, see how to match color and tone by hand with Levels.
-
Drag the light to where the sun is.
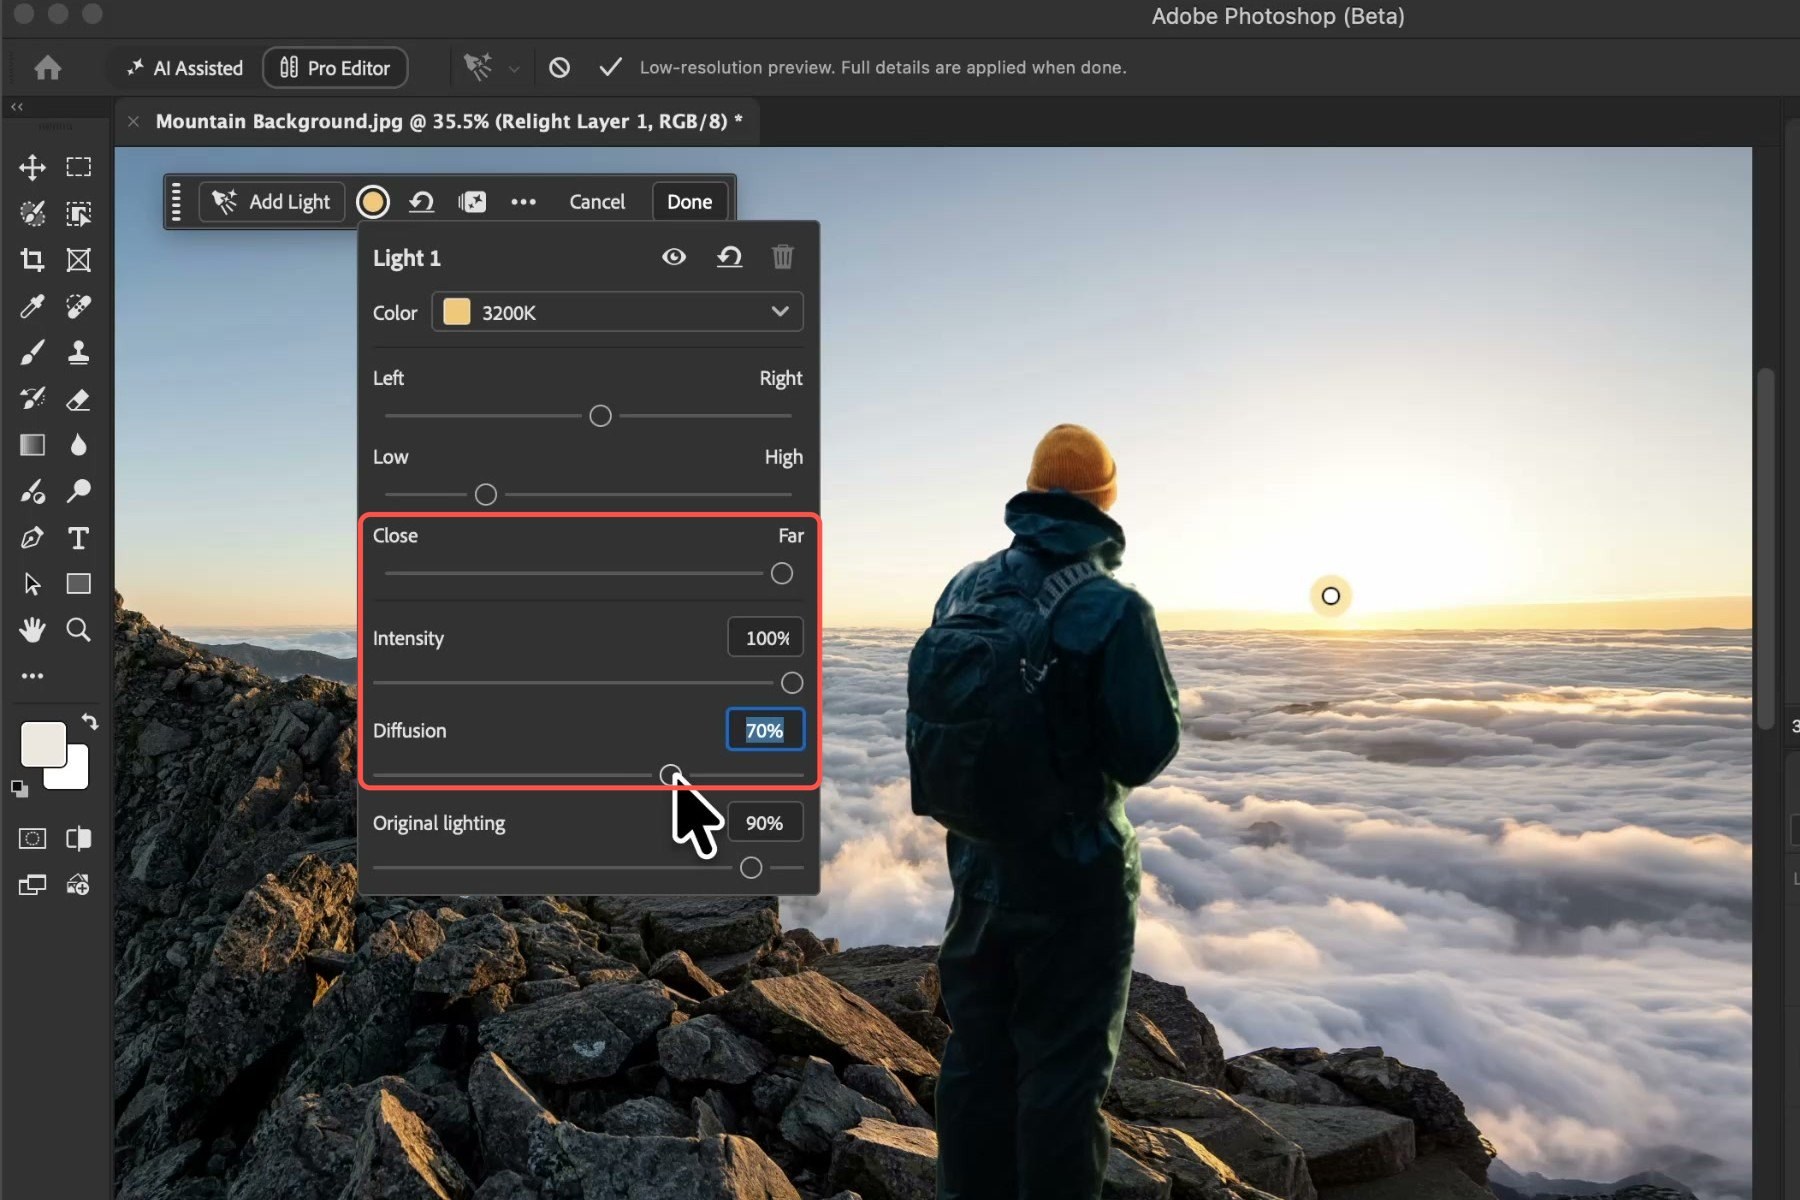
The preview opens with one light on the canvas. Click it and drag it onto the sun in the background.
-
Open the lighting controls.
The bar above the photo has Add Light and the controls for each light. You can add up to three lights, and they all work the same way. One sun needs one light, so skip Add Light here.
-
Set the color temperature first.
Work from the top of the panel down. Change Color to 3200K to warm the light so it matches the scene.
-
Leave the two position sliders alone.
Left to Right and Low to High move the light around, but dragging the light on the canvas moves those sliders for you.
-
Push Close to Far all the way to Far.
In Aaron’s opinion this is the most important slider. Close means close to the camera. As you move it toward Far, the light passes right by the subject and ends up on the other side of him, which is exactly what you want here. The sun is very far away, so push it all the way.
-
Bring the Intensity all the way up.
It is the sun, so it should be bright. You get a clear highlight around the edge of the subject.

-
Raise the Diffusion slowly.
Diffusion makes the light source softer. It usually improves the result, but it can be too much, so go a little at a time and stop when it looks good.
-
Balance the Original lighting.
This slider sets how much of the photo’s own light stays. Lower it and you get less of the original light and more of the new sunlight. Find the balance for each photo.
If you want to shape light by hand with no credits at all, the Light adjustment layer is the place to start.
Click Done, Then Look at the Detail
Everything up to here was free. This is the part that costs credits.
-
Check the price.
Click the credit usage icon in the bar, open Features and scroll to the bottom. Relight is listed at 30 credits. Nothing has been used yet.
-
Click Done.
Photoshop shows “Generating lighting”, uses the 30 credits and bakes the lighting into the new layer. Turn that layer off and on to see what it added.
-
Zoom in and compare.
Turn it off and on over the original hiker while zoomed in. This is the complaint people have: the relit copy is lower in resolution than the original photo. Aaron agrees that, as it stands, it is not there for professional-level photos.
Compare It With Harmonize, Then Use Both With Lighten
Harmonize is built for composites, so this is not a like-for-like test. It blends a subject into a scene, while Relight adds a light. But it uses 5 credits where Relight uses 30, so it is worth seeing them side by side.
-
Run Harmonize on the original hiker layer.
Turn off the Relight layer, select the original hiker layer and click Harmonize. You get three variations. In the video they all blend the hiker into the scene well, and the tool also adds a shadow under him. Aaron keeps the second. Our Harmonize tutorial covers the tool in full.
-
Compare the resolution.
Zoom in and look at all three: the original layer, the Harmonized layer and the Relight layer. The relit copy has the lowest resolution, the harmonized one is in the middle, and the original is the sharpest.

-
Turn the Relight layer back on and set it to Lighten.
Change its blend mode from Normal to Lighten. Now only the light from the Relight layer is used, on top of the image below. New to blend modes? Start with blending modes in Photoshop.
-
Control the light with Opacity.
Lower the Relight layer’s Opacity to turn the light down. You can click Edit Lighting at any time, but as soon as you click Done again you use another 30 credits. Opacity on a layer set to Lighten costs nothing.
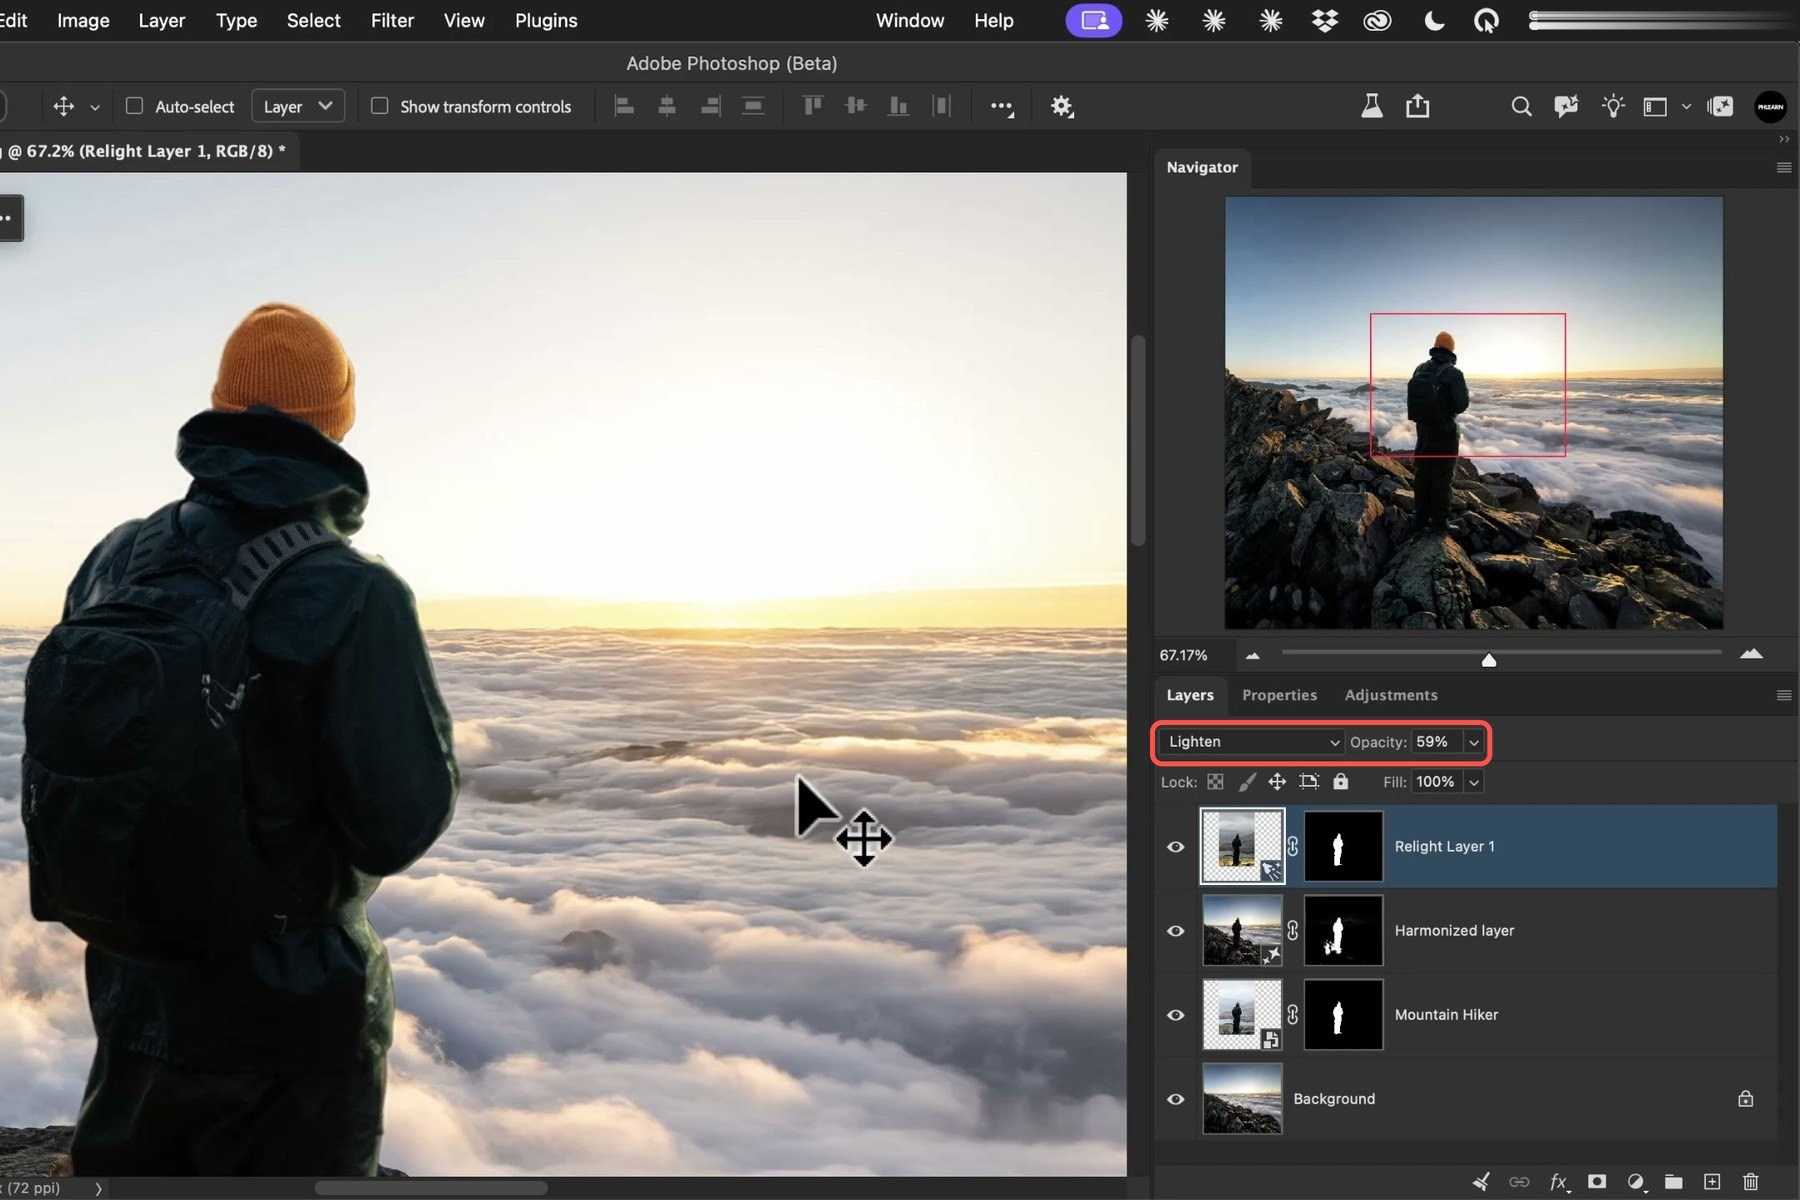
The workflow Aaron recommends for a composite: cut out your subject, add a Harmonize layer, then add a Relight layer on top of it and set it to Lighten.
What Trips People Up
New Relight Layer is not in the Layer menu
Relight in Photoshop is in the Beta only for now. Download Photoshop Beta and get the latest version.
Relight changed only one layer
That is how it works. It relights the layer you had selected, not the whole image. Select the subject layer before you add it.
The light is on the wrong side of my subject
Close to Far is still near Close, which is next to the camera. Push it toward Far until the light passes the subject.
My subject looks soft after clicking Done
The relit copy is lower in resolution than the original. Set it to Lighten so only its light is used over the sharper layers below.
I changed the light and it used credits again
Every time you click Done is another 30 credits in the current Beta. Use the layer’s Opacity for small changes.
When to Use Relight in Photoshop, and When Not To
Use it when you have a clearly defined subject, such as a person or a product. It does not need to be a composite. You can use it on a single photo to add light sources to the subject.
Do not use it for a landscape, or to relight a background. That is not what the tool is meant for.
For a composite, Harmonize does more of the job for fewer credits, and it adds the shadow. Relight is the layer you add on top when you want to decide where the light comes from. You can still paint highlights and shadows by hand for no credits at all.
Aaron’s verdict: it is a really great start. If the credits come down and the resolution goes up, a lot of people who composite will be happy. He would also like predefined lights to choose from, such as sunlight, a fill light, a softbox or a cloudy day. Relight is in beta, so it may change before the full release, and Adobe does tend to listen to feedback.
Quick Reference: Menus, Settings and Credits
- Add a Relight layerLayer > New Relight Layer (Photoshop Beta)
- Cut out the subjectRemove Background
- Match a low sunColor 3200K, Far, Intensity all the way up, some Diffusion
- Lights per Relight layerUp to three
- Keep the original detailRelight layer blend mode: Lighten
- Turn the light down for freeLower the Relight layer’s Opacity
- Composite workflowCut out, Harmonize, then Relight on top set to Lighten
- Relight cost (beta)30 credits every time you click Done
- Harmonize cost5 credits for three variations

Free Downloads
Follow Along on the Same Photos
2 sample images, 1 layered PSD and the 6-page PDF guide with every step and setting. Free with a PHLEARN account.
Relight in Photoshop: Common Questions
What is Relight in Photoshop?
Relight is a new layer type in Photoshop Beta that lets you move the light on a subject after the photo has been taken. You can drag a light around the photo and set its color temperature, distance, intensity and diffusion, and you can add up to three lights.
Where is the Relight layer in Photoshop?
Select the layer you want to relight and go to Layer > New Relight Layer. For now it is only in Photoshop Beta, so download the Beta and get the latest version if you do not see it.
How many generative credits does Relight use?
In the Beta used in the video, Relight uses 30 credits when you click Done. Setting up the light in the preview does not use any. Relight is a beta feature, so this may change.
Does editing the lighting cost credits again?
Yes. You can click Edit Lighting at any time, but as soon as you click Done again you use another 30 credits. To turn the light down without spending credits, set the Relight layer to Lighten and lower its Opacity.
Does Relight lower the quality of my photo?
In our test the Relight layer was lower in resolution than the original photo. Your original is not changed, because Relight duplicates the layer and works on the copy.
How do I keep the original detail when using Relight?
Change the Relight layer’s blend mode from Normal to Lighten. Only the light from the Relight layer is used, on top of the sharper layers below it.
Does Relight work on landscapes or backgrounds?
No. It is meant for subjects, such as people or products. As long as the photo has a clearly defined subject you can change the light on that subject, in a composite or in a single photo.
Does Relight change the whole image?
No. It works layer by layer. Select the layer you want to relight before you choose New Relight Layer.
Should I use Relight or Harmonize for a composite?
Harmonize is built for composites: it blends the subject into the scene and adds a shadow, and it kept more detail than Relight in our test. Aaron recommends using both: cut out the subject, add a Harmonize layer, then add a Relight layer on top set to Lighten.
How many credits does Harmonize use?
In the video, Harmonize uses 5 credits and gives you three variations to choose from.
Does Relight add a shadow under the subject?
No. Relight adds a light. In the video it is Harmonize that adds the shadow under the hiker.
Master Photoshop, Lightroom and Photography
Join PHLEARN PRO for $12.99 a month or $99.99 a year. Cancel anytime, with a 100% money-back guarantee.





