
Download Assets
This tutorial includes 1 photoshop brush. Downloads are free with a PHLEARN account.
- Download the sample images and PSDs from every free tutorial on PHLEARN
- New free tutorials published every week
- One free account — sign up once, then download anything
description
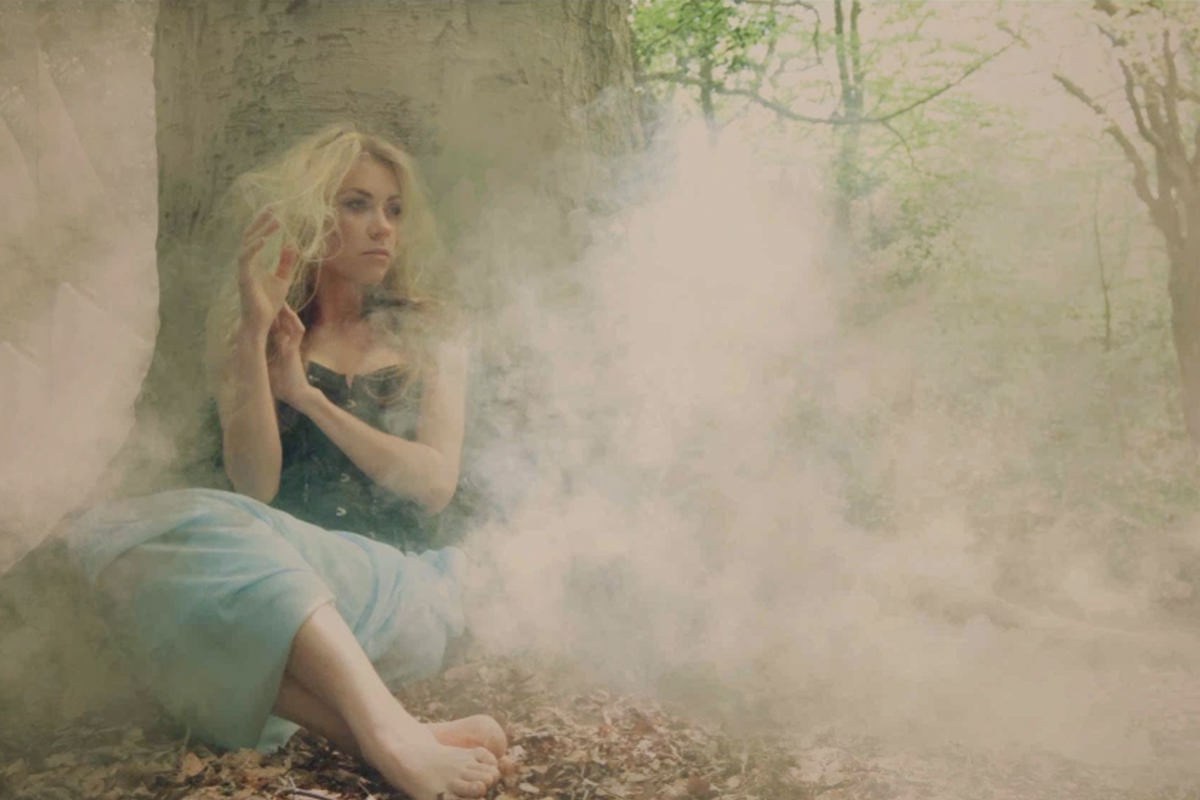
Fog, smoke, and soft, faded detail can turn a technically fine photo into one with real depth and mood, but the effect only reads as natural when it’s built up in layers rather than applied all at once. This walkthrough covers a full atmosphere pass on a portrait: fixing blown highlights, painting layered fog with a custom brush, toning the color to match the light, fading detail to direct attention, and finishing with a sharpening pass on the subject.
Enjoying This Free Tutorial?
We publish a new free tutorial every week, each one with sample images and PSDs you can download and follow along with. Sign up and they land straight in your inbox, along with early word on sales, events and subscriber-only offers.
Tips to Add Atmosphere in Your Images
Fog, smoke, and soft, faded detail can turn a technically fine photo into one with real depth and mood, but the effect only reads as natural when it’s built up in layers rather than applied all at once. This walkthrough covers a full atmosphere pass on a portrait: fixing blown highlights, painting layered fog with a custom brush, toning the color to match the light, fading detail to direct attention, and finishing with a sharpening pass on the subject.
Getting Started: Fixing Exposure with Curves and Apply Image
Before adding any atmosphere, blown-out highlights in the original photo need a quick fix using a trick that targets the correction automatically based on brightness.
-
Add a Curves Adjustment Layer
Add a Curves adjustment layer and drag the curve down to darken the image overall.
-
Apply Image to the Layer Mask
Click the adjustment layer’s mask, go to Image > Apply Image, and click OK.
Why Apply Image Creates This Kind of Mask
Running Apply Image on a layer mask generates a grayscale mask based on the image’s own brightness values, which makes the darkening adjustment more visible in the lighter, blown-out areas and less visible in the darker areas that didn’t need correcting. It won’t produce a perfect result on its own, but it targets the fix roughly where it’s needed without any manual masking.
Painting Layered Fog with a Custom Brush
Building fog in layers, from dark to light, produces a much more convincing result than a single flat application.
-
Select a Fog Brush
Choose a soft, cloud-shaped fog brush and pick a dark color for the first pass.
-
Paint Dark Fog in the Background
On a new layer, paint the dark fog color into the background areas of the image.
-
Add a Lighter Fog Layer
Create another new layer, choose a lighter color, and paint additional fog over the dark base, building the effect up gradually.
-
Add an Even Lighter Fog Layer
Repeat once more with an even lighter color in select areas to finish building up the fog’s depth.
Tinting the Fog to Match the Light
-
Group and Mask the Fog Layers
Select the fog layers and group them together, then add a layer mask and use the same fog brush to selectively fade parts of the fog so it dissipates naturally rather than sitting as a solid block.
-
Adjust the Fog’s Color Channel
Press Ctrl + L (Cmd + L) on the fog group, switch to the Blue channel, and adjust the levels to shift the fog away from plain gray toward a warmer or cooler tone that matches the light in the scene — gray fog often reads as flat because it isn’t reflecting any actual light color.
Adding Fog Behind a Specific Element
Sometimes extra fog is needed only behind a specific object, like a tree, rather than across the whole background.
-
Select the Area with the Lasso Tool
Make a rough selection around the specific area, like the space behind a tree, using the Lasso tool.
-
Load the Selection as a Layer Mask
Create a new layer and click the Layer Mask icon with the selection active, so the fog you add can only appear in that specific area.
-
Paint Additional Fog into That Area
Paint more fog with the fog brush, now confined to just that masked region, which adds a subtle sense of depth and distinction between foreground and background elements.
Why an Imperfect Selection Can Help Here
Using the Lasso tool by hand, rather than a perfectly clean Pen tool path, naturally introduces small irregularities along the selection edge. Those irregularities can actually read as more convincing, since they mimic the uneven, organic edge of a real object like a tree rather than a suspiciously smooth, computer-generated line.
Toning Color with Levels and Curves Channels
With the fog and light corrected, a final color-toning pass over the whole image adds mood and cohesion.
-
Add a Levels or Curves Adjustment Layer
Add a Levels or Curves adjustment layer over the whole image for color toning — either works, so use whichever you’re more comfortable with.
-
Adjust Individual Color Channels
Switch between the Red, Green, and Blue channels and adjust each output level slightly, keeping in mind that colors work in opposing pairs — blue and yellow are opposites, as are red and cyan — so dragging a channel’s slider one direction pushes the image toward that channel’s opposite color.
-
Add a Second Adjustment for Extra Warmth
Add another Curves layer, switch to the Red channel, and add a small amount more red if the image needs additional warmth.
Fading Detail to Draw Attention to Your Subject
Selectively softening detail in less important areas of a photo is a technique borrowed directly from traditional painting, where an artist leaves fine detail out of everywhere except the subject’s face to guide the viewer’s eye.
-
Select a Large, Soft Brush
Choose a large, soft-edged regular brush.
-
Paint Over Areas to Fade Their Detail
Paint directly over less important areas of the image with the brush to soften and fade their detail, working with the existing fog to reduce visual clutter and pull attention toward the subject.
Sharpening Your Subject with High Pass
Since so much of the image has just been softened with fog and faded detail, a final sharpening pass targeted specifically at the subject helps them stand out clearly against the atmosphere.
-
Stamp a Merged Layer
Press Shift + Alt/Option + Ctrl/Cmd + E to stamp a new merged layer combining everything visible so far.
-
Desaturate and Set to Soft Light
Desaturate the stamped layer and change its blend mode to Soft Light.
-
Apply the High Pass Filter
Go to Filter > Other > High Pass and apply it to sharpen fine detail on that layer.
-
Switch to Linear Light for a Stronger Effect
Change the blend mode from Soft Light to Linear Light for a more pronounced sharpening effect.
Why Invert the Mask Before Painting the Sharpening In
Applying this sharpening layer globally would counteract the soft, faded look built up in the earlier steps. Inverting the layer’s mask to hide the effect everywhere, then painting it back in with white only over the subject’s face and hands, keeps the sharpening focused exactly where it draws the most attention while leaving the atmospheric fade intact elsewhere.
Fixing Local Exposure with the Darken Blend Mode
-
Sample a Color and Paint with Darken
Grab a color with the brush tool, set the layer’s blend mode to Darken, and paint loosely over any remaining overly bright area, like a leg that’s still too light.
Why Darken Mode Allows a Loose Paint Job
With the blend mode set to Darken, painting only affects pixels that are lighter than the color you’re painting with, so the correction automatically shows up only in the areas that are actually too bright. That means you don’t need to paint carefully or mask precisely — the blend mode itself keeps the effect contained.
Common Mistakes to Avoid
Applying fog as a single flat layer, rather than building it up gradually with darker and lighter passes, tends to look artificial and less like real atmospheric depth. It’s also easy to leave fog looking plain gray instead of tinting it to match the scene’s actual light color, and to skip masking the final sharpening pass to just the subject, which undoes the intentional softness built up everywhere else in the image.
More Free Photoshop Tutorials
If you enjoyed these atmosphere-building techniques, these free tutorials cover related color and finishing work:
- Curves vs Levels in Photoshop: What the Difference Actually Is
- How to Color Grade in Photoshop using Camera Raw
- Three Ways to Use Blend If in Photoshop
Why This Approach Works
What makes this atmosphere effect convincing rather than obviously added is that almost every step relies on brightness and blend modes to do the targeting work automatically, instead of painstaking manual masking. Using Apply Image to build the exposure-correction mask, tinting the fog through a color channel rather than a flat color fill, and using Darken mode to fix a bright spot without careful masking are all examples of letting Photoshop’s own math handle where an effect should and shouldn’t show up. Building the fog in multiple layers of increasing lightness, then fading detail elsewhere in the frame, mimics how real fog and atmospheric light actually behave — layered, uneven, and concentrated more in some areas than others. And finishing with a High Pass sharpening pass masked specifically to the subject is what keeps the person from getting lost in all that softness; the fog and fade pull attention away from the background precisely so the sharpened subject can pull it right back.
Final Thoughts
Atmosphere in a photo isn’t one filter or one brush stroke — it’s the accumulation of several small, deliberate choices: a brightness-based exposure fix, layered fog with real color, faded detail away from the subject, and a masked sharpening pass to bring focus back. None of these individual techniques are complicated on their own, but combined thoughtfully, they add up to a portrait that feels like it has real depth and mood rather than a single obvious effect layered on top.
New Free Tutorials View All »











Enjoying This Free Tutorial? Go Further with PRO.
Unlock Full Sample Files, PSDs, and Hundreds of Masterclasses!

Download full project assets, original PSDs, and RAW images for every lesson
Unlimited access to our complete library of PRO Photoshop & Lightroom courses
Instant 4K Ultra HD streaming on all devices, anytime, anywhere
Full access to our entire library of Photoshop Actions, Presets, and LUTs
Flexible monthly and annual membership plans
Cancel anytime with zero hassle or commitments