
Download Assets
This tutorial includes sample images. Downloads are free with a PHLEARN account.
- Download the sample images and PSDs from every free tutorial on PHLEARN
- New free tutorials published every week
- One free account — sign up once, then download anything
description
The invisible-person effect is not one trick but the same substitution repeated: shoot the scene locked on a tripod, then take an extra frame of every limb with the clothing empty in exactly that position. Load the lot with File > Scripts > Load Files into Stack, then mask each empty-clothing piece into place, match it with clipped Curves and Color layers, and clean the edges with the Pen tool.
Enjoying This Free Tutorial?
We publish a new free tutorial every week, each one with sample images and PSDs you can download and follow along with. Sign up and they land straight in your inbox, along with early word on sales, events and subscriber-only offers.


How to Make Yourself INVISIBLE in Photoshop
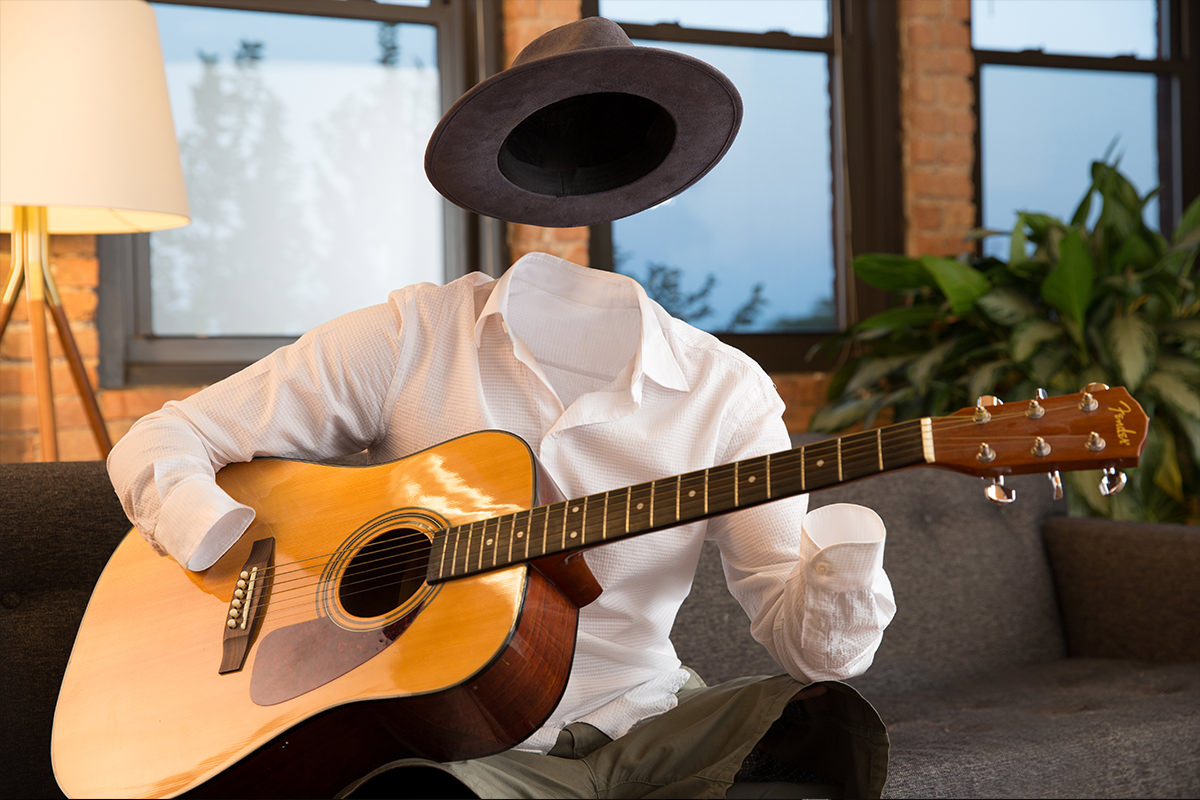
Making a person disappear from a photo while their clothes and props stay behind is one of the more involved compositing effects out there, but it comes down to a repeatable process: photograph the same scene multiple times, once with your body in each position and once with just the empty clothing in that exact spot, then blend those pieces together in Photoshop. It takes patience, but the technique itself isn’t complicated once you understand the pattern.
Planning the Photo Shoot: Gear and Wardrobe
This effect calls for a camera locked down on a tripod, a computer to tether the camera to, and ideally a second person to help, since lining everything up is much easier with an extra set of hands. A prop to hold or interact with — a guitar, in this case — sells the illusion far better than an empty pose would, since it gives the invisible body something believable to be doing.
Why White Clothing Makes Compositing Easier
Wearing simple, solid-colored clothing — ideally white — makes the Photoshop side of this effect dramatically easier. Blending white fabric against more white fabric from a separate shot is a much more forgiving task than trying to match a patterned or textured garment, where every seam has to line up exactly for the illusion to hold.
Shooting Tethered to Line Up Every Frame
Shooting tethered — connecting the camera directly to a computer so each photo appears immediately on screen — makes this entire process far more manageable. A program like (Capture One) can overlay the current live view on top of a previous shot, making it much easier to see exactly how a new frame lines up against the one before it. Without a tethering setup, marking reference points on the back of the camera’s LCD screen with removable tape or a dry-erase marker is a workable substitute for keeping body positions consistent between shots.
Photographing Empty Clothing for Each Body Part
Start with one base photo showing the full pose — in this case, sitting on a couch holding a guitar while wearing a hat and long-sleeve shirt. From there, take a separate photo for every part of the body that needs to disappear: one with each hand removed but the sleeve left in its original position, one with the shirt collar empty, one for each pant leg, and one showing the hat resting in place without a head underneath it. Every visible part of the body needs its own corresponding “empty clothing” shot in the exact same position. Shooting a few extra frames of each area, rather than the bare minimum, gives more material to work with once compositing begins — and starting with just one arm, or an arm and the head, is a reasonable way to try this effect for the first time before attempting a full-body removal.
Loading Every Photo into One Document as Layers
In Photoshop, go to File, down to Scripts, and choose Load Files into Stack, then select every image from the shoot at once. Checking the option to automatically align the source images helps compensate for any small shifts between shots, and the result is a single document with every photo stacked as its own labeled layer, ready to be assembled piece by piece.
Blending in the Arm Using Layer Masks
Lower the opacity of the layer containing the empty-sleeve replacement so you can see through it and line it up against the layer below. Once it’s positioned closely, bring the opacity back to full, hold Alt or Option and click the layer mask icon to add a black (fully hidden) mask, then paint white directly onto that mask to reveal the replacement sleeve exactly where it’s needed.
Transforming a Selection to Fine-Tune Alignment
When a replacement layer is close but not perfectly aligned, select the Rectangular Marquee tool and make a selection slightly larger than the area needing adjustment, then press Ctrl or Cmd+T to transform just that selected region. Holding Ctrl or Cmd while dragging a corner lets you nudge one part of the image independently, which is useful for correcting a small misalignment without distorting the rest of the layer — since only a specific portion of the frame is being used, an aggressive transform on that small area doesn’t visibly skew anything else.
Matching Color and Brightness with a Clipped Curves Adjustment
A replacement sleeve pulled from a different frame often won’t match the lighting or color of its surroundings exactly. Adding a Curves adjustment layer and clipping it to the sleeve layer (clicking the clipping icon between the two layers) restricts the brightness change to just that one layer. Inverting the adjustment’s mask with Ctrl or Cmd+I hides the effect everywhere, then painting white only where the mismatch exists brings the brightness into line locally rather than affecting the whole composite. A similar clipped layer, painted with a sampled color and set to the Color blend mode, can correct a color cast — like warm lighting shifting a white sleeve toward yellow — the same way.
Refining Edges with the Pen Tool
For a cleaner edge than a rough brush mask can achieve — around a collar or sleeve, for instance — the Pen tool traces a precise path just slightly inside the actual edge of the fabric. Right-clicking that path and choosing Make Selection, with a small feather amount like 0.5 pixels, produces a clean selection that can be painted onto a layer mask to hide anything outside the intended boundary. Any small imperfections left over after this — a spot that doesn’t quite blend — can be smoothed out afterward with the Healing Brush or Clone Stamp tool, sampling nearby fabric and painting directly over the seam.
Removing the Head with the Hat Layers
The head disappears using the same layered approach: one hat layer fills in the background behind where the head used to be, and a second hat layer, transformed and masked into place, completes the hat itself sitting seemingly on nothing. The Pen tool again helps define a sharp, accurate edge along the bottom rim of the hat, keeping that boundary crisp rather than soft or uneven.
Rebuilding the Collar in Multiple Layers
The collar is typically the hardest part of this effect, since it involves fine detail on multiple sides at once. Duplicating the collar layer and working on just the inside of the collar first, then adding further duplicated layers for the left side, right side, and top edge separately, breaks the problem down into smaller, more manageable pieces rather than trying to solve the entire collar in one layer. Each piece gets its own layer mask, and any exposure mismatch between pieces can be corrected the same way as the sleeve, with a clipped Curves adjustment.
Cleaning Up Stray Details Like Clothing Tags
Small details like a visible clothing tag inside a collar or hat are easy to overlook but worth removing for a clean final result. The Healing Brush tool, sampling a nearby clean area and painting directly over the tag, handles this kind of small cleanup quickly without needing a new selection or layer mask.
More Free Photoshop Tutorials
- Select Subject and Refine Edges in Photoshop
- Three Ways to Use Blend If
- Curves vs. Levels: Learn the Difference
Why This Effect Works
The invisible-person effect works because it breaks an impossibly complex composite down into a series of small, manageable substitutions — one body part at a time, each handled with the same basic pattern of positioning, masking, and blending. Shooting on a locked tripod (with a camera like a Canon 5D Mark III) in manual mode keeps every frame consistent enough to composite together, tethering makes real-time alignment dramatically easier, and choosing plain white clothing removes one of the hardest parts of any composite — matching pattern and texture — from the equation entirely. Layer masks, clipped adjustment layers for color and brightness, and the Pen tool for precise edges are the same tools used throughout every part of the effect, just applied repeatedly to each limb, the head, and the collar in turn.
Final Thoughts
Making yourself disappear in Photoshop is genuinely achievable with the right shoot and some patience in post-production — it’s not a single trick so much as the same masking-and-blending process repeated carefully across every part of the body that needs to vanish. Starting small, with just one limb or the head, is a smart way to learn the pattern before attempting a full-body removal, since the difficulty scales directly with how many separate pieces need to be composited together.
New Free Tutorials View All »











Enjoying This Free Tutorial? Go Further with PRO.
Unlock Full Sample Files, PSDs, and Hundreds of Masterclasses!

Download full project assets, original PSDs, and RAW images for every lesson
Unlimited access to our complete library of PRO Photoshop & Lightroom courses
Instant 4K Ultra HD streaming on all devices, anytime, anywhere
Full access to our entire library of Photoshop Actions, Presets, and LUTs
Flexible monthly and annual membership plans
Cancel anytime with zero hassle or commitments