

Download Assets
Download Assets
This tutorial includes 2 sample images and 1 RAW file. Downloads are free with a PHLEARN account.
- Free sample files with every tutorial on PHLEARN
- New tutorials published every week
- Unlimited downloads with your free PHLEARN account
Watch the Full Series
10 Days of AI in Photoshop & LightroomWatch all 10 tutorials free
description
Lens Blur and AI Denoise solve two problems that account for most of the gap between a photograph that looks professional and one that doesn’t, and neither is about composition: background separation — the shallow depth of field you get from fast glass you may not own — and noise, the price of shooting anything in low light.
Lightroom Classic now handles both. Lens Blur detects your subject and blurs behind it with depth-aware falloff, and AI Denoise cleans high-ISO RAW files without turning skin to plastic. Neither needs a mask, and neither costs generative credits.
Continue Watching 10 Days of AI
JOIN 10 DAYS OF AI (FOR FREE!)
Ready to jump in? Sign up and we’ll email you a printable calendar and daily class schedule so you can get started right away!
Image Source


Lens Blur and AI Denoise Fix the Two Things a Cheap Lens Can’t
Two problems account for most of the difference between a photograph that looks professional and one that doesn’t, and neither is about composition. The first is background separation — the shallow depth of field you get from fast glass you may not own. The second is noise, the price of shooting anything in low light.
Lightroom Classic now handles both automatically. Lens blur detects your subject and blurs behind them with realistic falloff, and AI Denoise cleans high-ISO RAW files without turning skin into plastic. Neither needs a mask, and both are free of generative credits.
Why These Aren’t the Old Versions of the Same Tools
The Blur Understands Depth
A Gaussian blur on a background mask blurs everything equally. Lens blur builds a depth map, so things a little behind your subject blur a little and things far behind blur a lot — which is how an actual lens behaves.
The Denoise Preserves Detail
Traditional noise reduction is a trade: less grain, less texture. The AI version separates noise from detail rather than smoothing both, so eyelashes and fabric survive.
Both Are One-Click, Then Adjustable
You get a result immediately and then dial it. That order matters — it’s much easier to judge how much blur you want when you can see some.
Apply Lens Blur
-
Open the Develop Module and Find Lens Blur
It has its own category in the right-hand panel.

-
Click Apply
Lightroom analyses the image, finds the subject, and blurs behind it. This first result is a starting point rather than an answer.
-
Pull the Blur Amount Back
The default is usually too strong. Subtle is what reads as a real lens — heavy blur reads as an effect, and it’s the single most common way this gets overdone.
-
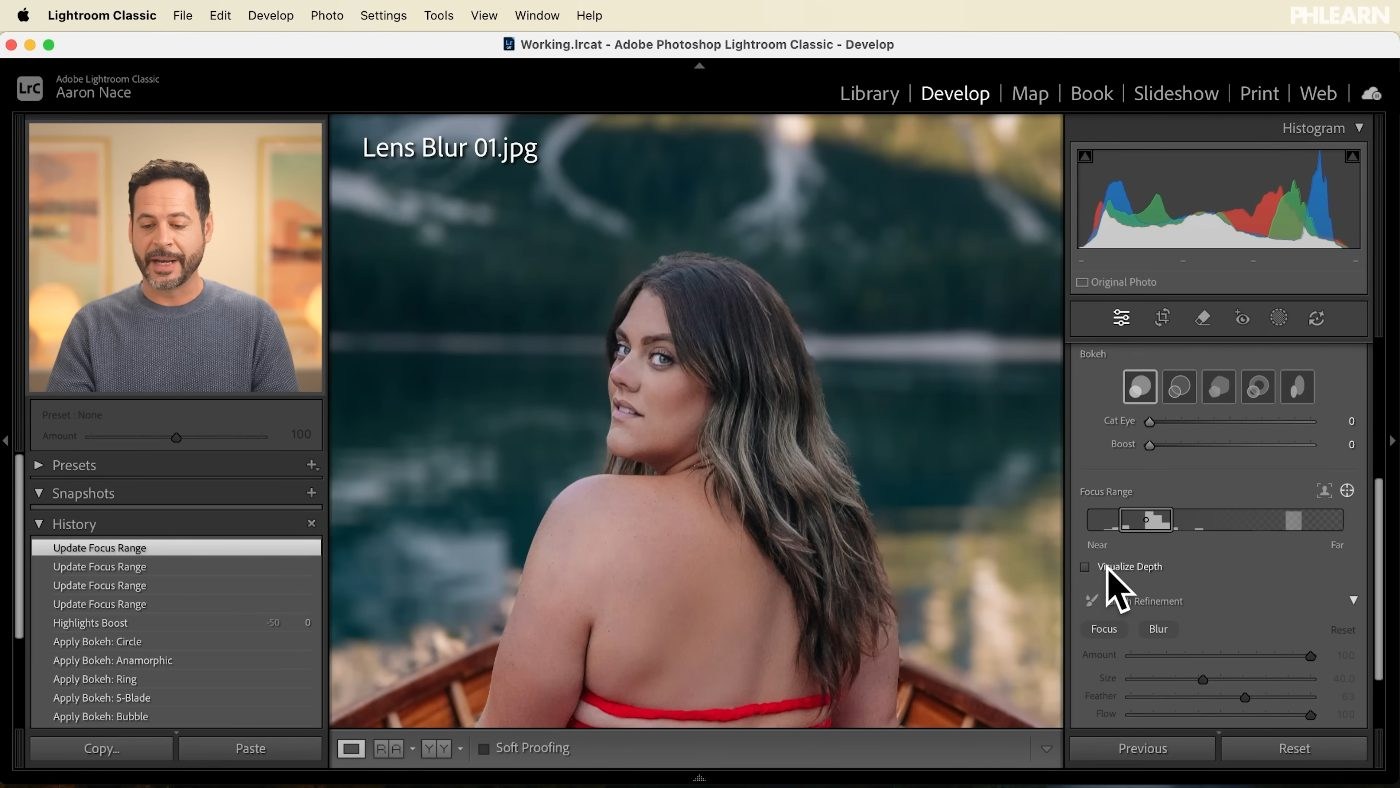
Choose a Bokeh Shape
Circular, Cat Eye and the rest change the character of the out-of-focus highlights. Cat Eye mimics the optical distortion real lenses show toward the frame edges, which is a convincing detail on images with bright points behind the subject.
-
Set the Focus Range
Drag the slider, or use the target icon to draw a rectangle over your subject and let Lightroom work out the plane of focus from it. The second method is faster and usually more accurate.
-
Press / to Check Before and After
Slash toggles the comparison. Worth doing at every stage — the blur creeps up on you, and the before view is the fastest reality check.
Refine the Blur Where It Matters
-
Click Visualize Depth
This shows a greyscale overlay of what the AI thinks is near and far. If the blur looks wrong somewhere, this is where you see why — it’s usually a depth estimate that’s gone astray around a complicated edge.

-
Open Brush Refinement and Paint the Corrections
Paint areas more in focus or more blurred by hand. Hair is the usual culprit: the AI cuts a clean line where reality has a soft, complicated edge.
-
Lower the Brush Flow and Amount First
Full-strength corrections show as obvious patches. Small values, built up over several passes, blend into what the AI produced instead of fighting it.
-
Note That It Works Over Retouched Areas
If you’ve already removed something from the background generatively, lens blur applies cleanly over the repaired area — so the removal-then-blur order works without artefacts.
Remove Noise With AI Denoise
-
Scroll to the Detail Category
Also in the Develop module’s right-hand panel, below Lens Blur.
-
Click Denoise
Lightroom processes the file and strips the noise while holding onto detail. It takes a moment — this is real computation, not a slider.
-
Set the Amount in the Dialog
Maximum isn’t automatically right. Push it until the noise goes, then ease back if the image starts looking waxy — a little grain reads as photographic, none at all sometimes doesn’t.

Things Worth Knowing Before You Start
Denoise Is RAW-Only, For Now
It won’t run on JPEGs. Adobe has said support is planned, but today this is a reason to shoot RAW if you work in low light.
Too Much Blur Is the Giveaway
Real shallow depth of field has a gradient. A background that goes uniformly soft right at the subject’s outline looks like software, however good the edge detection was.
Check the Hair at 100%
Fine edges are where depth estimation struggles. Zoom in before you decide the blur is finished, and use Brush Refinement if it isn’t.
Denoise Then Sharpen, Not the Reverse
Sharpening first amplifies the noise you’re about to ask the AI to remove, and makes its job harder.
What These Tools Actually Buy You
It’s worth saying plainly what’s happened here: two things that used to require expensive glass and good light are now available to anyone with a RAW file. That’s a genuine democratisation, and being sniffy about it doesn’t help anyone.
What hasn’t changed is that the blur has to be believable and the denoise has to stop before the image goes plastic. Both tools will happily go too far, and knowing where to stop comes from having looked closely at a lot of photographs — which is still the skill underneath all of it.
Try It on a Low-Light RAW File
Open Lens Blur, click Apply, pull the amount back further than feels right, pick a bokeh shape, set the focus range with the target tool, then check the depth visualisation and clean up the hair with a low-flow brush. Scroll to Detail, run Denoise, and set the amount just short of maximum. Download the free sample RAW file and work through both — then run them on a photograph you’d written off as too noisy. For color and masking in Lightroom in depth, our PRO Power of Masking and Coloring in Lightroom goes considerably further.
Quick Reference: Keys, Menus and Settings
- Apply Lens BlurDevelop module > Lens Blur > Apply, then keep Blur Amount subtle
- Set the focusFocus Range: target icon, draw a rectangle around the subject
- Check and correctVisualize Depth; Brush Refinement with Flow and Amount way down
- Before and after\, the key above Enter/Return
- Remove before blurringRemove tool with generative AI, paint over the boats, Alt/Option to subtract, then Remove
- Remove noiseDevelop module > Detail > Denoise (RAW files)
- In PhotoshopFilter > Camera Raw Filter > Lens Blur
Free Downloads
Follow Along on the Same Photos
Get the two sample images for Lens Blur, one with boats to remove first, and the ISO 1250 RAW file for AI Denoise. Free with a PHLEARN account.
Lens Blur and AI Denoise: Common Questions
Where is Lens Blur in Lightroom Classic?
In the Develop module, Lens Blur has its own section in the right-hand panel. Click Apply and Lightroom analyzes the image, detects your subject and blurs the background.
Why does my lens blur look fake?
Usually the Blur Amount is too high. Aaron keeps it on the subtle side, because heavy blur doesn’t look realistic.
What do the bokeh options do?
They change how the out-of-focus areas look. Aaron tends to use the standard shape; Cat Eye stretches out the background, and Boost Highlights brightens light sources behind the subject.
The wrong part of my photo is in focus. How do I fix it?
Under Focus Range, click the target icon and draw a rectangle around your subject. Aaron finds this isolates the subject very well when the automatic detection misses.
How do I fix the blur around hair?
Click Visualize Depth to see what the AI thinks is near and far. Then open Brush Refinement, bring Flow and Amount way down, and paint focus or blur along the edge. Cmd/Ctrl + Z undoes a stroke that’s too strong.
Can I remove objects first and still use Lens Blur?
Yes. In the video Aaron paints over the boats with the Remove tool using generative AI, holding Alt/Option to take back any part of the subject, then clicks Remove. Lens Blur then applies cleanly over the cleaned-up background.
Can I use Lens Blur in Photoshop?
Yes, through Camera Raw. Go to the Filter menu, open the Camera Raw Filter and you’ll find Lens Blur there too.
How do I use AI Denoise in Lightroom Classic?
In the Develop module, go to the Detail section and click Denoise. It removes the noise while keeping detail, and a slider lets you choose how strong it is.
Does AI Denoise work on JPEGs?
Not when this video was recorded; it worked on RAW photos only. Aaron notes Adobe has announced JPEG support for the future.
Are the sample files free?
Yes, with a free PHLEARN account. You get 2 sample images and 1 RAW file: the two Lens Blur photos and a CR3 shot at ISO 1250 for AI Denoise.
Master Photoshop, Lightroom and Photography
Join PHLEARN PRO for $12.99 a month or $99.99 a year. Cancel anytime, with a 100% money-back guarantee.





