
Download Assets
This tutorial includes 2 sample images, 1 sample PSD and 1 PDF guide. Downloads are free with a PHLEARN account.
- Download the sample images and PSDs from every free tutorial on PHLEARN
- New free tutorials published every week
- One free account — sign up once, then download anything
Free PDF Guide · 4 Pages
This Tutorial as a Step-by-Step PDF
Walks through dragging in a photographed flare set to Screen, flipping it with Ctrl/Command+T, warming it with Filter > Camera Raw Filter on a Smart Object, two Radial Gradient masks for the haze, bringing Highlights down to protect the face, and a reversed Gradient Map at 20%. Keep it next to your keyboard.
description
A lens flare effect in Photoshop only looks real when the flare is a photograph, not a filter. This tutorial builds the whole warm-afternoon look from one.
A photograph rarely comes out of the camera looking like a warm summer afternoon. In this free tutorial we build that look from scratch: a real photographed lens flare dropped in on Screen, warmed in Adobe Camera Raw, and positioned to match the light already in the shot.
Then we add the haze that actually sells it, using radial gradient masks in Camera Raw to lift the blacks and warm the corner of the frame, and finish with a Gradient Map that colors the flare and the photograph together. Every step stays editable to the end.
Enjoying This Free Tutorial?
We publish a new free tutorial every week, each one with sample images and PSDs you can download and follow along with. Sign up and they land straight in your inbox, along with early word on sales, events and subscriber-only offers.
Image Source
Photography by Dat Tae Studio, sourced from Pexels.
How to Create a Lens Flare Effect in Photoshop
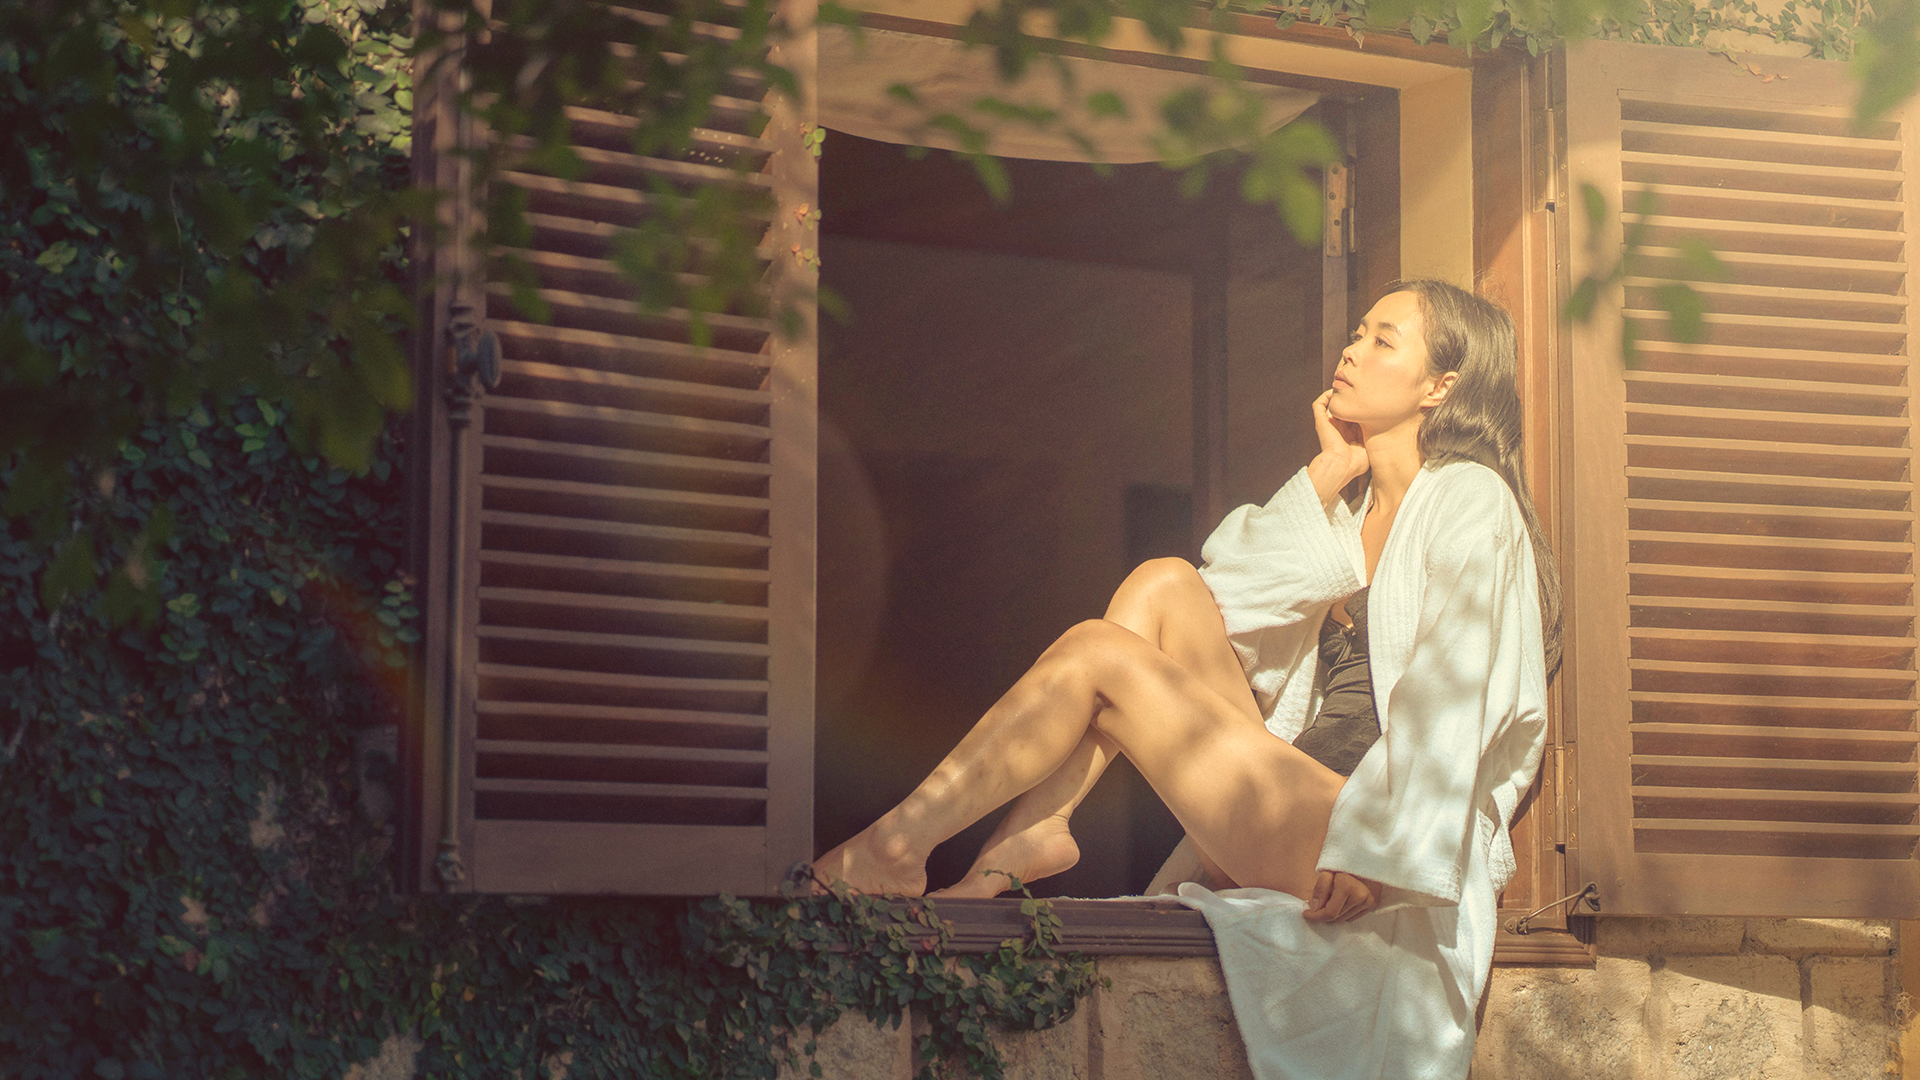
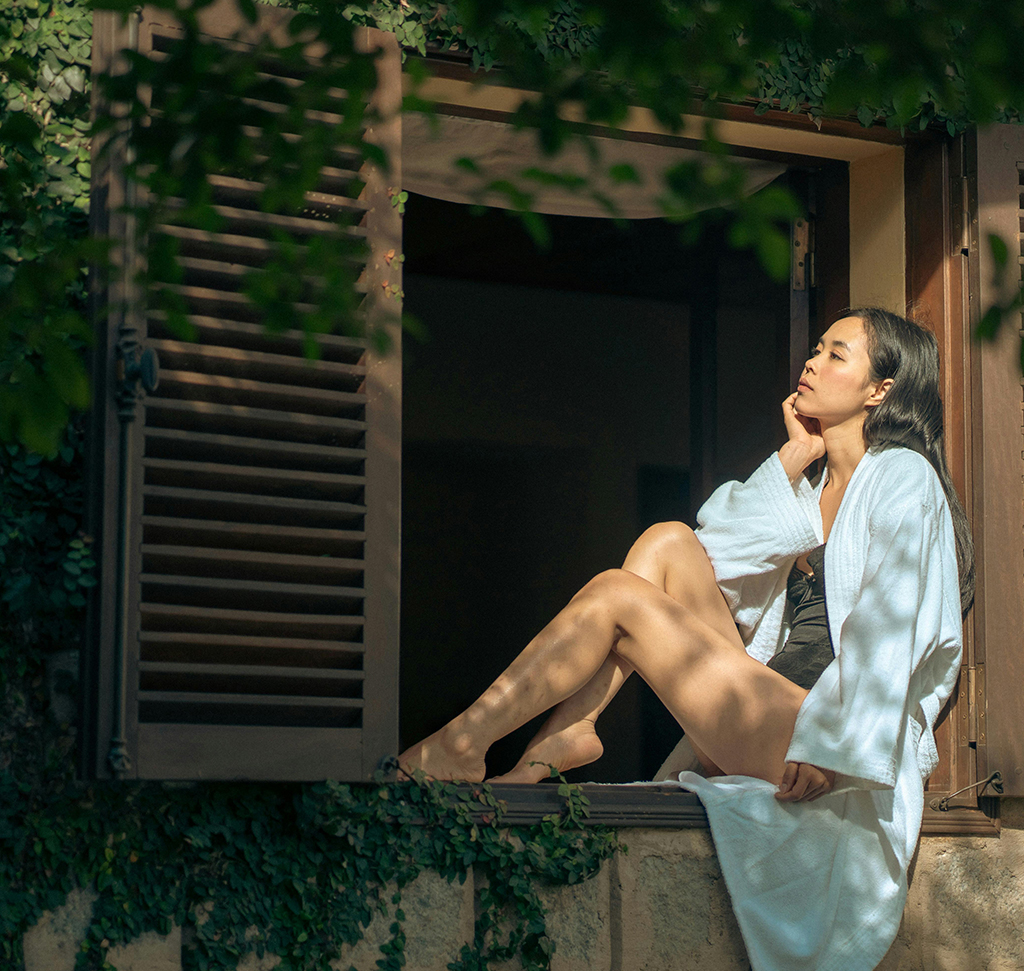
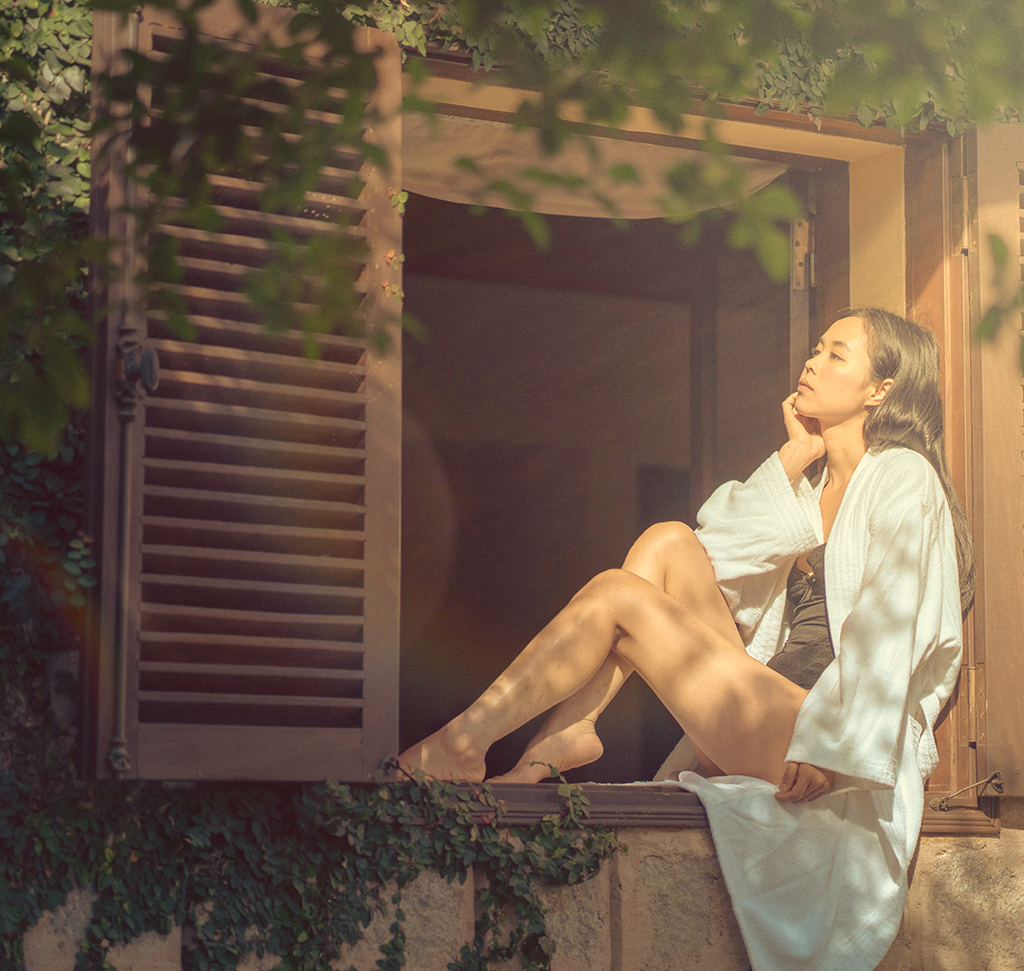
A photo that looks like a warm summer afternoon — sunlight raking across your subject, a little haze in the corner of the frame — is rarely the photo that came out of the camera. It is usually a flare, some warmth and a gradient map stacked on top of an ordinary shot.
This tutorial builds that look in four passes: drop in a real photographed flare, warm it, add a light haze to the original photograph with Camera Raw masking, then color the whole frame with a gradient map. Everything stays editable to the end.
Start With a Photographed Flare
Rather than a built-in filter, this effect starts with an actual flare image. Photoshop has an Adobe Stock tab built into the start screen — click it, tick the Free filter, and search for lens flare. There are a lot of good options, and because they are photographs they carry the imperfections a generated flare tends to miss.
-
Open your base image
A portrait with some existing directional light gives the effect something to agree with.
-
Find a flare on Adobe Stock
Open the Adobe Stock tab, tick Free, and search for lens flare.
-
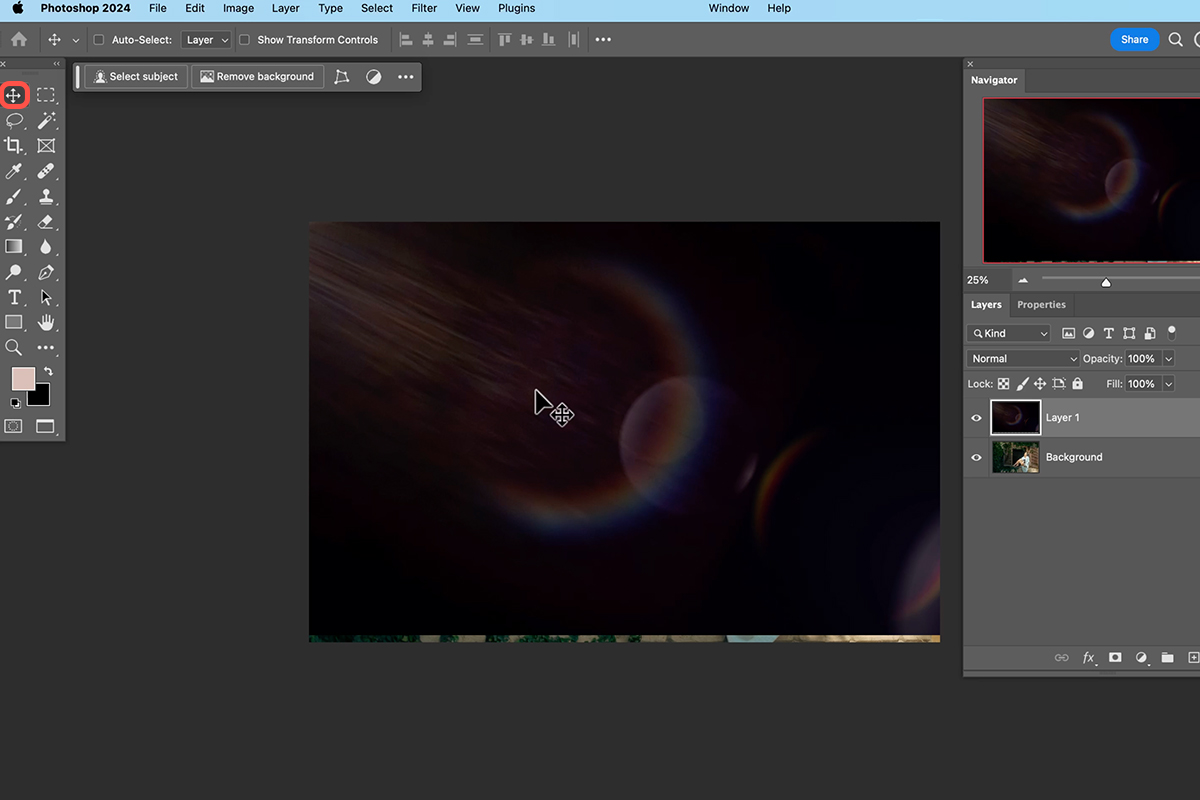
Drag the flare into your document with the Move Tool
Click and drag from one tab to the other. F4 gives you a full-screen view to work in.
Screen: the Blend Mode That Does the Work
Dropped in as a normal layer, the flare is a black rectangle covering your photo. Change the layer’s blend mode from Normal to Screen and it composites properly.
Why Screen Is the Right Choice Here
Flare plates are shot as bright streaks on a black field, and Screen discards black while keeping everything brighter than it. That is the entire reason this technique works with a single click rather than a cut-out. It is worth understanding the rest of the set too — how blending modes actually work and what each one is for will save you guessing on the next composite.
-
Set the layer blend mode to Screen
The black field drops away and only the flare remains.
-
Press Ctrl or Cmd + T to transform
Then use the contextual task bar to flip horizontally if the light is coming from the wrong side.
-
Position and scale it
Match the flare to where the light in your photo is actually coming from. You do not need to use all of the plate.
Warming the Flare in Camera Raw
Most stock flares come in cooler than a summer afternoon should look. The fastest way to fix that is Adobe Camera Raw, which is essentially Lightroom’s editing panel living inside Photoshop as a filter.
Convert to a Smart Object Before Any Filter
Right-click the flare layer and choose Convert to Smart Object before you go anywhere near the Filter menu. Do this every single time you are about to apply a filter. It costs one click and it turns a permanent change into a setting you can reopen, adjust or switch off at any point — which matters here, because you will come back and re-warm this later once the rest of the image exists. If Smart Objects are new to you, this is the habit worth building first, and the fuller walkthrough covers what else they unlock.
-
Right-click the flare layer and Convert to Smart Object
A small badge appears on the layer thumbnail confirming it worked.
-
Go to Filter and choose Camera Raw Filter
The full Camera Raw panel opens on your flare layer alone.
-
Push the Temperature slider warm
In the example this lands around +46 — enough to read as sunlight rather than daylight.
-
Add a touch of magenta with Tint, then click OK
A little magenta keeps the warmth from going orange and flat.
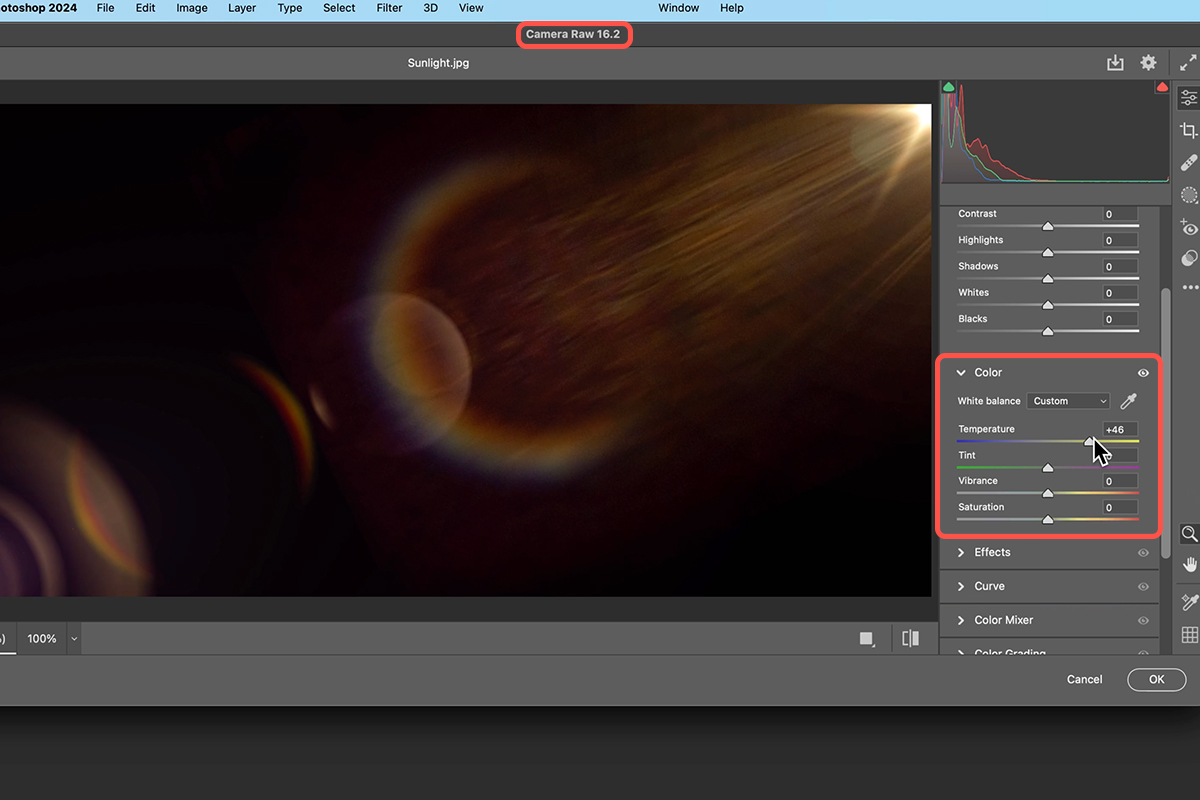
To change any of it later, double-click Camera Raw Filter under the layer in the Layers panel and the whole panel reopens exactly as you left it. That is the payoff for converting first. There is a lot more you can do from this panel — color grading in Camera Raw and a complete tour of Camera Raw are both good next steps.
Building the Light Haze on the Photograph
The flare is only half of it. The other half is haze in the photograph itself — the wash of warm light that spills across a frame when the sun is just outside it. That gets built on the original image, not on the flare layer.
-
Select the background layer and convert it to a Smart Object
Same right-click, same reason.
-
Open the Camera Raw Filter on it
This time you are editing the actual photograph.
-
Open the masking tools and add a Radial Gradient
Click and drag in from the side the light is coming from. A high feather value keeps the edge invisible.
-
Bring contrast down, shadows up and blacks up
Lifting the black point is what creates the hazy, washed look. Contrast is what fights it.
-
Warm the temperature inside the mask and add a little magenta
The light spilling in should be warmer than the rest of the frame.
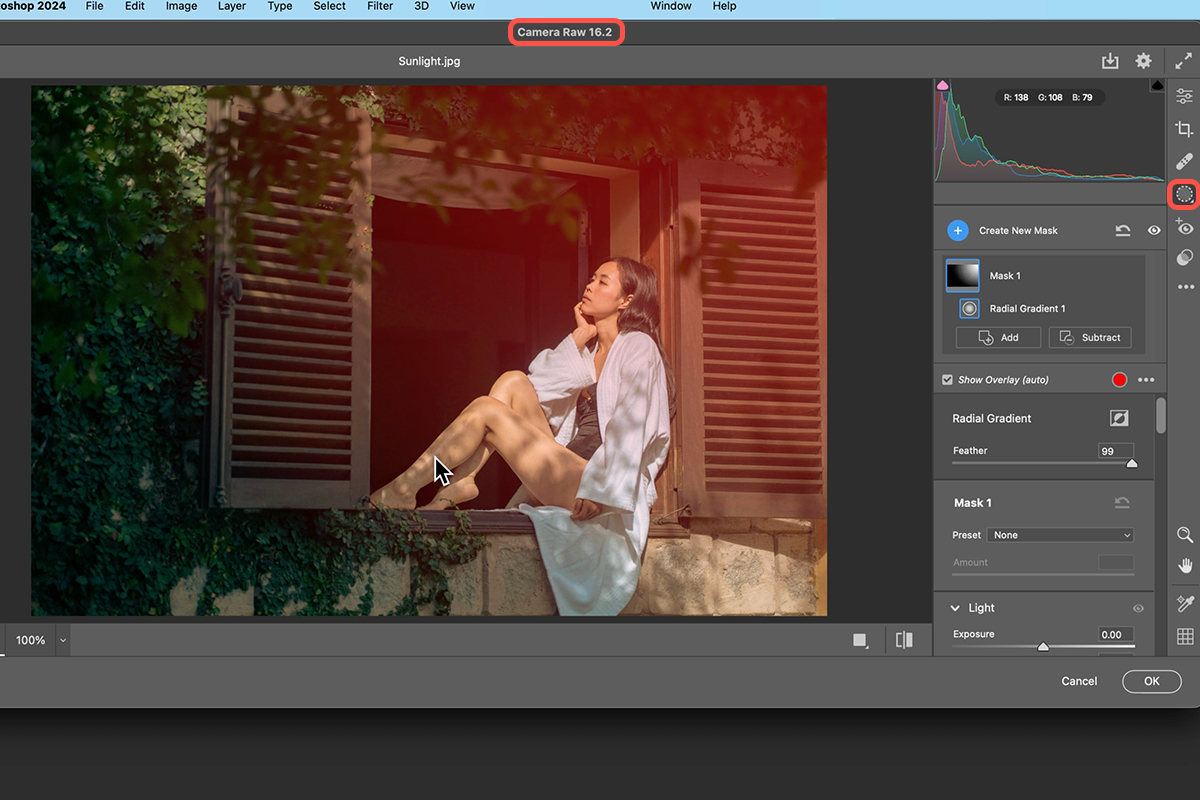
The eyeball next to Mask 1 toggles it on and off, which is the only reliable way to judge whether you have gone too far. Masking like this is worth practicing on its own — the same thinking drives color grading presets in Camera Raw.
A Second Gradient from the Corner
One mask gives you a glow. Two gives you a direction. Click Create New Mask, choose Radial Gradient again, and drag out from the top corner nearest your light source.
-
Create a new Radial Gradient mask from the corner
Drag outward from the corner the sun would be sitting in.
-
Raise exposure and lift the blacks
Brighter and flatter than the first mask, since this is closest to the source.
-
Add color back with Temperature and a little Tint
Then click OK to apply everything to the layer.
Why the Second Mask Needs Color Added Back
Raising exposure and lifting blacks together desaturates whatever they touch — the area goes bright but gray. Warming the temperature inside the same mask puts the color back, and it is the step people skip. A washed-out gray corner reads as a mistake; a washed-out warm corner reads as sunlight.
Dialing It Back
With both halves in place, the effect is almost certainly too strong. Go back to the flare layer and pull its opacity down — a flare at 100% announces itself, and a subtler one is more convincing.
Then double-click back into the Camera Raw smart filter on the photograph. Because everything is live, you can now judge each mask against the finished stack rather than in isolation.
Pull the Highlights Down to Protect the Face
Once you push exposure further inside a mask, the first thing to break is your subject’s skin. Bringing the highlight slider down within that same mask lets you keep the extra brightness in the haze without blowing out the face it happens to overlap. Raise exposure, warm the temperature further if you want it hotter, and drop highlights to hold the detail.
Coloring the Whole Frame With a Gradient Map
The last step ties the flare and the photograph together by coloring both at once. Go to Layer > New Adjustment Layer > Gradient Map and place it above everything.
-
Add a Gradient Map adjustment layer at the top of the stack
It will look wrong immediately. That is expected.
-
Open the gradient dropdown in the Properties panel
If you cannot see Properties, go to Window and turn it on. The presets are grouped by color family.
-
Click Reverse if the image looks inverted
Gradient maps map dark to the left of the gradient and light to the right, so a warm-to-dark preset often needs flipping.
-
Drop the layer opacity to around 20%
Gradient maps arrive at 100%, which is almost always far too much.
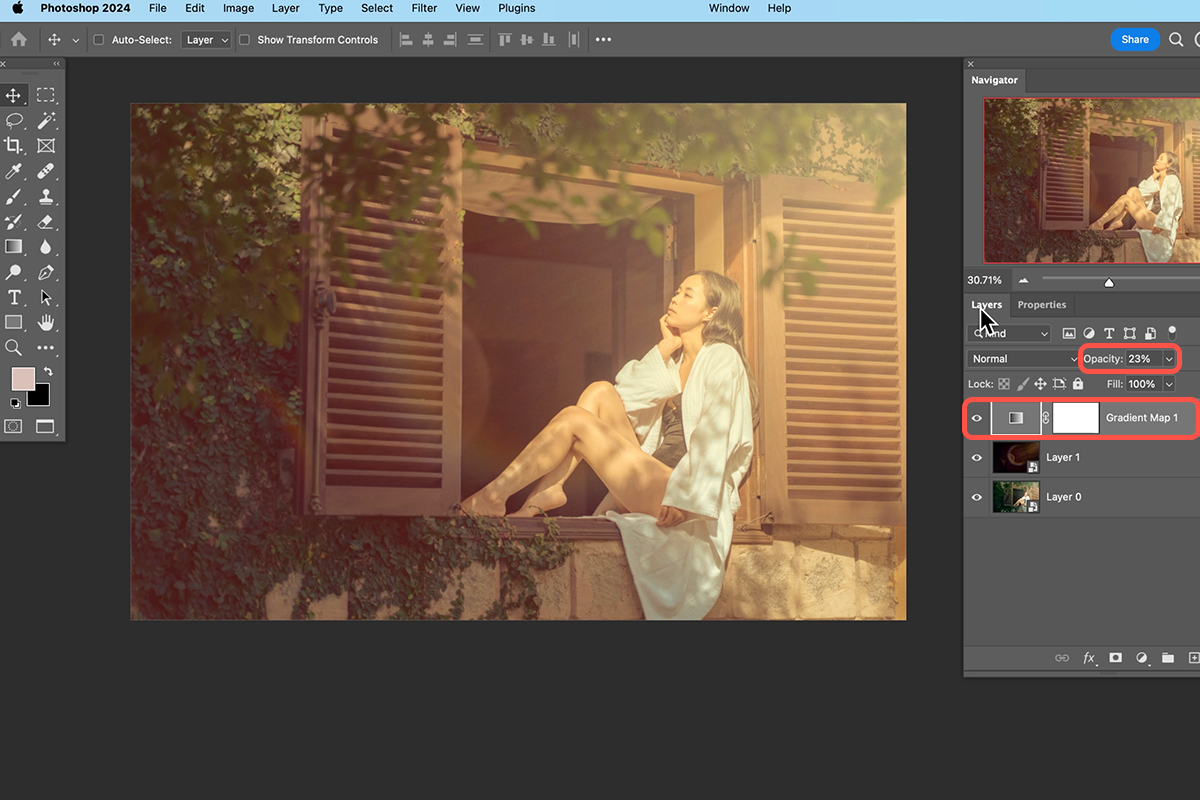
Set the Opacity Before You Audition Presets
This is the tip worth taking away from the whole tutorial. Reverse the gradient and drop the opacity first, then click through the presets. Every one you try is now already reversed and already at 20%, so you are comparing them as they will actually appear instead of judging each at full strength and rejecting all of them.
Work through the oranges for a sunset feel, the reds if you want it hotter, the pinks for something softer. Gradient maps push color into highlights, midtones and shadows separately, which is why they can drop peach into the shadows without touching the warmth you already built. There is How to Color Tone Using Gradient Maps, and color toning with gradient maps covers the underlying idea.
Why This Reads as Sunlight
Real sunlight does not arrive as a single bright shape. It comes with a direction, a wash of haze where it enters the frame, a lifted black point that kills contrast, and a color cast over everything it touches. This build supplies all four separately, which is why it holds together better than dropping a flare on top and calling it done.
The flare gives direction. The masked Camera Raw work supplies the haze and the lifted blacks. The gradient map unifies the color so the flare and the photograph look like they were lit by the same sun.
Keep Every Step Live
Because both layers were converted to Smart Objects before any filter ran, nothing here is committed. Double-click a smart filter and the panel reopens; toggle a mask’s eyeball and it disappears; drag the gradient map opacity and the whole grade shifts.
That matters more on color work than almost anywhere else, because warmth you judged as perfect on one image will look overdone on the next. Build it live and you can tune the same stack to a different photograph in under a minute.
Quick Reference: Keys, Menus and Settings
- Find a flareAdobe Stock tab, select Free, search lens flare
- Drop the blackMove Tool, drag the flare onto the photo, blend mode Screen; F for full screen
- Flip and placeCmd/Ctrl + T, Flip Horizontal in the Contextual Task Bar, then position and scale
- Warm the flareRight-click > Convert to Smart Object, Filter > Camera Raw Filter, Temperature about +46, a little magenta Tint
- Haze from the sideBackground as a Smart Object, Camera Raw > Masking > Radial Gradient: Contrast down, Shadows and Blacks up, Temperature warm
- Glow from the cornerCreate New Mask > Radial Gradient: Exposure and Blacks up, Temperature warm; Highlights down to protect the face
- Color the frameLayer > New Adjustment Layer > Gradient Map, Reverse, Opacity 20%, then click through the Oranges
No AI, no generative credits. Both layers are Smart Objects, so every step stays editable.

Free Downloads
Follow Along on the Same Photos
Get the portrait, a real photographed lens flare to layer over it, the finished PSD and the 4-page PDF guide. Free with a PHLEARN account.
Lens Flare Effect in Photoshop: Common Questions
Where do I get a lens flare image?
The free download includes the photographed flare used here. For more, open the Adobe Stock tab in Photoshop, select Free and type in lens flare; there are a ton of options.
Why is my lens flare a black rectangle over the photo?
It is still on the Normal blend mode. Change the flare layer to Screen in the Layers panel; Screen drops the black and keeps only the bright flare.
The flare comes from the wrong side. How do I flip it?
Press Cmd/Ctrl + T for Transform and click Flip Horizontal in the Contextual Task Bar. Then move and scale it so it matches where the light in the photo comes from.
How do I make the flare warmer?
Convert the flare layer to a Smart Object, go to Filter > Camera Raw Filter and drag Temperature to the right, about +46 in the example. A little magenta from Tint finishes it.
Why convert to a Smart Object before Camera Raw?
Any time you use a filter, make the layer a Smart Object first. You can then double-click Camera Raw Filter under the layer to reopen it, or turn it off with the eye icon.
How do I add a sunlight haze to the photo?
Convert the Background to a Smart Object and open the Camera Raw Filter. In Masking, add a Radial Gradient dragged in from the side the light comes from, then bring Contrast down, Shadows and Blacks up and warm the Temperature.
Why does my haze look gray?
Raising Exposure and Blacks desaturates whatever they touch. Push Temperature to the right and add a little Tint in the same mask to put the color back.
How do I keep the haze from blowing out my subject’s face?
In the mask that overlaps the face, bring Highlights down. You keep the extra brightness in the haze without affecting the highlights on the face.
How do I color the whole photo, flare included?
Add Layer > New Adjustment Layer > Gradient Map on top. Click Reverse in the Properties panel if it looks inverted, drop Opacity to about 20%, then click through the presets; Aaron sticks with an orange.
Are the sample files free?
Yes, with a free PHLEARN account. You get 2 sample images, 1 sample PSD and 1 PDF guide: the portrait, a photographed lens flare and the finished document to compare your layers against.
Master Photoshop, Lightroom and Photography
Join PHLEARN PRO for $12.99 a month or $99.99 a year. Cancel anytime, with a 100% money-back guarantee.





