
description
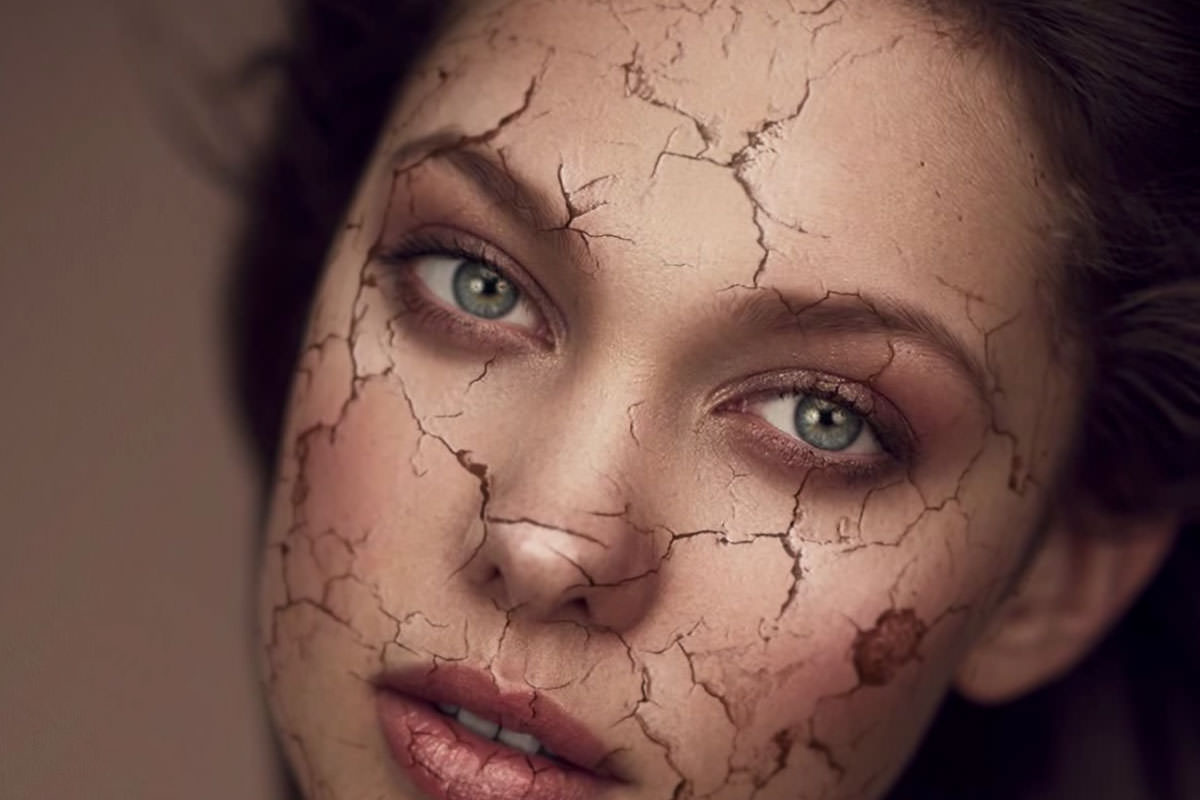
Learn how to create a cracked skin effect in Photoshop by wrapping a photo of cracked, peeling paint around a face. Position and Warp the texture first, then use Liquefy with Show Backdrop and the Freeze Mask tool so it pushes around the nose and eyes instead of dragging across them. Multiply plus Blend If removes the texture’s own highlights without touching the photo, and a clipped, colorized Hue/Saturation layer takes the cracks to a believable skin tone.
Enjoying This Free Tutorial?
We publish a new free tutorial every week, each one with sample images and PSDs you can download and follow along with. Sign up and they land straight in your inbox, along with early word on sales, events and subscriber-only offers.


How to Create an Amazing Cracked Skin Effect in Photoshop, Part 1
Combining a portrait with a photo of cracked, peeling paint can make a face look like it’s genuinely breaking apart, once the texture is warped, liquefied, and blended to actually follow the contours of the face. This first half of a two-part series brings the texture in, wraps it around the face with Warp and Liquefy, and takes the first steps toward blending it into the skin.
Bringing In and Positioning the Texture
Dragging a texture image directly into the portrait document, then scaling and rotating it at a reduced opacity, makes it easy to judge where it fits best on the face.
-
Drag the Texture Into the Portrait Document
Use the Move tool to click and drag the cracked-paint texture image into the portrait document.
-
Lower the Opacity to See Through It
Press V and then a number key, such as 5 for 50%, to lower the texture layer’s opacity so the face underneath stays visible while positioning it.
-
Scale and Rotate the Texture Into Place
Press Cmd/Ctrl+T, link the width and height, and scale and rotate the texture to a position that avoids covering the eyes too heavily.
-
Flip the Texture if Needed
Right-click and choose Flip Horizontal if a mirrored version of the texture fits the face better.
Warping the Texture to Start Wrapping the Face
A basic Warp pulls the flat texture’s corners and edges inward, giving it an initial sense of curving around the face before the more detailed Liquefy work begins.
-
Open the Warp Tool
Press Cmd/Ctrl+T, right-click, and choose Warp.
-
Pull the Corners and Anchor Points Inward
Click and drag the corner and anchor points inward to start shaping the flat texture around the contours of the face.
-
Decide How Much Should Stay Visible
Adjust how much of the texture remains visible on areas like around the eyes, removing some if it feels like too much.
Using Liquefy With the Background as a Preview Backdrop
Turning on Liquefy’s Show Backdrop option, set to the background layer, makes it possible to see the actual face while liquefying the texture layer above it.
-
Return the Layer to Full Opacity
Bring the texture layer’s opacity back to 100% before opening Liquefy.
-
Open Liquefy
Go to Filter > Liquefy.
-
Enable Show Backdrop on the Background Layer
Turn on Show Backdrop and choose the background layer, adjusting its opacity to see through the texture as needed.
Why the Backdrop Needs Full Opacity to Be Useful
Working in Liquefy with the texture layer still at a reduced opacity makes the backdrop preview partially transparent as well, which makes it harder to judge exactly where the face’s features actually are. Restoring the texture layer to 100% opacity first keeps the Liquefy backdrop preview clean, so the face underneath is clearly visible while shaping the texture around it.
Pushing the Texture Inward From the Edges
Working the Forward Warp tool from outside the face inward compresses the texture toward the edges, which is what sells the illusion that it’s wrapping around the face rather than sitting flat on top.
-
Increase the Brush Size
Make the Forward Warp brush larger to work with broader areas at once.
-
Push From Outside the Face Inward
Starting well outside the edge of the face, click and drag inward repeatedly, compressing the texture’s details closer together as they approach the face’s edge.
-
Adjust Density and Pressure to Taste
Raise Density and Pressure for faster results with fewer strokes, or keep them lower for slower, more controlled adjustments with fewer mistakes.
Duplicating for a Safety Backup Before Facial Detail Work
A duplicate of the liquefied texture layer provides a safe fallback before starting the more delicate work around individual facial features.
-
Duplicate the Liquefied Layer
Press Cmd/Ctrl+J to duplicate the texture layer after the initial Liquefy pass.
-
Hide the Backup Copy
Make the duplicate layer invisible and continue working on the original.
Using Freeze Mask to Wrap Around Facial Features
Freeze Mask stops the Liquefy tool from affecting specific areas, which creates natural stopping edges around features like the nose and eyes as the texture is pushed around them.
-
Open Liquefy on the Working Layer
Go to Filter > Liquefy again, making sure the background is set as the backdrop.
-
Paint a Freeze Mask Around a Feature
Select the Freeze Mask tool, raise its density, and paint around a feature like the edge of the nose to protect that area from further changes.
-
Push the Texture Up to the Freeze Mask
Use Forward Warp to push the texture toward the frozen area, watching it curve around the feature and stop exactly at the mask’s edge.
-
Repeat Around Other Features
Add new freeze masks and repeat the same process around the eyes, just above the eyelid fold, and other facial features.
Why Freeze Mask Creates Believable Edges
Without a Freeze Mask, pushing the texture around a feature like the nose would drag it across that feature rather than stopping cleanly at its edge. Freezing that specific area first means the texture’s push stops exactly where the mask begins, which is what makes it look like the texture is genuinely moving with the skin’s actual shape.
Removing Highlights With Multiply and Blend If
Changing the texture layer’s blend mode to Multiply hides its lighter areas, and Blend If cleans up any remaining highlights that Multiply alone doesn’t fully remove.
-
Change the Blend Mode to Multiply
Change the texture layer’s blend mode from Normal to Multiply so only its darker areas remain visible.
-
Open Blending Options
Double-click the layer to open its Blending Options.
-
Hide Remaining Highlights With Blend If
Hold Option/Alt and drag the underlying layer’s lighter-area slider so any remaining light areas of the texture become invisible.
Why Blend If Works Better Here Than Curves
Brightening the image’s highlights with a Curves adjustment would technically hide more of the texture’s light areas too, since Multiply makes lighter tones disappear, but it also risks blowing out the actual photo’s highlights in the process. Using Blend If instead targets only how the texture layer itself blends, hiding its remaining light areas without touching the brightness of the underlying photo at all.
Colorizing the Cracks to Match Skin
A clipped, colorized Hue/Saturation layer shifts the texture’s raw color into something that reads as skin-toned rather than an obviously mismatched color like yellow or green.
-
Add a Hue/Saturation Layer
Add a Hue/Saturation adjustment layer above the texture.
-
Turn On Colorize
Check the Colorize option, which applies a single unified hue across the layers beneath it.
-
Clip It to the Texture Layer
Right-click the adjustment layer and choose Create Clipping Mask so it only affects the texture layer rather than the whole image.
-
Choose a Skin-Toned Hue
Shift the Hue into a red-orange range and adjust Saturation to make the cracks read as a believable skin color.
Masking the Cracks Off the Eyes and Teeth
A final layer mask removes the cracked texture from areas where it clearly shouldn’t appear, like directly over the eyeballs or teeth.
-
Add a Layer Mask
Add a layer mask to the texture layer.
-
Paint Black Over the Eyes and Teeth
Paint black over the eyeballs, teeth, and any other small area where the cracked texture shouldn’t be visible.
-
Mask Away From Anywhere Off the Face
Paint black over any part of the texture that extends past the edge of the face or subject entirely.
More Free Photoshop Tutorials
To build on the warping and blending techniques used here, check out these free tutorials:
- How to Create an Amazing Cracked Skin Effect in Photoshop, Part 2
- Three Ways to Use Blend If in Photoshop
- How to Select Subjects and Refine Edges in Photoshop
- Curves vs Levels in Photoshop: What the Difference Actually Is
Why This Approach Works
Warping the texture first and then refining it with Liquefy’s Freeze Mask is what turns a flat, rectangular texture into something that genuinely appears to wrap around the contours of a face. Removing highlights with Multiply and Blend If together, rather than relying on either alone, keeps the texture’s dark cracks visible without also washing out or darkening the actual photo underneath. Clipping a colorized Hue/Saturation layer to just the texture is a simple, reversible way to try different skin-toned colors until the cracks stop looking like an obviously separate texture.
Final Thoughts
By the end of this first part, the texture is wrapped, blended for highlights, colorized, and masked off the eyes and teeth, but it still looks flat and uniformly in focus compared to the rest of the photo. Part 2 picks up here to add real depth to the cracks and blend the effect’s focus to match the rest of the image.
Related Tutorials






Enjoying This Free Tutorial? Go Further with PRO.
200+ PRO courses. 1,000+ practice files. One membership.

Unlimited access to every PRO course
New PRO courses every month
Layered PSDs and RAW files to follow along
100+ Lightroom Presets, LUTs, Actions and Brushes
Stream in up to 4K, with captions and chapters
Watch on any device: desktop, tablet or phone
4.93 average from 3,900+ reviews · 2M+ students