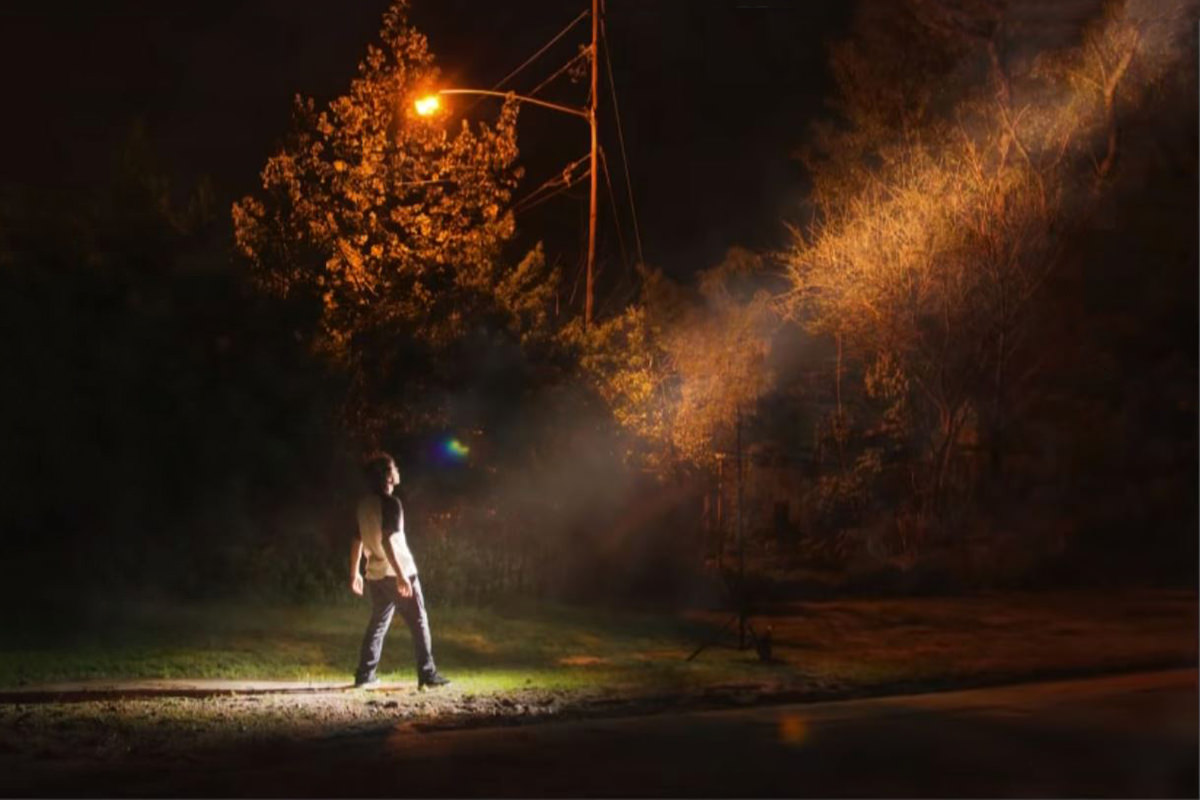

A beam of light is not one shape with a blur on it. This free Photoshop tutorial builds one the way light actually behaves: three Polygonal Lasso selections of decreasing size, each brightened with its own Curves layer and given progressively less Gaussian blur, then rendered clouds standing in for the haze the light needs to scatter off, with the warm color pass saved for last so it does not tint everything below it.
We publish a new free tutorial every week, each one with sample images and PSDs you can download and follow along with. Sign up and they land straight in your inbox, along with early word on sales, events and subscriber-only offers.
How to Create a Realistic Beam of Light in Photoshop
A convincing beam of light coming from a source overhead — whether it’s meant to look like sunlight, a streetlamp, or something more dramatic — isn’t built as one shape with a blur applied. It’s built as several overlapping layers of light, each with its own brightness, blur, and eventually color, combined with a touch of simulated fog that gives the beam something to actually be visible in. The same underlying technique adapts easily to a flashlight, headlights through a window, or any other light source shining through open air.
Getting Started: Removing the Visible Light Source
If the photo shows the actual light fixture or stand that’s meant to be producing this beam, it usually needs to disappear first so the effect reads as a natural light source rather than an obvious studio light.
-
Clone Stamp Out the Light Fixture
Use the Clone Stamp Tool to remove any visible light stand, modifier, or grid from the shot. It doesn’t need to be flawless — just clean enough that it doesn’t draw the eye once the light beam is added on top.
A Better Way to Handle This on Future Shoots
If you’re planning this effect ahead of time, capturing a second exposure with the light source physically moved out of frame, then blending the two images with a layer mask, gives cleaner results than cloning it out after the fact — you get real background detail instead of cloned-in guesswork.
Building the Outer Shape of the Light Beam
The beam’s shape is built with the Polygonal Lasso Tool, tracing from where the light source sits down to where the light actually lands and is visible in the scene.
-
Trace the Beam’s Outer Boundary
Create a new layer and use the Polygonal Lasso Tool to click out the outer edges of the beam, starting narrow near the light source and widening toward wherever the light hits the ground or subject. Make sure the shape covers everywhere the light visibly lands, not just the area closest to the source.
Brightening and Blurring the Outer Layer
A flat, hard-edged selection doesn’t look like light yet — brightness and blur are what start selling the illusion.
-
Brighten the Selection with Curves
With the outer shape selected, add a Curves adjustment layer, which automatically loads the selection into its mask, and drag the curve upward to brighten that area.
-
Apply a Large Gaussian Blur
Go to Filter > Blur > Gaussian Blur and apply a large blur radius to this outer layer, so its edges fade out softly rather than ending in a hard line.
Adding a Brighter Core and Center to the Beam
Light naturally gets more intense toward the middle of its source and decays outward, so repeating the same process on progressively smaller, brighter selections is what gives the beam real depth.
-
Select a Smaller Inner Area
Using the Polygonal Lasso Tool again, trace a narrower shape inside the outer beam — this becomes the beam’s brighter core.
-
Brighten and Blur the Core with Progressively Less Blur
Add another Curves adjustment layer to brighten this inner selection, then apply Gaussian Blur again, using a somewhat smaller blur radius than the outer layer so the core reads as more defined.
-
Repeat for a Bright Center Layer
Trace an even narrower shape for the very center of the beam, brighten it with another Curves layer, and apply a final, smaller blur. Extend this center layer slightly past where it meets the subject, since the light continues on to wherever it visibly lands.
Why Multiple Layers Beat One Single Shape
A single blurred selection never looks quite right because real light doesn’t decay evenly — it’s brightest near its source and toward its center, and fades unevenly outward. Building the beam from several progressively smaller and brighter layers, each with its own blur radius and intensity, reproduces that natural falloff far better than any single adjustment could.
Simulating Fog So the Beam Has Something to Be Seen In
Light beams are only visible in real life because of fog, haze, or airborne particles scattering the light — without some equivalent in the image, the beam won’t look believable no matter how well it’s blurred and brightened.
-
Create a New Curves Layer and Brighten It
Add another Curves adjustment layer and brighten it generally to establish a base foggy tone, then invert its mask to black and paint white only where you want the haze to appear.
-
Render Clouds Onto the Layer
Go to Filter > Render > Clouds to fill the layer with a cloud pattern. If the clouds look too small or detailed, press Ctrl + T on PC (Cmd + T on Mac) and scale the pattern up for a softer, larger look.
-
Paint Away Fog Where It Doesn’t Belong
Using a low-flow brush (around 30–40%), paint black over areas where the haze shouldn’t show, keeping it concentrated mainly around the beam and any other light sources in the scene.
Adding Warmth and Color to the Beam
Once the shape, blur, and fog are all in place, a final color pass ties the beam together and makes it feel like it belongs in the scene’s existing light.
-
Warm the Beam with a Curves Layer
Add one more Curves adjustment layer, pull the Blue channel down slightly and the Red channel up slightly to introduce warmth, then paint that warmth in with a large, soft brush over the beam. Do color adjustments last — a color layer placed above other layers tints everything beneath it, so it should come after every other layer in the beam is finished.
Fading the Beam from Top to Bottom
Grouping every beam-related layer together and duplicating the group, then applying a foreground-to-transparent gradient on a layer mask, lets you make the beam more visible near the top and less visible lower down (or the reverse), adding one more layer of natural-looking variation without touching the beam’s actual shape or color.
Common Mistakes to Avoid With This Technique
The most common mistake is building the beam as a single layer with one blur applied, which reads as flat and clearly artificial compared to a beam built from several overlapping layers of varying brightness and blur. The second is skipping the fog step entirely — a beam of light with no atmospheric haze around it looks like it’s floating in a vacuum rather than traveling through real air. Adding color too early, before the beam’s shape and blur layers are finished, is also worth avoiding, since a color adjustment near the top of the stack tints every layer underneath it.
More Free Photoshop Tutorials
If you want to build on this atmospheric lighting technique, these free tutorials cover related tools:
- How to Add Realistic Clouds with Blend If in Photoshop
- How to Add a Gradient in Photoshop
- How to Use the Gradient Tool in Photoshop
Why This Technique Works
What makes a Photoshop-built light beam convincing is that it mimics how light actually behaves rather than just applying one filter and calling it done: intensity concentrated near the source and center, a soft falloff at the edges built from real Gaussian blur rather than a flat glow, and visibility that depends entirely on the presence of something — fog, dust, haze — for the light to scatter off of. Layering several selections of decreasing size and increasing brightness recreates that falloff far more convincingly than a single gradient ever could, and rendering actual cloud texture into the haze gives it organic, uneven variation instead of a flat, obviously synthetic glow. Once you understand this layered approach, it scales to any light-through-air situation — a flashlight beam, headlights cutting through fog, or light streaming through a window — using exactly the same underlying structure.
Final Thoughts
A believable beam of light comes down to patience with layers more than any single clever trick: several selections of varying size and brightness, real Gaussian blur on each one, simulated fog for the light to travel through, and color added only at the very end. Once that structure feels familiar, it’s a technique worth revisiting any time a photo needs a light source that isn’t actually there, and pairing it with a gradient-based fade gives you even more control over exactly how the beam reads from top to bottom.
New Free Tutorials View All »











Enjoying This Free Tutorial? Go Further with PRO.
Unlock Full Sample Files, PSDs, and Hundreds of Masterclasses!

Download full project assets, original PSDs, and RAW images for every lesson
Unlimited access to our complete library of PRO Photoshop & Lightroom courses
Instant 4K Ultra HD streaming on all devices, anytime, anywhere
Full access to our entire library of Photoshop Actions, Presets, and LUTs
Flexible monthly and annual membership plans
Cancel anytime with zero hassle or commitments