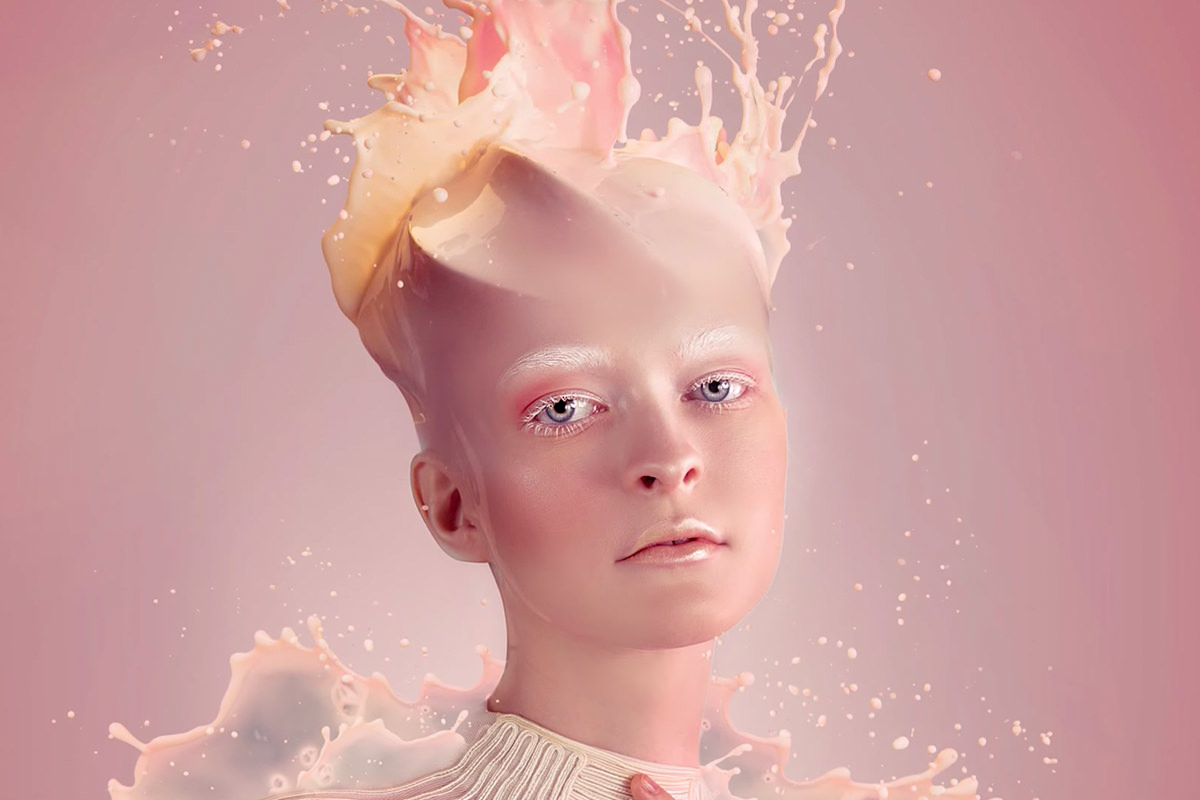

description
Turning a portrait covered in splashing milk into one cohesive image started long before any camera came out, with a concept sketch, dozens of gathered references, and a lighting setup built specifically to keep the subject almost entirely shadow-free. This behind-the-scenes look covers the concept, casting and wardrobe, hair and makeup, the light-by-light build of the set, and photographing the splashes separately with a mannequin stand-in.
Enjoying This Free Tutorial?
We publish a new free tutorial every week, each one with sample images and PSDs you can download and follow along with. Sign up and they land straight in your inbox, along with early word on sales, events and subscriber-only offers.
Liquid Portrait Photoshoot (Behind the Scenes)
Turning a portrait covered in splashing milk into one cohesive image started long before any camera came out, with a concept sketch, dozens of gathered references, and a carefully planned lighting setup built to keep the subject almost entirely shadow-free. This behind-the-scenes look covers concept, hair and makeup, lighting, and the separate challenge of photographing the splashes themselves using a mannequin stand-in. The finished composite is walked through step by step in the Liquid Portrait tutorial.
Developing the Concept and Gathering References
A simple sketch and a large collection of reference photos, gathered before the shoot even begins, settle most of the creative decisions in advance.
-
Sketch the Basic Concept
Sketch out the core idea early, in this case a stylized, fantasy-leaning portrait built around milk splashes.
-
Gather a Large Set of Reference Photos
Collect a large number of reference images, around 50 in this case, to work out details like lighting, styling, hair, and makeup before the shoot begins.
Why Reference Photos Matter Before a Photo Shoot Begins
Gathering references in advance settles most of the small creative decisions, like lighting style, model appearance, hair, makeup, and wardrobe, before the pressure of an actual shoot day. Having that groundwork already done means the shoot itself becomes about executing a plan rather than inventing decisions on the spot.
Casting a Model and Choosing Wardrobe
A model and wardrobe chosen specifically to match the concept’s palette make every other creative decision easier to execute consistently.
-
Choose a Model to Match the Concept
Cast a model with features that fit the concept, in this case very light skin and light hair.
-
Shop for Wardrobe Ahead of the Shoot
Shop in advance for multiple outfit options that match the concept’s color and texture, such as all-white pieces with lace detail.
-
Try Multiple Outfits on the Day of the Shoot
Test several wardrobe options directly on the model on shoot day to see what actually works best both for the concept and for her.
Creating a Custom Makeup Look
A specialized makeup artist working from the same references translated the concept into details like airbrushed skin and white eyebrows and eyelashes.
-
Bring In a Specialized Makeup Artist
Work with a makeup artist experienced in creating a unique, concept-specific look rather than a standard makeup application.
-
Base the Makeup Style on the Same References
Have the makeup artist review the same reference photos used for the overall concept to design a matching look.
-
Add Concept-Specific Details
Include specific touches like airbrushed skin and white eyebrows and eyelashes to support the overall stylized, pale look.
Lighting the Subject to Eliminate Shadows
Because the subject needed to read as extremely light and pale, the lighting setup was built specifically to minimize visible shadow.
-
Set Up Two V-Flats as Broad Fill Light
Place two V-Flats, large sheets of foam core with a light shone into each, on either side of the subject to bounce back broad, directionless fill light.
-
Add a Beauty Dish as the Main Light
Position a beauty dish camera-right at standard height as the main light source.
-
Add an Upward-Facing Soft Box to Counter Remaining Shadows
Place a soft box beneath the model pointing upward to fill in shadows the beauty dish still casts under the eyes, nose, and chin.
Adding Rim Lights and Colored Gels for Interest
With shadows minimized, a couple of gelled rim lights from behind added color and visual interest without disturbing the pale, shadowless look up front.
-
Add a Pink-Gelled Parabolic Reflector
Place a parabolic reflector fitted with a pink gel behind the subject on the camera-right side to bathe them in pink light.
-
Add an Orange-Gelled Hair Light
Add a medium octabox fitted with an orange gel as a hair light, also placed behind the subject.
-
Build the Setup Gradually From a Simple Starting Point
Start with a single large, broad fill light, then add each additional light only to solve a specific shadow or add specific interest, rather than planning the whole setup at once.
Photographing Splashes With a Mannequin Stand-In
A mannequin, posed and lit to match the subject, took the place of a live model for the actual splash photography.
-
Rent a Mannequin Posed Like the Subject
Rent a mannequin and pose it similarly to the subject, since repeatedly splashing cold milk on a live model wasn’t practical.
-
Protect the Set for Splash Photography
Cover the ground and lighting equipment with a tarp to accommodate the mess of repeated splashes.
-
Match the Mannequin’s Lighting to the Subject’s
Keep the lighting setup on the mannequin as close as possible to the subject’s original lighting, to simplify combining the two later.
Why a Mannequin Stood In for the Splash Photography
Photographing splashes properly takes many repeated attempts, and having cold milk splashed on a live model over and over isn’t something most subjects would want to sit through. A mannequin posed identically to the subject solved that problem, allowing for as many splash attempts as needed without involving the actual model at all.
Freezing Splashes in Air With Low Flash Power
Getting a splash to look genuinely frozen in midair, rather than slightly streaked, comes down to flash duration rather than shutter speed alone.
-
Use Flashes With a Dedicated Action Mode
Use flashes built for freezing fast motion, such as models with a dedicated action mode, when available.
-
Keep Flash Power as Low as Possible
Lower the flash’s power output as much as possible, since lower power produces a shorter flash duration.
-
Raise ISO to Compensate for Lower Flash Power
Raise the camera’s ISO setting to compensate for the reduced light output from a lower-power flash.
Why Lower Flash Power Freezes Motion Better
A flash at higher power takes longer to fully discharge its light, which means the flash itself stays on slightly longer and can register motion blur on something moving as fast as a splash. Lowering flash power shortens that discharge time significantly, which is what actually freezes fast motion in place, even if it means compensating for less light by raising ISO.
More Free Photoshop Tutorials
To learn the compositing techniques this shoot was planned around, check out these free tutorials:
- Liquid Portrait in Photoshop: Master 1 Splash Composite
- How to Select Subjects and Refine Edges in Photoshop
- Three Ways to Use Blend If in Photoshop
Why This Approach Works
Gathering references and sketching the concept before shooting anything is what allowed every later decision, from casting to lighting to wardrobe, to support one clear final image instead of being figured out on the fly. Building the lighting gradually, starting with a simple broad fill and adding each light only to solve a specific problem, kept a genuinely complex final setup approachable step by step. Using a mannequin lit to match the subject, combined with low flash power to freeze the splashes, is what made it possible to combine two separately photographed elements into one believable composite.
Final Thoughts
None of the splash photography, the lighting, or the styling would have come together without a clear picture of the final image established well before the shoot day. A simple sketch and a solid set of references made every later decision, on set and in Photoshop, far more straightforward than figuring it out as the shoot went along.
Related Tutorials
New Free Tutorials View All »






Enjoying This Free Tutorial? Go Further with PRO.
200+ PRO courses. 1,000+ practice files. One membership.

Unlimited access to every PRO course
New PRO courses every month
Layered PSDs and RAW files to follow along
100+ Lightroom Presets, LUTs, Actions and Brushes
Stream in up to 4K, with captions and chapters
Watch on any device: desktop, tablet or phone
4.93 average from 3,900+ reviews · 2M+ students