
description
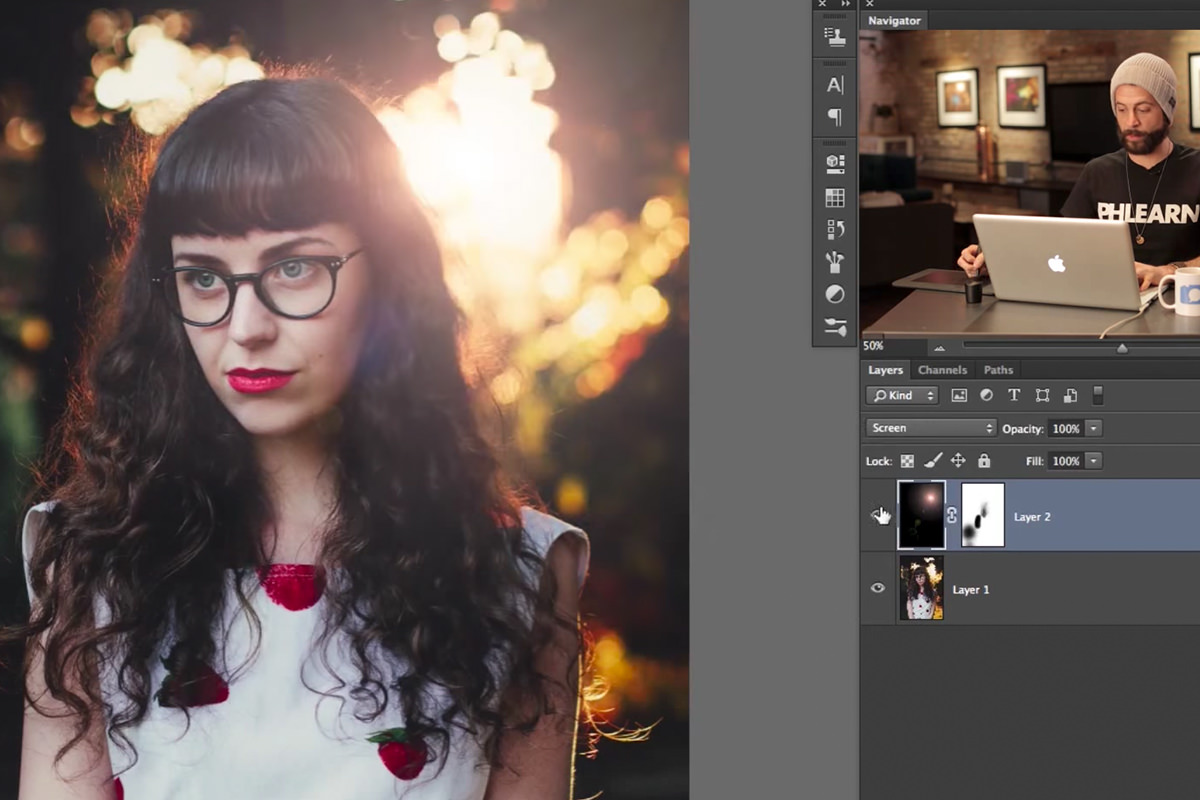
Learn how to use the Lens Flare filter in Photoshop without baking it into your image. The filter refuses to run on an empty layer, so the trick is to apply it once to the photo, undo it, fill a new layer with black, and use the direct filter-repeat command to reproduce the identical flare there. Screen blend mode hides the black and leaves the flare alone on its own layer, free to be recolored, moved, blurred, and masked.
Enjoying This Free Tutorial?
We publish a new free tutorial every week, each one with sample images and PSDs you can download and follow along with. Sign up and they land straight in your inbox, along with early word on sales, events and subscriber-only offers.
Unlock the Secrets to the Lens Flare in Photoshop
Photoshop’s Lens Flare filter refuses to apply to a blank layer, which normally forces it directly onto the background or a flattened stamp visible layer with no room for later adjustment. This tutorial gets around that limitation with a quick trick, putting the lens flare on its own fully adjustable layer that can be recolored, repositioned, blurred, and masked after the fact.
Why Lens Flare Won’t Apply to a Blank Layer
Trying to apply the Lens Flare filter to a brand new, empty layer fails outright, since the filter needs existing pixel data to work with.
-
Create a New Blank Layer
Create a new, empty layer above the image.
-
Try Applying Lens Flare Directly
Go to Filter > Render > Lens Flare on that blank layer and notice that Photoshop won’t allow it because the layer has no image data.
Applying the Flare to the Image, Then Undoing It
Applying the lens flare once on the actual image layer, choosing its position and brightness, sets up the exact effect to be reapplied in the next step.
-
Select the Image Layer
Click on the actual image layer rather than a blank one.
-
Apply Lens Flare Normally
Go to Filter > Render > Lens Flare, choose a position such as the top right, adjust the brightness, and click OK.
-
Undo the Applied Flare
Press Cmd/Ctrl+Z to undo the lens flare that was just applied.
Why Applying and Undoing First Actually Matters
Undoing the flare might seem like it throws the work away, but Photoshop remembers the exact settings from that last-applied filter even after an undo. Doing this step first is what makes it possible to reapply that identical flare in the next step, rather than having to redo the whole dialogue from scratch.
Creating a Black Layer to Reapply the Filter Onto
A new layer filled entirely with black gives the Lens Flare filter actual pixel data to work with, satisfying the requirement that a blank layer can’t meet.
-
Create Another New Layer
Create a new layer above the image.
-
Fill It With Black
Press Shift+Delete and fill the new layer with black.
Reapplying the Exact Same Filter
Using the direct repeat filter command, rather than going back through the Render submenu, reapplies the identical lens flare from before onto this new black layer.
-
Go to the Direct Filter Repeat Option
Go to Filter and choose the top Lens Flare option directly, rather than going back down to Render > Lens Flare.
-
Confirm the Flare Reapplies Identically
Confirm that the filter reapplies in the exact same position and intensity as before, this time onto the black layer.
Why the Direct Repeat Command Matters Here
Going back through the Render submenu would reopen the full dialogue and risk changing the flare’s exact position or brightness from what was chosen the first time. Using the direct repeat option instead reapplies precisely the same settings automatically, which is what keeps this new black layer’s flare identical to the one just undone.
Revealing the Flare With Screen Blend Mode
Switching the black layer’s blend mode to Screen removes the black entirely, leaving only the bright lens flare visible on its own separate layer.
-
Change the Blend Mode to Screen
Change the black layer’s blend mode from Normal to Screen.
-
Confirm the Image Looks Unchanged
Confirm the image looks the same as it did with the flare applied directly, only now it’s sitting on its own separate, adjustable layer.
Why Screen Blend Mode Is the Right Choice Here
Screen blend mode ignores pure black entirely while letting brighter pixels show through, which is exactly the behavior needed to hide the black fill while keeping the bright lens flare visible. That’s what turns a flat black layer into what functions as a fully transparent layer containing only the flare itself.
Recoloring the Flare With Hue/Saturation
With the flare isolated on its own layer, a Hue/Saturation adjustment can shift its color to something other than its default warm tone.
-
Open Hue/Saturation on the Flare Layer
Press Cmd/Ctrl+U on the flare layer to open Hue/Saturation.
-
Shift the Hue to Recolor the Flare
Drag the Hue slider to warm the flare further, or shift it toward green or blue for a completely different colored flare.
Repositioning and Rotating the Flare With Free Transform
Free Transform on the isolated flare layer makes it possible to move, scale, and rotate the flare freely, which isn’t possible when it’s baked directly into the image.
-
Open Free Transform on the Flare Layer
Press Cmd/Ctrl+T on the flare layer.
-
Move the Control Point to Reposition the Flare
Drag the flare’s center control point to a new position, such as directly onto a specific light source.
-
Scale or Rotate as Needed
Scale the flare larger to cover more of the frame, or rotate it if one of its light streaks needs to point in a different direction, such as away from a subject’s face.
Softening the Flare With a Gaussian Blur
A small Gaussian blur on the flare layer takes the edge off its brightest points so the effect feels less intrusive.
-
Apply a Gaussian Blur to the Flare Layer
Go to Filter > Blur > Gaussian Blur and apply a small amount of blur to the flare layer.
-
Check That the Lights Still Read Clearly
Confirm the individual lights are still recognizable, just softened enough that they no longer look harsh or overly sharp.
Masking the Flare Where It’s Not Wanted
A layer mask on the flare layer hides specific parts of the effect, such as a stray light streak crossing directly over a subject’s face.
-
Add a Layer Mask to the Flare Layer
Add a layer mask to the flare layer.
-
Paint Out Any Unwanted Overlap
Paint black over any part of the flare that overlaps somewhere unwanted, such as directly across a subject’s face.
More Free Photoshop Tutorials
To build on the blending and masking techniques used here, check out these free tutorials:
- Three Ways to Use Blend If in Photoshop
- How to Select Subjects and Refine Edges in Photoshop
- Curves vs Levels in Photoshop: What the Difference Actually Is
Why This Approach Works
Applying the lens flare once on the actual image and then undoing it is what lets Photoshop’s filter-repeat command reproduce that exact same effect a second time onto a new, isolated layer. Screen blend mode is what makes a plain black fill layer function as if it only contained the bright flare itself, with nothing else visible. Keeping the flare on its own separate layer is what unlocks every adjustment covered here, recoloring, repositioning, blurring, and masking, none of which would be possible if the flare were baked directly into the image.
Final Thoughts
What looks like a hard limitation in Photoshop, a filter that refuses to work on an empty layer, turns out to have a simple workaround once the filter-repeat trick is understood. This same isolated-layer approach works for any lens flare, on any image, so it’s worth using every time a flare needs more control than applying it directly would allow.
New Free Tutorials View All »












Enjoying This Free Tutorial? Go Further with PRO.
Unlock Full Sample Files, PSDs, and Hundreds of Masterclasses!

Download full project assets, original PSDs, and RAW images for every lesson
Unlimited access to our complete library of PRO Photoshop & Lightroom courses
Instant 4K Ultra HD streaming on all devices, anytime, anywhere
Full access to our entire library of Photoshop Actions, Presets, and LUTs
Flexible monthly and annual membership plans
Cancel anytime with zero hassle or commitments