

Download Sample Images
description
Lightroom Classic is an essential tool for photographers and image makers. In the first episode of our series, we take you on a tour of this powerful software that can help you take your photos to new heights.
Follow along as we take you on a tour of Lightroom Classic! Learn about how the program is structured, how to import and protect your photos, and how to stay organized both within Lightroom and on your computer.
If you’re ready to take a deep-dive into everything Lightroom Classic has to offer, try our PRO tutorial The Beginner’s Guide to Lightroom Classic!
Enjoying This Free Tutorial?
We publish a new free tutorial every week, each one with sample images and PSDs you can download and follow along with. Sign up and they land straight in your inbox, along with early word on sales, events and subscriber-only offers.
Free Lightroom Preset Sample 10 Pack
Lightroom Presets are a great way to quickly add style and charm to your photos. Try our custom-made PHLEARN Lightroom Presets with our free sample 10 pack of some of our favorite bright and beautiful looks!
Watch Next
This episode is part of our FREE Intro to Lightroom Classic series.


LEARN TO USE LIGHTROOM CLASSIC
Get Your Photos In — and Be Able to Find Them Again in Five Years
Welcome to the first part of our free Intro to Lightroom Classic series. Before any editing happens, two things have to be right: your photos need to get into Lightroom in a sensible state, and they need to land somewhere you can still find them long after you’ve forgotten the shoot.
That second half is what Lightroom Classic is genuinely great at, and it’s the part most people skip. In this tutorial we’ll tour the interface, import a set of images, embed your copyright into every file on the way in, and build a folder structure that keeps working whether or not Lightroom is even open.
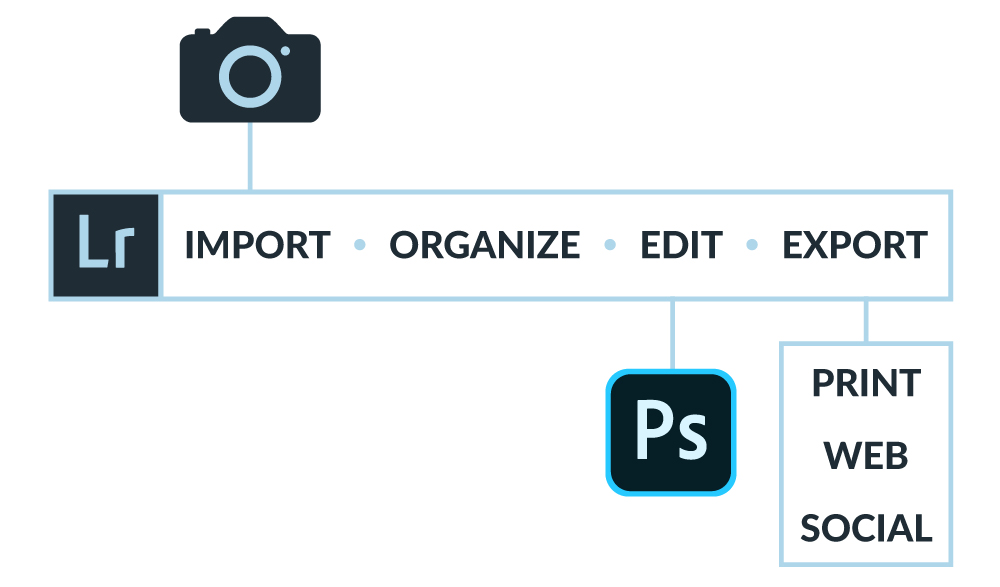
A Quick Tour of Lightroom Classic
Lightroom is organised into modules across the top. You’ll spend almost all of your time in two of them.
Library versus Develop
The Library module is for getting photos in, sorting them, keywording them and finding them again. The Develop module is for editing. The others — Map, Book, Slideshow, Print, Web — are real, but most photographers rarely open them. This series covers Library and Develop.
The panels either side
The left panel holds your Catalog, your Folders (which mirror the folders on your hard drive), your Collections, and the Import and Export buttons. The right panel holds information about whatever is selected — Quick Develop, Keywording, Metadata. Every panel collapses by clicking its edge arrow, and Shift + Tab hides all of them at once for a clean full-screen look at your photos.
The four view modes
Along the bottom of the Library: Grid shows thumbnails; Loupe shows one photo large; Compare puts two side by side so you can arrow between them and pick a winner; Survey holds several on screen at once and lets you click the X on each to eliminate it until only your favourites remain. Survey is excellent for narrowing a shortlist in front of a client.
Importing Your Photos
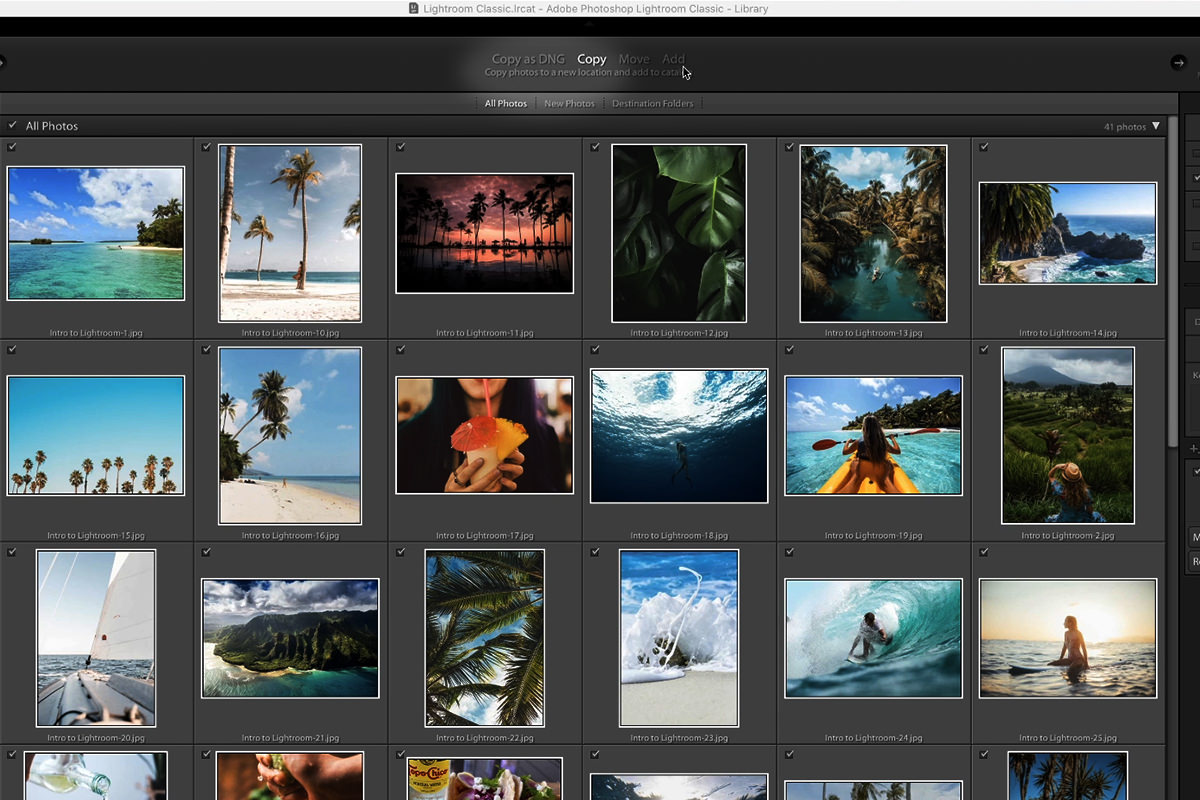
Go to File › Import Photos and Video. The dialog reads left to right: choose your source on the left, choose what happens to the files across the top, and set the destination and options on the right.
You can browse to your source in Lightroom’s own file tree, but dragging the folder straight in from Finder or Windows Explorer is faster. If you’re pulling from a memory card, the card appears in the source list on the left automatically.
Add, Copy, Move, or Copy as DNG
The four buttons across the top are the most consequential choice in the dialog:
- Add leaves the files exactly where they are and simply catalogs them. Right for photos already sitting where you want them.
- Copy duplicates the files to a destination you choose and catalogs the copies. Right for importing from a memory card.
- Move relocates them rather than duplicating.
- Copy as DNG converts RAW files to Adobe’s DNG format as it copies — smaller on disk than most native RAW formats and more universally readable. If you shoot RAW and you’re importing from a card, this is the one to use.
Set previews to Standard unless you have a reason not to; the larger options mostly cost you time and disk space.
Embed Your Copyright on the Way In
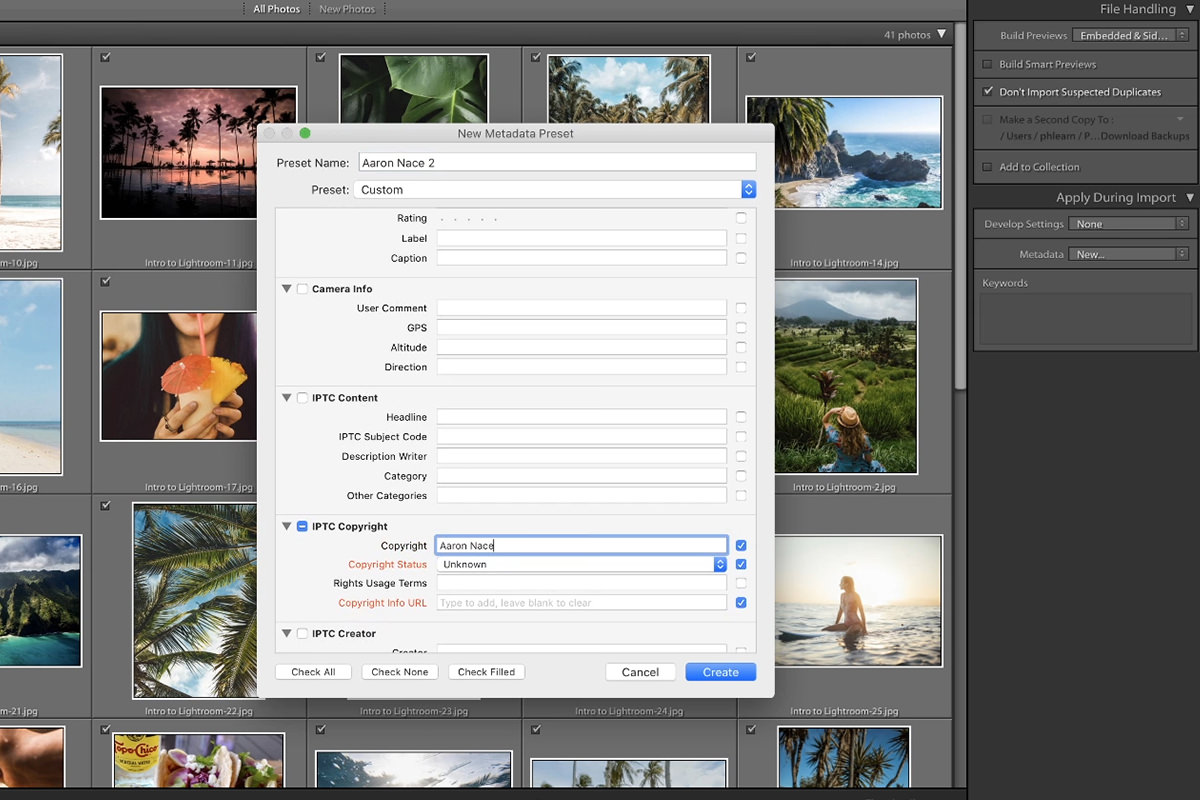
This takes thirty seconds once and then protects every photo you ever import. In the import dialog’s Apply During Import section, open the Metadata dropdown and choose New.
-
Name the preset
Your own name works fine — you’ll be reusing it forever.
-
Fill in the IPTC Copyright block
Creator name, copyright status set to Copyrighted, and your website. These are the fields that matter; the rest of the panel is optional.
-
Create it, then leave it selected
From now on every import stamps that information directly into the files. If an image ends up somewhere on the web, the ownership details travel inside it.
-
Add keywords while you’re here
The Keywords box in the same panel applies a word to every photo in the import. Something as broad as the trip or client name is enough to make the whole batch searchable later.
Let Lightroom File by Date as It Copies
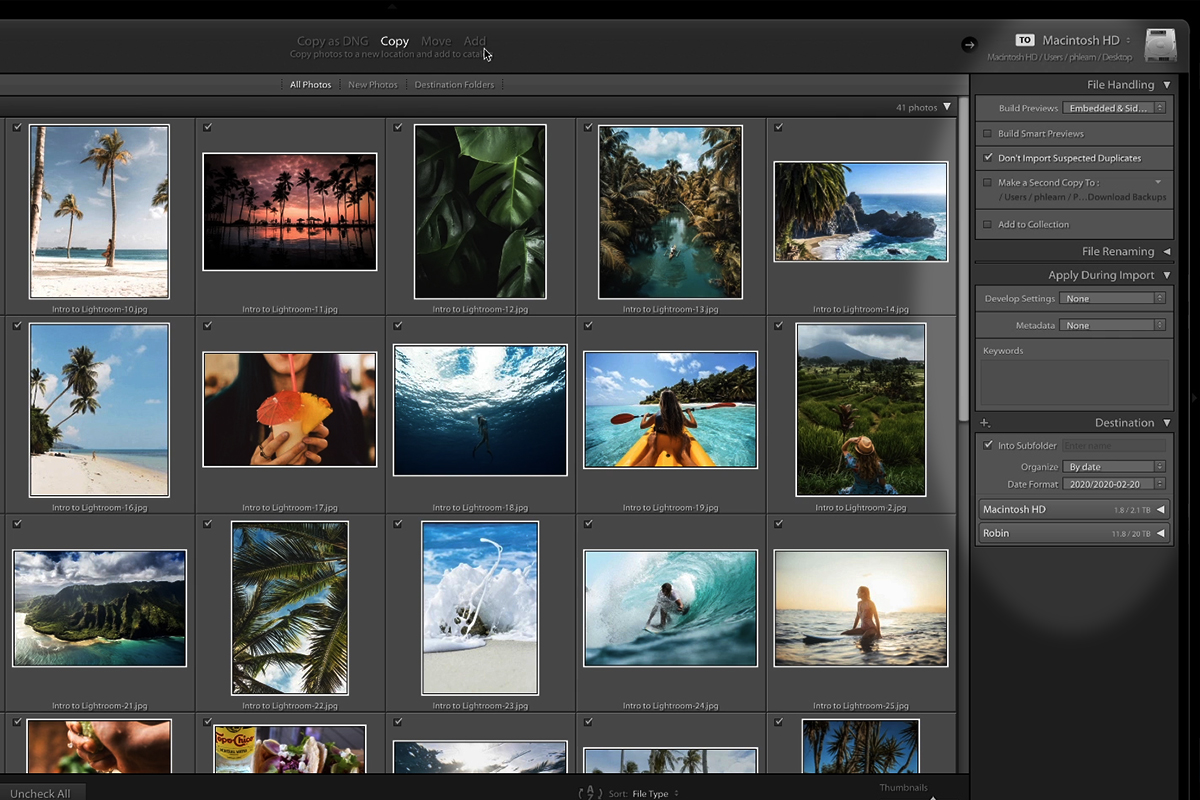
When you choose Copy or Copy as DNG, a Destination panel appears at the bottom right, and this is where long-term organisation is actually decided.
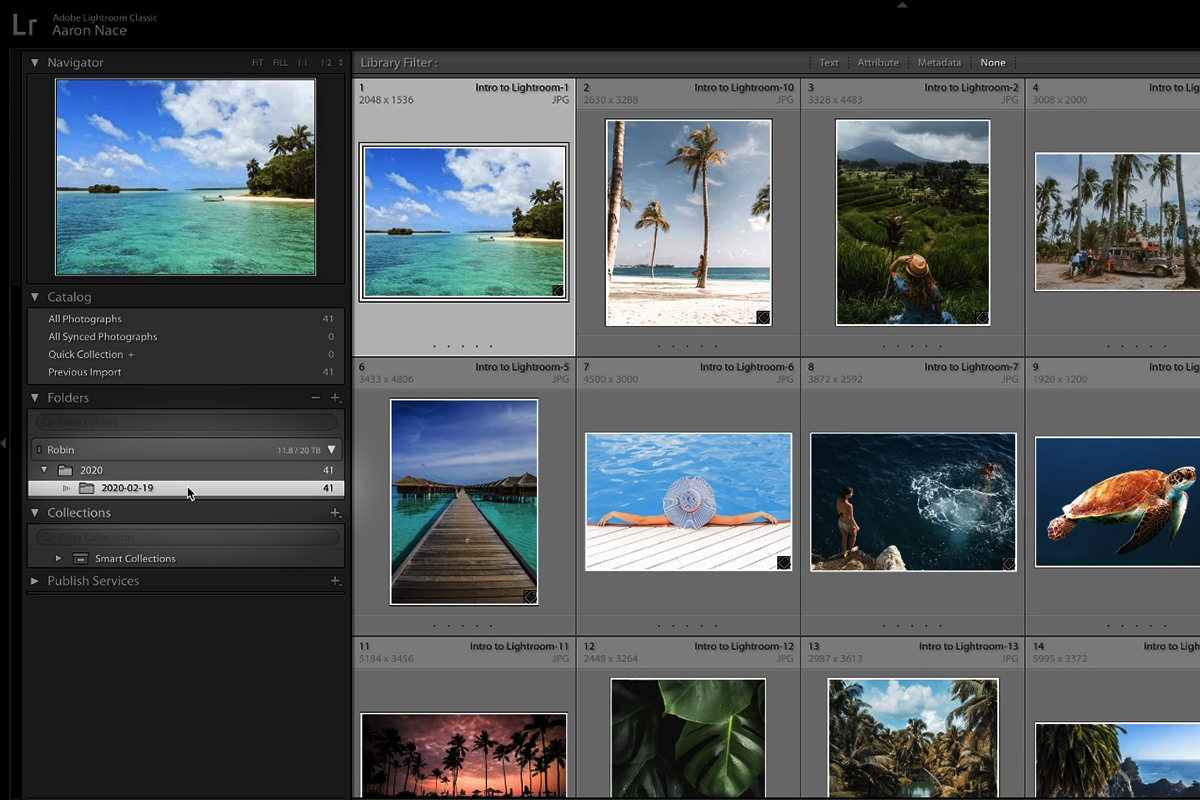
Set Organize to By date rather than “Into one folder.” Pick a date format — a year folder containing dated shoot folders is the most readable — and point it at your main pictures directory. Lightroom then builds the year and date folders for you on every import, forever, without you thinking about it.
Add a Name, Not Just a Date

A date alone tells you nothing two years later. Right-click the newly created shoot folder, choose Rename, and append a short description to the date — the trip, the client, the subject.
It’s a five-second habit with a large payoff. A folder list of bare dates forces you to open each one to remember what it holds; a list of dates with names can be scanned.
Lightroom’s Folders Are Your Computer’s Folders
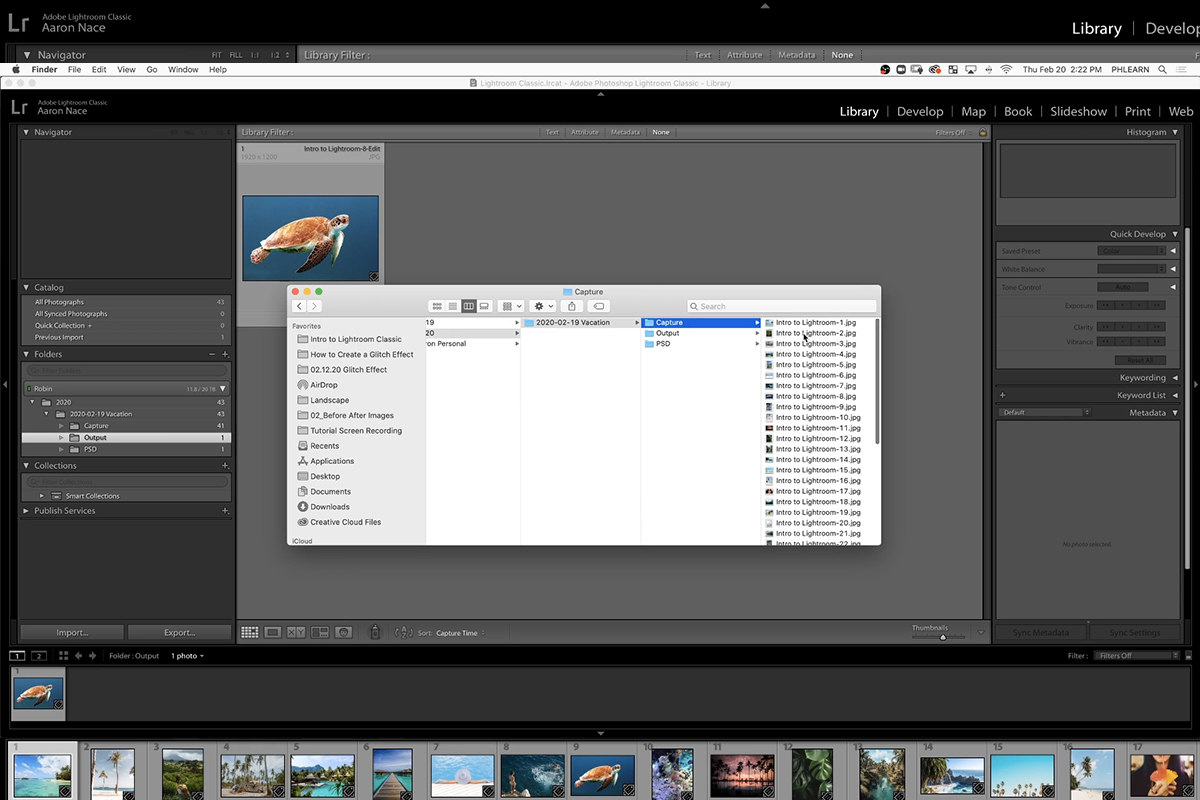
This is the single most important thing to understand about Lightroom Classic, and it’s what separates it from Lightroom CC.
The Folders panel is not a Lightroom-only abstraction — it is your actual hard drive. Create a folder in Lightroom and it appears on your computer. Rename it in Lightroom and it renames on disk. Move photos between folders in Lightroom and the files physically move. Right-click any folder and choose Show in Finder (or Show in Explorer) to see the identical structure.
The consequence is the good part: the organisation you build inside Lightroom keeps working when Lightroom isn’t running, on a machine that doesn’t have it installed, or years after you’ve moved to something else.
The Subfolder Structure Worth Copying
A single folder of mixed files gets unusable fast once a shoot contains RAWs, layered PSDs and web-sized exports. Three subfolders inside each shoot solve it permanently. Right-click the shoot folder and choose Create Folder Inside for each:
-
Capture
Everything that came off the camera. Select all your imported images and drag them in here.
-
PSD
Anything you took into Photoshop. Right-click a photo, choose Edit In › Adobe Photoshop, work on it, save and close, and the PSD reappears in Lightroom ready to be filed here.
-
Output
Finished exports for web, print or social. Export with Shift + Cmd/Ctrl + E and point it at this folder.
If an exported file doesn’t appear in Lightroom straight away, right-click the parent folder and choose Synchronize Folder — Lightroom scans the disk and pulls in anything new.
Consistency matters more than the specific names. Whatever you call these three, use the same three every single time, and years of shoots stay navigable.
Grouping Photos with Collections
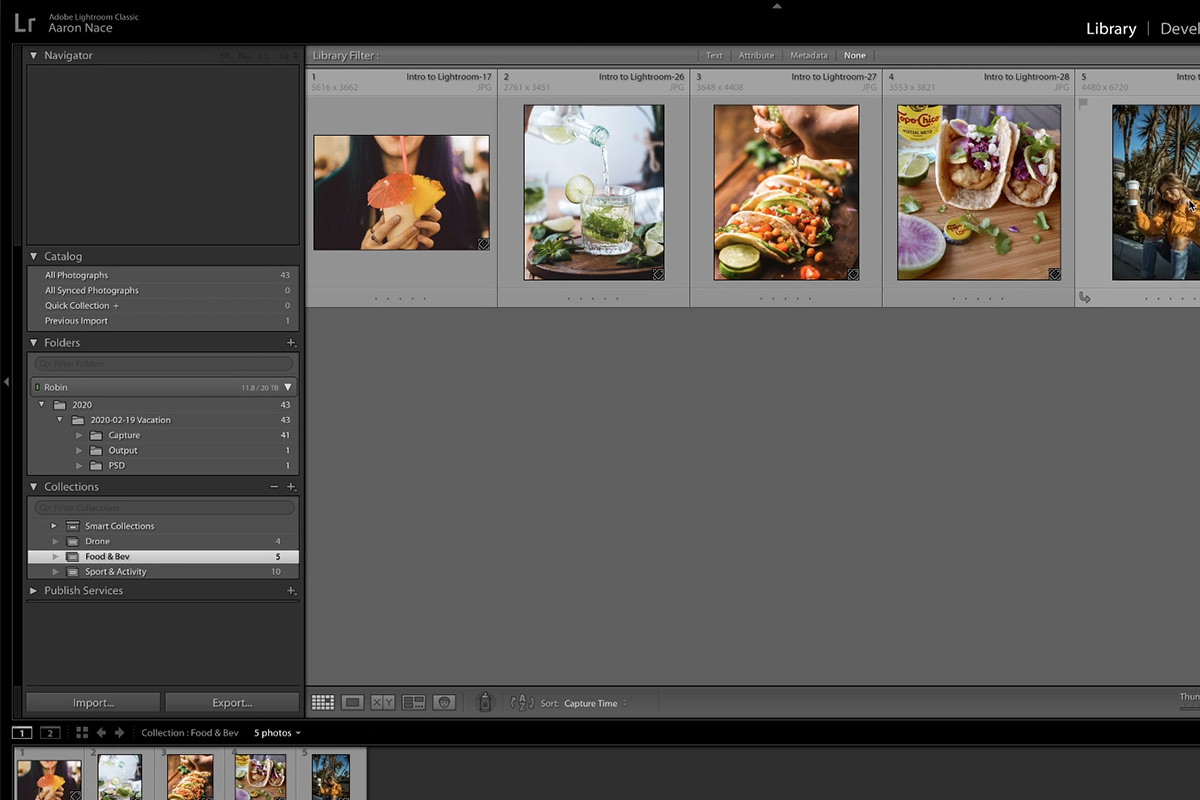
Collections group photos by theme without moving a single file. Select the images you want, click the plus on the Collections panel, name it, and they’re grouped — while still living in whatever folder they were already in. A photo can sit in as many Collections as you like.
On a trip that might be Sports and Activity, Drone, and Food and Drink. On a wedding it’s far more useful: engagement session, ceremony, vows, reception, dancing, b-roll, stills, video. Anything you’d want to pull up as a set later is worth a Collection.
The one catch with Collections
Collections live in the Lightroom catalog, not on your hard drive. Switch to a different catalog, or stop using Lightroom, and they’re gone — the photos are all still safely on disk, but the groupings aren’t. That’s the trade-off against folders, which survive anything.
Folders or Collections? You Can Have Both
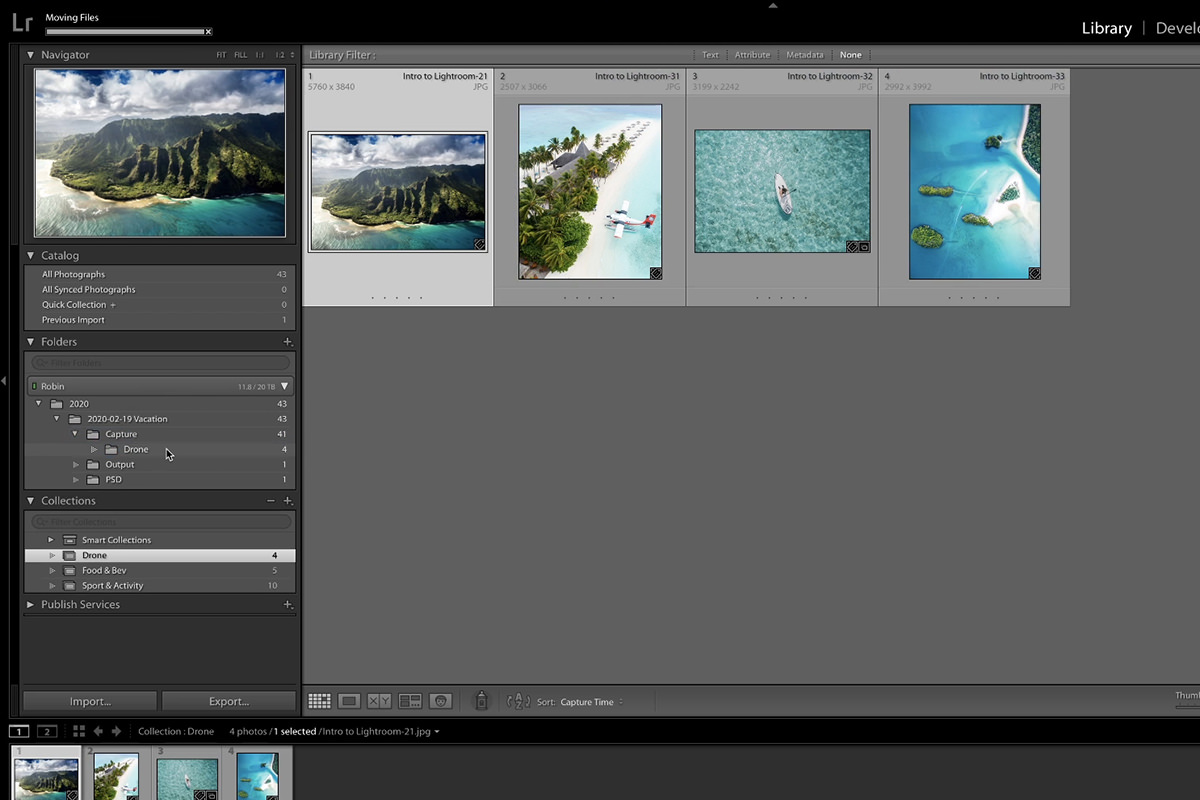
If you’d rather your grouping outlast the catalog, build the same themes as subfolders inside Capture instead — right-click, Create Folder Inside, then drag each set in. Show in Finder and the themes are right there on disk, readable by anything.
The honest answer is that Collections are faster and more flexible day to day, folders are permanent, and there’s nothing stopping you using Collections for working sets and folders for the groupings you want to keep for good.
Where People Get Stuck
Choosing Add when importing from a card
Add catalogs the files where they are — which, for a memory card, means Lightroom points at a card you’re about to reformat. Use Copy or Copy as DNG from a card, every time.
Reorganising photos in Finder instead of Lightroom
Because the folders are real, it’s tempting to rearrange them on the desktop. Do it outside Lightroom and the catalog loses track of the files. Move things in Lightroom and both stay in sync; if something does go missing, Synchronize Folder is the repair.
Leaving the copyright preset for later
Metadata applied at import costs nothing. Applying it to four years of back catalog is a project. Build the preset on your first import.
Continue the Intro to Lightroom Classic Series
This is part one. Each part builds on the last:
- How to Filter & Favorite Images in Lightroom Classic — culling a shoot down to the frames worth editing.
- How to Edit Photos in Lightroom Classic — the Develop module sliders, in the right order.
- Advanced Photo Editing in Lightroom Classic — local adjustments and range masking.
- How to Batch Edit Photos in Lightroom Classic — applying one edit across an entire shoot.
- How to Create Presets in Lightroom Classic — saving a look so it’s one click next time.
- How to Export Photos in Lightroom Classic — export presets, sizing for the web, and watermarked client proofs.
And once your library is in order, there’s plenty more to explore — from basic photo editing through high-end retouching to unreal compositing.
Set It Up Once, Benefit for Years
None of this is difficult, and that’s rather the point — it’s a set of small decisions made once, at import, that quietly pay off every time you go looking for something later. Date-and-name your shoot folders, keep the same three subfolders inside each one, and let the copyright preset run automatically.
The test is simple: pick a shoot from two years ago and see how long it takes to open the finished file. With this structure in place it’s a few clicks, whether Lightroom is running or not.







Enjoying This Free Tutorial? Go Further with PRO.
Unlock Full Sample Files, PSDs, and Hundreds of Masterclasses!

Download full project assets, original PSDs, and RAW images for every lesson
Unlimited access to our complete library of PRO Photoshop & Lightroom courses
Instant 4K Ultra HD streaming on all devices, anytime, anywhere
Full access to our entire library of Photoshop Actions, Presets, and LUTs
Flexible monthly and annual membership plans
Cancel anytime with zero hassle or commitments