
Download Assets
This tutorial includes 2 sample images, 2 sample PSDs and 1 PDF guide. Downloads are free with a PHLEARN account.
- Download the sample images and PSDs from every free tutorial on PHLEARN
- New free tutorials published every week
- One free account — sign up once, then download anything
Free PDF Guide · 3 Pages
This Tutorial as a Step-by-Step PDF
The 3-page guide walks through Filter > Convert for Smart Filters, Filter > Camera Raw Filter, clicking a target neutral with the White Balance eyedropper, reading what Temperature -6 and Tint +42 did, the Light sliders, and fixing a second photo’s green tint with one click on the shirt. Keep it next to your keyboard.
description
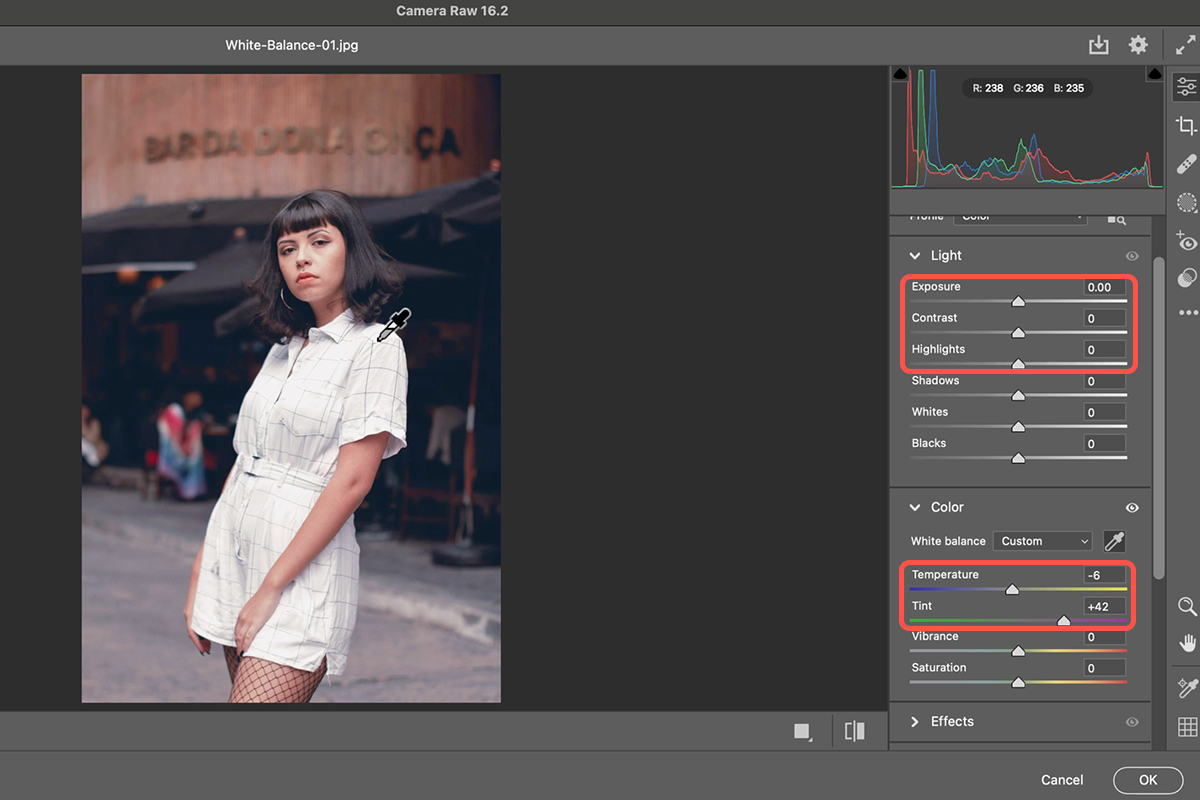
To correct white balance in Photoshop, work in Camera Raw on a Smart Object and click something that should be neutral. The whole cast shifts at once, and the correction stays editable.
Learn how to master white balance correction in Photoshop, even with JPEGs! This tutorial will guide you through the process of achieving accurate and natural colors in your photos using the Camera Raw filter and the white balance eyedropper tool.
Enjoying This Free Tutorial?
We publish a new free tutorial every week, each one with sample images and PSDs you can download and follow along with. Sign up and they land straight in your inbox, along with early word on sales, events and subscriber-only offers.
Artist Credit
- Becca Correia
- Zahra Talebizadeh
Images sourced from Pexels.
How to Correct White Balance in Photoshop
A color cast is one of those problems that is invisible until you fix it. A photograph shot under tungsten light looks orange, one shot in shade looks blue, and because your eye adapts while you work, you can spend an hour on an image without noticing it is the wrong color throughout.
White balance is straightforward to correct in Lightroom when you have a raw file. What is less widely known is that Photoshop gives you the same controls for a JPEG, through the Camera Raw Filter — and set up properly, the correction stays editable indefinitely.
Set It Up Non-Destructively First
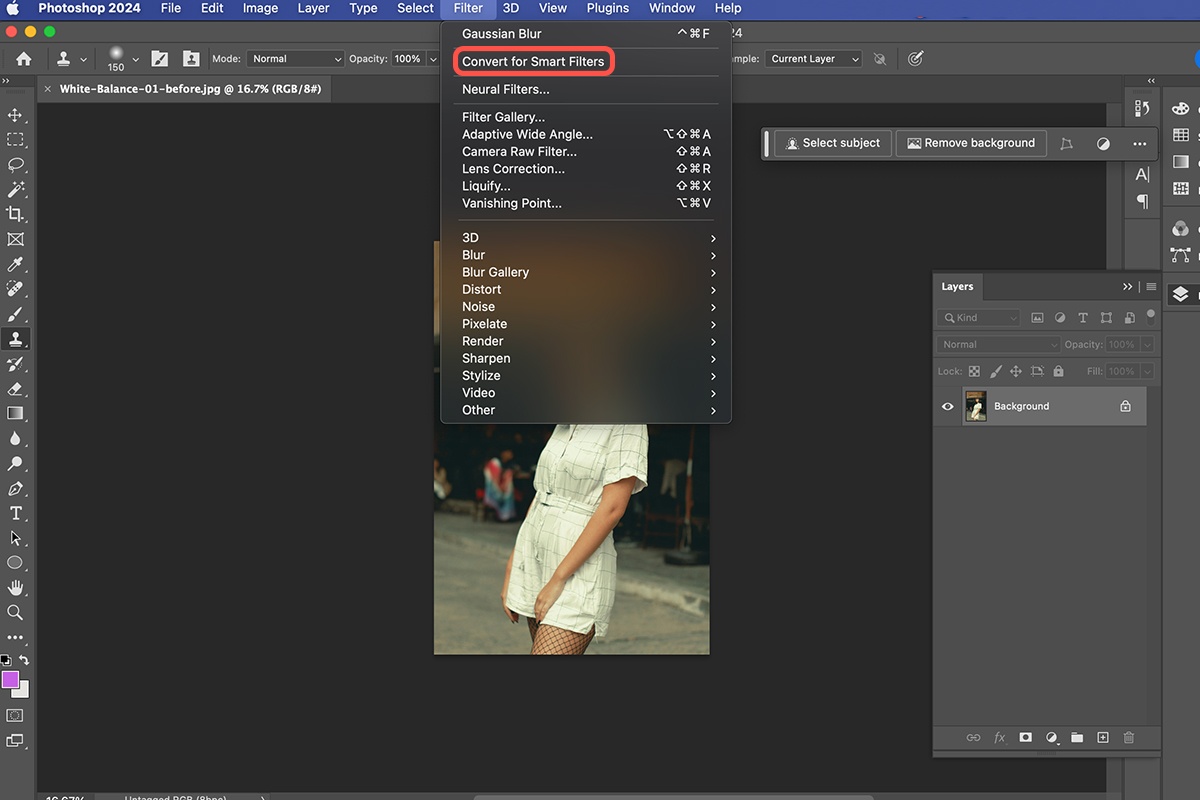
Before touching any settings, convert your layer to a Smart Object. Go to Filter, then Convert for Smart Filters.
This takes one click and changes what the whole edit is worth. With a Smart Object, the Camera Raw Filter is applied as a smart filter — meaning you can double-click it hours later and reopen the panel with every slider exactly where you left it. Without it, the adjustment is baked into the pixels and the only way to change your mind is to undo.
White balance in particular is something you often want to revisit, because how warm an image should be is a judgment that shifts once the rest of the edit is in place.
The Correction
-
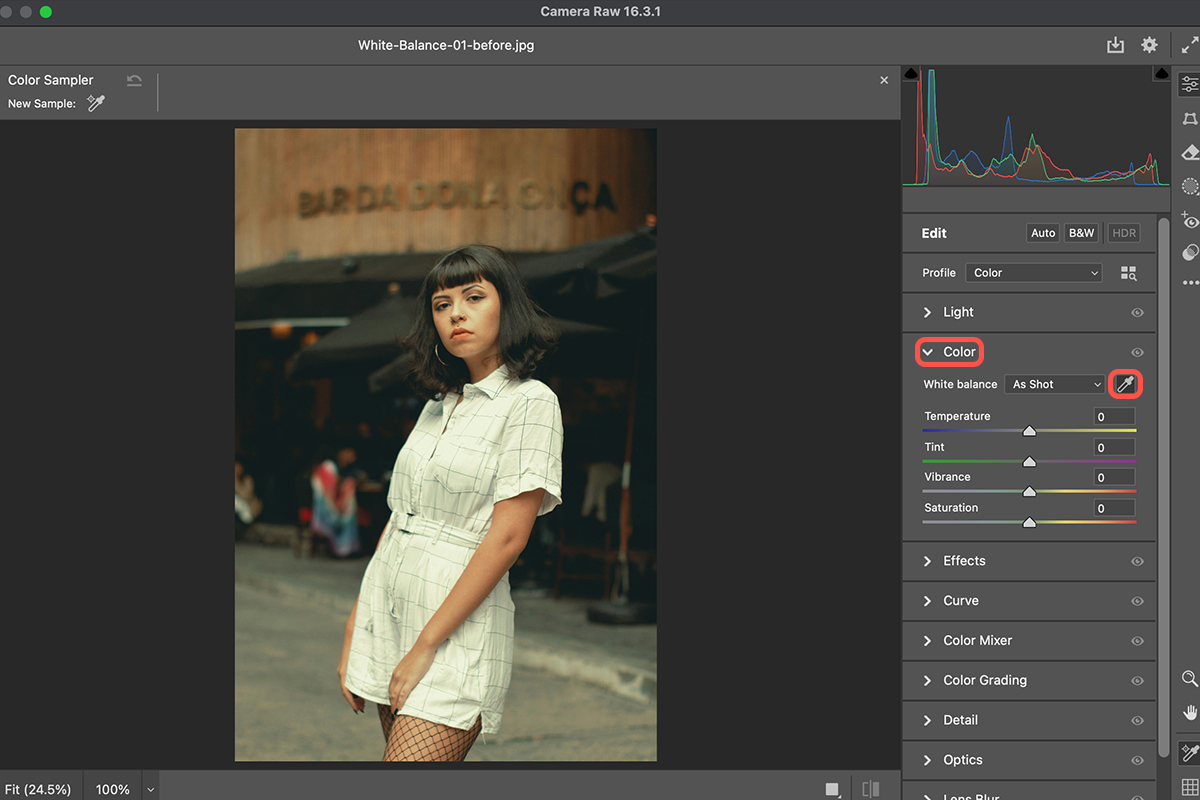
Go to Filter, then Camera Raw Filter
The full Camera Raw interface opens over your image.
-
Find the White Balance controls in the Color section
You get an eyedropper, a Temperature slider and a Tint slider.
-
Select the White Balance eyedropper
This is the fastest route to a correct starting point.
-
Click on something that should be neutral
Camera Raw analyzes that pixel and shifts the whole image so the sampled area becomes neutral gray.
-
Fine-tune with Temperature and Tint
The eyedropper gets you close; your eye decides the rest.
-
Click OK
The adjustment appears as an editable smart filter beneath your layer.
Choosing Where to Click
This is the whole technique, and it is where results are won or lost.
Look for something genuinely neutral
Concrete, a gray pavement, asphalt, a white or gray garment, a plain wall, the white of an eye, a shadow on a neutral surface. You are looking for something you know should have no color of its own.
Avoid saturated colors
Clicking a red jacket tells Photoshop that red should be gray, and it will shift the entire image toward cyan to make that true. The result is dramatically wrong. The same applies to any strongly colored surface — grass, sky, skin.
Avoid blown highlights and crushed shadows
A pure white blown area carries no usable color information, and neither does a completely black shadow. Sample from a mid-tone where there is real data.
Try several spots
The eyedropper is instant and non-committal, so click around. Sample the pavement, then a shirt, then a wall, and watch how each one shifts the image. Comparing three or four attempts tells you far more than agonising over the first.
Fine-Tuning by Eye
Temperature runs blue to yellow. Drag right to warm the image, left to cool it.
Tint runs green to magenta. This is the one people forget, and it is often the reason an image still looks slightly off after the temperature is right — fluorescent lighting in particular pushes images green, and no amount of temperature adjustment will fix that.
Technically correct is not always what you want. A portrait usually benefits from being a touch warmer than neutral, and a winter landscape often reads better slightly cool. Use the eyedropper to establish what neutral actually is, then move deliberately away from it if the image calls for it.
While You Are In There
The Camera Raw Filter gives a JPEG the same Basic panel Lightroom offers on a raw file: Exposure, Contrast, Highlights, Shadows, Whites and Blacks.
Since you are already in the panel, recovering some highlight detail or lifting shadows here is often better than doing it later with adjustment layers — Camera Raw’s tone controls are well-behaved and, because everything is inside one smart filter, all of it stays editable together.
The limits of a JPEG still apply. There is far less latitude than a raw file, so push too far and you will see banding in skies and color breaking up in the shadows. Work in smaller amounts than you would on a raw file.
Checking the Result
Toggle the smart filter’s visibility off and on. Your eye adapts to a cast within seconds, so a direct before-and-after is the only reliable way to judge whether you have actually corrected it or simply moved it somewhere else.
A useful habit: look at the neutral areas rather than the subject. Skin tones are forgiving and your eye will accept a wide range as plausible. Concrete, white shirts and paper are not — if those look neutral, the image is balanced.
When There Is Nothing Neutral to Sample
Some images contain nothing that should be gray — a sunset, a scene lit entirely by one strong color, a studio shot on a colored backdrop. The eyedropper has nothing useful to work with.
In that case, set the Temperature and Tint by eye instead. Push the temperature well too warm, then well too cool, and note where it stops looking wrong in each direction; the right answer is usually near the middle of that range. It is slower than sampling, but it is more reliable than clicking hopefully on something that only looks neutral.
It is also worth remembering that a strong color cast is sometimes the photograph. Golden hour is meant to be warm, and neutralizing it removes the reason the shot was taken. Correct casts that are mistakes; keep the ones that are the point.
Quick Reference: Keys, Menus and Settings
- Make it editableFilter > Convert for Smart Filters; F for full screen
- Open Camera RawFilter > Camera Raw Filter, then the Color section
- Set white balanceWhite Balance eyedropper, click a target neutral: the white dress, gray sidewalk or a shirt
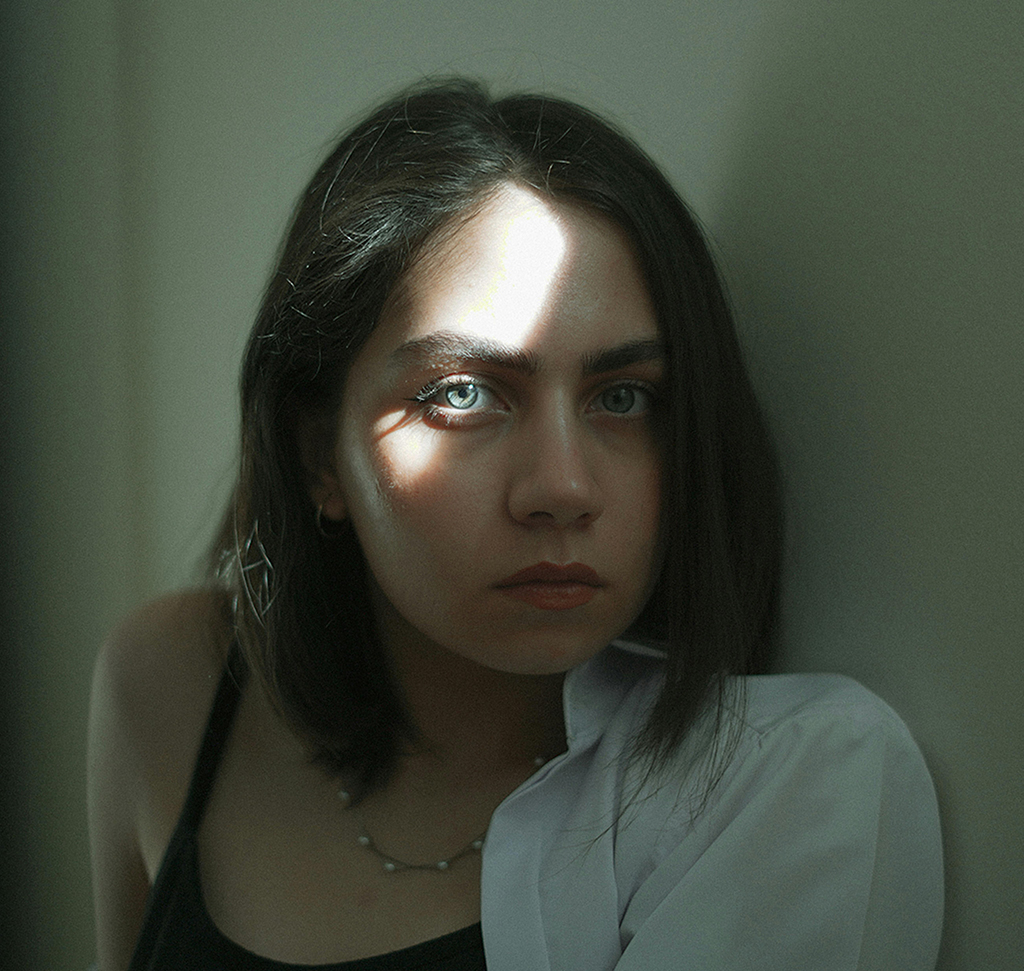
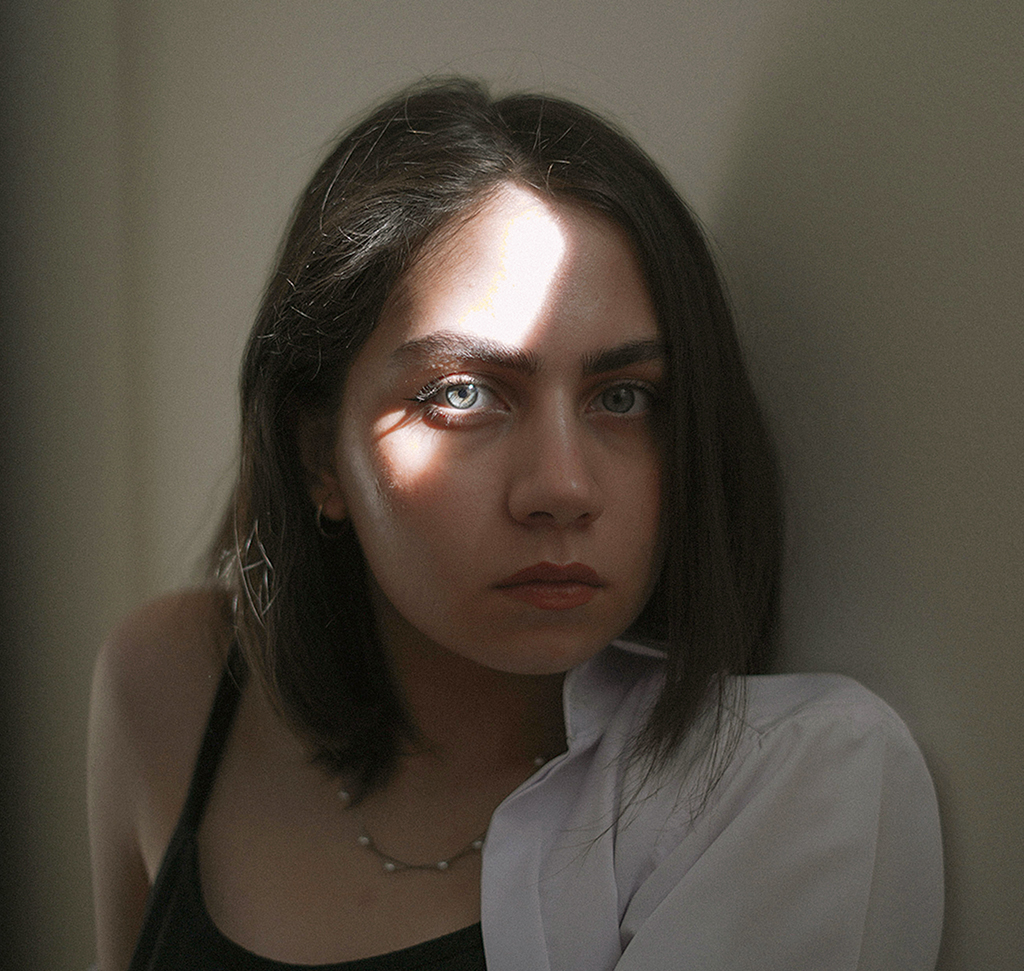
- Fine-tuneTemperature runs blue to yellow, Tint green to magenta; the first photo landed at -6 and +42
- Tone while you are thereLight: Contrast down a little, Shadows up, Highlights down
- Before and afterOK, then the eyeball next to Camera Raw Filter under Smart Filters; double-click it to edit again
No AI, no generative credits.

Free Downloads
Follow Along on the Same Photos
Get the two portraits with a color cast, the two finished PSDs with the Camera Raw smart filter and the 3-page PDF guide. Free with a PHLEARN account.
Correcting White Balance: Common Questions
Can I fix white balance on a JPEG in Photoshop?
Yes. Filter > Camera Raw Filter gives a JPEG the same white balance tools Lightroom has: the eyedropper, Temperature and Tint.
Why convert for Smart Filters first?
Filter > Convert for Smart Filters makes the layer a Smart Object, so Camera Raw is applied as a smart filter. Double-click it later and the panel reopens with every slider where you left it.
Where is the white balance eyedropper in Camera Raw?
Open the Color section and find White Balance. The eyedropper sits next to the menu; click it and your cursor becomes an eyedropper over the image.
What should I click on with the eyedropper?
A target neutral, something that should have no color of its own. In the video that is the white dress, the gray sidewalk and, in the second photo, the subject’s shirt.
Why did my whole photo turn the wrong color after one click?
You clicked a color, not a neutral. Click the red sign and Photoshop treats red as gray and shifts everything away from it; skin throws it off too. Click somewhere in the gray range instead.
How do I fix a green tint?
The same way: click a neutral with the White Balance eyedropper. In the second example one click on the shirt fixes it. Tint runs green to magenta, so that is the slider to nudge afterward.
Can I make it warmer than the eyedropper set it?
Yes. Drag Temperature a little to the right. A subtle warm push makes a photo feel more like a sunny day, and a portrait often looks better a touch warmer than neutral.
What if nothing in the photo is neutral?
Set Temperature and Tint by eye. Push well too warm, then well too cool, and settle near the middle of where it stops looking wrong.
How do I check the before and after?
Click OK, then click the eyeball next to Camera Raw Filter under Smart Filters in the Layers panel. Your eye adapts to a cast quickly, so toggling is the reliable check.
Are the sample files free?
Yes, with a free PHLEARN account. You get 2 sample images, 2 sample PSDs and 1 PDF guide: both color-cast photos, the corrected files and a 3-page step-by-step guide.
From the Magazine View all
Stories, interviews and guides for photographers, new every week.
 EditingLightCraft vs Lightroom: I Edited the Same RAW Files in BothThe free clone on the same RAW files: what matches, what breaks and who should switch.
 InspirationRare Historical Photos: 13 of the Rarest Pictures Ever TakenFrom the earliest surviving picture of a person to the last passenger pigeon: who took each one and why it survives.
 EditingArtCraft: Photoshop Cloned by AI in Two Weeks. Is It Legal?ArtCraft cloned Photoshop and Lightroom with AI and gave them away. Any good? Legal? Safe?
Master Photoshop, Lightroom and Photography
Join PHLEARN PRO for $12.99 a month, or $99.99 a year (save 36%). Cancel anytime, with a 30-day money-back guarantee.