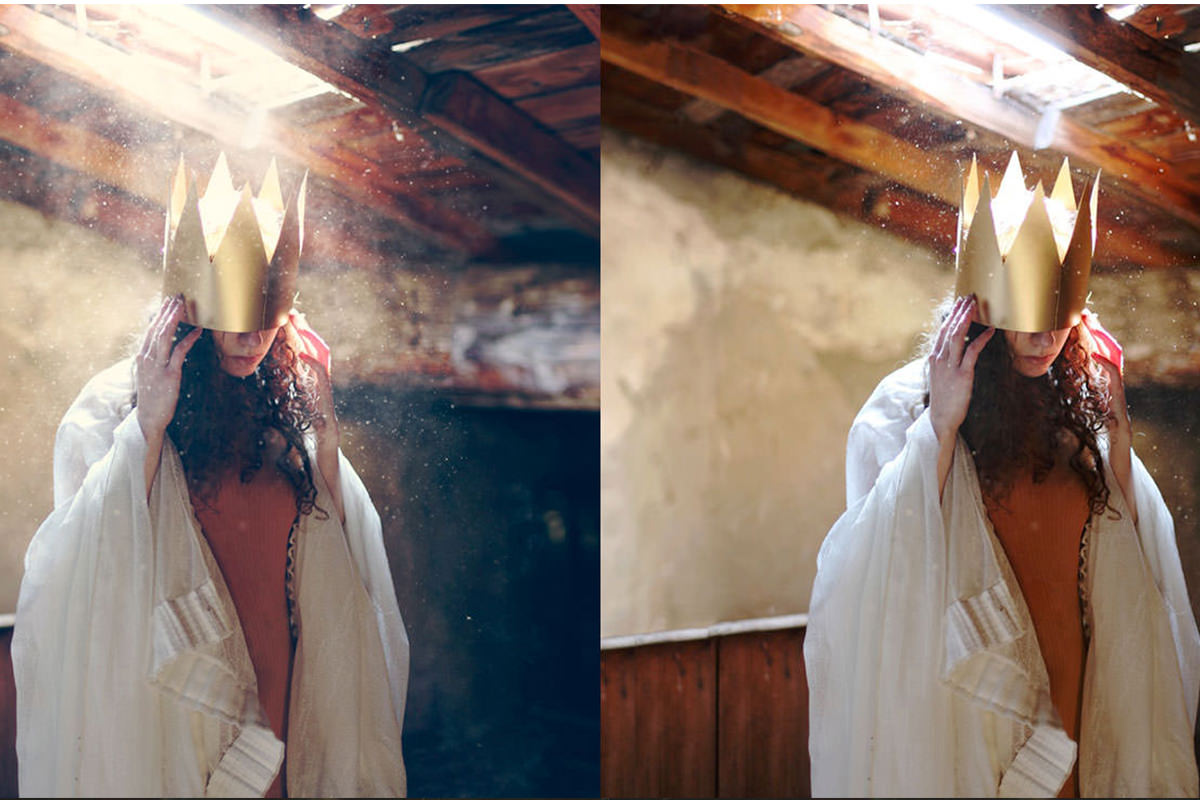

Painting fog or dust with a standard soft round brush almost always reads as exactly that: a brush painted onto a photo. This free Photoshop tutorial builds custom brushes from scratch using the image itself as the source, cloning a random organic pattern, inverting it and boosting contrast with Levels, then defining it as a brush preset. Shape Dynamics, Scattering, and pressure-sensitive Transfer add the randomness that makes the finished fog and floating dust belong in the scene.
We publish a new free tutorial every week, each one with sample images and PSDs you can download and follow along with. Sign up and they land straight in your inbox, along with early word on sales, events and subscriber-only offers.
How to Use Custom Brushes to Create Atmosphere in Photoshop
Adding fog, smoke, or floating dust to a photo with a regular soft round brush almost always looks exactly like what it is: a Photoshop brush painted onto an image. This tutorial builds a genuinely random, organic custom brush from scratch, using the same image it will be painted into, and shows how to turn that brush into two different atmospheric effects.

Building the Base Pattern for a Custom Brush
A convincing atmosphere brush starts with a random, hand-built pattern rather than any preset shape.
-
Duplicate the Layer Into a New Document
Right-click the background layer, choose Duplicate Layer, and send it to a new document so you’re free to experiment without touching the original image.
-
Convert to Black and White
Press Shift+Cmd/Ctrl+U to desaturate the new document, since a custom brush’s color doesn’t matter — only its light and dark values do.
-
Clone Stamp With Screen and Multiply Blending
Select the Clone Stamp tool, sample from within the image, and paint using the Screen blending mode to build up lighter areas, then switch to Multiply to build up darker ones. Repeat and experiment freely — the goal is an interesting, organic pattern of light surrounded by dark, not a specific final look.
Why You Should Avoid Straight Edges in the Base Pattern
Cloning in a way that creates a hard line or lets the pattern run into the edge of the document produces a visible straight edge that will show up every time the finished brush is used. Keeping the clone stamping away from document boundaries and avoiding harsh, angular marks is what keeps the eventual brush looking random rather than obviously repeated.
Inverting and Boosting Contrast With Levels
Once the pattern looks interesting, it needs to be prepared specifically for how Photoshop interprets brush shapes.
-
Invert the Layer
Press Cmd/Ctrl+I to invert the pattern, since Photoshop’s custom brushes work best as dark marks on a light background rather than the other way around.
-
Add a Levels Layer and Push the Black Point Up
Add a Levels adjustment layer and drag the black point input slider significantly to the right. This increases contrast so only true dark areas will become part of the brush shape, avoiding a hard visible edge once the brush is painted with later.
-
Paint Pure White Around the Edges
On a new layer above the background, paint pure white directly around any remaining defined edges of the pattern so the finished brush fades out naturally in every direction instead of stopping abruptly.
Why Photoshop Brushes Need Dark-on-Light Contrast
Photoshop defines a custom brush by treating dark areas of the source image as the parts that paint, and light areas as the parts that stay transparent. Boosting contrast with Levels and eliminating any leftover midtone edges is what prevents a hard geometric boundary from appearing every time the brush is stamped down.
Defining the Brush Preset
With the pattern finished, it’s ready to become an actual, reusable brush.
-
Merge and Define the Brush
Shift-click all the layers used to build the pattern and press Cmd/Ctrl+E to merge them, then go to Edit > Define Brush Preset and give it a name.
Adding Randomness With Shape Dynamics, Scattering, and Transfer
A newly defined brush still paints the same repeating pattern every time on its own, so the Brush panel’s dynamic settings add the variation needed to make it feel truly random.
-
Turn On Shape Dynamics
Open Window > Brush, enable Shape Dynamics, raise Size Jitter so individual marks vary in scale, raise Angle Jitter so they rotate randomly, and lower Minimum Diameter to allow smaller marks as well as large ones.
-
Turn Up Scattering
Enable Scattering and increase it so individual brush marks spread out unpredictably rather than following a single straight line.
-
Set Up Transfer for Pen Pressure
Enable Transfer, set Flow Jitter’s control to Pen Pressure so pressing harder deposits more of the brush and lighter pressure deposits less, giving you direct manual control over how much of the effect builds up in any one spot.
-
Save the Fully Configured Brush
Once the settings feel sufficiently random, click New Brush Preset and save it under a new name so both the raw shape and the fully configured version remain available.
Painting and Erasing With the Same Brush for Natural Fog
The finished brush becomes far more convincing when it’s used with both the Brush tool and the Eraser tool together.
-
Paint Fog on a New Layer
Create a new layer, sample a color from the light source already present in the image with the Brush tool, and paint your custom brush where you want the atmosphere to appear, adjusting brush size as you go.
-
Erase With the Same Custom Brush
Select the Eraser tool, right-click to choose the same custom brush from the brush picker, and erase back into the painted fog. Erasing with the identical random brush, rather than a standard round eraser, keeps the edges of the effect just as organic as the paint itself.
Creating a Second Brush for Floating Dust Specks
The same overall process, scaled down, produces a completely different but equally useful atmospheric brush.
-
Build a Smaller Pattern for Dust
Following the same steps as before, build a much smaller, finer version of the pattern to represent floating dust particles rather than broad fog, and define it as its own brush preset.
-
Confirm the Background Is Pure White
If the finished brush shows a visible square or rectangular edge when used, check that the background behind your pattern was actually filled with pure white rather than light gray, and correct it before redefining the brush.
Why the Base Pattern’s Background Must Be Pure White
Any part of the source pattern that isn’t fully white gets interpreted as at least partially part of the brush shape, which is exactly what causes a faint square or rectangular outline to appear around an otherwise random brush. Confirming the background is genuinely pure white, not just close to it, eliminates that visible boundary entirely.
Adding Color Toning With a Levels Adjustment Layer
A final pass of color work ties the new atmospheric elements together with the rest of the image.
-
Shift Channels in Levels for an Artistic Tone
Add a Levels adjustment layer, pull the Blue channel’s highlight point toward yellow, add a touch of green, and push the Red channel slightly toward red for an overall warmer, more artistic feel.
More Free Photoshop Tutorials
To keep building your atmospheric and brush-based editing skills, check out these free tutorials:
- How to Color Grade in Photoshop Using Camera Raw
- Three Ways to Use Blend If in Photoshop
- Curves vs Levels in Photoshop: What the Difference Actually Is
Why This Approach Works
Building the brush from cloned marks within the same image, rather than starting from a stock texture, is what makes the finished effect feel native to the photo instead of pasted on top of it. Layering Shape Dynamics, Scattering, and pressure-sensitive Transfer settings onto that hand-built pattern adds the unpredictability that a static brush shape can’t provide on its own, and painting with the brush while also erasing with that same brush keeps both the additions and their edges consistently organic. Once built, these brushes aren’t single-use — the same fog and dust brushes created here work on any image, and you can download the Atmosphere Brushes used in this tutorial rather than rebuilding them from scratch.
Final Thoughts
The best place to use a fog or dust brush like this is anywhere light is already coming from behind your subject, since that’s exactly where real atmospheric particles would naturally catch and scatter that light. Building a custom brush once and reusing it across many images is a genuinely efficient workflow, and the underlying technique here — cloning a random pattern, boosting contrast, and adding brush dynamics for variation — extends well beyond fog and dust to any organic texture you might want to paint into a photo.
Related Tutorials
New Free Tutorials View All »






Enjoying This Free Tutorial? Go Further with PRO.
200+ PRO courses. 1,000+ practice files. One membership.

Unlimited access to every PRO course
New PRO courses every month
Layered PSDs and RAW files to follow along
100+ Lightroom Presets, LUTs, Actions and Brushes
Stream in up to 4K, with captions and chapters
Watch on any device: desktop, tablet or phone
4.93 average from 3,900+ reviews · 2M+ students