
Download Assets
This tutorial includes sample images and a hologram texture. Downloads are free with a PHLEARN account.
- Download the sample images and PSDs from every free tutorial on PHLEARN
- New free tutorials published every week
- One free account — sign up once, then download anything
description
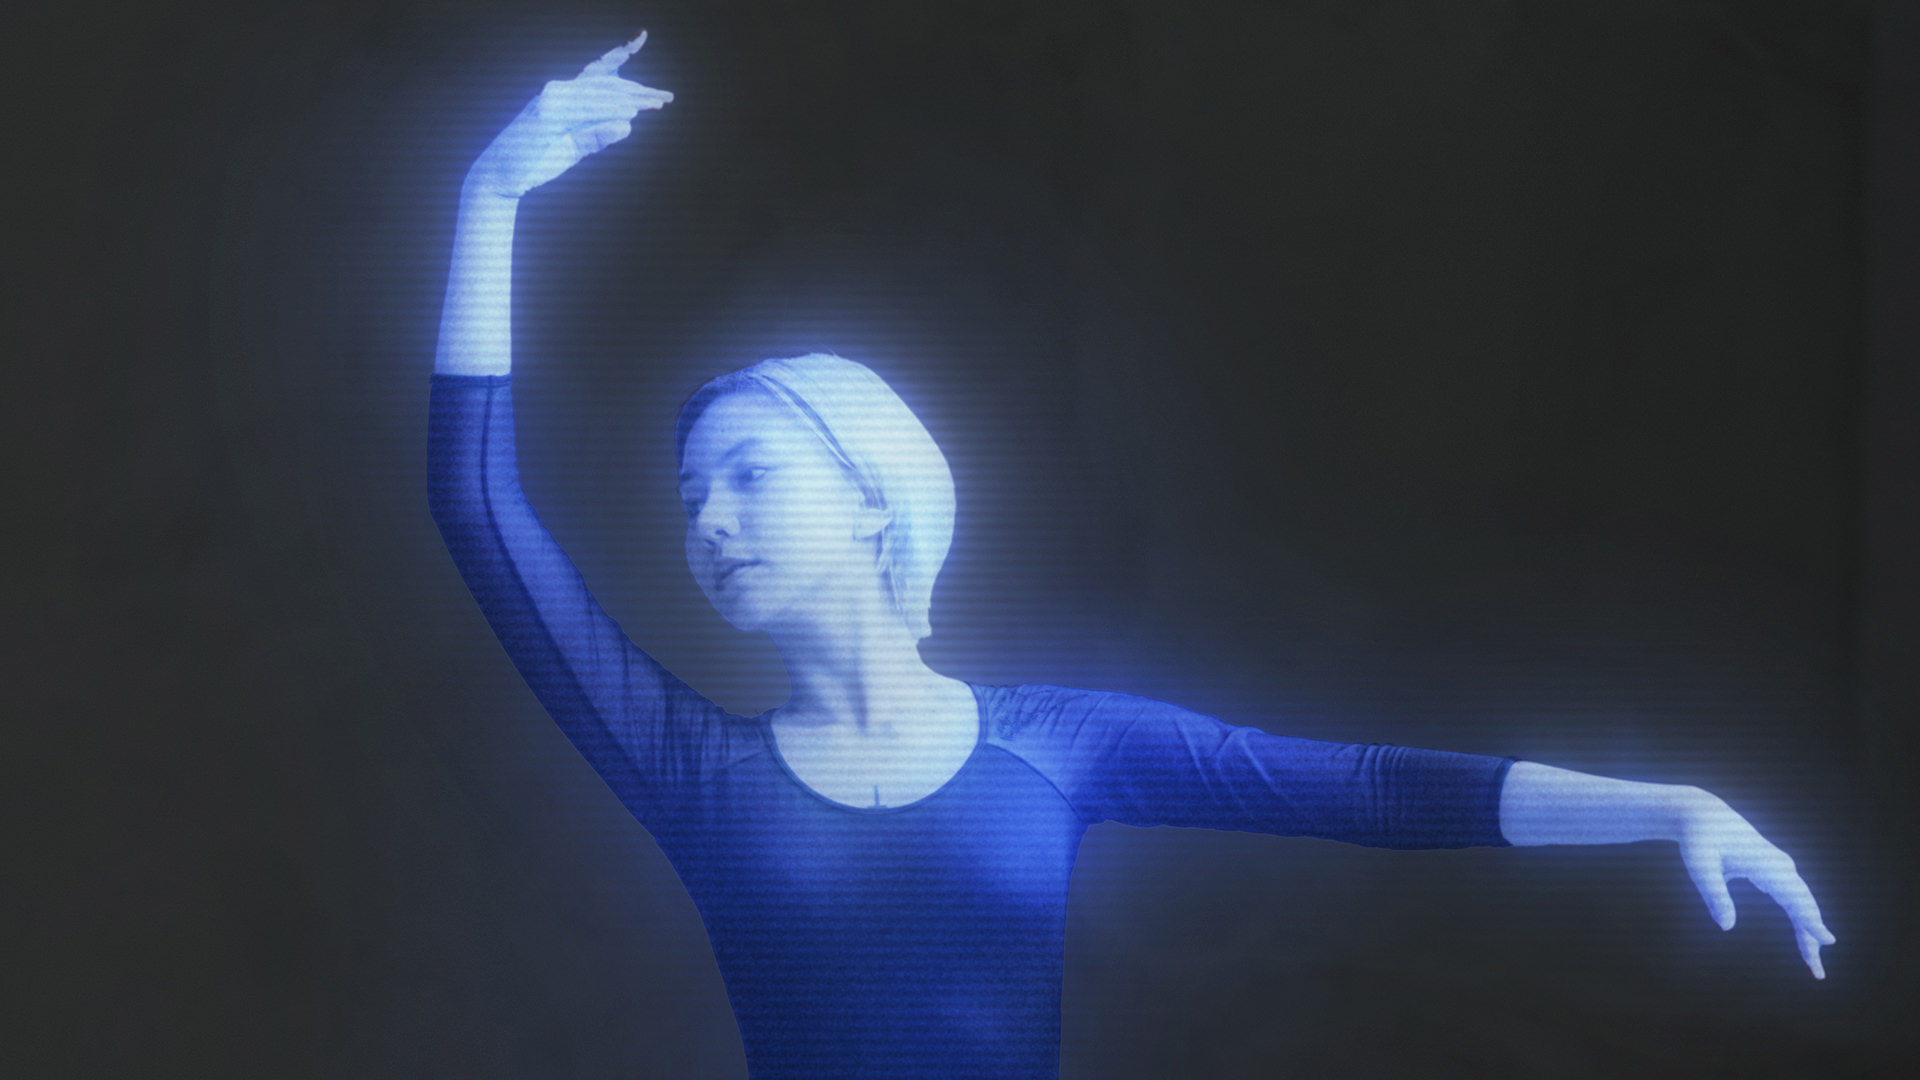
Learn how to create a sci-fi hologram effect in Photoshop using the included hologram line texture. Cut your subject out with Select Subject, darken the background, then treat the subject like a light source with the Screen blending mode, a clipped Hue/Saturation Colorize adjustment, noise, and blur. Add horizontal scan lines as a mask, build up a glow with stacked blurred duplicates, paint in random glow with Color Dodge, and finish with a flipped, faded reflection.
Click here to download the complete PSD file (315MB).
Enjoying This Free Tutorial?
We publish a new free tutorial every week, each one with sample images and PSDs you can download and follow along with. Sign up and they land straight in your inbox, along with early word on sales, events and subscriber-only offers.
Image Source
Photo by Jorge Fakhouri Filho via Pexels
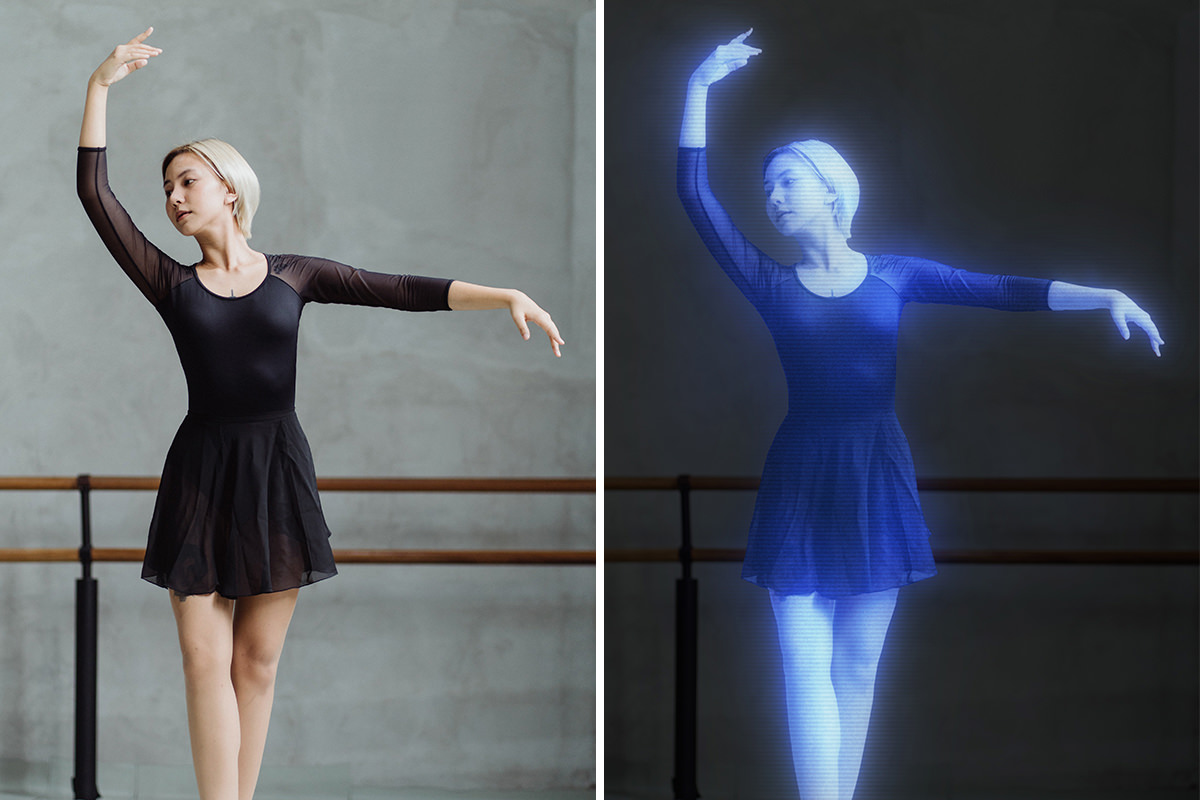
CREATE A SCI-FI HOLOGRAM EFFECT
How to Create a Hologram Effect in Photoshop
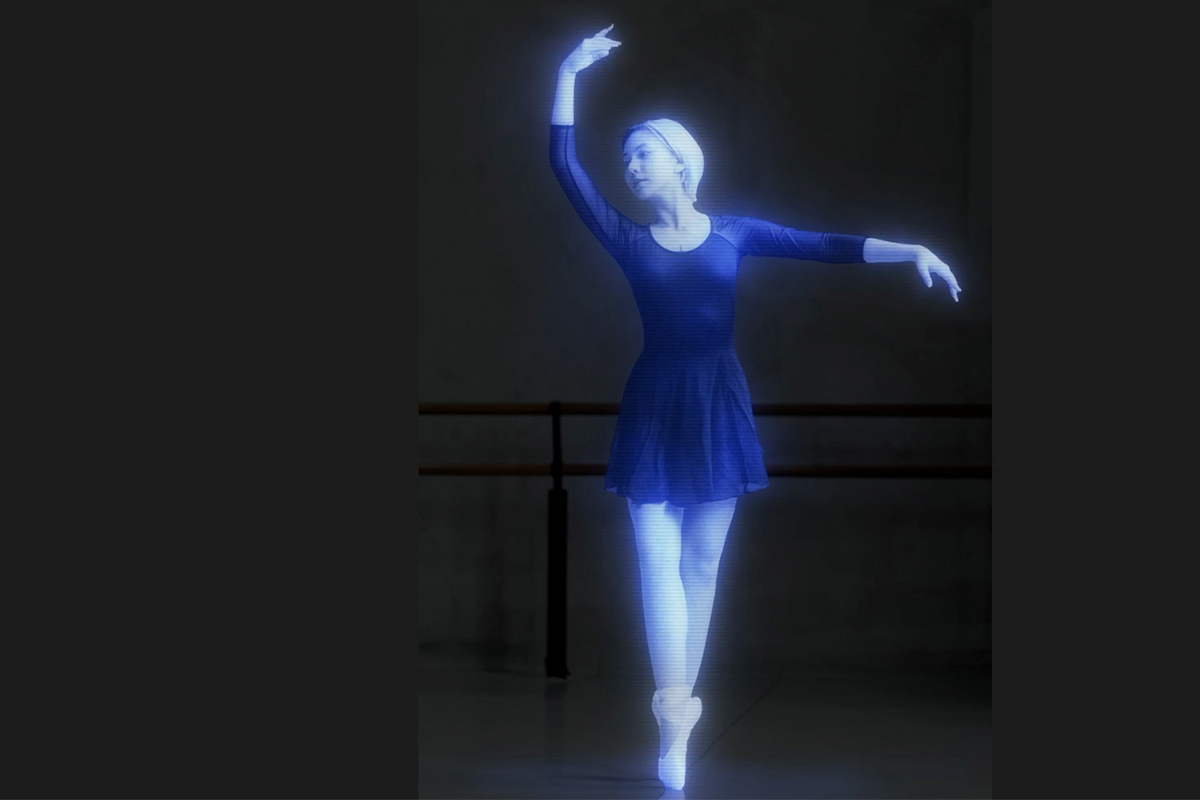
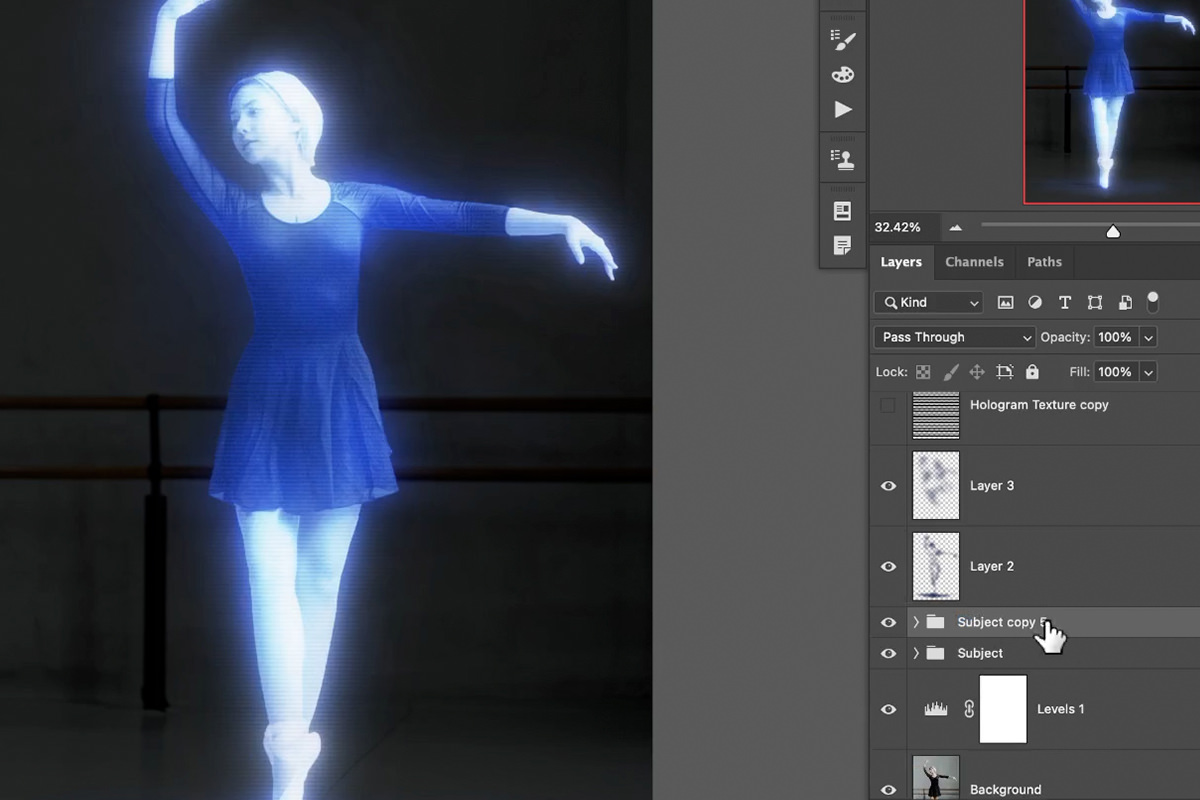
A convincing hologram effect comes down to treating your subject like a light source instead of a photo — screen-blended color, layered glow, scanning horizontal lines, and a subtle blur that sells the idea of a projection rather than a solid person. A subject with an already dynamic, almost floating pose (pointed toes, extended fingers) gives the effect a big head start, since part of what reads as “hologram” is simply the pose itself.
Cutting Out Your Subject
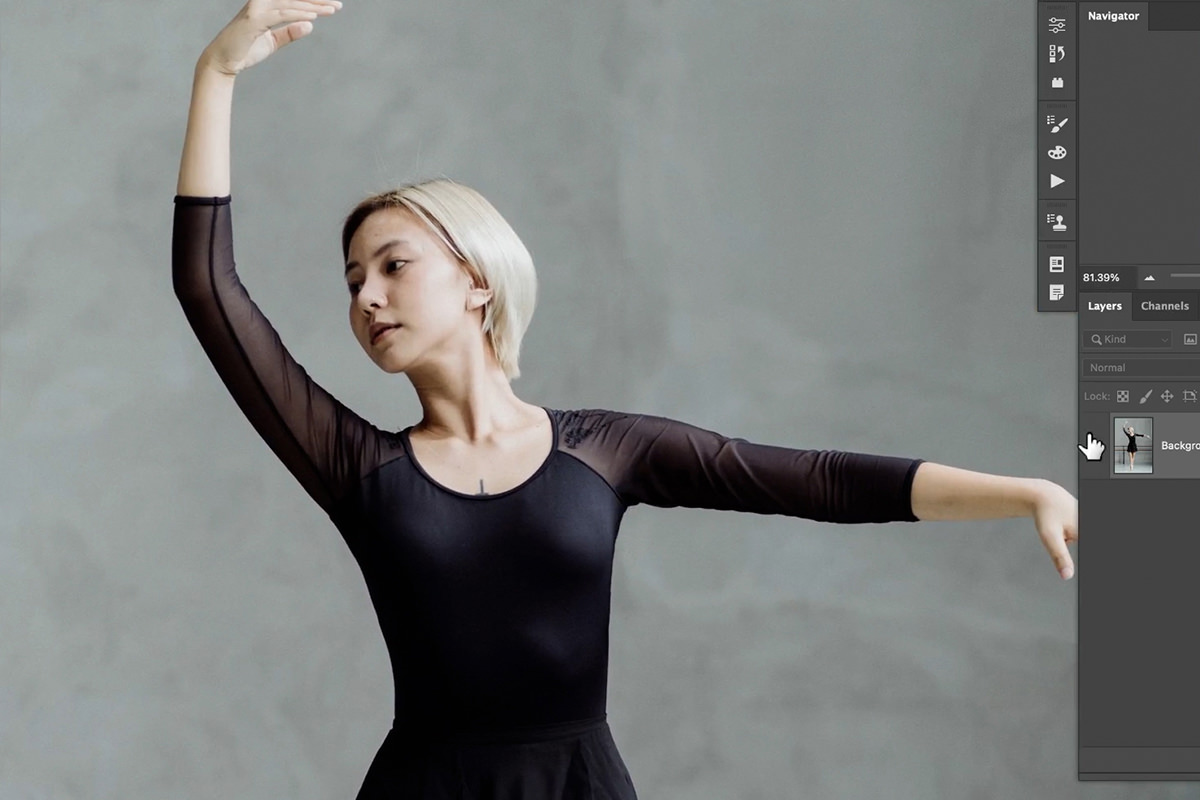
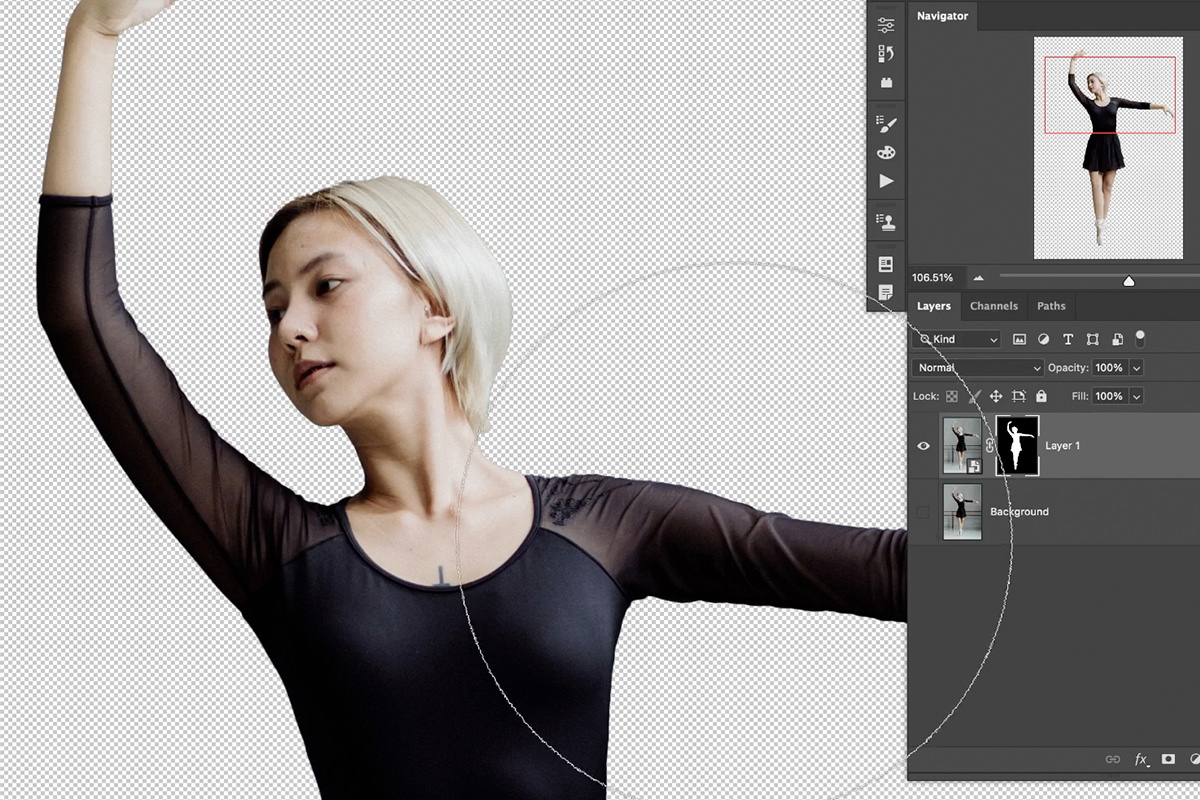
Everything in this effect happens on a duplicated, isolated copy of your subject, separated from the background so it can be treated completely differently.
-
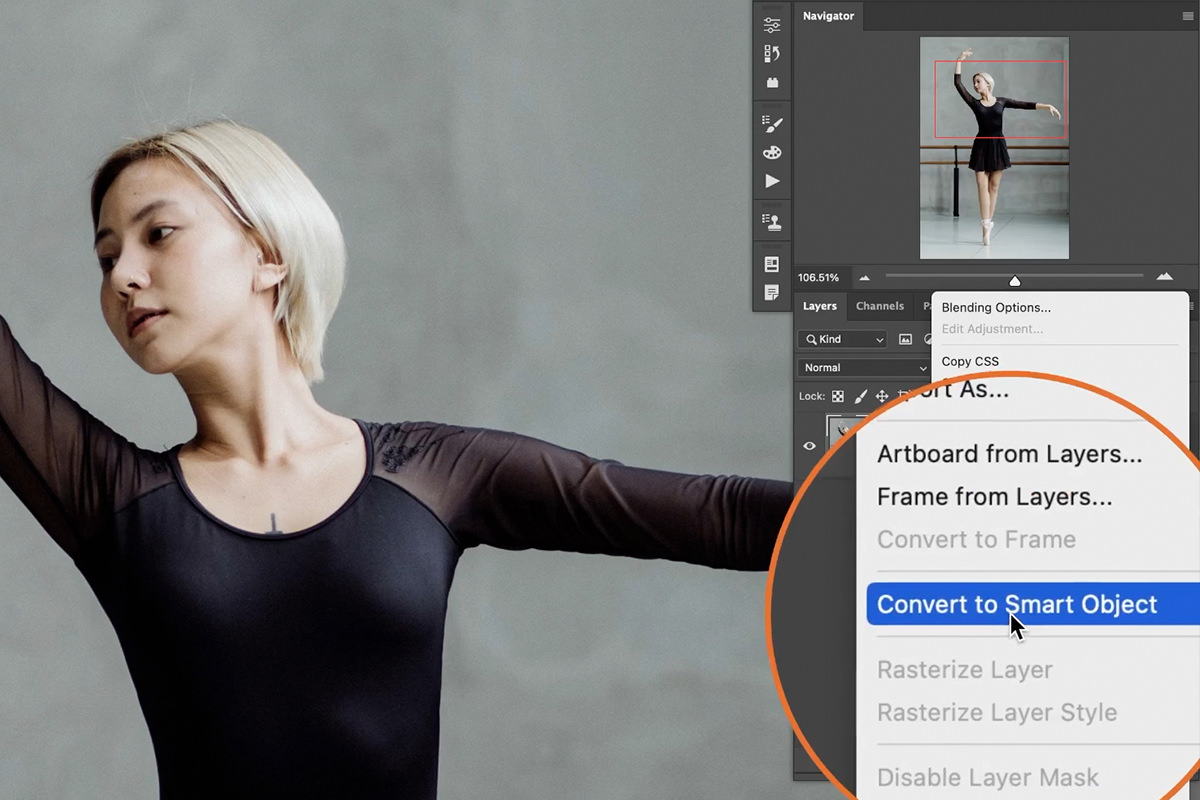
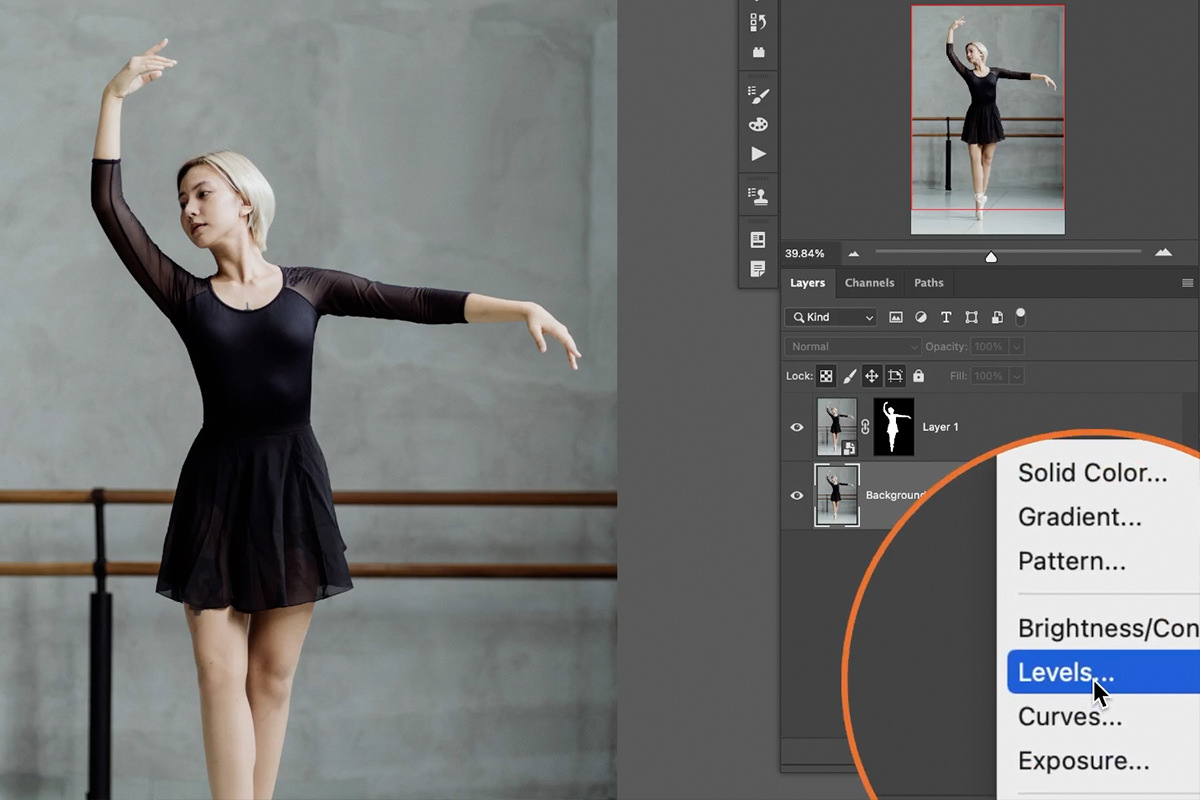
Duplicate the Background and Convert to a Smart Object
Press Ctrl/Cmd + J to duplicate your background layer, then right-click it and choose Convert to Smart Object. This lets every filter added later stay fully editable.
-
Select and Mask Your Subject
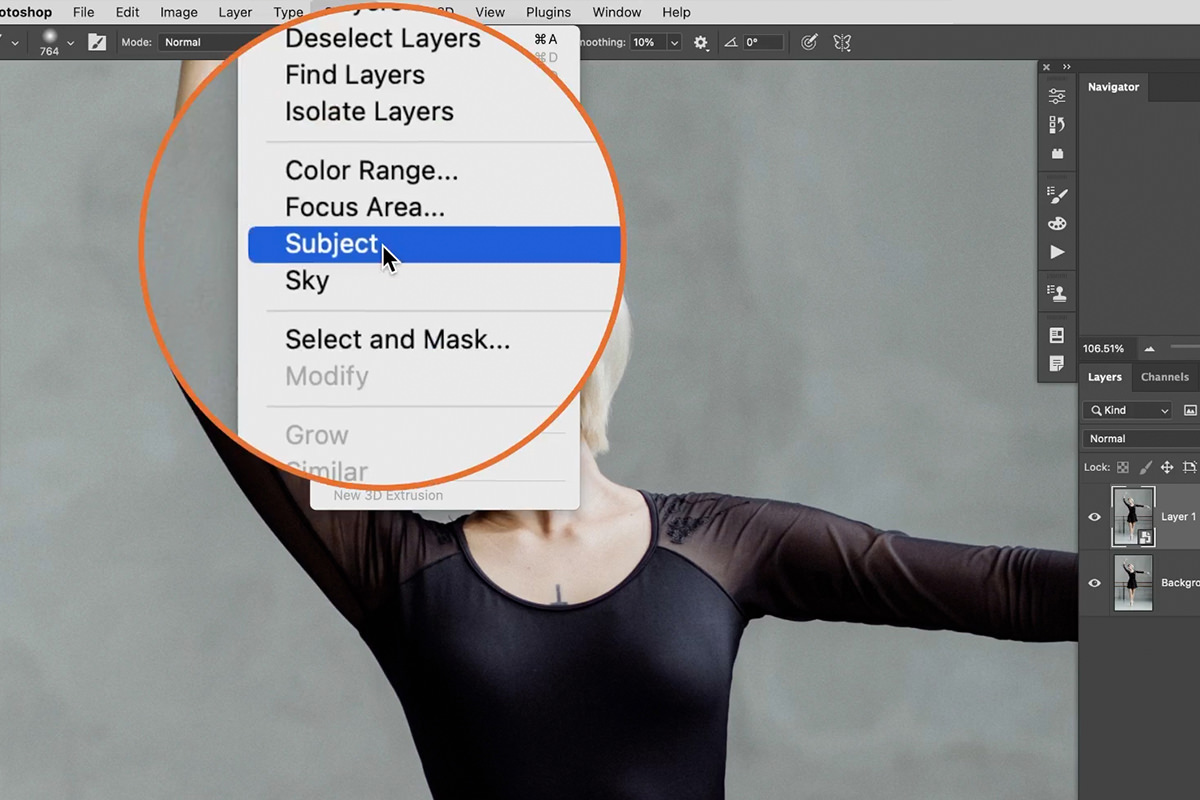
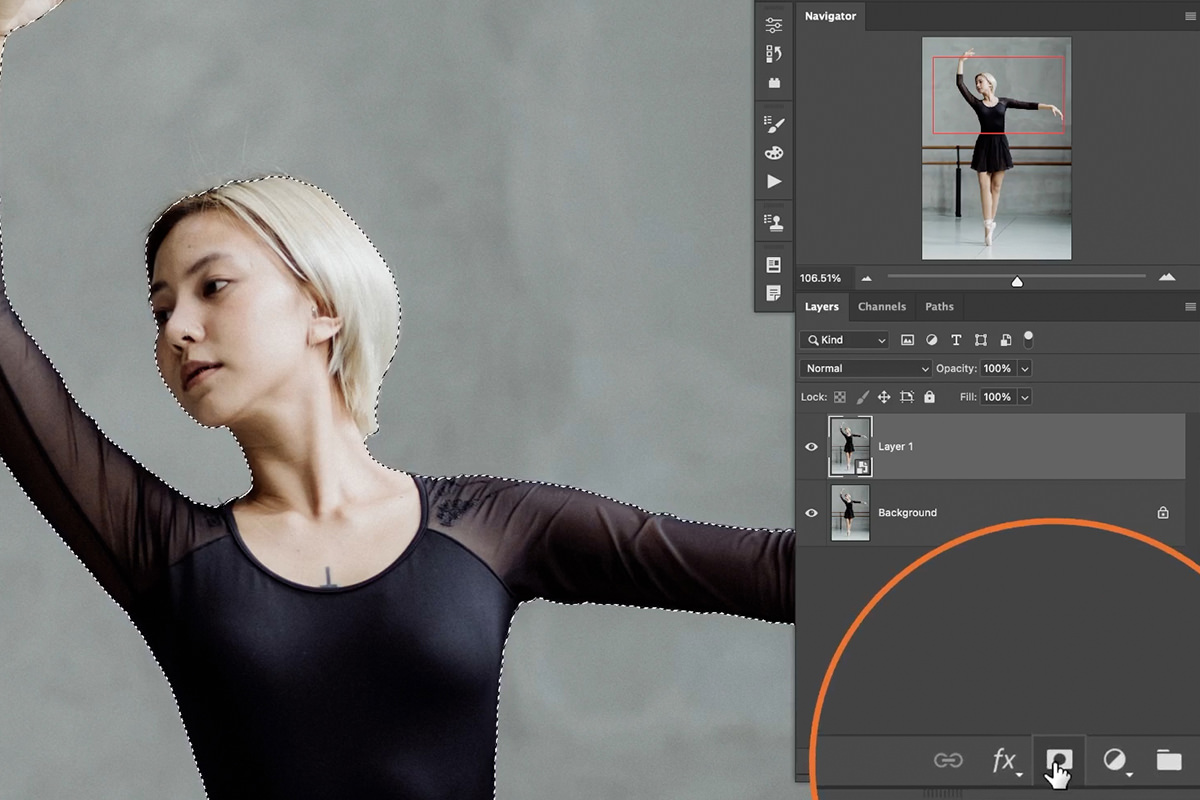
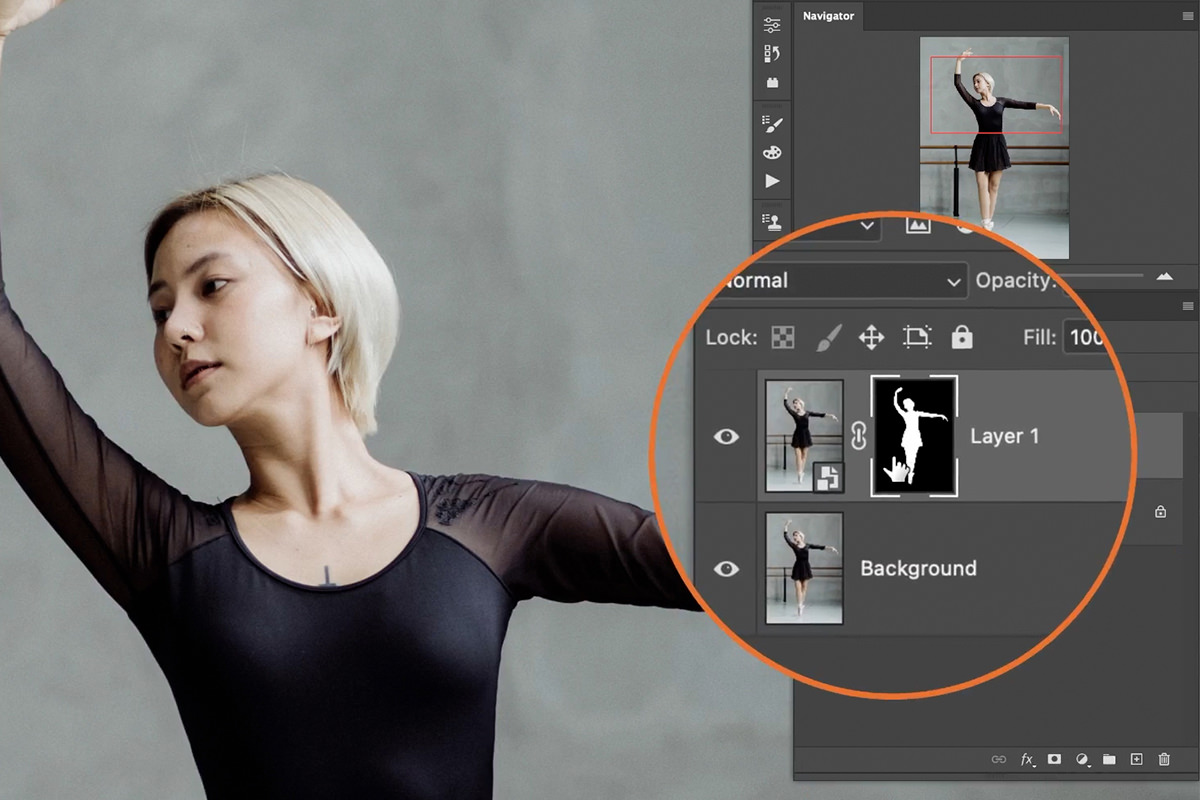
Go to Select > Subject to let Photoshop automatically select your subject, then click the layer mask icon to turn that selection into a mask, cutting your subject out from the background.
Darkening the Background
A hologram reads best against a dark backdrop, as if the projected figure is the main source of light in the scene.
-
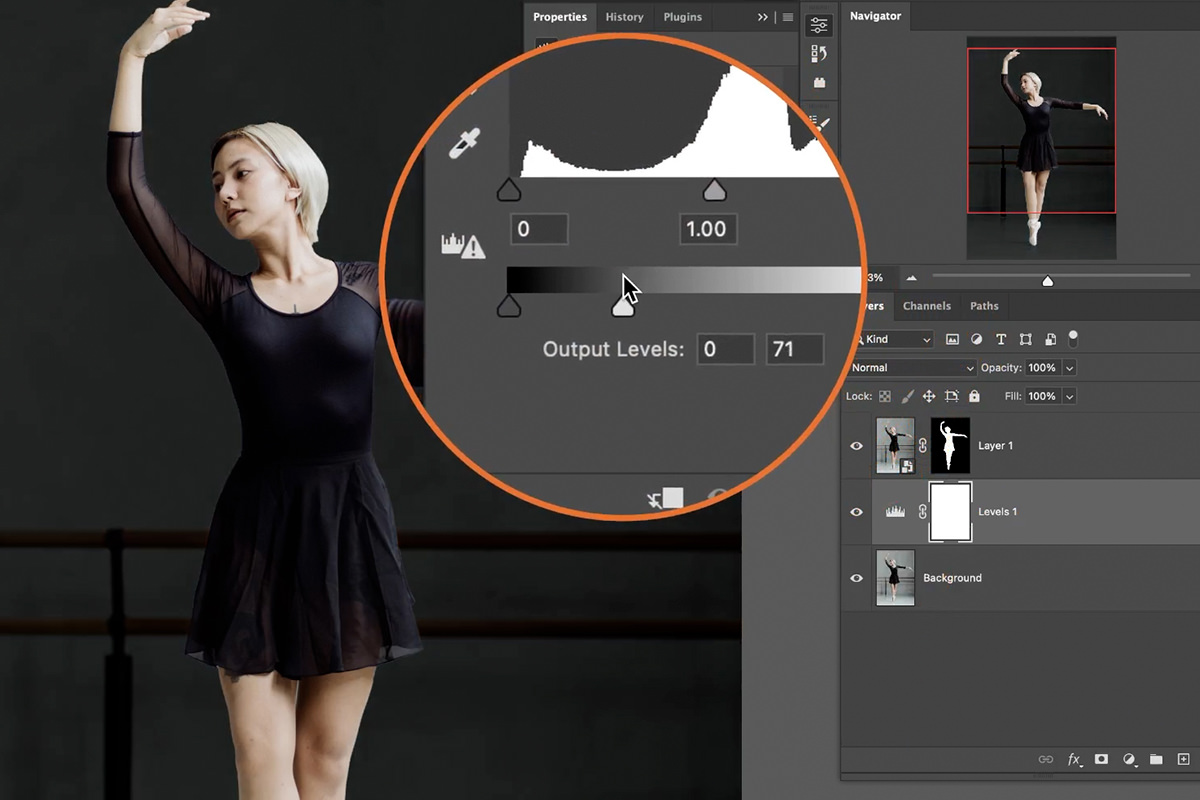
Add a Levels Adjustment Layer to the Background
With your background layer selected, add a Levels adjustment layer and drag the highlight point to the left to darken the scene. Because your subject is already cut out on its own layer above, this only affects the background.
Colorizing Your Subject as a Hologram
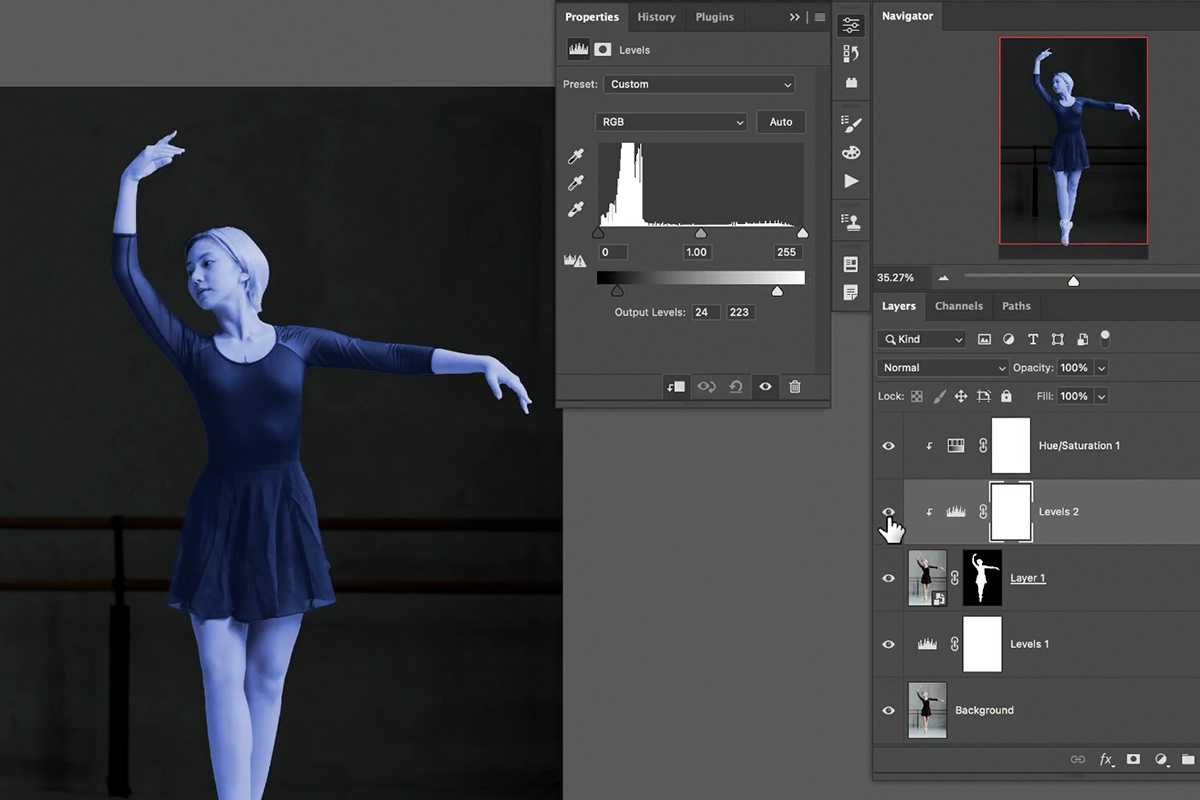
The color of the effect comes from a Hue/Saturation adjustment, clipped so it only affects the cut-out subject and not the background behind it.
-
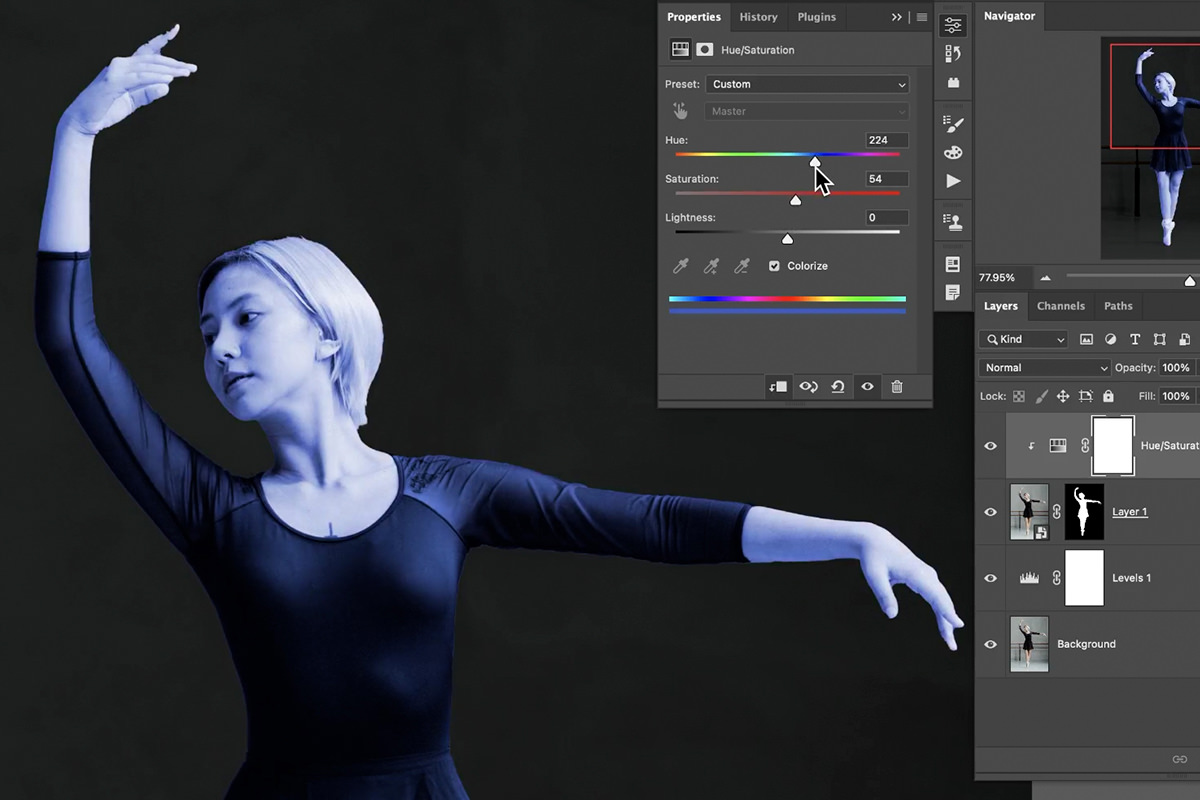
Set the Subject Layer to Screen
Change your subject layer’s blending mode from Normal to Screen, since a hologram should be producing light rather than reflecting it.
-
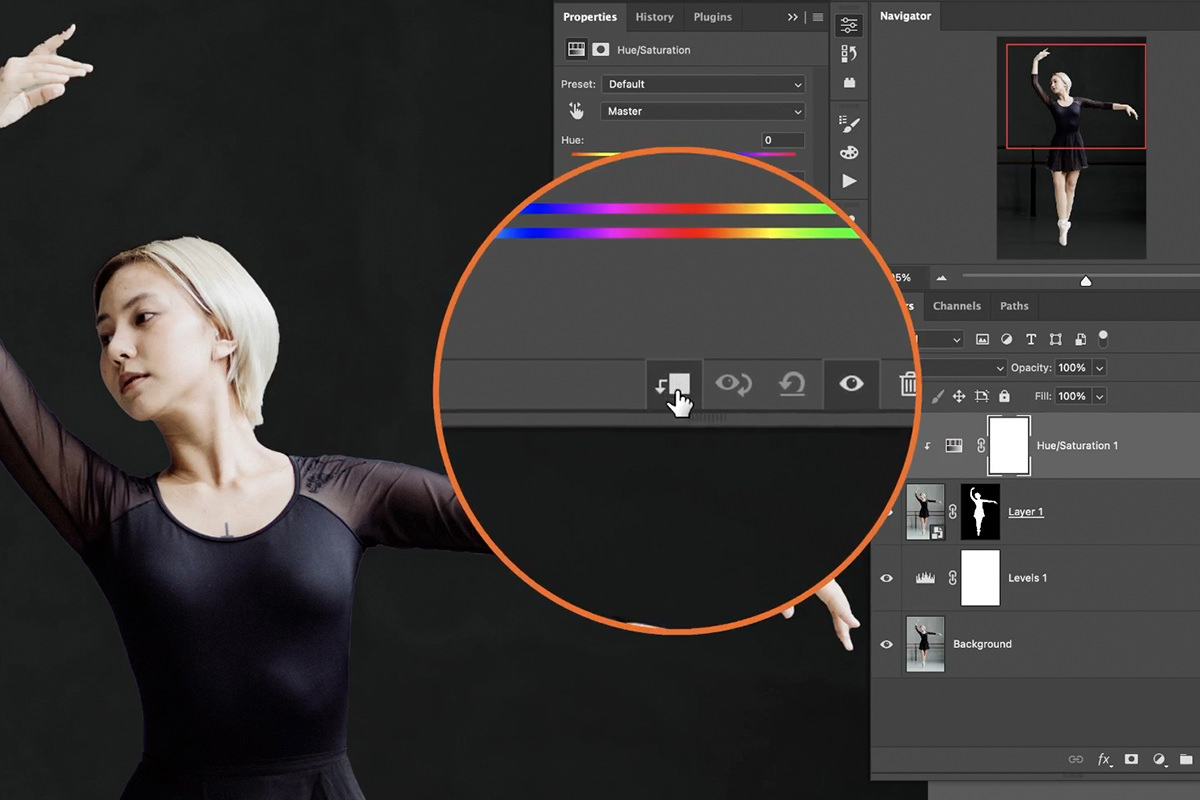
Clip a Hue/Saturation Adjustment to Your Subject
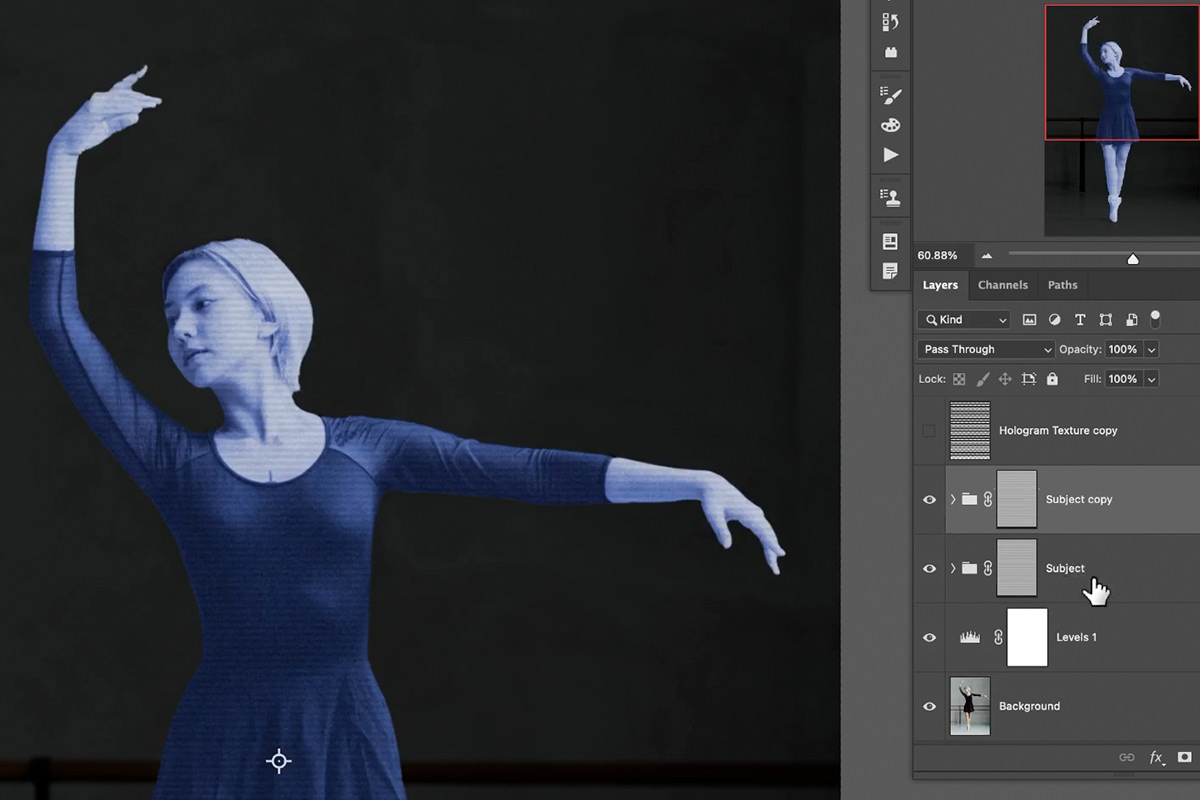
Add a Hue/Saturation adjustment layer and click the clipping mask icon (or right-click and choose Create Clipping Mask) so it only affects your subject layer. Check Colorize and raise the saturation to land on a hologram-style color.
-
Add a Clipped Levels Adjustment for Contrast
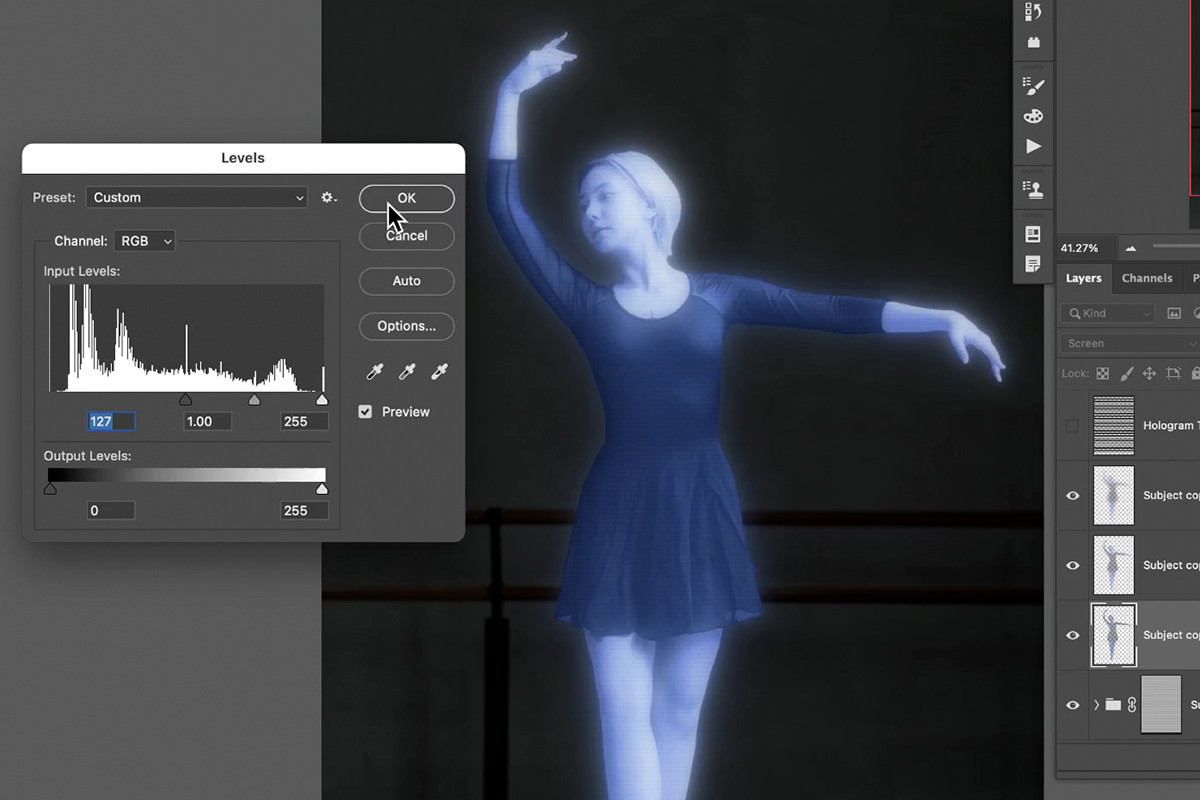
Add another Levels adjustment layer, clipped the same way, and adjust the lights and darks to make your subject look like it’s glowing.
Why Clipping Masks Matter Here
Without clipping the Hue/Saturation and Levels adjustments to your subject layer, both would affect every layer beneath them, including the background you just darkened separately. Clipping keeps each adjustment’s influence contained to exactly the layer it’s stacked on top of.
Adding Noise and Blur for a Projected Look
A real projection is never perfectly sharp or perfectly clean, so a touch of noise and blur on both the subject and its mask helps sell that quality.
-
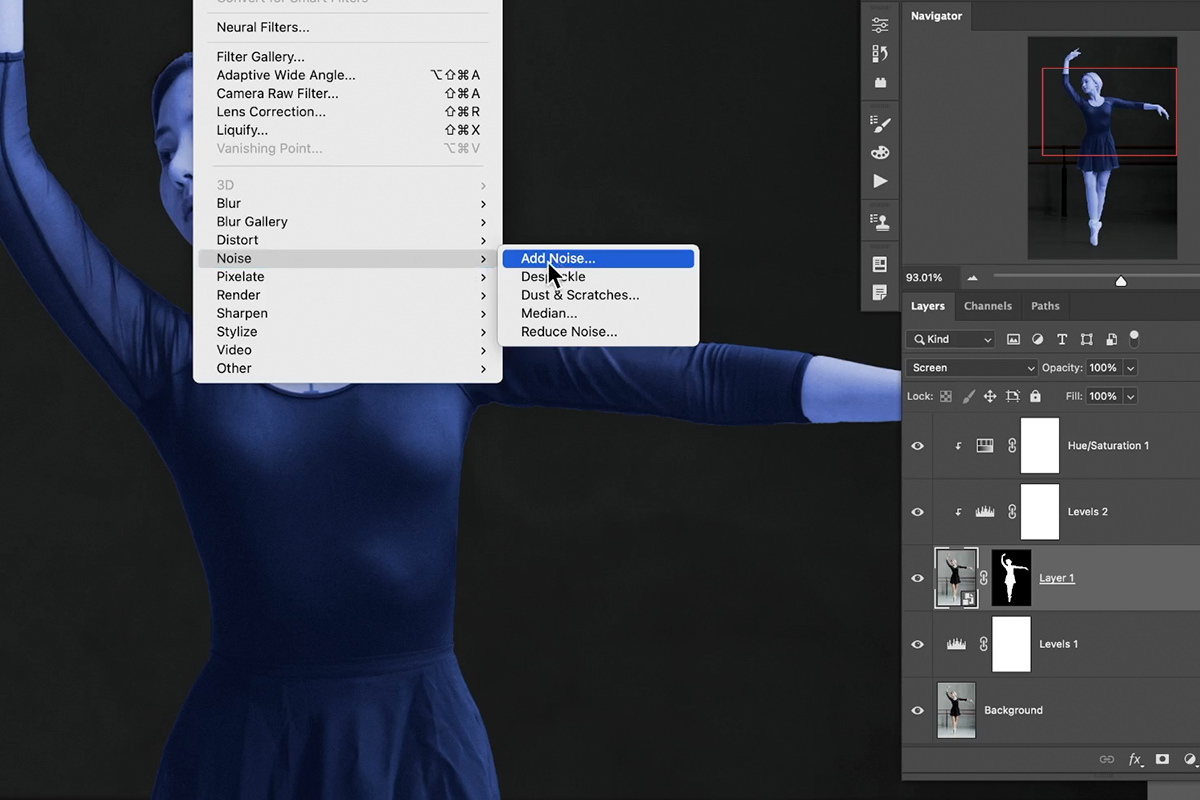
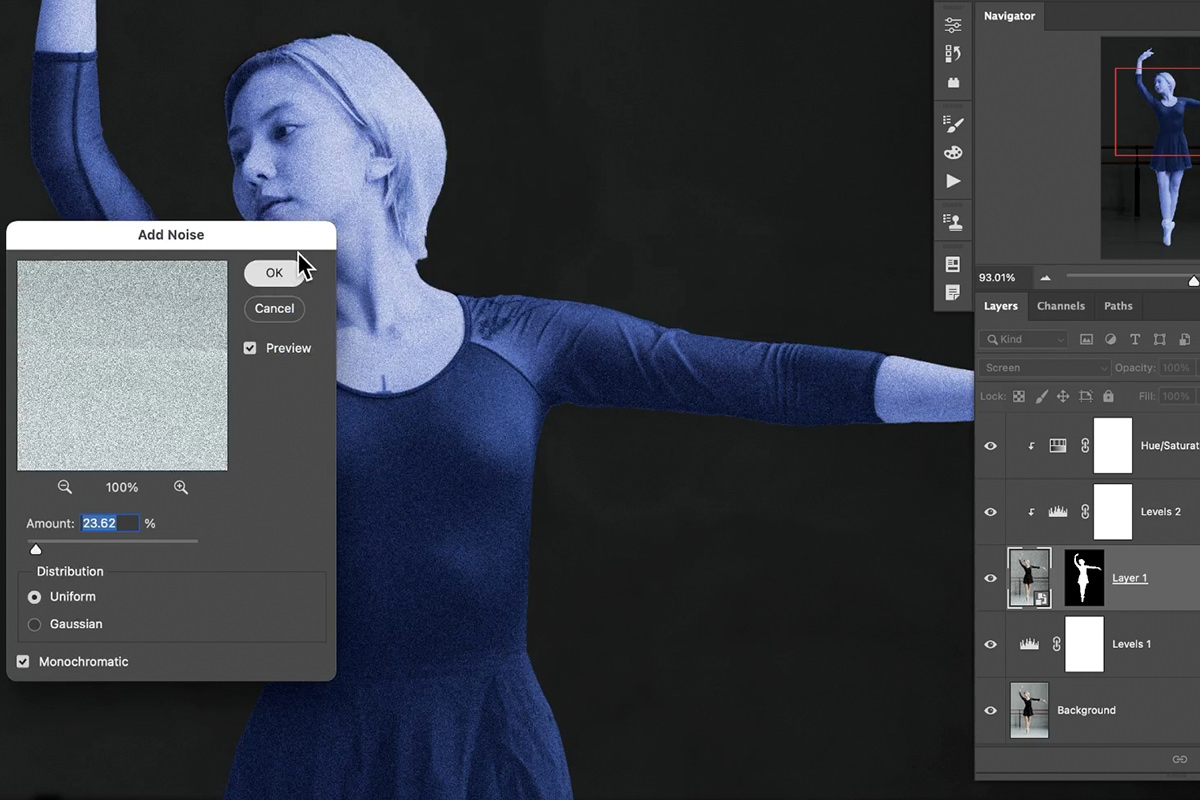
Add Noise to Your Subject
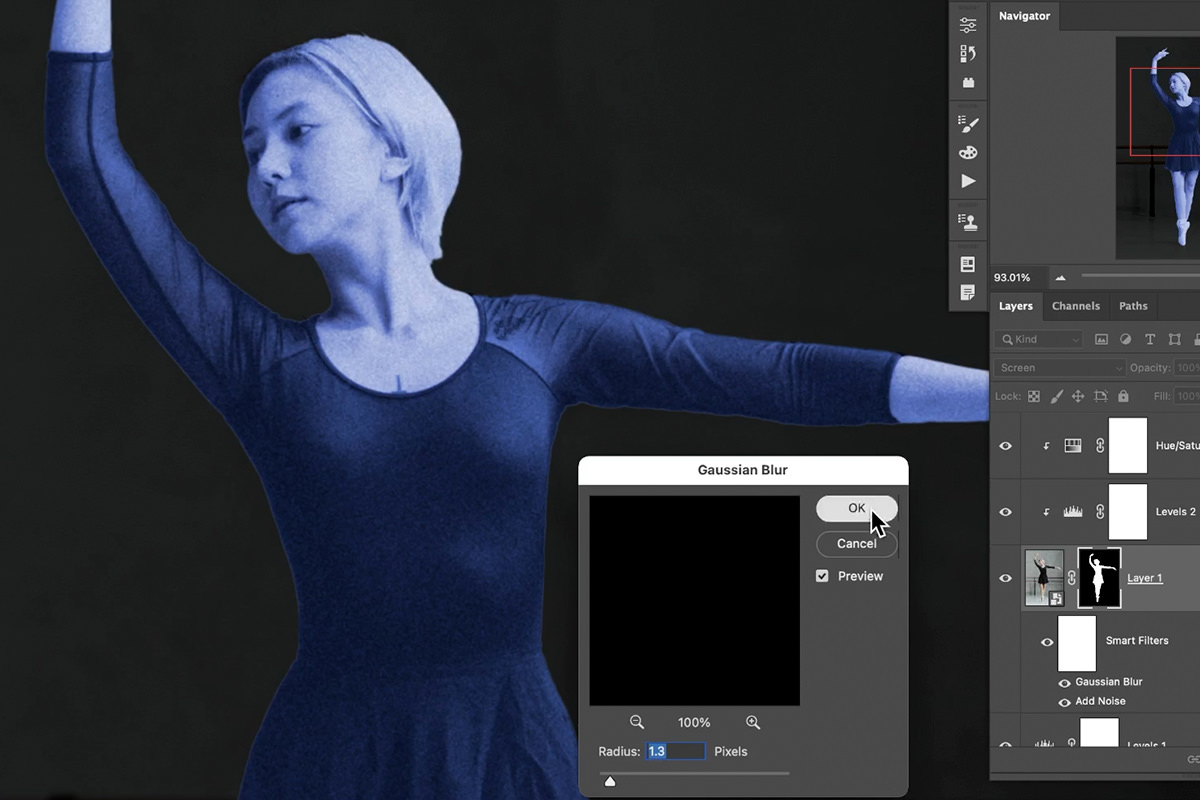
With your subject layer selected, go to Filter > Noise > Add Noise and apply a small amount — since this is applied as a Smart Filter, the amount can be adjusted again at any time.
-
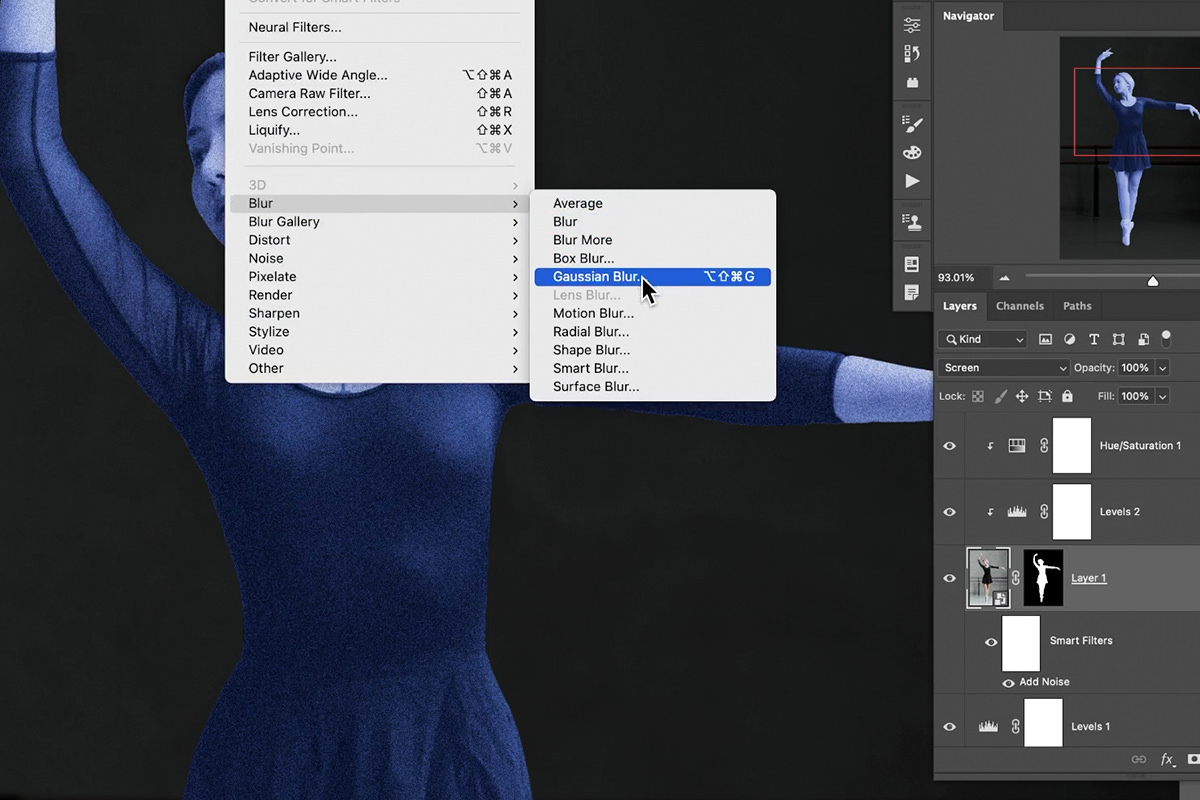
Add a Slight Gaussian Blur
Go to Filter > Blur > Gaussian Blur and apply just a small amount of blur, enough to suggest a projection rather than a sharp photo.
-
Blur the Layer Mask Too
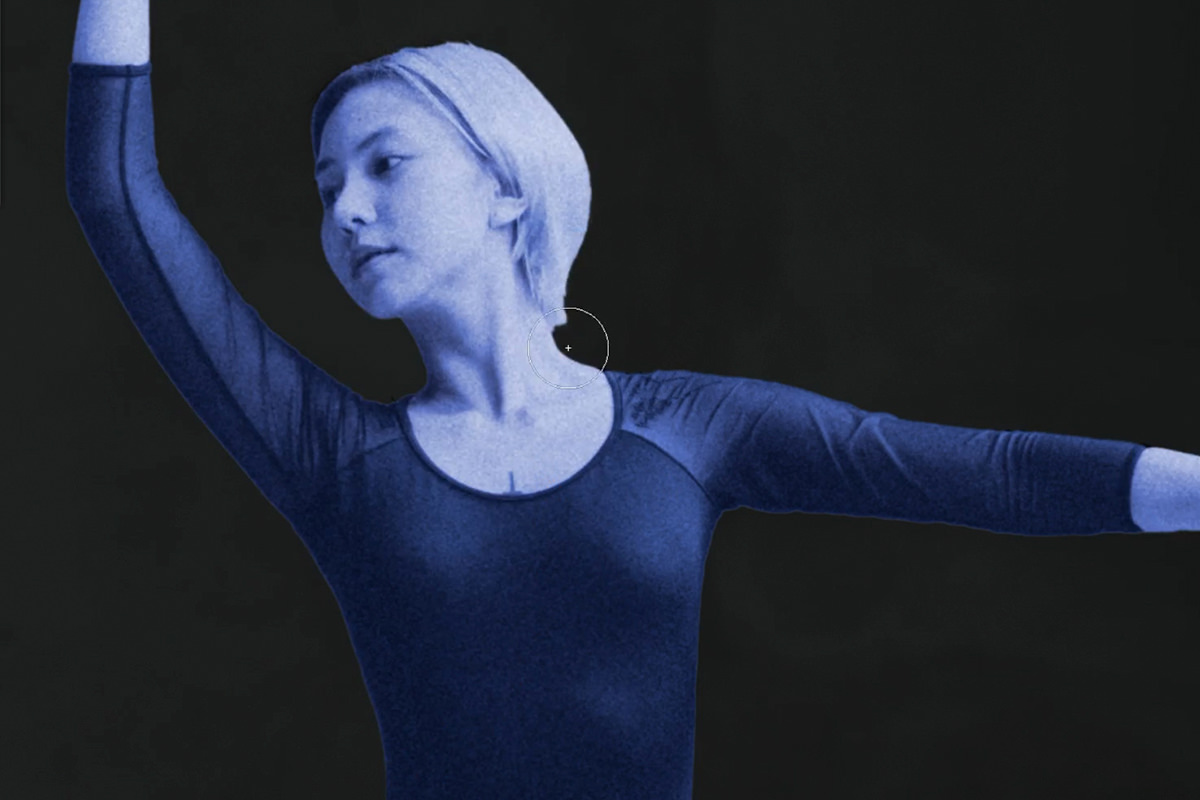
Click on the layer mask itself, then apply the same Gaussian Blur filter to it, softening the edge between subject and background.
-
Refine the Edge with Select and Mask
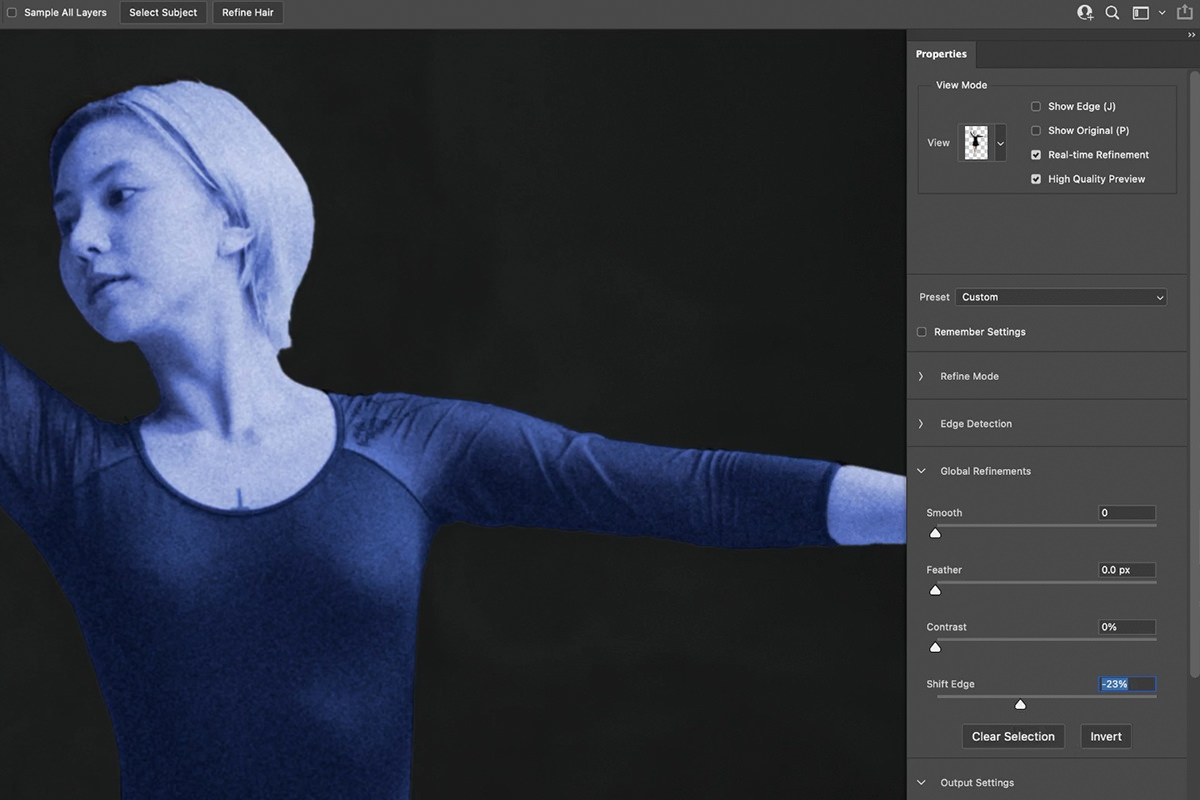
With the mask selected, go to Select and Mask, switch the view to On Layers, and shift the Edge slider slightly inward in the Global Refinements to clean up any glowing edge left around your subject. Make sure the output is set to Layer Mask before confirming.
Bringing In Horizontal Scan Lines
The scanning horizontal lines that make a hologram read as a projection rather than a solid figure come from a separate line-texture file, brought in and scaled to fit.
-
Group Your Subject Layers
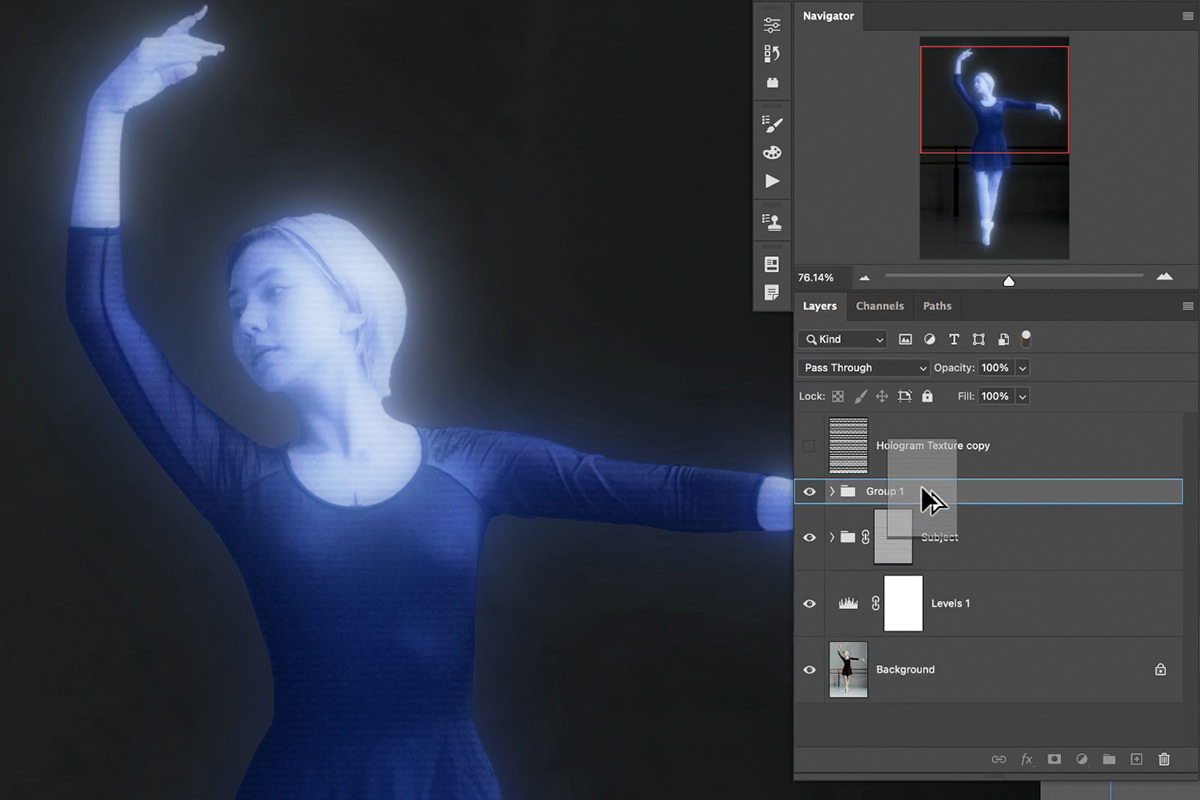
Select your subject layer along with its clipped adjustment layers and group them together, so the group can be masked as a single unit.
-
Drag In a Line Texture File
Open a horizontal-line texture PSD, then hold Shift while dragging it from that document into your working file, positioning it above your subject group.
-
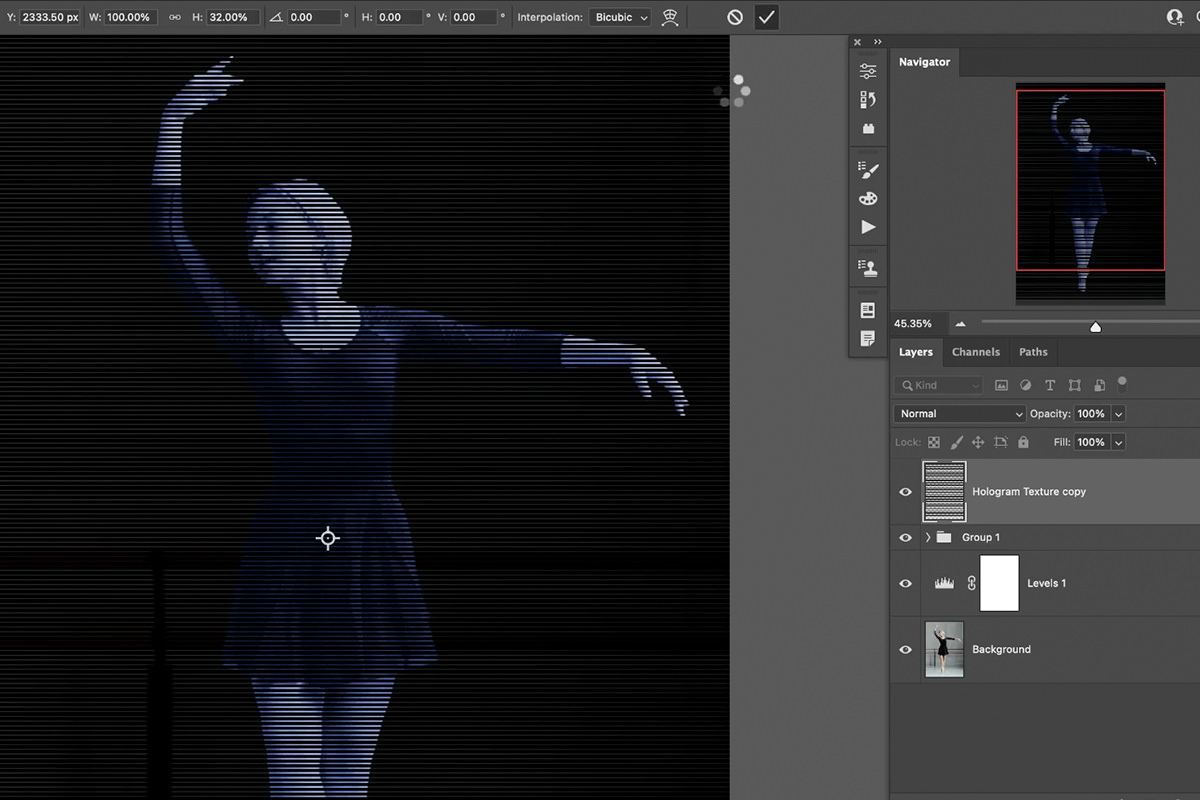
Scale the Lines to Adjust Their Size
Press Ctrl/Cmd + T and change the height value to make the lines thicker or thinner — smaller lines give a finer scan effect, larger lines give a bolder, more obvious one.
Turning the Lines into a Mask for Your Subject
Rather than leaving the lines as a visible layer sitting on top of everything, they work better used to define where your subject itself is visible.
-
Load the Lines as a Selection
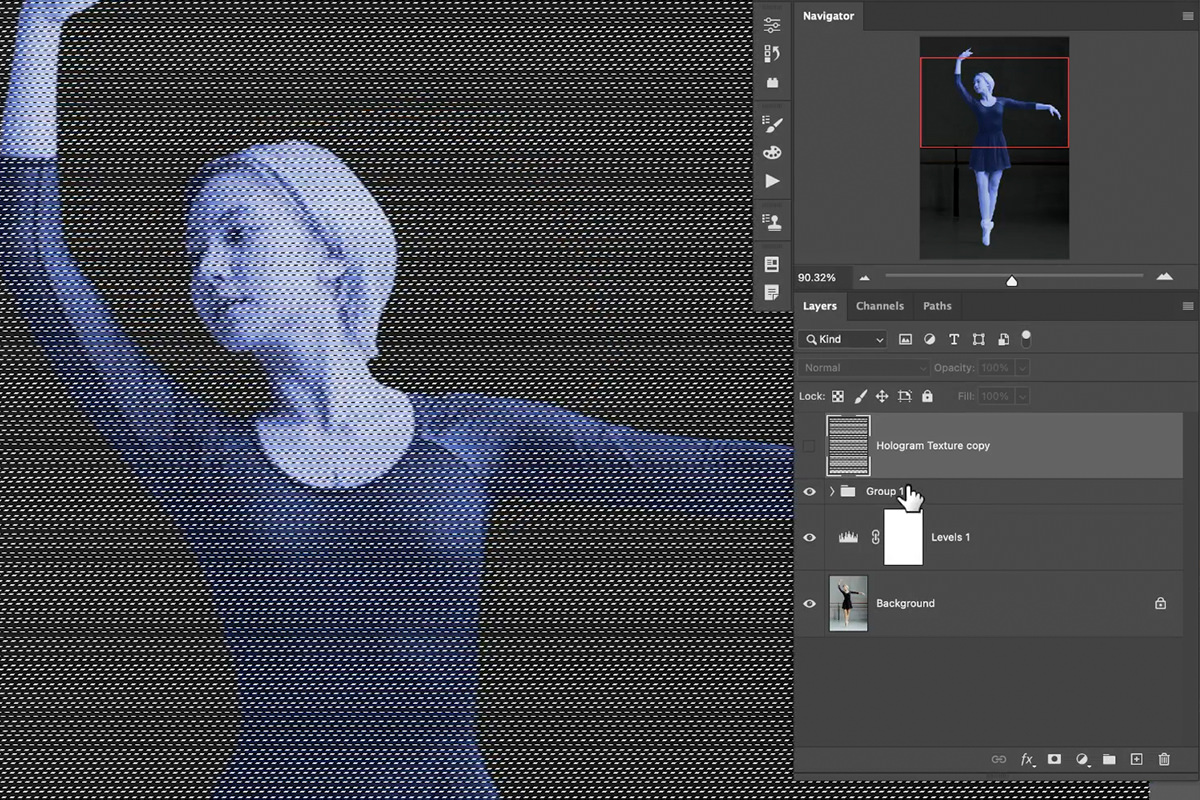
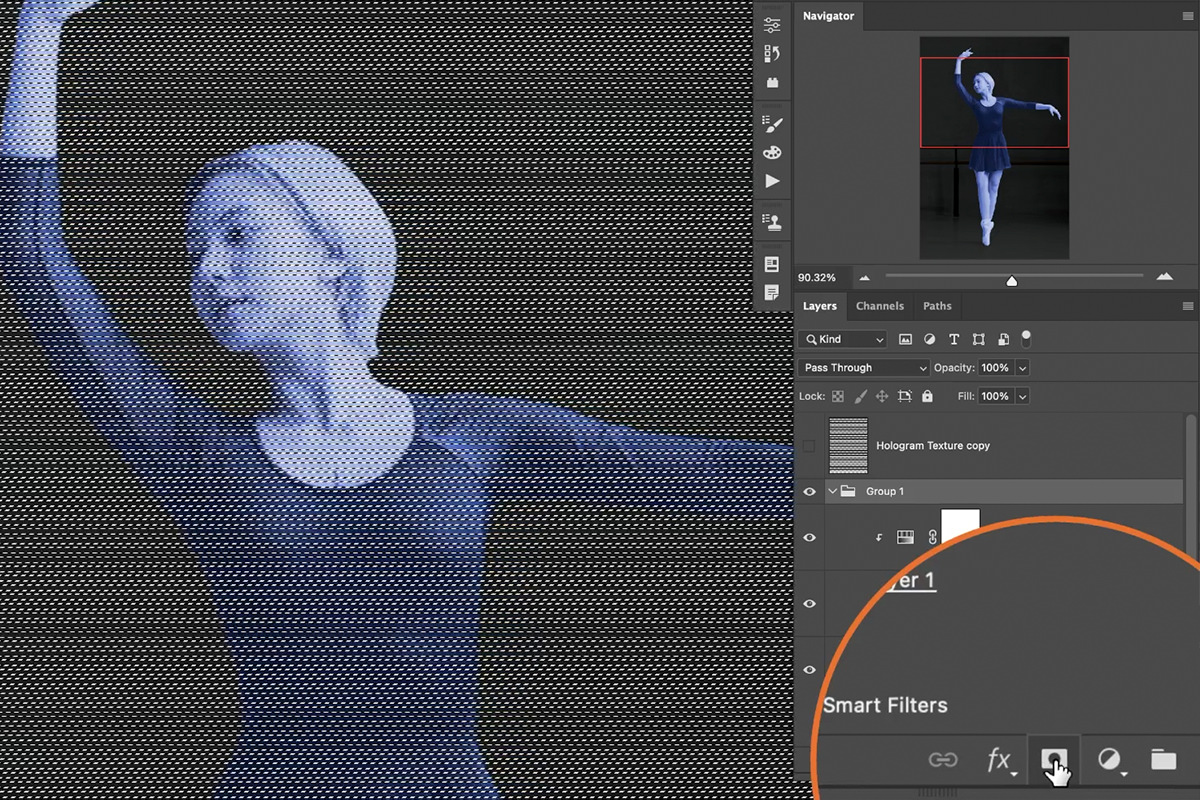
Hold Ctrl/Cmd and click on the line-texture layer’s thumbnail to load it as a selection, then hide the line layer itself since it’s no longer needed as a visible element.
-
Apply the Selection to Your Subject Group’s Mask
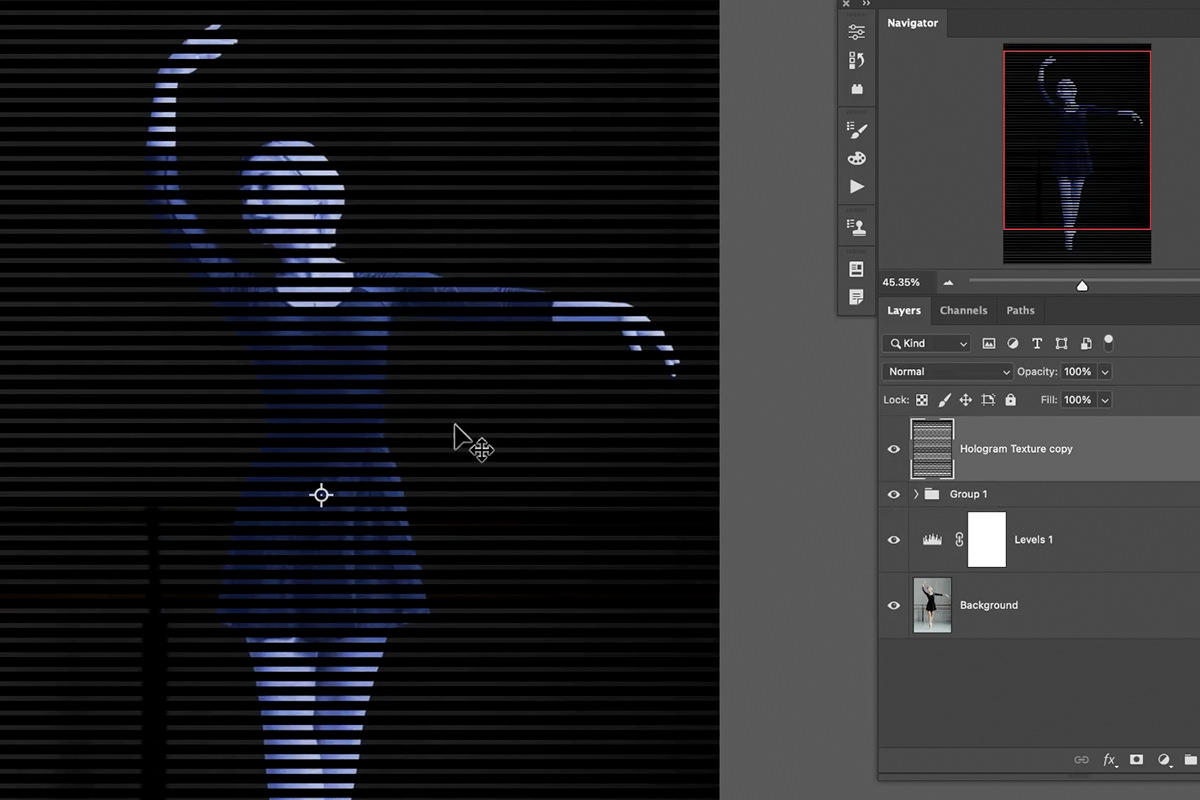
Select your subject group, click the layer mask icon while the line selection is still active, and Photoshop loads that selection directly into the group’s mask — so your subject is now only visible where the horizontal lines were.
-
Blur and Add Noise to the New Mask
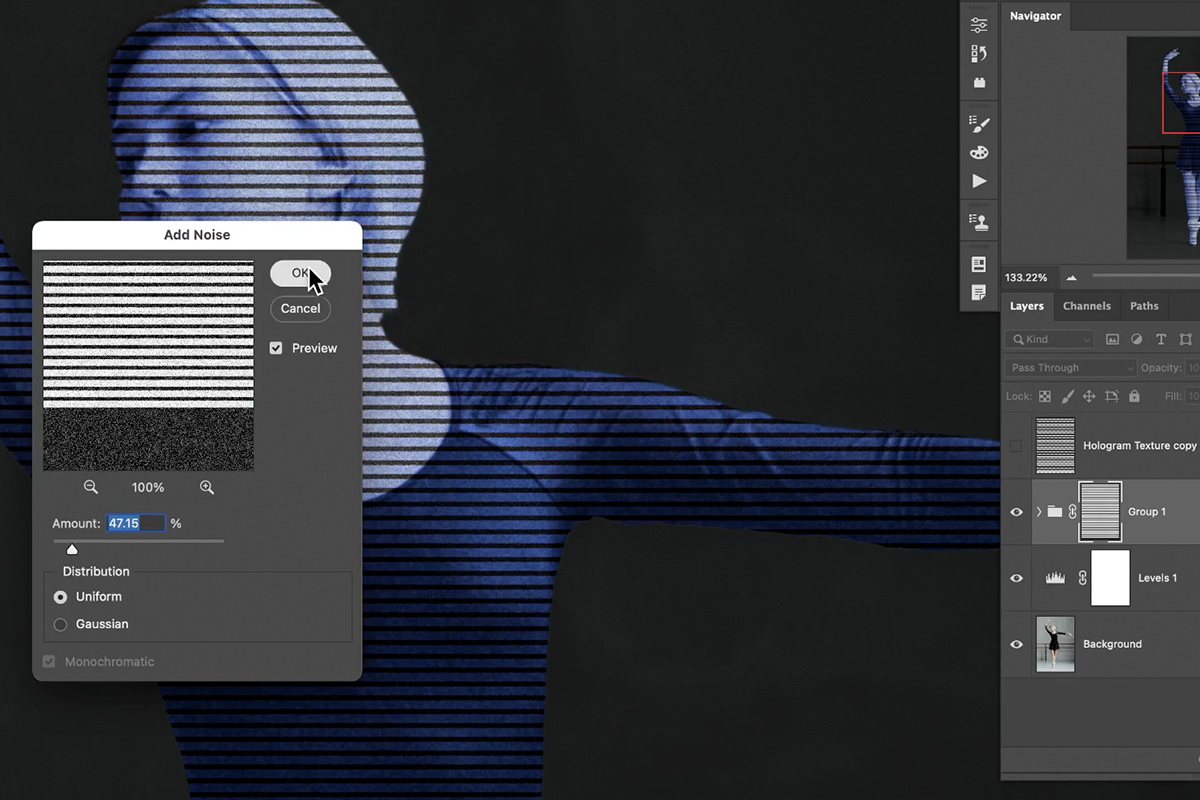
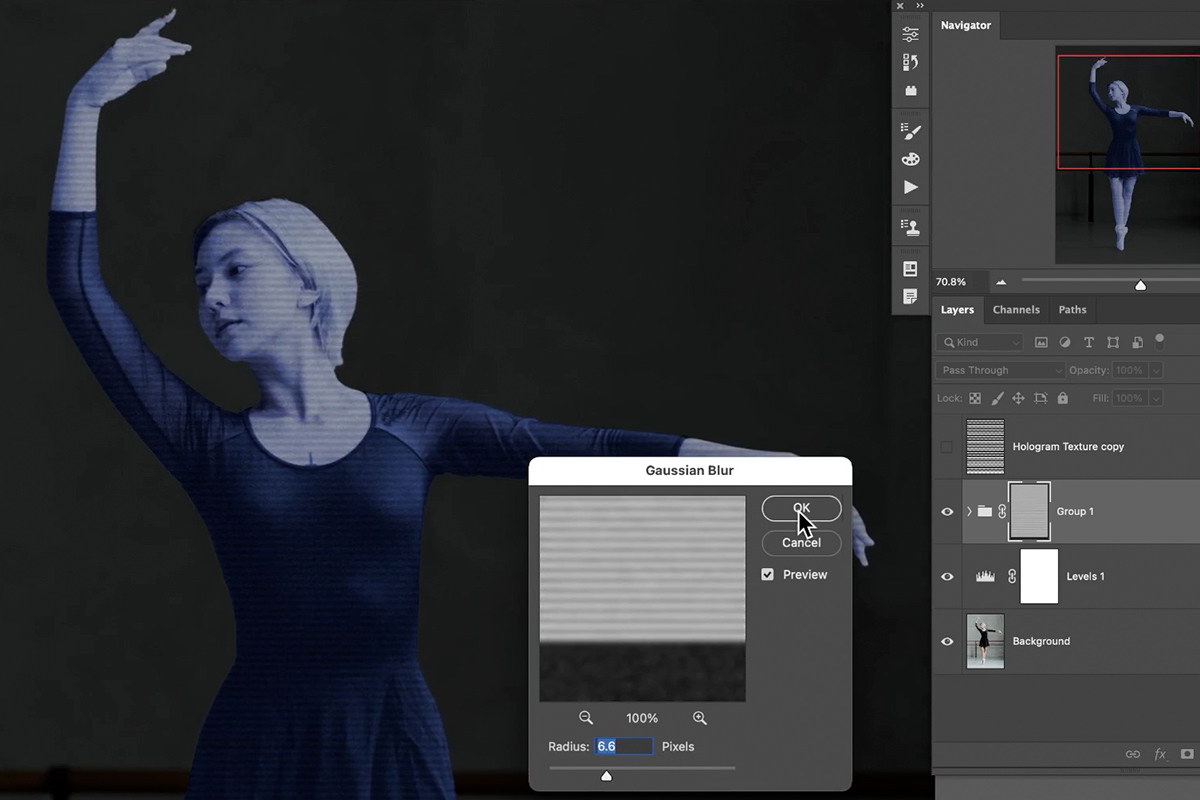
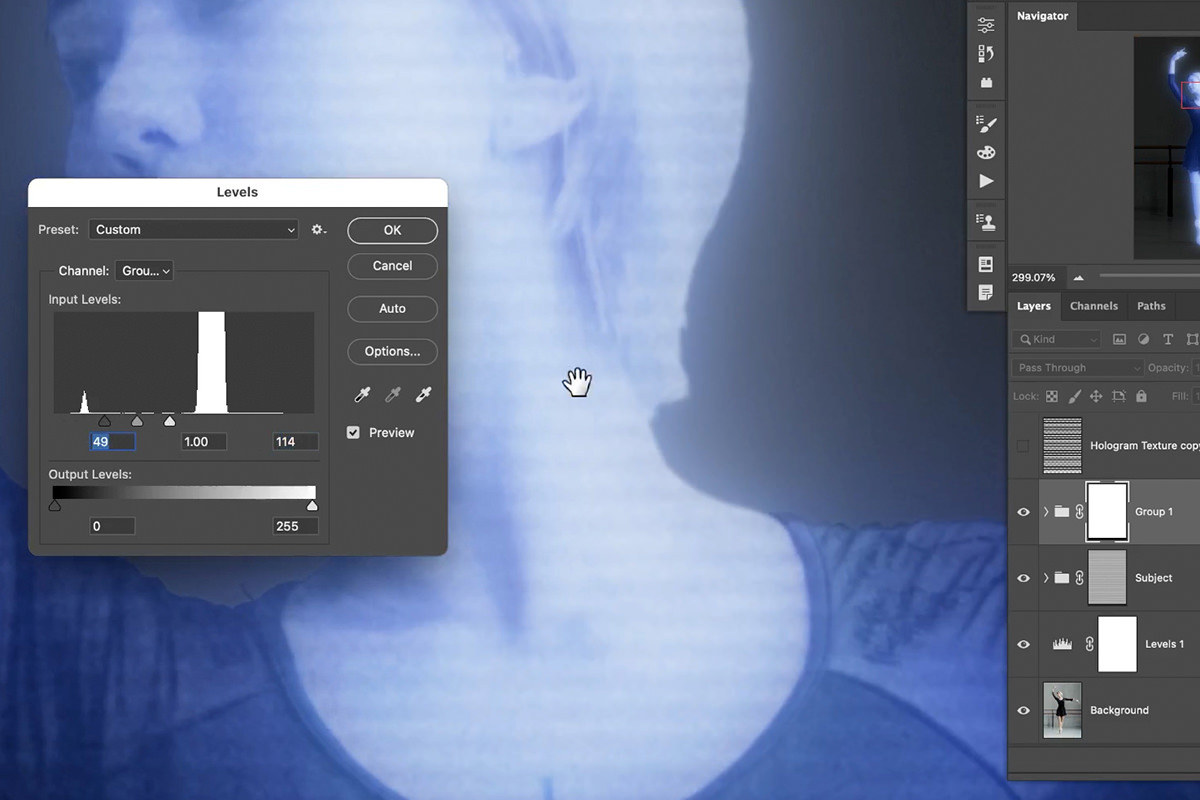
With the group’s mask selected, apply Filter > Noise > Add Noise followed by Filter > Blur > Gaussian Blur. Blurring the lines more heavily reads as a smoother, more believable scan effect than leaving them crisp and well-defined.
Building Up a Glow with Duplicated, Blurred Layers
A flat, single-layer hologram still looks static rather than like a light source, so the next step stacks multiple blurred duplicates on top of it to create actual glow.
-
Duplicate and Merge the Subject Group
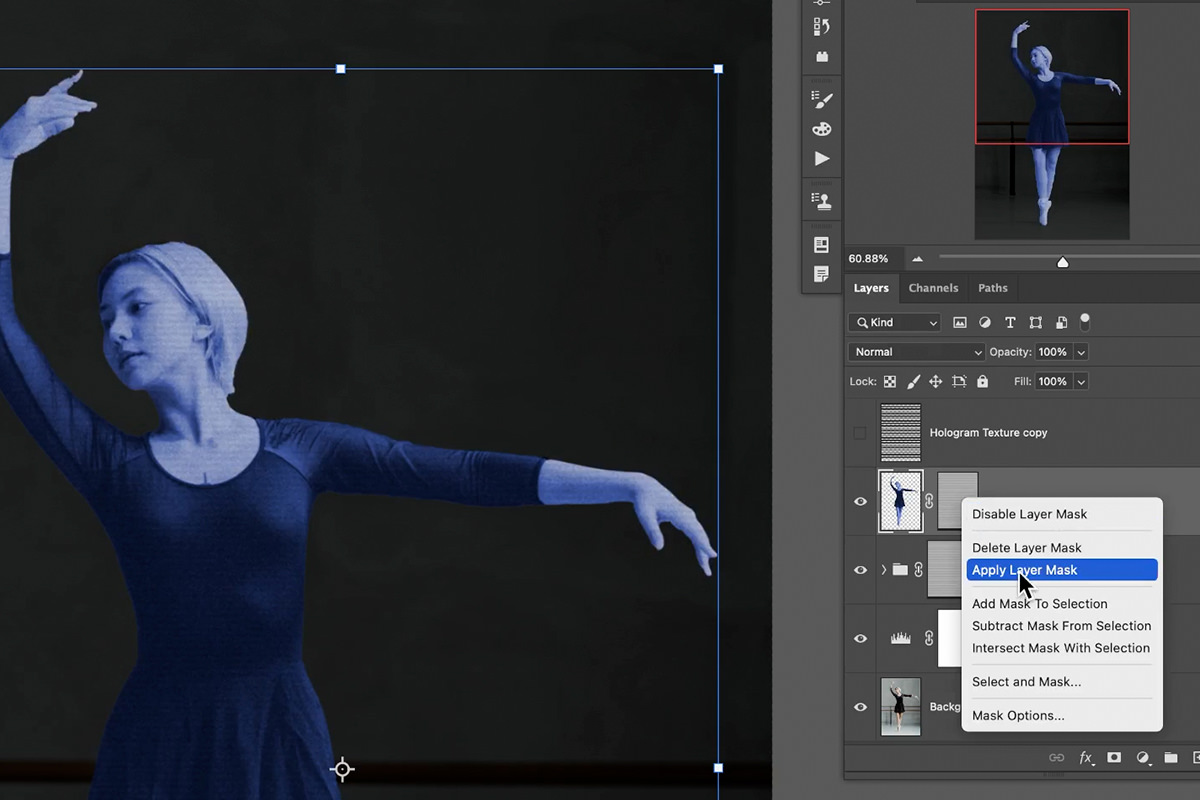
Press Ctrl/Cmd + J to duplicate the entire subject group, then Ctrl/Cmd + E to merge it into a single layer. Right-click the layer mask and choose Apply Layer Mask so the masked shape becomes permanent on this copy.
-
Set the Copy to Screen and Blur It
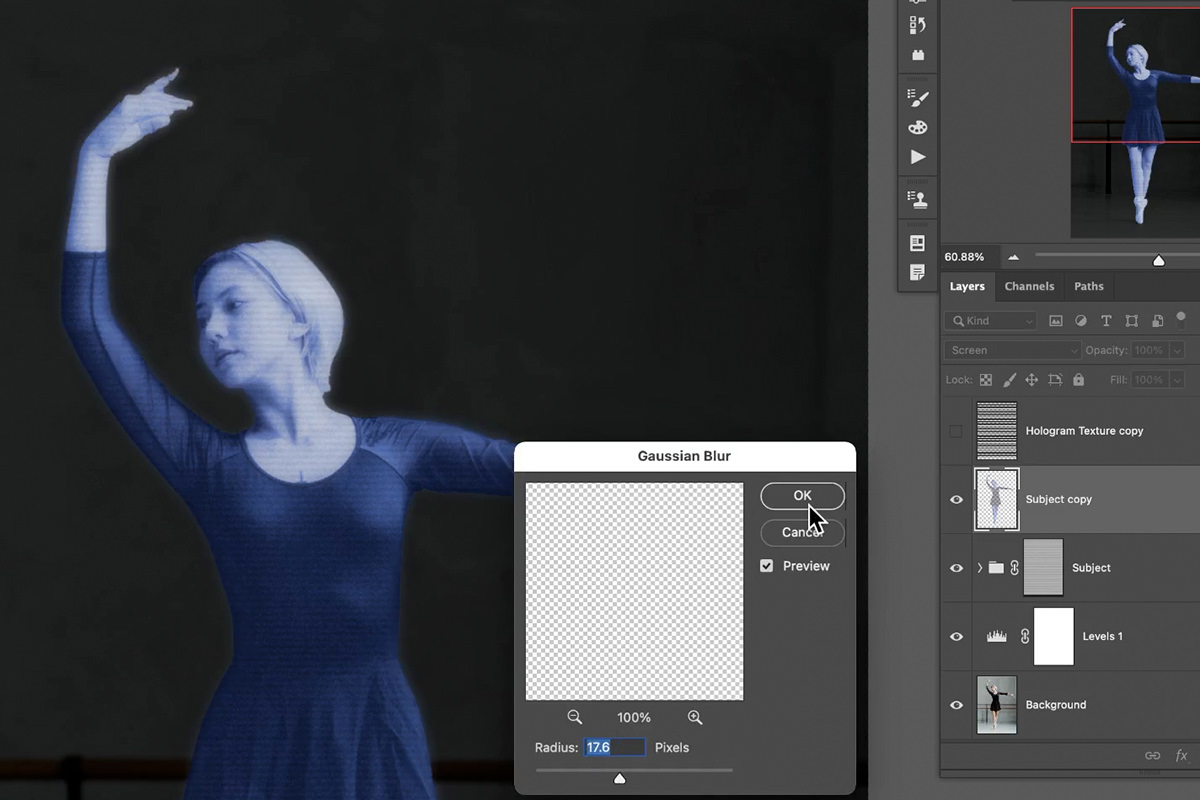
Set this merged copy’s blending mode to Screen as well, then apply Gaussian Blur to it for a soft glow just outside your subject’s edges.
-
Duplicate and Blur Again, Multiple Times
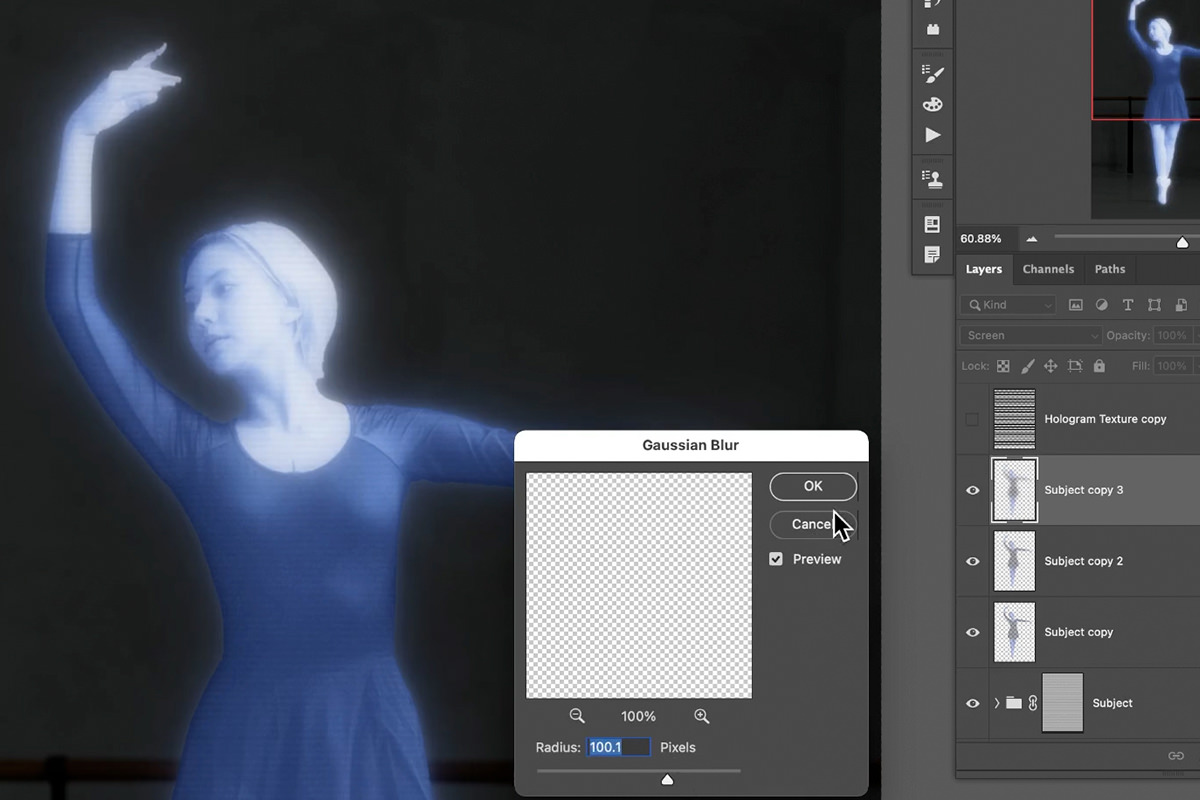
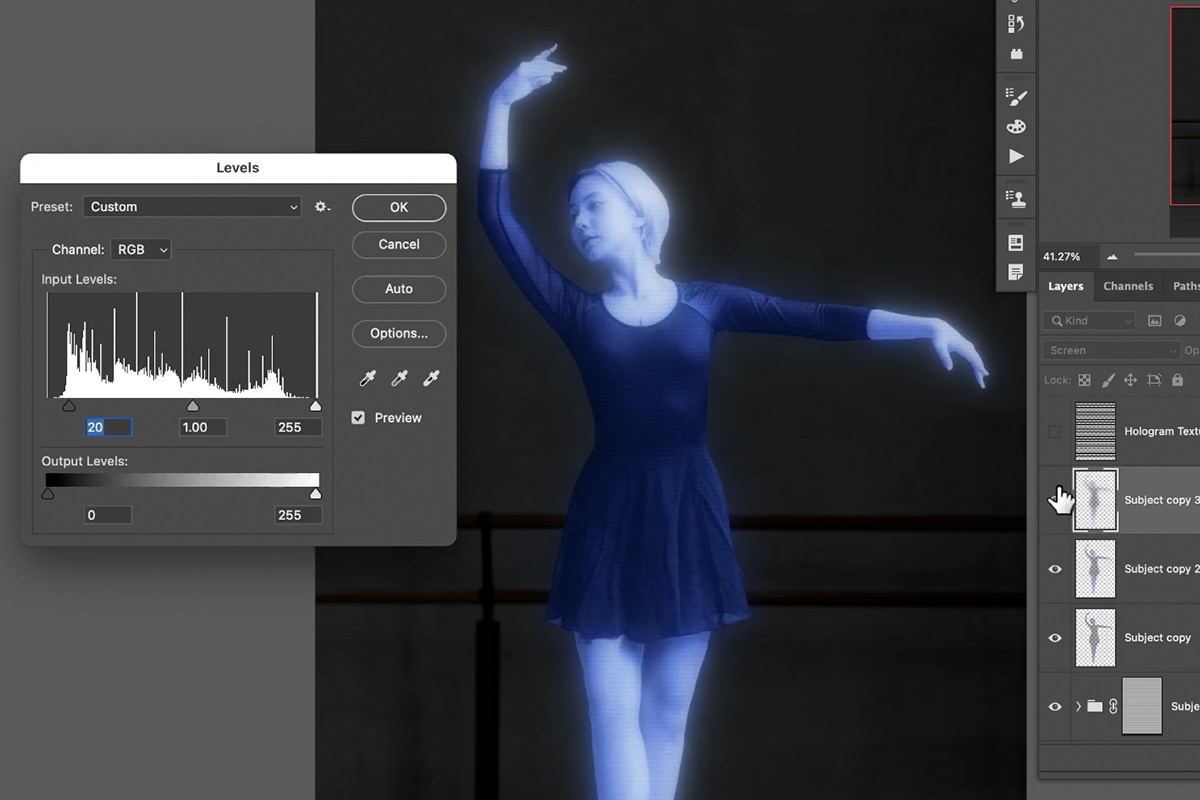
Press Ctrl/Cmd + J to duplicate this blurred layer, apply Gaussian Blur again with a slightly larger radius, and repeat this a few more times, increasing the blur amount each time, to build up several stacked layers of soft glow.
-
Adjust Levels on Each Glow Layer
On each of these glow layers, press Ctrl/Cmd + L and darken the shadows so that only the brighter areas of your subject continue to glow strongly, giving the light a more natural falloff.
-
Group the Glow Layers Together
Select all of the duplicated glow layers and press Ctrl/Cmd + G to group them, keeping the glow effect organized as one unit.
Why Multiple Blurred Copies Instead of One
A single blurred layer produces one uniform halo, but stacking several copies at increasing blur radii creates the layered falloff that reads as actual light — tighter, brighter glow close to the subject and a softer, wider spread further out. It’s the same principle used to build convincing glow in other lighting effects: several soft passes read as more natural than one strong one.
Carrying the Scan Lines into the Glow Layer
For the lines to read consistently across the whole effect, the same masking pattern used on the subject needs to carry over to the glow group as well.
-
Copy the Line Mask onto the Glow Group
Hold Alt/Option and drag the subject’s line-pattern layer mask onto the glow group’s mask, applying the same scan-line pattern to the glow.
-
Brighten the Lines on the Glow Mask
Press Ctrl/Cmd + L directly on the glow group’s mask and raise the highlights, making the lines more visible within the glow without needing to touch the subject layer itself.
Painting In Random Glow Spots
Perfectly symmetrical, duplicated glow can start to look artificial, so a hand-painted pass adds some randomness back into the effect.
-
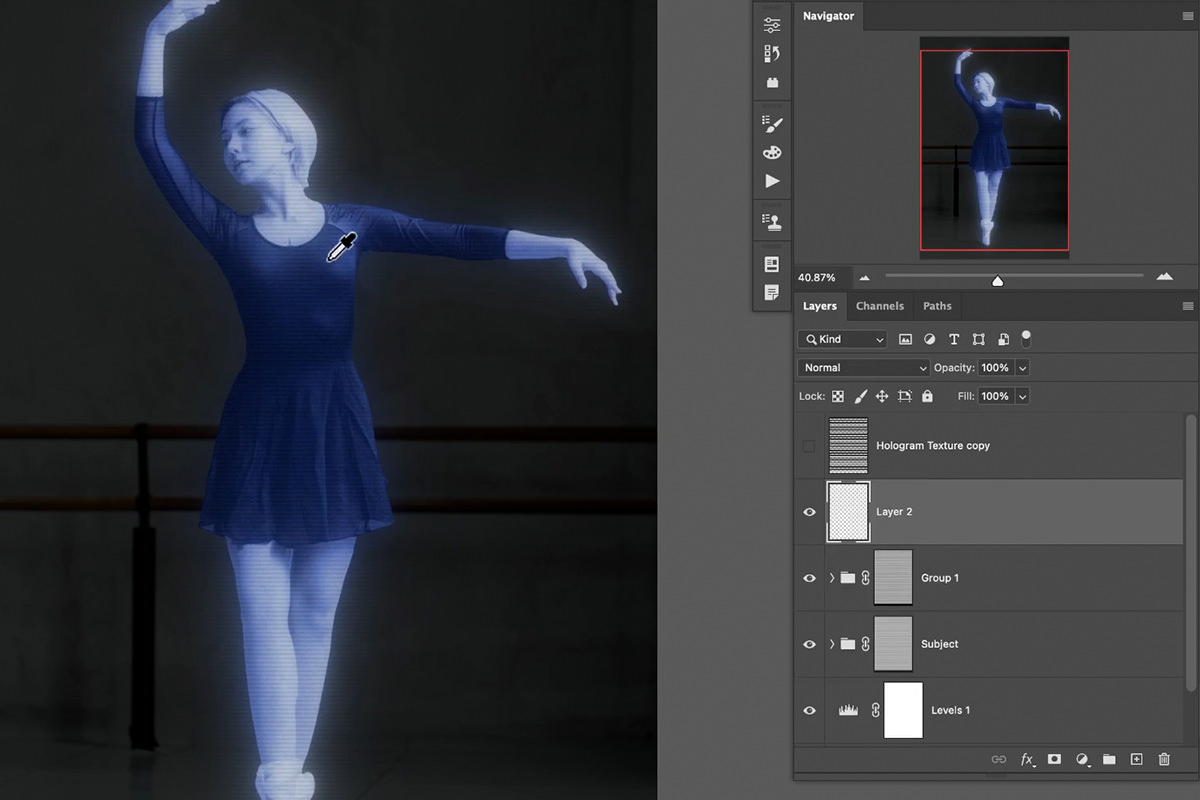
Sample Your Subject’s Color
Create a new layer, press B for the Brush tool, and hold Alt/Option to sample a color directly from your hologram subject.
-
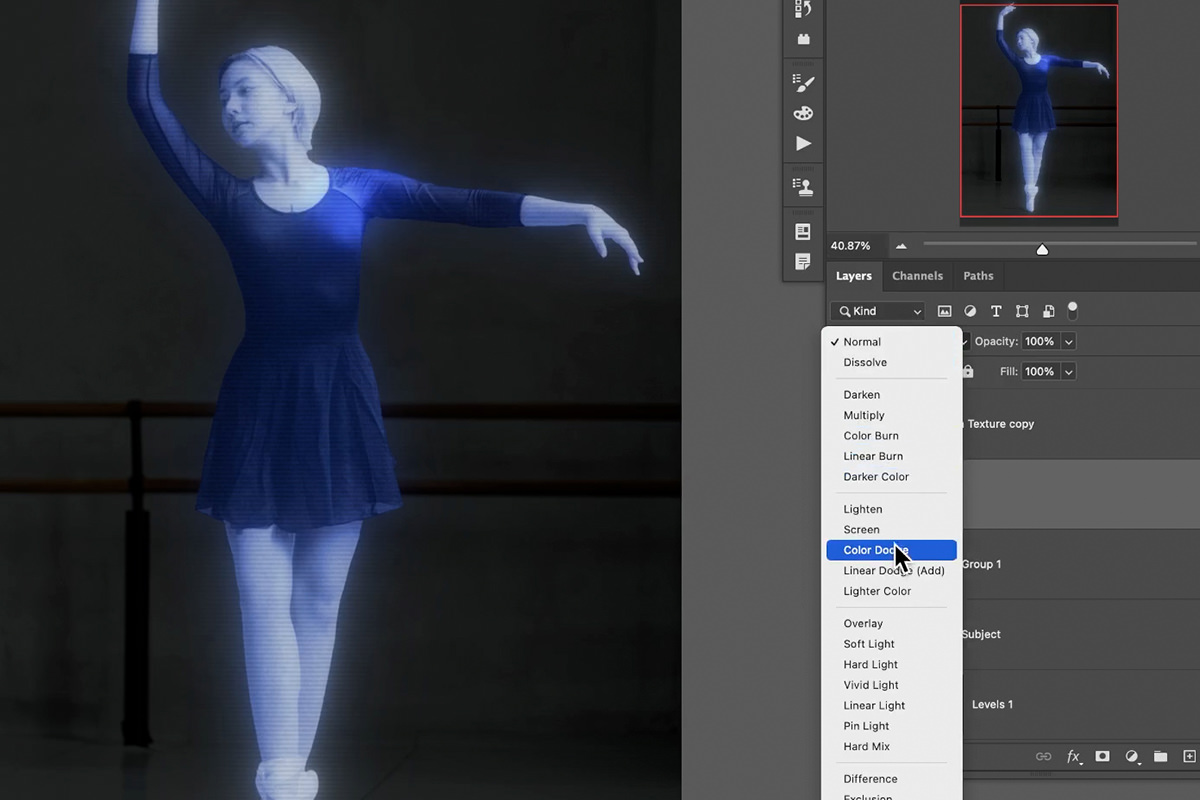
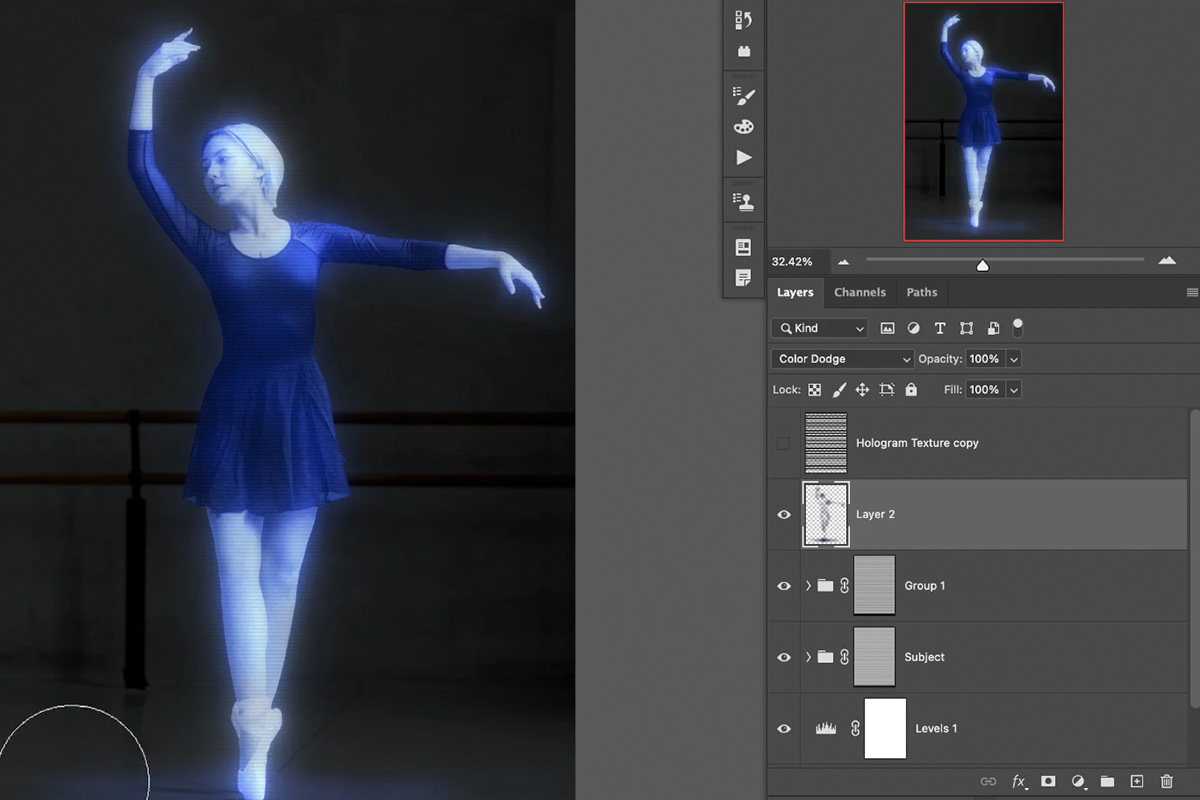
Paint with Color Dodge
Set the new layer’s blending mode to Color Dodge and paint loosely in a few spots — near the brightest parts of your subject, or on the ground beneath it — to suggest scattered, uneven light rather than a uniform glow.
-
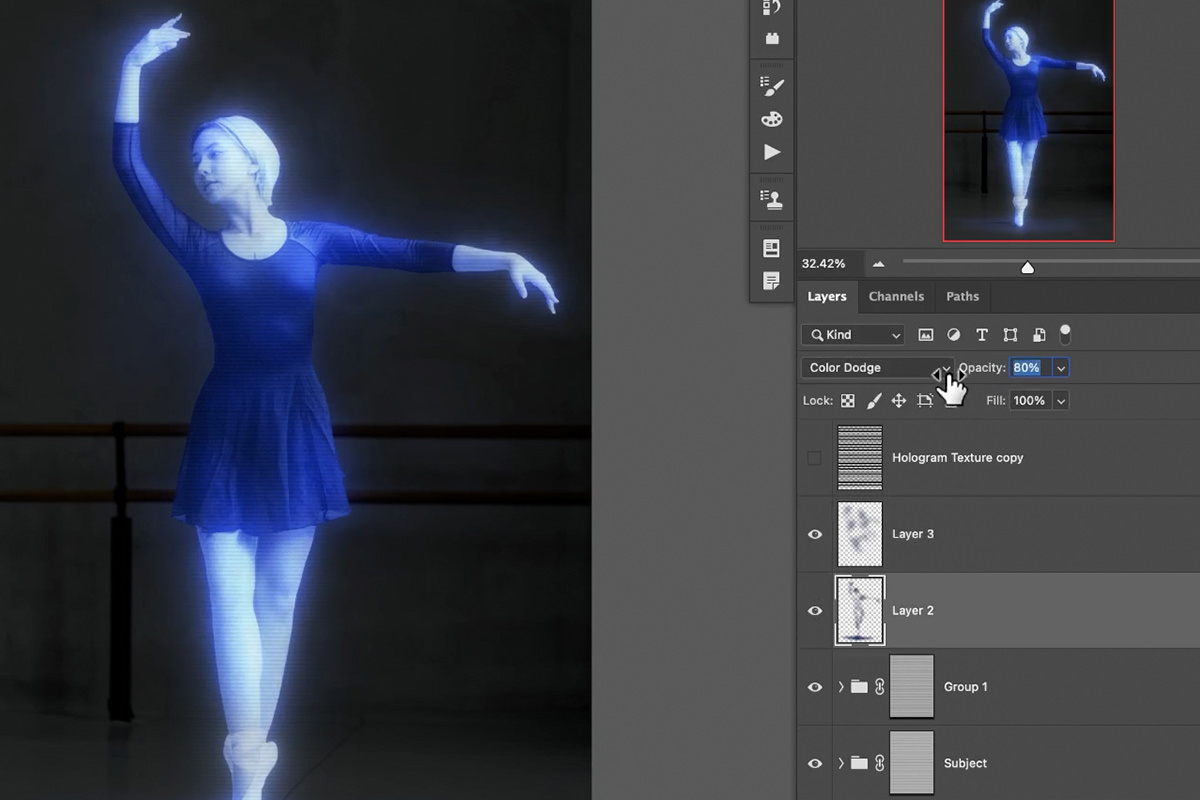
Repeat with a Larger Brush
Create another new layer, set it to Color Dodge as well, and paint with a larger, softer brush for a broader wash of extra glow. Adjust each layer’s opacity afterward if any area feels too strong.
Adding a Reflection Beneath Your Subject
A simple flipped, faded copy of the hologram beneath it goes a long way toward selling the illusion of a projection sitting on the ground.
-
Group and Duplicate Your Subject
Group your subject’s layers together, then press Ctrl/Cmd + J to duplicate the whole group.
-
Flip and Reposition the Duplicate
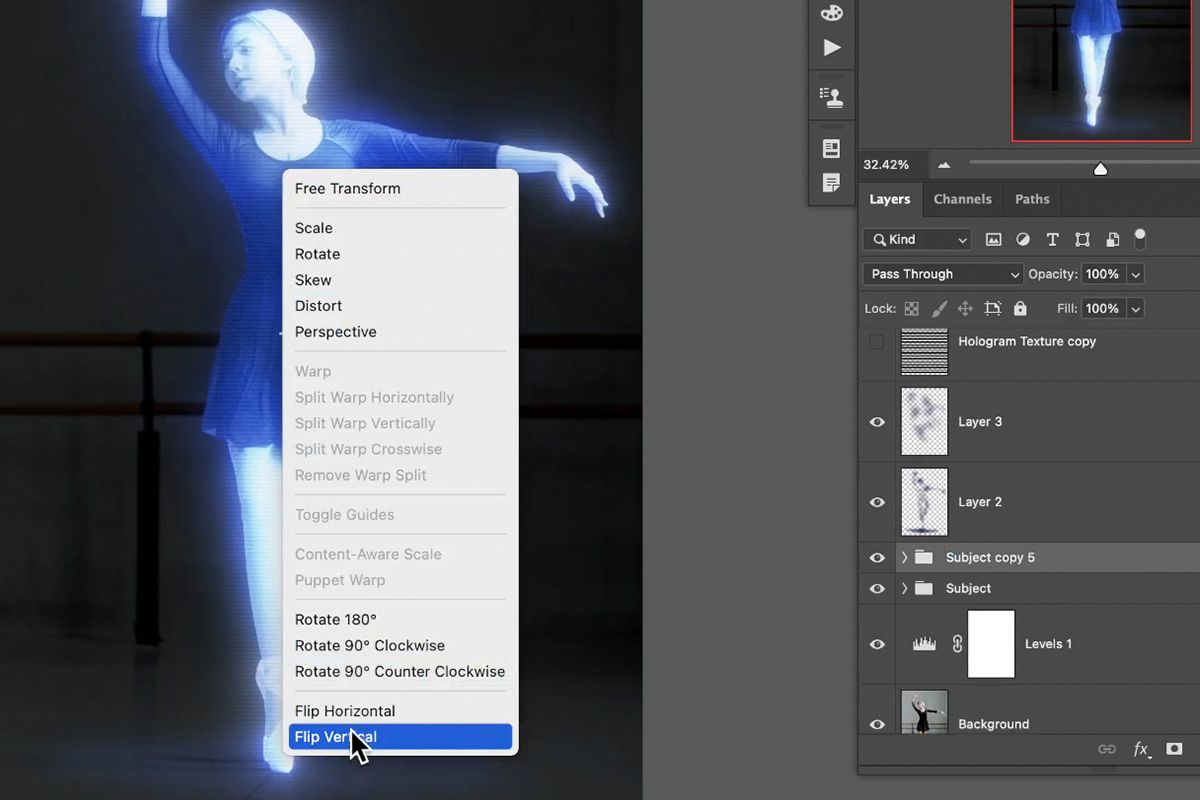
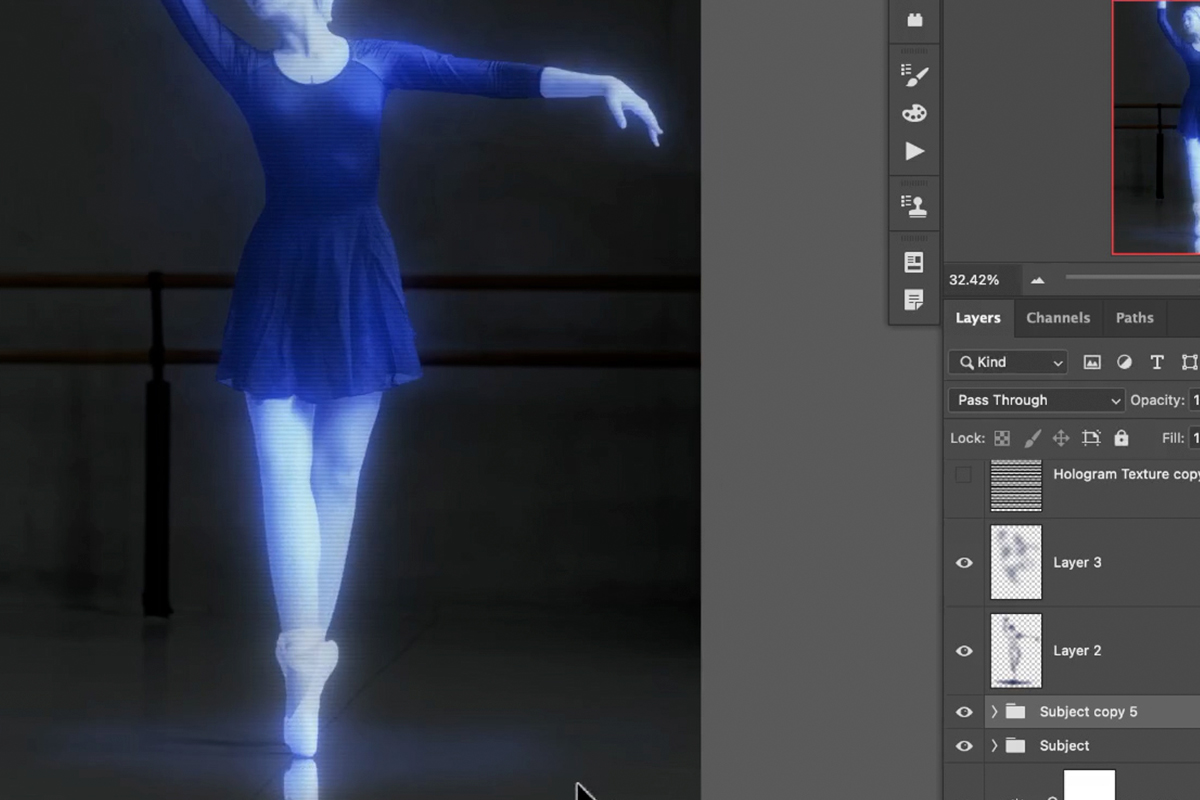
Press Ctrl/Cmd + T, right-click and choose Flip Vertical, confirm the transform, then use the Move tool to drag the flipped copy down below your subject’s feet.
-
Lower the Reflection’s Opacity
Reduce the opacity of the flipped group so the reflection reads as subtle rather than a full duplicate of your subject.
Common Mistakes to Avoid
The most common issue is skipping the clipping masks on the color and levels adjustments, which lets them spill onto the darkened background instead of staying contained to the subject. It’s also easy to leave the scan lines too crisp — a heavier blur on the line-derived mask almost always looks more convincing than sharp, well-defined bands. And building the glow from just one blurred duplicate instead of several, each blurred a little further and levels-adjusted, tends to read as a flat halo rather than actual light falloff.
More Free Photoshop Effects Tutorials
If a light-based effect like this one is your thing, these free tutorials are worth exploring next:
- How to Create a Light Effect in Photoshop
- How to Create a Cinematic Vintage Glow in Photoshop 2026
- How to Create a 3D Text Effect in Photoshop
Why This Effect Works
Every technique in this effect is aimed at the same goal: convincing you that light, not a photograph, is producing what you’re looking at. Screen blending mode does the heavy lifting for that illusion, because it only ever brightens what’s beneath it rather than replacing pixels outright — which is exactly how real projected light behaves. Stacking several blurred, screen-blended duplicates instead of relying on one blur pass is what turns a flat cutout into something with actual falloff, the same layered-glow logic you’d use building glowing objects from scratch. The horizontal scan lines, meanwhile, do double duty as both a visual signature of “hologram” and a literal transparency mask, so the projection quality isn’t just implied by color and blur — it’s built into where the subject is and isn’t visible at all. Combined with a pose that already suggests movement or floating, similar to what makes levitating people effects convincing, and a composited setting like an alien world backdrop, the same core hologram technique scales easily into a much larger scene.
Final Thoughts
The hologram effect holds together because each layer is doing one specific, limited job — color, contrast, scan lines, glow, and reflection are all separated out rather than baked into a single flattened pass, which means any one of them can be dialed up or down without redoing the rest. Once you’re comfortable with the screen-blend-plus-glow structure here, it transfers directly to other glow effects where a subject needs to read as an actual light source rather than a lit subject. Treat the number of blurred glow copies and how heavily you mask the scan lines as the two biggest levers for how subtle or dramatic the final hologram looks.
New Free Tutorials View All »











Enjoying This Free Tutorial? Go Further with PRO.
Unlock Full Sample Files, PSDs, and Hundreds of Masterclasses!

Download full project assets, original PSDs, and RAW images for every lesson
Unlimited access to our complete library of PRO Photoshop & Lightroom courses
Instant 4K Ultra HD streaming on all devices, anytime, anywhere
Full access to our entire library of Photoshop Actions, Presets, and LUTs
Flexible monthly and annual membership plans
Cancel anytime with zero hassle or commitments