
Download Assets
This tutorial includes 1 sample image and 1 sample PSD. Downloads are free with a PHLEARN account.
- Download the sample images and PSDs from every free tutorial on PHLEARN
- New free tutorials published every week
- One free account — sign up once, then download anything
description
Dodge and burn in Photoshop means lightening and darkening chosen parts of an image, and it remains the most effective way to make a flat photograph look three-dimensional. This tutorial skips Photoshop’s Dodge and Burn tools — they alter your pixels permanently — and builds the effect on Curves adjustment layers instead.
You will even out the exposure with a soft, low-flow brush, carve individual highlights to add depth, then let Blend If isolate those highlights automatically. Everything stays editable: each pass sits on its own masked layer you can weaken, strengthen or delete at any point.
Enjoying This Free Tutorial?
We publish a new free tutorial every week, each one with sample images and PSDs you can download and follow along with. Sign up and they land straight in your inbox, along with early word on sales, events and subscriber-only offers.
Image Source
How to Dodge & Burn in Photoshop
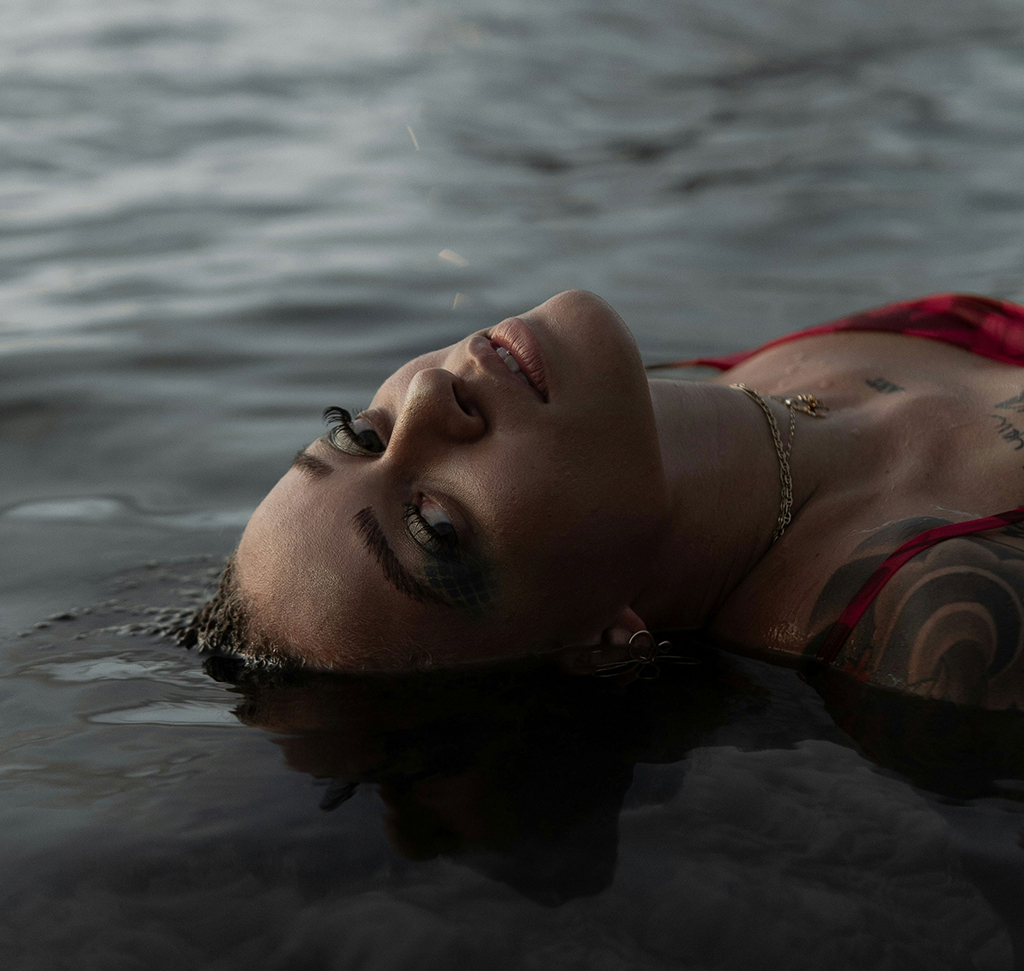
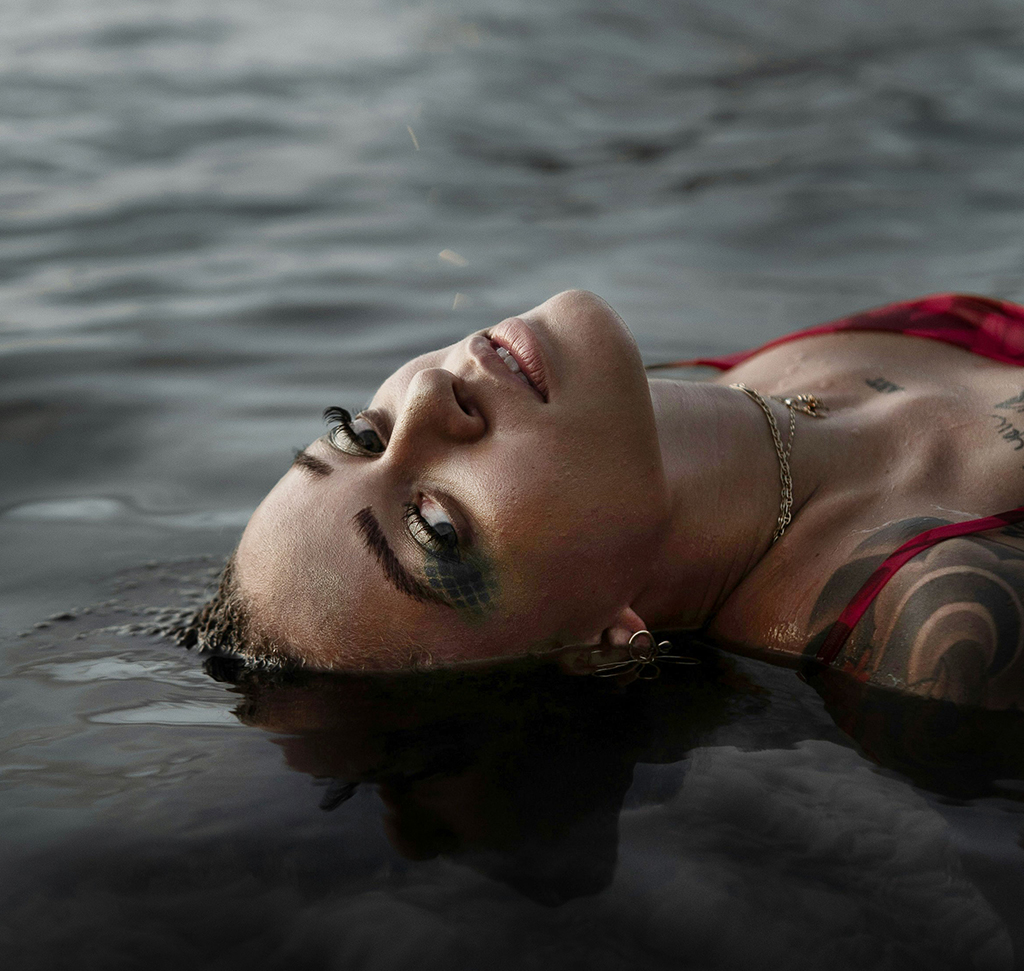
Dodging and burning is simply lightening and darkening chosen parts of an image. It is the oldest retouching idea there is, carried over from the darkroom, and it remains the most effective way to make a flat photograph look three-dimensional — you are shaping the light that is already in the picture rather than adding anything to it.
Photoshop has a Dodge Tool and a Burn Tool built for exactly this, and this tutorial does not use either of them. Curves adjustment layers do the same job with none of the drawbacks, and once the setup makes sense you will find it faster as well as safer.
Why Not the Dodge and Burn Tools?
The tools work — brush over an area with Dodge and it brightens, brush with Burn and it darkens. The problem is where that change lands: directly on the pixels of the layer you are painting on. There is no separating it afterwards, no dialling it back a week later, and no turning it off to see what you actually did.
A Curves adjustment layer with a mask keeps every one of those options open. The brightening lives on its own layer, the mask records exactly where you applied it, and the strength stays adjustable forever. Nothing about the original pixels changes. If you want the broader argument for working this way, adjustments versus adjustment layers lays it out.
Getting Started: Curves on a Masked Layer
The setup is the same every time, for dodging and for burning. Learn it once and the rest of this is repetition.
-
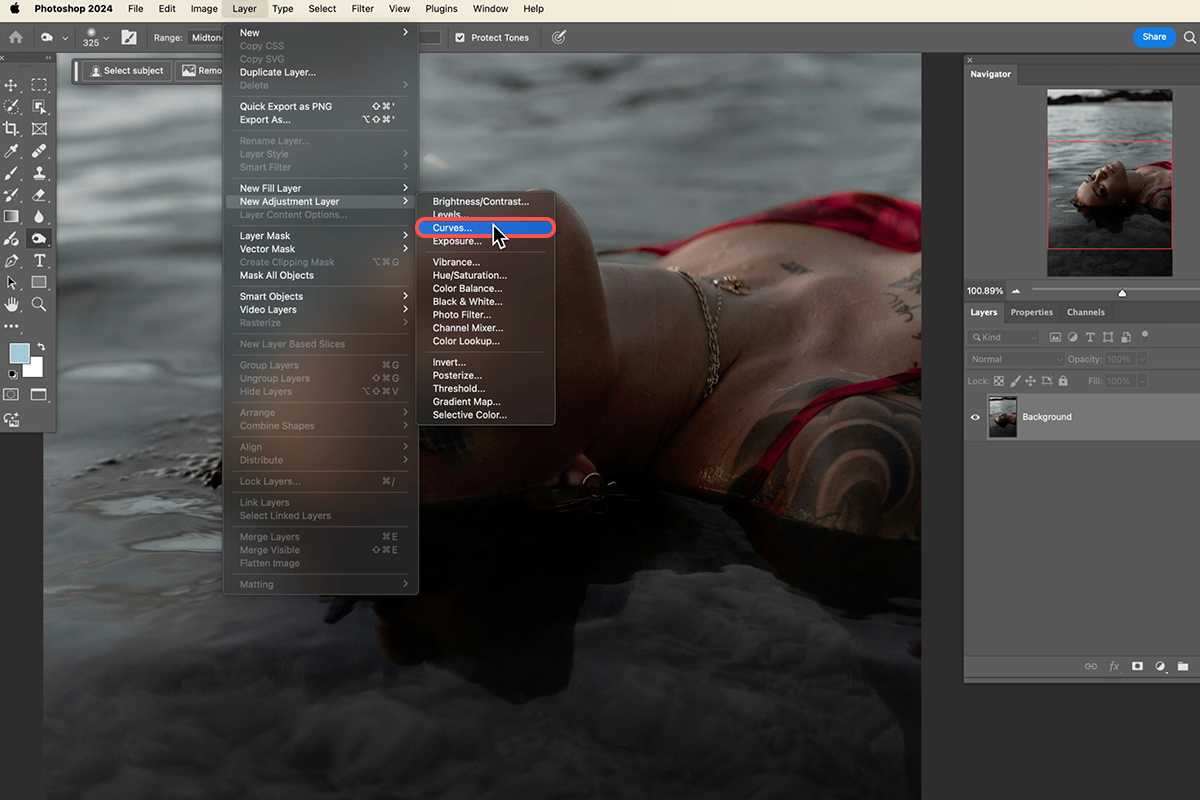
Add a Curves Adjustment Layer
Go to Layer > New Adjustment Layer > Curves and click OK. Curves gives you finer control than Levels, which is why it is worth using here even for a simple brightness change.
-
Push the Curve Up
Click the middle of the line and drag upward to brighten. Go further than looks sensible — you are setting the maximum strength of the effect, and you will be revealing only a fraction of it.
-
Invert the Mask
Click the layer mask thumbnail and press Cmd + I on Mac (Ctrl + I on PC). The mask turns black and the brightening disappears completely. Layer masks are doing the real work here, so it is worth being comfortable with them.
-
Get Ready to Paint It Back
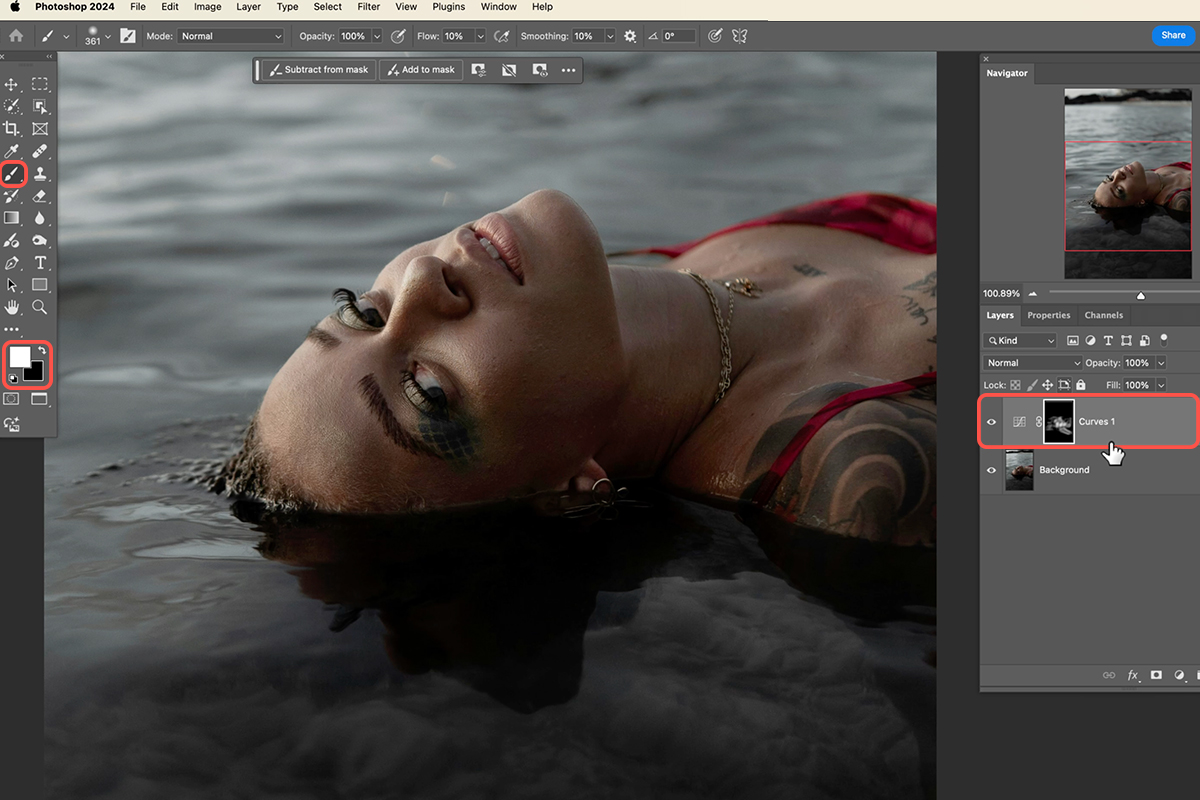
Select the Brush Tool (Keyboard Shortcut “B”) and set your foreground color to white. Anywhere you paint, the brightening returns.
The Two Brush Settings That Matter
Almost everything that separates convincing dodging and burning from obvious dodging and burning comes down to two numbers in the options bar. Getting these wrong is the single most common reason the technique looks bad.
-
Hardness to 0
Right-click on the canvas and drag Hardness all the way down. A hard-edged brush leaves visible boundaries where light should fade, and no amount of care afterwards will disguise them.
-
Flow to About 10%
Type 10 into the Flow field. At 100% the effect is essentially a switch — on where you painted, off where you did not. At 10% each pass lays down a fraction of it, so you build the light up gradually by going over an area more times where you want more. Layer mask shortcuts make this much faster once you are working at speed.
Why Flow, Not Opacity
Both reduce the strength of a stroke, but they behave differently in a way that matters here. With low Flow, the effect keeps accumulating as you move back and forth without releasing the mouse, so a single continuous stroke can build up dense in one place and barely register in another. Opacity caps the whole stroke at one value no matter how many times you cross the same spot. Since dodging and burning is entirely about varying intensity across an area, Flow is the control that suits it.
Pass One: Evening Out the Light
The first pass is broad and unfussy. You are not sculpting anything yet — you are deciding which regions of the photograph are simply too dark and lifting them.
-
Use a Large, Soft Brush
Size it generously — larger than the areas you are lifting. Precision is not the goal here and a big brush keeps the transitions invisible.
-
Paint Where the Image Needs Light
Work across the face, the neck, anywhere that reads as underexposed compared to the rest. Go over the areas that need more lift a second and third time; the low Flow builds it up. A single continuous stroke can do the whole pass.
Check Your Mask As You Go
Hold Alt on PC (Option on Mac) and click the layer mask thumbnail to view the mask on its own. It will look like a rough, uneven smudge, and that is exactly right — it is a record of where you decided the image wanted light. Alt-click again to return. Toggling the layer’s visibility off and on is the other check worth making constantly, because the improvement is easy to lose track of while you are staring at it.
Pass Two: Carving the Highlights
The second pass is where the three-dimensional quality comes from. Instead of broad regions you are working on individual highlights, and the brush gets much smaller.
-
Duplicate the Curves Layer
Drag the existing Curves layer onto the new layer icon to copy it, then fill its mask with black — Edit > Fill, contents Black — so you are starting from a clean slate with the same brightening ready to go.
-
Size the Brush to the Highlight
Use the open and close bracket keys to make the brush roughly the size of the highlight you are enhancing. Matching the brush to the feature is what keeps this looking natural.
-
Paint Over Highlights That Already Exist
Go over the highlight on a shoulder, along the collarbone, the bridge of the nose, the brow, the lips, the eyelids. Two or three passes each. You are strengthening light the camera already recorded, not adding new light sources.
Follow the Light That Is Already There
This is the discipline that separates a believable result from an obviously retouched one. Look for where the light genuinely falls in your photograph and enhance those places. Invent a highlight on the wrong side of a face and the brain registers something as wrong long before the viewer can say what it is. The photograph tells you where to paint — your job is to read it and agree.
The Shortcut: Let Blend If Find the Highlights
Painting every individual highlight takes patience and a steady hand. There is a second route to the same result that asks for neither, and it is genuinely clever.
-
Set Up Another Curves Layer
New Curves adjustment layer, curve pushed up, mask inverted to black — exactly as before.
-
Paint Roughly, at Full Flow
Set Flow back to 100% and paint over your whole subject without any care for precision. Everything goes brighter, including areas that should not be.
-
Open Blend If
Double-click the empty part of the layer to open Layer Style, and find the Blend If section at the bottom of Blending Options.
-
Restrict It to the Highlights
On the Underlying Layer slider, hold Alt/Option and drag the left handle apart to split it, then move it inward. The brightening vanishes from the shadows and survives only where the image beneath is already light — Photoshop has isolated every highlight for you. Splitting the handle is essential; an unsplit slider gives a harsh, gritty edge. Three Ways to Use Blend If in Photoshop covers the sliders in full.
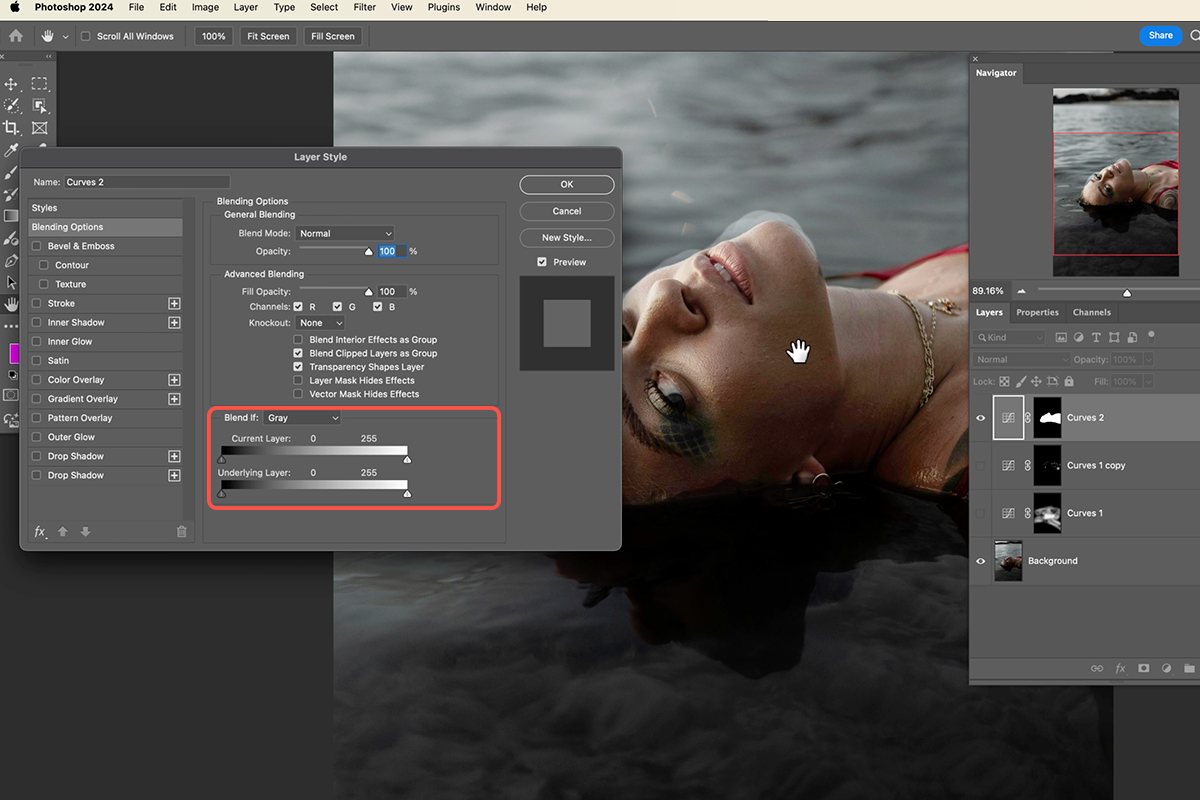
The strength stays adjustable afterwards: double-click the Curves thumbnail and raise or lower the curve, and the whole highlight structure follows. Comparing the two approaches, the painted version gives you more say over exactly which highlights get emphasis, while this one is faster and more even. Most retouchers end up using both.
Burning: The Same Process, Inverted
Burning needs no new technique at all. It is the identical setup with one change of direction, which is the neatest thing about building this on Curves rather than on two separate tools.
-
New Curves Layer, Curve Pulled Down
Add another Curves adjustment layer and drag the curve downward instead of up. Invert the mask to black as before.
-
Paint Into Existing Shadows
Deepen the shadows the photograph already has — under the jaw, beside the nose, along the edges of the body. The same rule applies as with the highlights: strengthen what is there rather than inventing a shadow that has no source.
-
Darken the Surroundings
Switch to a large brush and darken the background or foreground around your subject. Drawing light away from the edges of the frame pulls attention toward the middle without touching the subject at all.
Dodge More Than You Burn
As a matter of preference, most of this work ends up being dodging. Lifting light tends to open a photograph up, while heavy burning closes it down and can quickly look muddy. Burning is best used sparingly and locally — a little under the jaw, a little at the frame edges — against a broader base of lightening. It is a starting ratio rather than a rule, but it will steer you right more often than the reverse. Dodge and burn for shape and depth works through the same balance on a different image.
Where Dodging and Burning Goes Wrong
The failures are consistent and easy to avoid once you know them. A hard-edged brush leaves visible patches where light should fade into nothing. Flow left at 100% turns a subtle build-up into a switch, so the effect arrives all at once with no gradation. Painting highlights where the light never fell reads as wrong even to people who cannot articulate why.
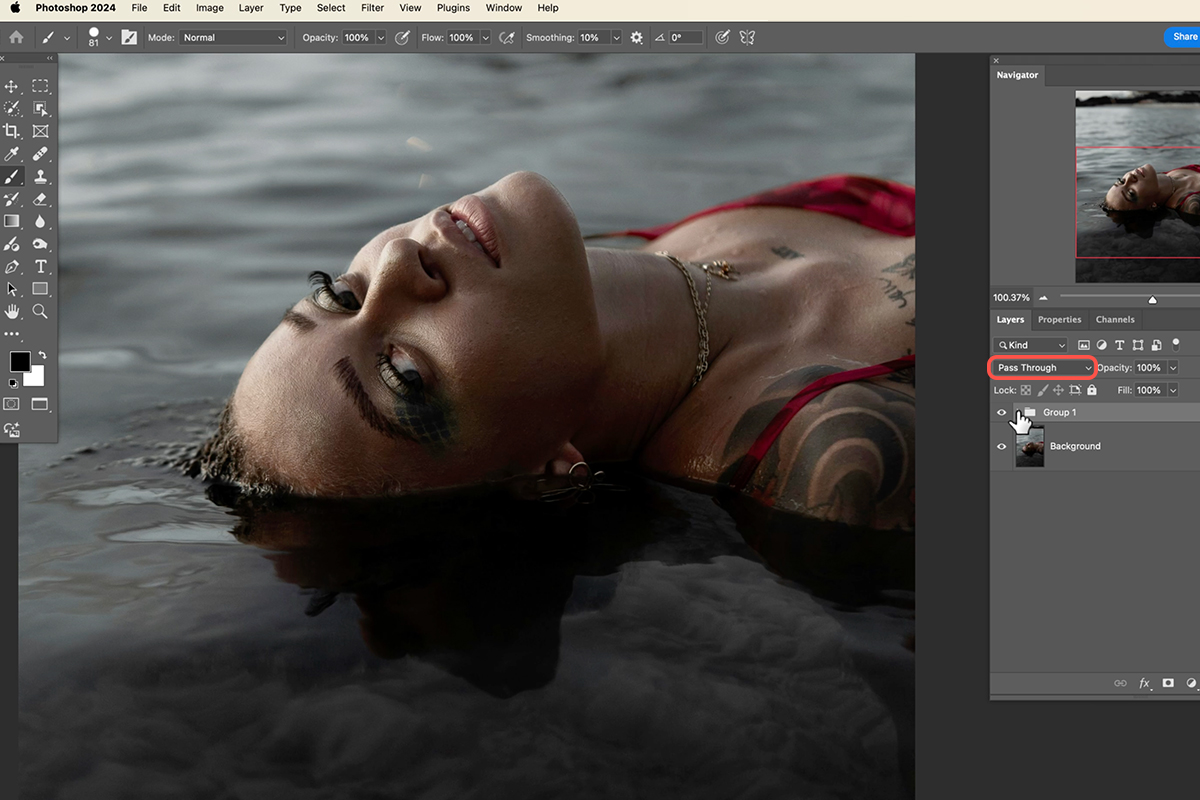
The subtler mistake is doing too much in one sitting. Stacking three or four of these layers is normal and correct, but they compound, and what looked restrained on each individual layer can be heavy-handed once they are all switched on together. Group them with Cmd/Ctrl + G, toggle the group off and on, and adjust the individual curves down if the total is too strong. If a mask ends up too blotchy, running Filter > Blur > Gaussian Blur on the mask itself softens the transitions without repainting anything.
Why This Beats the Dodge Tool
The Curves method wins on one thing above all: nothing you do is final. Every decision lives on its own layer with its own mask, so a week later you can weaken the highlight pass, strengthen the burn, delete one stage entirely, or paint more into an area you rushed. The Dodge and Burn tools bake all of that into the pixels the moment you release the mouse.
There is a quieter benefit too. Because each pass is separated, you end up thinking about them separately — evening out exposure is one decision, carving highlights is another, darkening the surroundings a third. That separation produces better work than trying to do all three at once with a single brush, which is what the dedicated tools quietly encourage. PHLEARN PRO members can see the technique inside a complete workflow in How to Retouch a Portrait in Photoshop, and there is a Lightroom Classic equivalent for work that never reaches Photoshop.
Make It Part of Your Retouching
Dodging and burning does more than the name suggests. It evens out patchy skin without any blurring, it gives features shape, it guides the eye around a frame, and it does all of it by adjusting light that the photograph already contains — which is why the result holds up where heavier retouching starts to look artificial.
Start with the broad pass on your next portrait and stop there. Once evening out the exposure feels routine, add the highlight pass, then try the Blend If route and compare. Save the layered file rather than flattening it, and you will have both a finished image and a record of exactly how you shaped the light — which is the part you will want back the next time a similar photograph lands on your desk.
Download the Practice Files
The practice files for this tutorial include 1 sample image and 1 sample PSD, so you can work both passes on the same portrait and compare your dodge and burn layers against the finished document. Downloads are free with a PHLEARN account.
More Free Retouching Tutorials
These free tutorials cover neighboring parts of the same retouching workflow.
New Free Tutorials View All »











Enjoying This Free Tutorial? Go Further with PRO.
Unlock Full Sample Files, PSDs, and Hundreds of Masterclasses!

Download full project assets, original PSDs, and RAW images for every lesson
Unlimited access to our complete library of PRO Photoshop & Lightroom courses
Instant 4K Ultra HD streaming on all devices, anytime, anywhere
Full access to our entire library of Photoshop Actions, Presets, and LUTs
Flexible monthly and annual membership plans
Cancel anytime with zero hassle or commitments