

download sample images
Download Assets
Downloads are free with a PHLEARN account.
- Download the sample images and PSDs from every free tutorial on PHLEARN
- New free tutorials published every week
- One free account — sign up once, then download anything
Watch the Full Series
description
2020 Edition
This lesson is from the original 30 Days of Photoshop. Photoshop has changed a great deal since — there is an updated version of this lesson in the 2025 Edition: Understanding Layers and Layer Masks in Photoshop, Day 4.
Layers are the backbone of Photoshop. Once you understand how they work, you’ll be well on your way to Photoshop mastery.
Learn how Layers are organized within the Layers Panel, how to edit without damaging your original photos, and how to show and hide parts of any Layer with Layer Masks.
This is Day 3 of our 30 Days of Photoshop series. Follow along with all 30 episodes as we explore the magic of Photoshop together!
Continue Watching 30 Days of Photoshop
JOIN 30 DAYS OF PHOTOSHOP (FOR FREE!)

Sign up to receive email updates to keep you going, sample images to follow along, and a printable calendar to keep track of your progress!
The Backbone of Photoshop
The most useful way to picture layers is as a stack of paper. Each sheet sits above the one below it. Some sheets cover everything underneath completely; some are transparent in places, so parts of the sheet below show through. Look at the stack from above and it reads as one image — but you can reorder the sheets, hide any of them, change how opaque they are, and change how each one blends with what is beneath.
Layer masks are the second half of the idea. A mask lets you hide or reveal any part of a layer without deleting anything, and it stays editable forever. This lesson builds one composite image from a photograph of citrus fruit using standard layers, masks, adjustment layers, type and clipping masks — and every step of it can be undone months later.
The Layers Panel and the Background Layer
If the panel is not on screen, it is under Window > Layers. The bottom layer is always called Background and it arrives with a small padlock. Try to move it with the Move tool and Photoshop refuses.
You can unlock it — right-click and choose Convert to Normal Layer — and then it moves like anything else, leaving transparency behind it. Most of the time you have no reason to, so if you do it by accident, Ctrl/Cmd + Z puts it back.
Standard Layers: Turn a Lemon Into a Lime
The first exercise is deliberately crude, because the point is the mechanism rather than the finish.
-
Add a New Layer
Click the plus icon at the bottom of the Layers panel. Nothing is on it yet, so moving it around does nothing at all.
-
Paint on It With the Brush
Press B, click the foreground colour swatch and pick a yellow-green, then paint roughly over one of the lemons. It does not need to be neat.
-
Change the Blending Mode to Hue
At the top of the Layers panel, change Normal to Hue. Instead of a flat green blob you now have the lemon’s own texture and shading carrying a green colour — it reads as a lime.
-
Retune the Colour Afterwards
You are not stuck with the green you happened to pick. Image > Adjustments > Hue/Saturation on that layer lets you shift the hue and saturation until the green looks believable.
Opacity
The Opacity slider at the top of the panel fades a layer toward whatever is underneath. It works on any layer type, and it is often the quickest way to ease off an effect that is slightly too strong.
Blending Modes Come in Groups
The long list is less daunting than it looks because it is organised, and the useful one in each group sits at the top. Darken and Multiply lead the darkening group. Lighten and Screen lead the lightening group. Overlay and Soft Light lead the contrast group. The Difference group is mostly for special effects. At the bottom sit Hue, Saturation, Color and Luminosity, which is where the lime trick came from. You do not need to memorise the rest.
Layer order matters here: because the green layer sits above the background, it affects whatever is beneath it. Drag it over the pomegranate seeds and they turn green too.
Copy Part of the Image With the Clone Stamp
To duplicate one of the oranges, add another new layer (Shift + Alt/Option + Cmd/Ctrl + N, or just the plus icon) and pick up the Clone Stamp.
In the options bar set the sample source to Current & Below — without that, the tool has nothing to read on an empty layer. Hold Alt/Option and click the orange to set the source point, then move across and paint. A live preview shows what you are about to lay down, and the copy lands on the new layer rather than on the photograph.
Layer Masks: White Shows, Black Hides
The cloned orange will have picked up a stray pomegranate seed along the way. The instinct is to reach for the Eraser. Do not — that deletes pixels permanently. Use a mask instead.
-
Add the Mask
With the layer selected, click the layer mask icon at the bottom of the panel — a white rectangle with a dark circle punched out of it. A white thumbnail appears beside the layer, and white means fully visible.
-
Paint Black to Hide
Click the mask thumbnail, press B, set the foreground colour to black, and paint over the part you want gone. It disappears, but the pixels are still there.
-
Paint White to Bring It Back
Press X to swap to white and paint over the same area. It returns. There is no time limit on this — save the file, come back in a year, and the mask is still editable.
Disable a Mask Temporarily
Hold Shift and click the mask thumbnail. A red cross appears across it and the whole layer shows again. Shift-click a second time to switch it back on. It is the fastest way to check what a mask is actually doing.
Transform and Warp the Copy
A straight duplicate is obvious. Press Ctrl/Cmd + T, scale it down slightly, then click the Warp button in the options bar and push the grid segments around to change its shape. Then paint a little black on the mask along the edge to fade it into the fruit around it.
Adjustment Layers Affect Everything Below Them
Go to Layer > New Adjustment Layer > Black & White. The image drops to greyscale — except the cloned orange, which stays in colour. That is not a bug. An adjustment layer only affects the layers beneath it, and the orange is sitting higher in the stack.
Drag the adjustment above the orange and the orange goes grey too. This is the clearest demonstration in the whole lesson of why layer order matters. Adjustment layers also carry their own masks, so you can paint black on one to let a single object keep its colour, and their opacity works the same way — drop it to 50% for a partly desaturated image.
Type Layers
Press T, click on the image and type. Ctrl/Cmd + Enter commits the text. Size, colour, font face and weight all live in the Character panel, or in Properties in newer versions (Window > Properties if it is hidden).
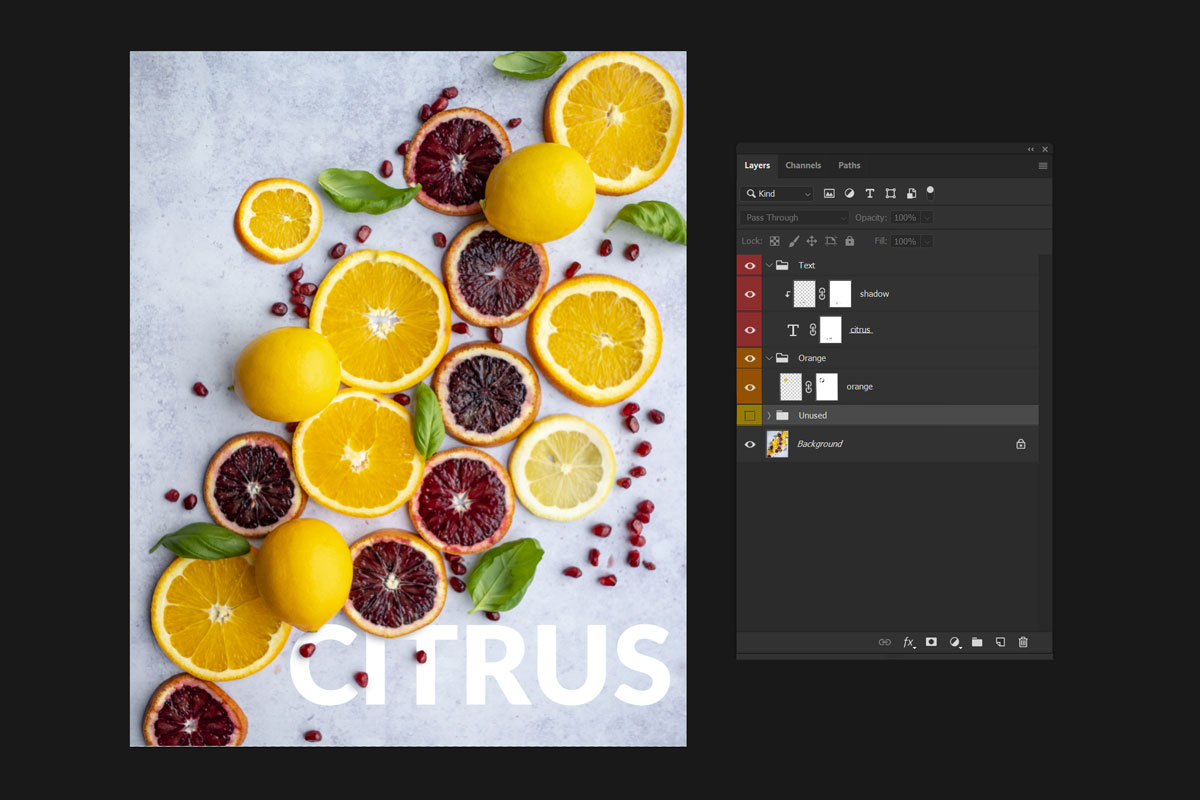
The interesting move is masking type. Add a layer mask to the type layer and paint black where a piece of fruit crosses the letters, and the text appears to sit behind the citrus. Overpaint and you simply switch to white and bring it back. Same rule as every other mask.
Clipping Masks Confine a Layer to the One Below
To drop a shadow under the type, add a layer above it, sample a colour from the image by holding Alt/Option with the Brush active, set a soft brush and paint where the shadow should fall.
The problem is immediate: the shadow covers the fruit as well as the text. Right-click the shadow layer and choose Create Clipping Mask. Now it shows only where the layer directly beneath it — the type — is visible. Set its blending mode to Multiply so it darkens rather than covers, and add a mask to soften whatever still looks artificial.
Sizing a Brush Without the Menu
Right-clicking on the canvas gives you size and hardness sliders. Faster: hold Ctrl + Alt (Windows) or Ctrl + Option (Mac) and drag — left and right changes size, up and down changes hardness.
Organise Before You Save
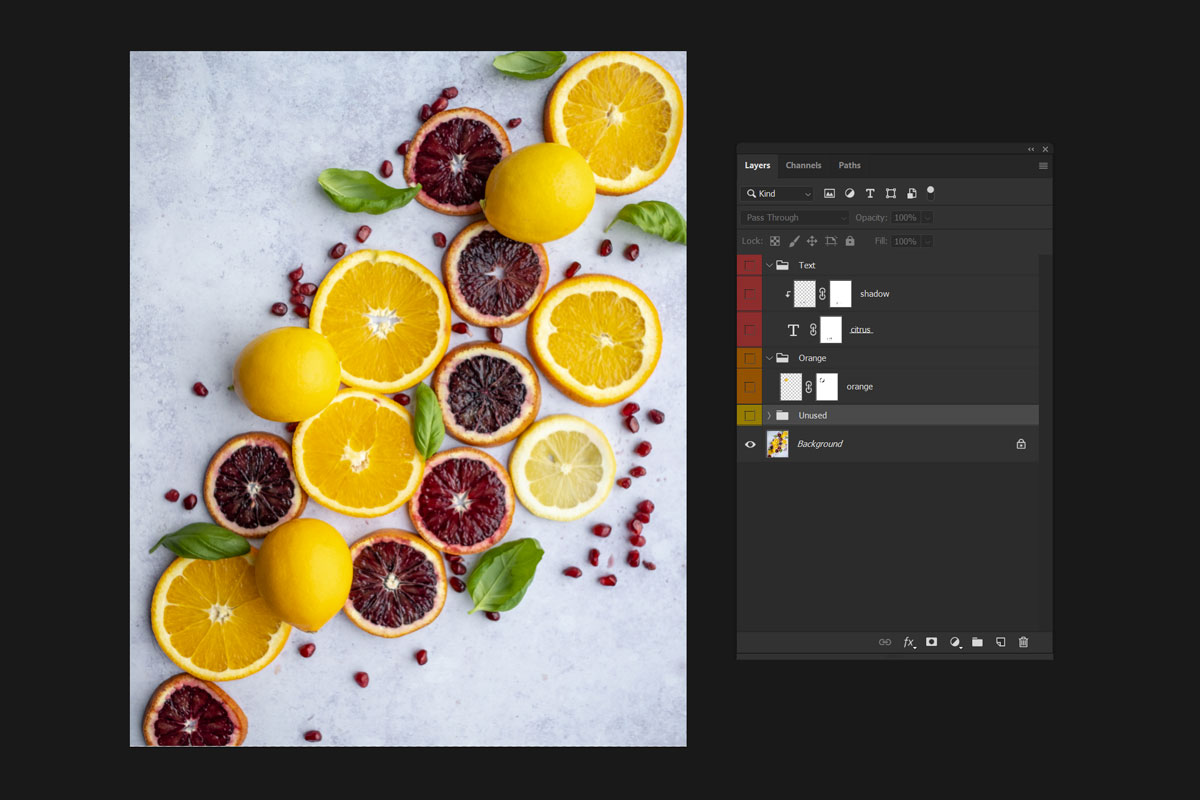
By this point the panel is a pile of layers, and a pile is where files go to die. Select related layers with Ctrl/Cmd + click and press Ctrl/Cmd + G to group them. Double-click the group name and call it something honest — “text”, “orange”, “unused”.
Right-click a layer’s eyeball to colour-code it, which makes a long stack scannable at a glance. Then save as a PSD (Shift + Cmd/Ctrl + S, format Photoshop) so every group, mask and adjustment survives. Classic Day 2 covers the save formats if you skipped it.
Build the Same File Yourself
Download the sample image and the finished PSD. Work through it in order — recolour a lemon with a Hue layer, clone an orange onto its own layer, mask the mistakes instead of erasing them, add a Black & White adjustment and move it up and down the stack to watch what changes, then set type behind the fruit with a mask and clip a shadow to it. Open the supplied PSD alongside yours to see how each mask was painted.
Tomorrow, Classic Day 4 goes deeper on adjustment layers. For the same ground in the current version of Photoshop, see Day 4 and Day 6 of the 2025 Edition.
New Free Tutorials View All »











Enjoying This Free Tutorial? Go Further with PRO.
Unlock Full Sample Files, PSDs, and Hundreds of Masterclasses!

Download full project assets, original PSDs, and RAW images for every lesson
Unlimited access to our complete library of PRO Photoshop & Lightroom courses
Instant 4K Ultra HD streaming on all devices, anytime, anywhere
Full access to our entire library of Photoshop Actions, Presets, and LUTs
Flexible monthly and annual membership plans
Cancel anytime with zero hassle or commitments