

Download Assets
This tutorial includes sample images. Downloads are free with a PHLEARN account.
- Download the sample images and PSDs from every free tutorial on PHLEARN
- New free tutorials published every week
- One free account — sign up once, then download anything
description
Pasting a subject onto a lake and flipping a copy underneath never convinces, because a real reflection distorts along with the water. This builds a subject floating just above a rippled lake with a reflection that actually follows the ripples, using Photoshop’s Displacement Map filter — including saving the background as a PSD, the alignment problem displacement maps always cause, and the finishing touches that sell the realism.
Enjoying This Free Tutorial?
We publish a new free tutorial every week, each one with sample images and PSDs you can download and follow along with. Sign up and they land straight in your inbox, along with early word on sales, events and subscriber-only offers.

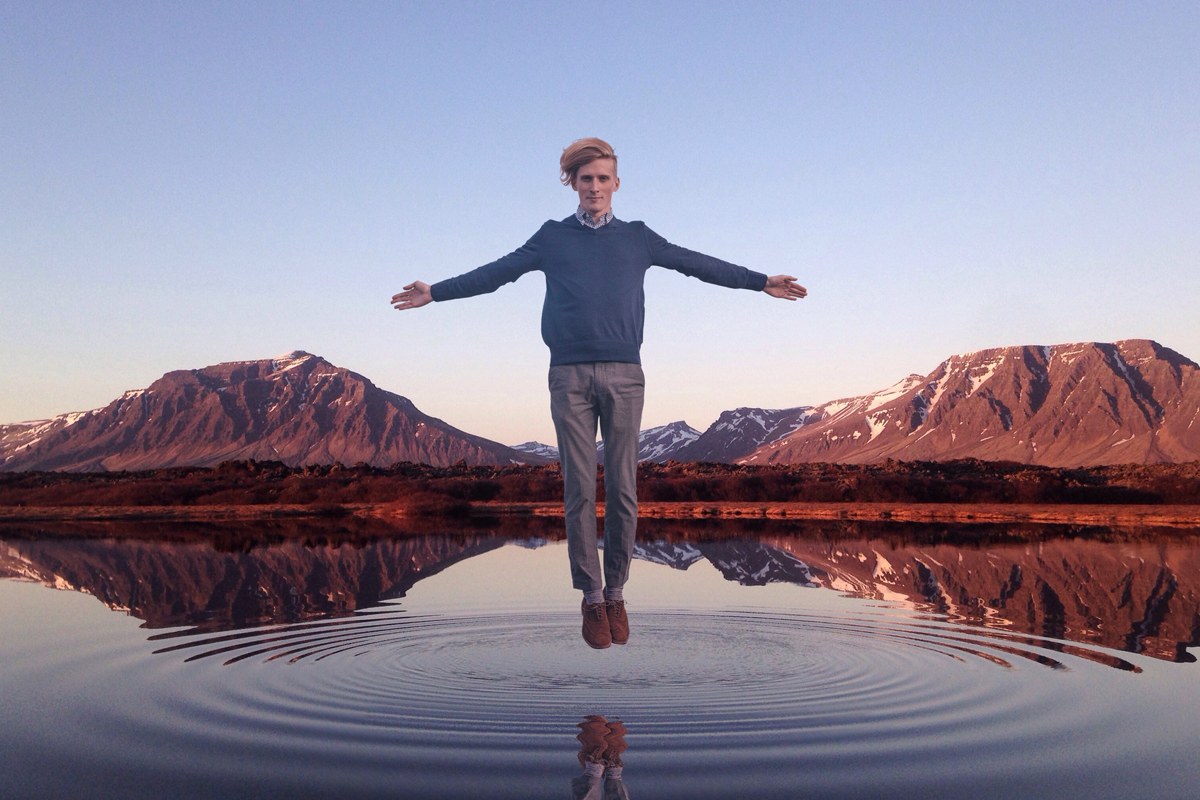
Create a Realistic Reflection in Photoshop
This tutorial builds a subject floating just above a rippled lake, complete with a reflection that actually distorts along with the water’s ripples, using Photoshop’s Displacement Map filter to make the reflection interact with the environment convincingly. The sample images, including the subject already cut out, are available as a free download on PHLEARN.com.
Why This Effect Needs a Displacement Map
Simply pasting a subject onto a lake background and flipping a copy for the reflection isn’t enough to sell the illusion, since the actual ripples in the water are visibly distorting the mountains reflected in it, and a static, undistorted reflection would immediately look pasted on. The Displacement Map filter solves this by reading the light and dark values from a separate reference image and using that information to physically shift, or displace, pixels on another layer to match.
Saving Your Background as a PSD
Before the displacement filter can be used, it needs a PSD file of the background to read distortion information from. With the subject temporarily hidden, go to File, then Save As, choose Photoshop as the format, and save the plain background alone as its own PSD. This file doesn’t need anything fancy in it, just the background itself, since it’s only being used as a reference map for the filter, not as part of the visible composite.
Understanding the Displacement Map Alignment Problem
Running Filter, then Distort, then Displace directly on the subject layer, choosing a modest scale like 10 for both horizontal and vertical along with Stretch to Fit and Wrap Around, and pointing it at the saved background PSD does produce visible distortion, but it lands in the wrong place on the subject. This happens because the subject layer has a lot of transparent pixels around it, so Photoshop compares the wrong effective layer size against the background PSD when trying to line the two up.
Fixing Alignment with a Smart Object
The fix is to give the subject layer the same full-canvas dimensions as the background before running the filter. Add a Solid Color fill layer, choose white, lower its opacity just enough to see through it, and place it directly beneath the subject layer. Select both the subject and the white fill layer together, right-click, and choose Convert to Smart Object, which merges them into a single unit that now spans the entire canvas the same way the background PSD does. Running the displacement filter again on this Smart Object lands the distortion correctly this time, and toggling the Smart Filter on and off confirms it. To remove the white layer afterward, double-click the Smart Object’s thumbnail to open its contents, turn that white layer off, and save and close it, which is one of the real advantages of doing this inside a Smart Object rather than merging layers permanently.
Testing the Displacement Filter on the Subject
With the alignment trick confirmed on the subject itself as a proof of concept, undo those test steps, since the actual displacement effect belongs on the reflection rather than the subject in the final image. Place the subject roughly where it should float above the water before moving on to building its reflection.
Building the Reflection
Duplicate the subject layer with Command/Ctrl+J, then use Command/Ctrl+T and right-click to Flip Vertical, creating an upside-down copy to serve as the reflection. Position it below the point where the subject would touch the water’s surface, matching the distance from that touch point down to the reflection roughly to the distance from that same point up to the subject, since a reflection sitting too far below or above that line immediately looks wrong. Rename this layer “reflection” to keep the layer stack easy to follow.
Coloring the Reflection to Match the Water
A reflection usually picks up a bit of the water’s own color. Create a new layer, use the Brush tool to sample a color directly from the lake, and paint over the reflection, then right-click that new color layer and choose Create Clipping Mask so the color only affects the reflection layer beneath it. Change its blend mode from Normal to Color, and keep the opacity low, around 10 percent, so the water’s tint is felt as a subtle shift rather than an obvious color wash. Merge the color layer down into the reflection layer with Command/Ctrl+E once it looks right.
Running the Displacement Map on the Reflection
With the reflection positioned and colored, apply the same Smart Object trick used earlier, this time to the reflection: add a Solid Color white fill layer underneath it, select both layers, and Convert to Smart Object. Run Filter, then Distort, then Displace again, but this time use a Horizontal Scale of around 20 and a Vertical Scale of around 2, since the water’s ripples should distort the reflection mostly side to side rather than up and down. For the Displacement Map options, choose Tile and Repeat Edge Pixels, and uncheck Embed File Data in the smart object dialog, then select the same background PSD saved earlier.
Fine-Tuning the Displacement Amount
The reflection’s distortion can be adjusted at any time by double-clicking the Displace Smart Filter entry and changing the Horizontal Scale value: a higher number like 30 produces a stronger, more visibly rippled distortion, while a lower number like 5 keeps the interaction subtler, so it’s worth trying a few values in that range to find whichever matches the intensity of the actual ripples in the source photo.
Finishing Touches for Realism
Double-click into the reflection’s Smart Object one more time to turn off the white fill layer used only for sizing, since it should stay invisible in the final composite, and save before closing back out. To help the reflection sit believably in the scene, add a small amount of Motion Blur with an angle of zero, which softens it just slightly the way water naturally would. Finally, add a touch of noise through Filter, then Noise, then Add Noise, using a small amount like 2 percent, since too much noise looks obviously artificial, and apply the same amount of noise to the subject itself, after converting it to a Smart Object too, so both elements share the same fine grain and read as part of the same photograph.
More Free Photoshop Tutorials
- Select Subject and Refine Edges in Photoshop
- Three Ways to Use Blend If
- Curves vs Levels: Learn the Difference
Why the Displacement Map Sells the Illusion
The core idea behind this whole technique is that a reflection only looks real when it responds to the same environment the water itself is showing, and a displacement map is what lets one image’s light and dark values physically warp another layer to match. Wrapping the subject and a sizing layer into a Smart Object first solves the alignment problem that would otherwise make the displacement land in the wrong place entirely.
Final Thoughts
Creating a convincing water reflection in Photoshop comes down to a specific sequence: save the background as a PSD, build the reflection and match its position to the subject, wrap it with a sizing layer into a Smart Object, then run the Displacement filter using that saved PSD as the map. Finish with a touch of color, blur, and matching noise, and a simple flipped copy turns into a reflection that genuinely looks like it’s interacting with the water it’s floating in.
Related Tutorials
New Free Tutorials View All »












Enjoying This Free Tutorial? Go Further with PRO.
Unlock Full Sample Files, PSDs, and Hundreds of Masterclasses!

Download full project assets, original PSDs, and RAW images for every lesson
Unlimited access to our complete library of PRO Photoshop & Lightroom courses
Instant 4K Ultra HD streaming on all devices, anytime, anywhere
Full access to our entire library of Photoshop Actions, Presets, and LUTs
Flexible monthly and annual membership plans
Cancel anytime with zero hassle or commitments