Download Assets
description
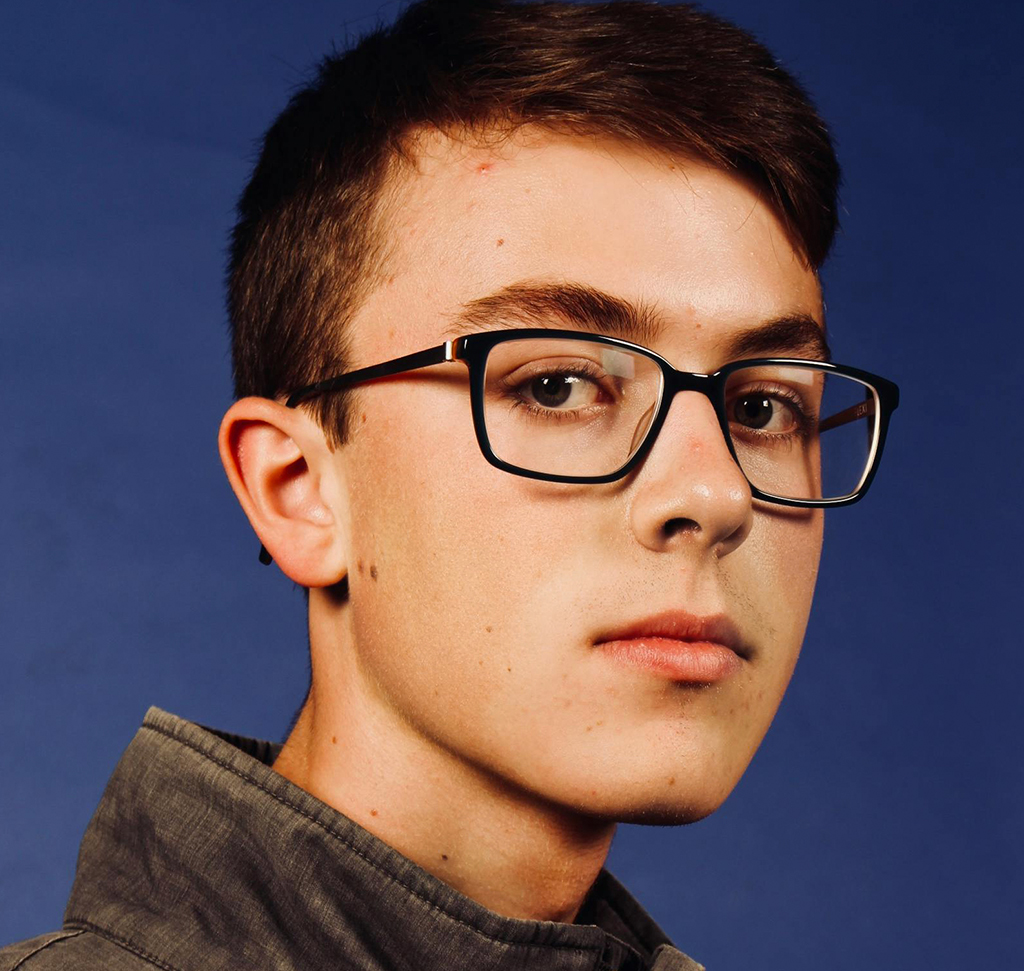
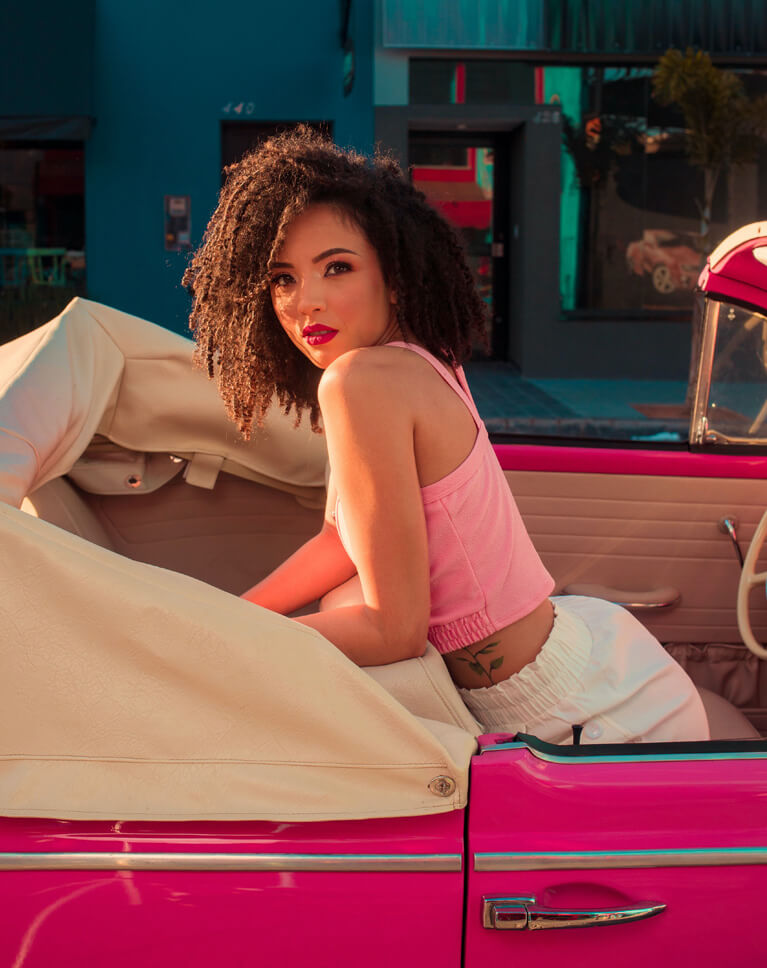
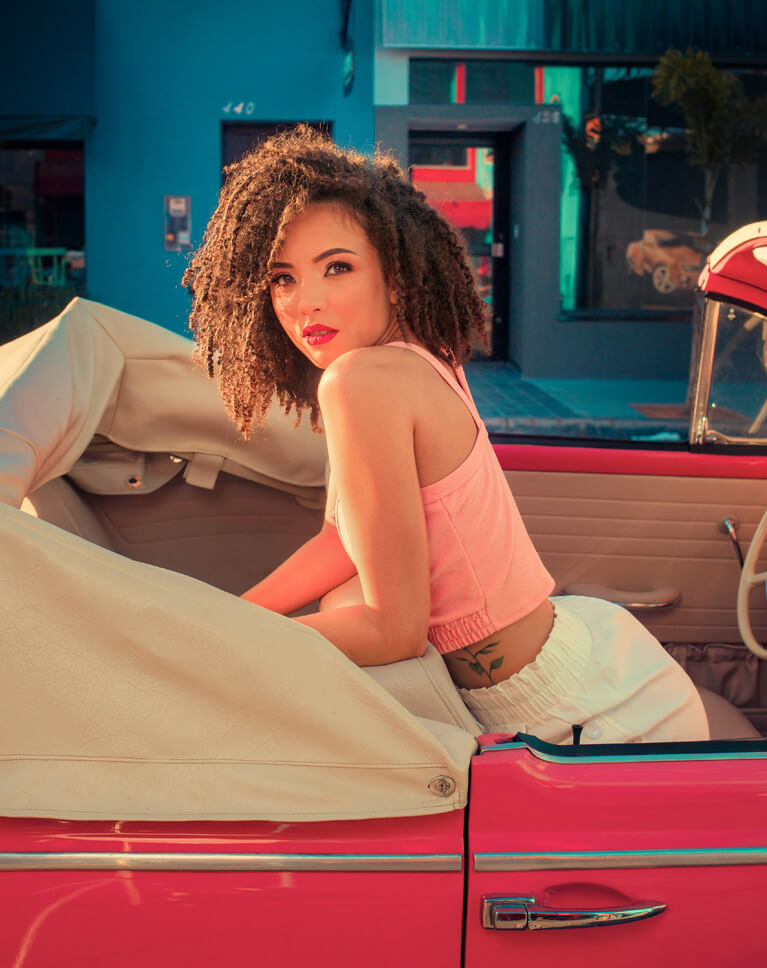
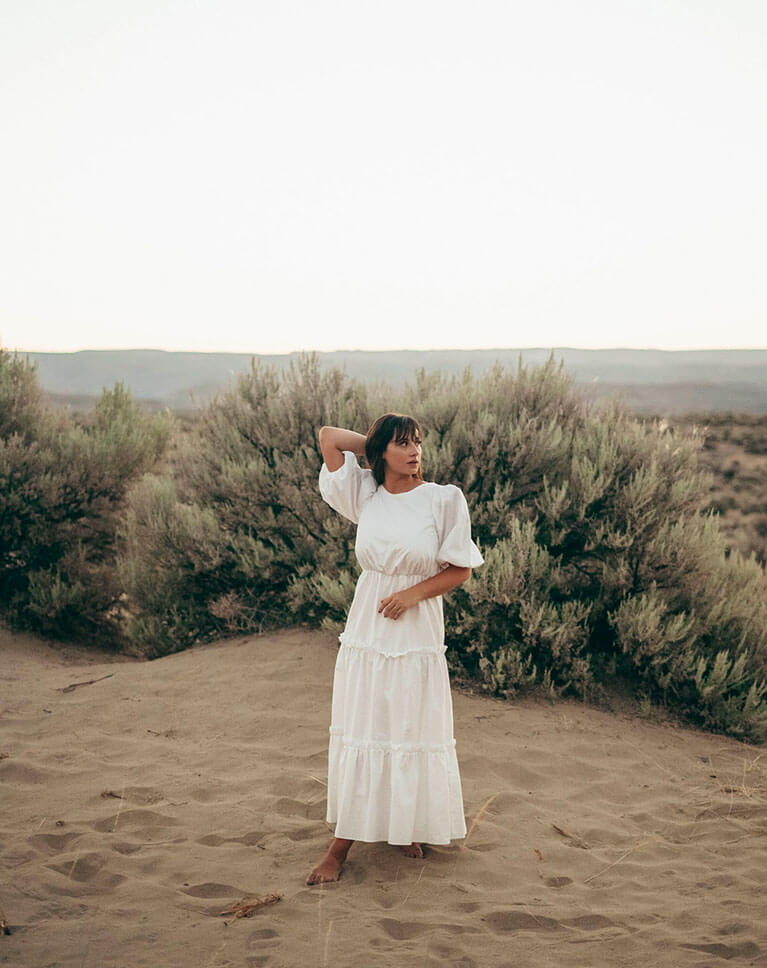
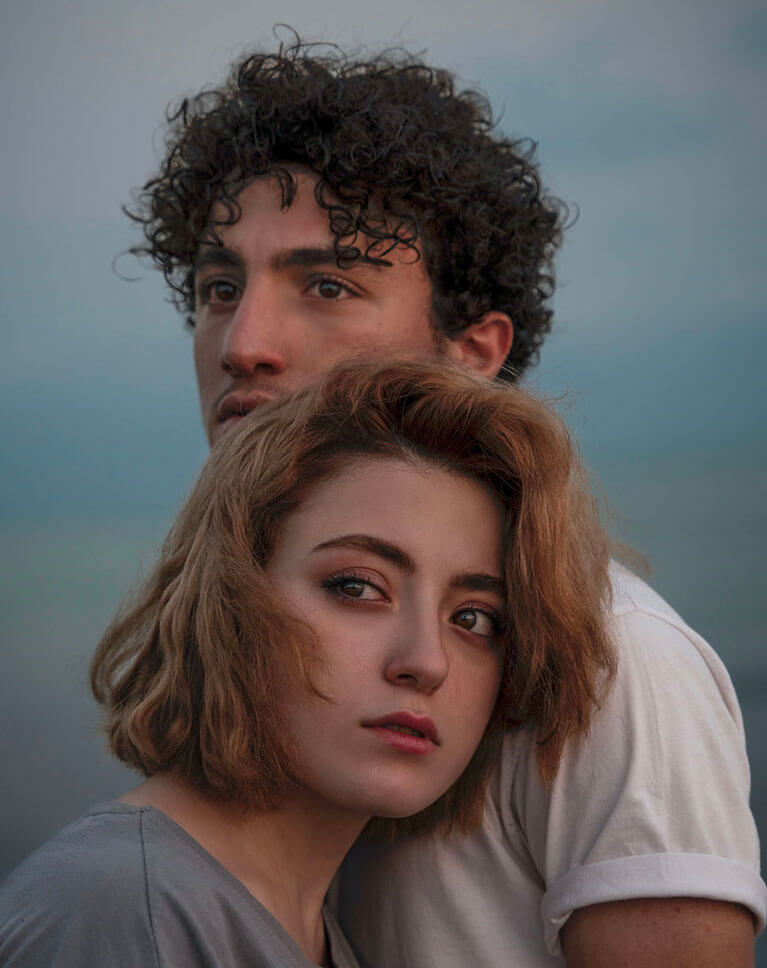
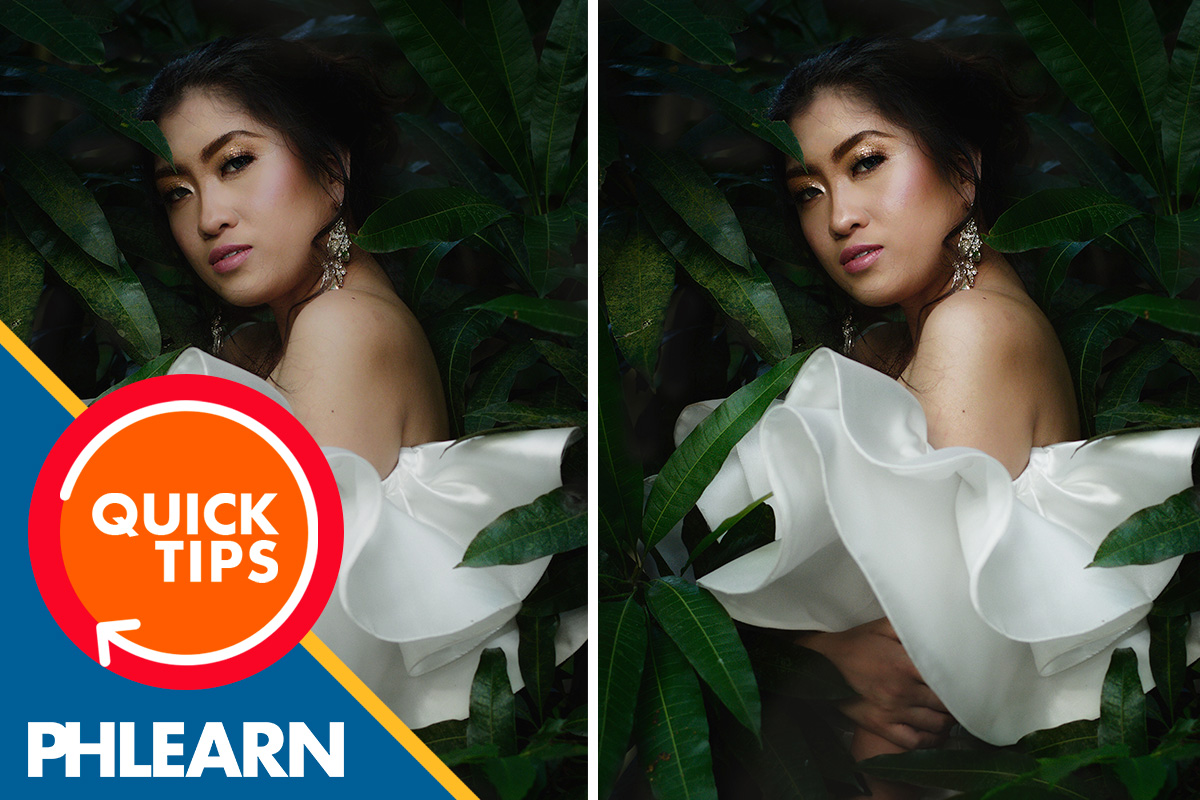
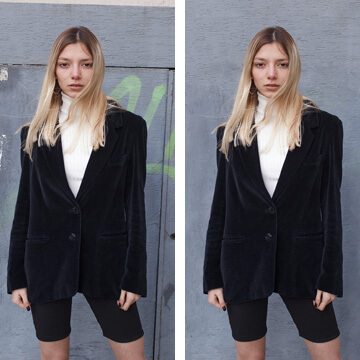
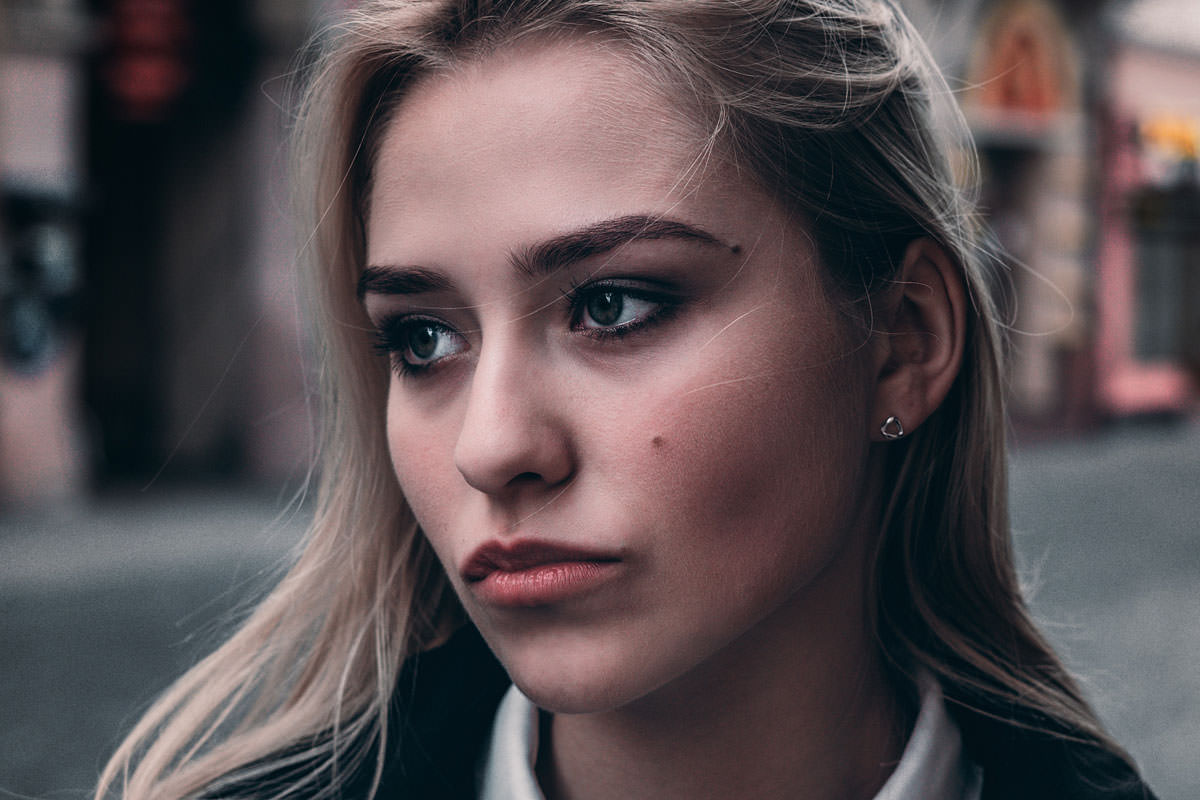
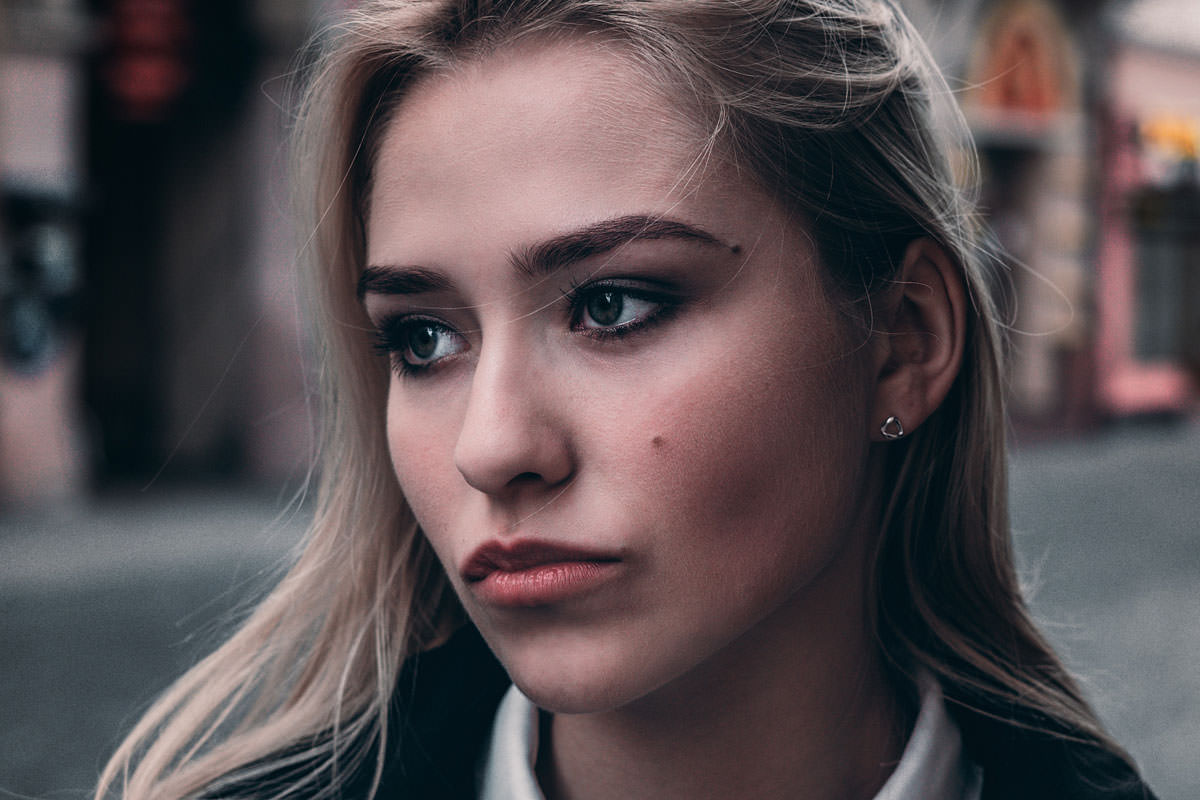
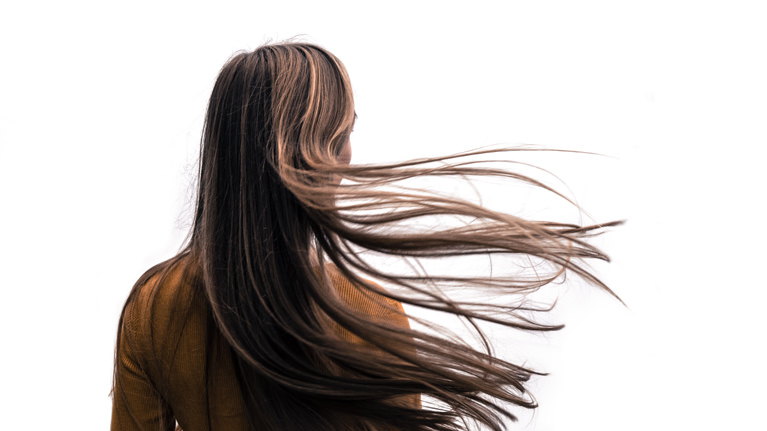
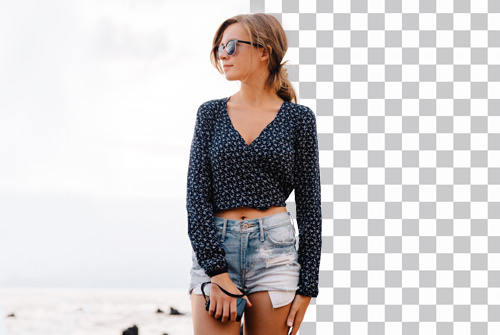
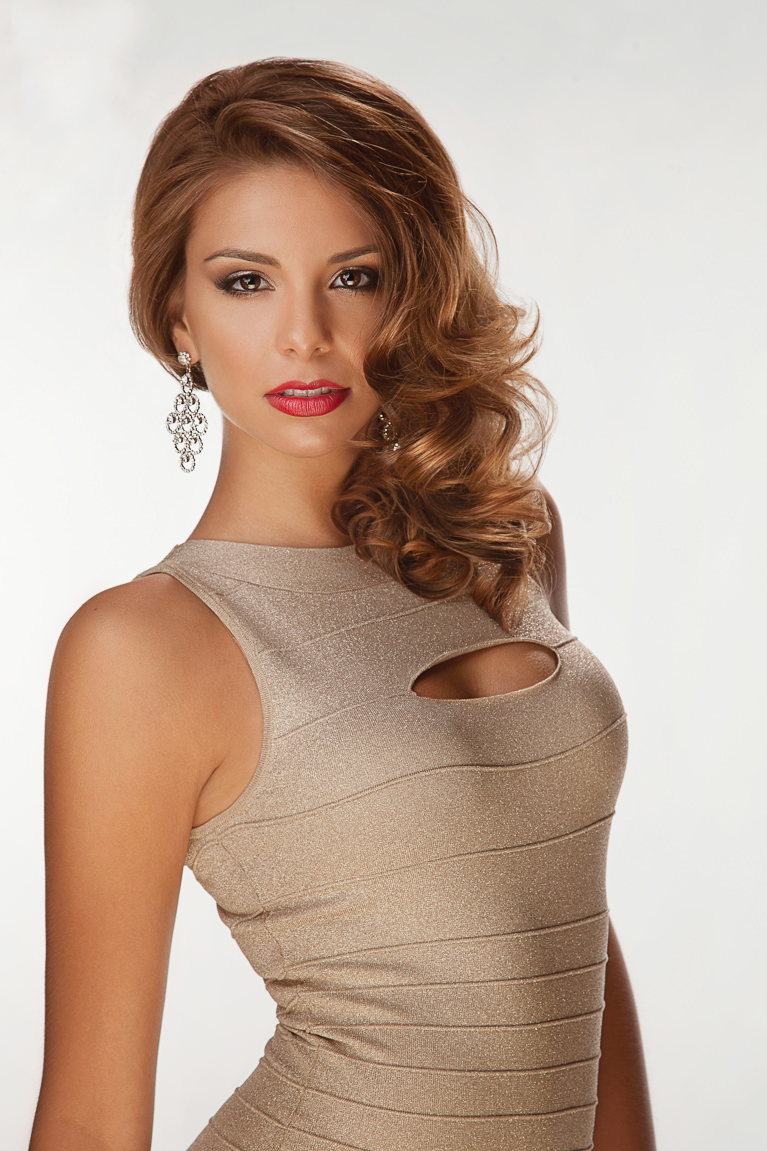
A common challenge in portrait photography is red cast on skin tones. This often appears in areas with increased blood flow, like around the nose, cheeks, and near the eyes. In this tutorial, we’ll show you how to fix it using the Hue/Saturation Adjustment Layer in Photoshop.
Go PRO:
Discover the secrets of classic retouching techniques and AI-powered tools for smooth skin, subtle enhancements, and breathtaking results. Watch our in-depth PRO tutorial The Beginner’s Guide to Portrait Retouching Using AI & Traditional Tools.
Artist Credit
Share
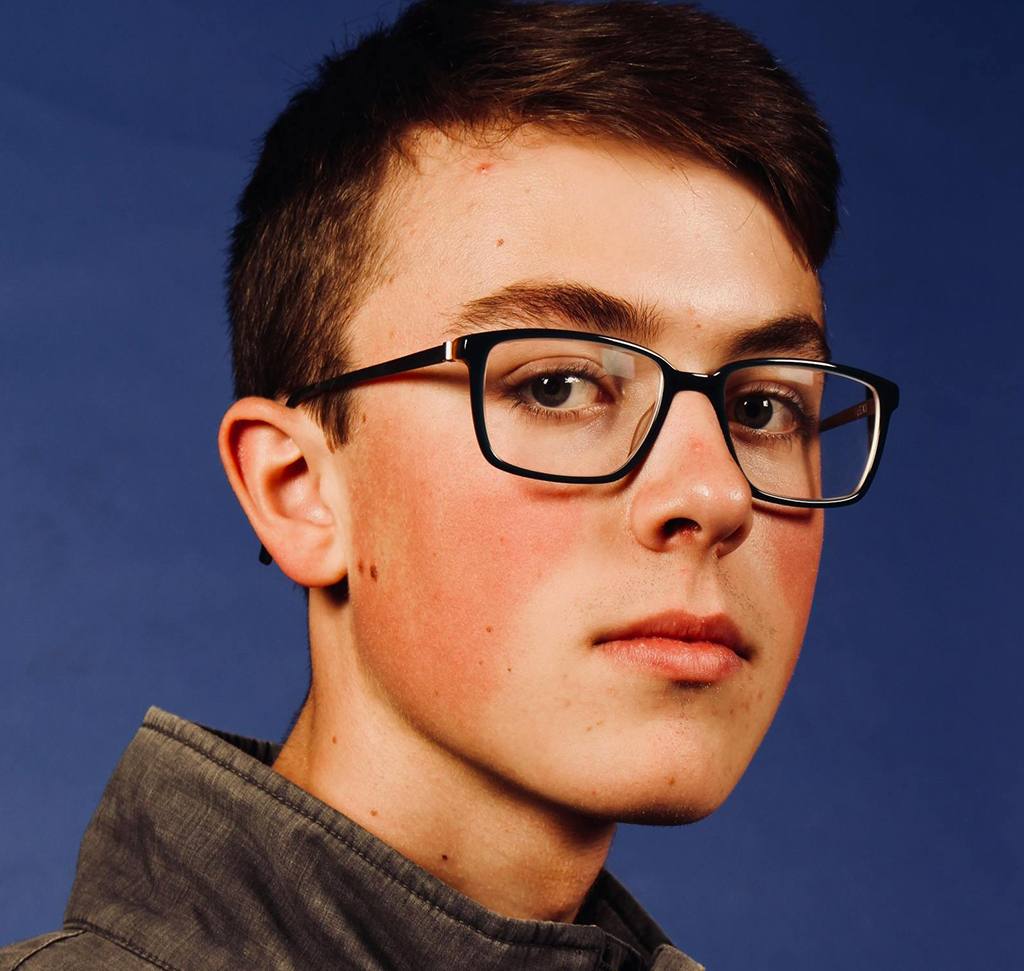
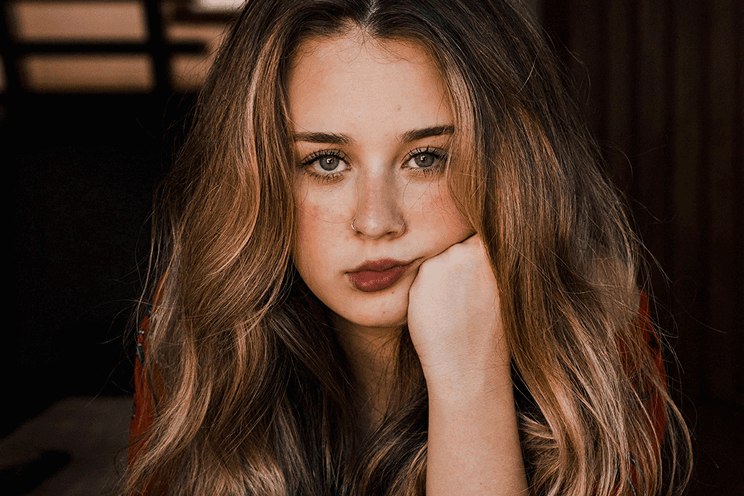
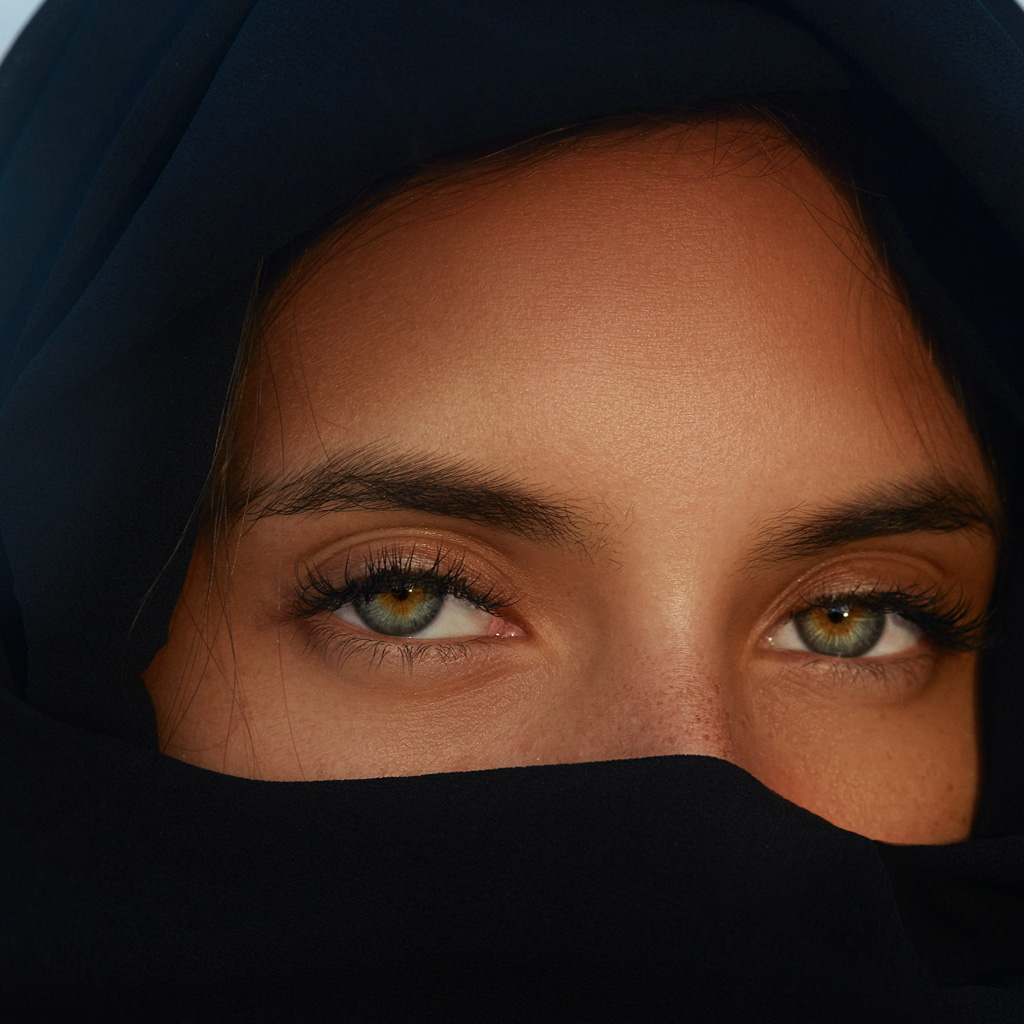
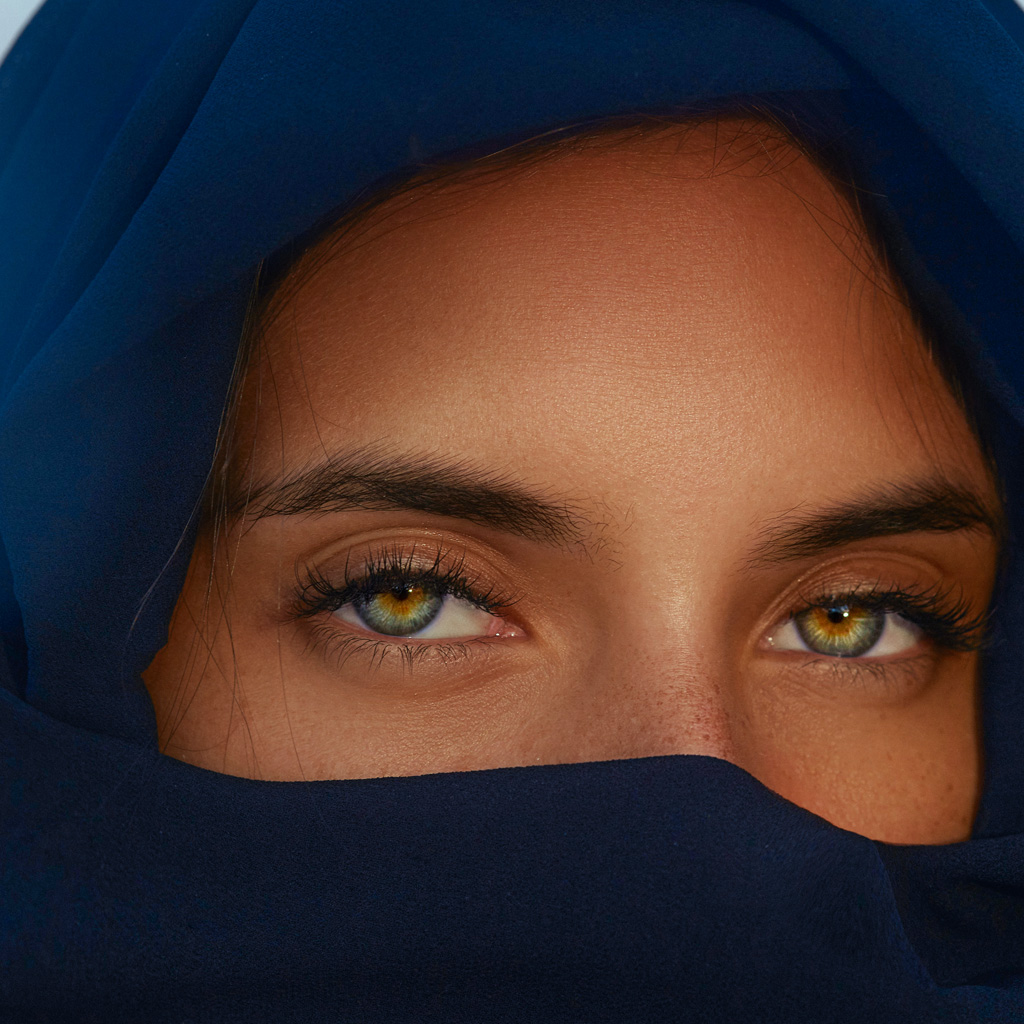
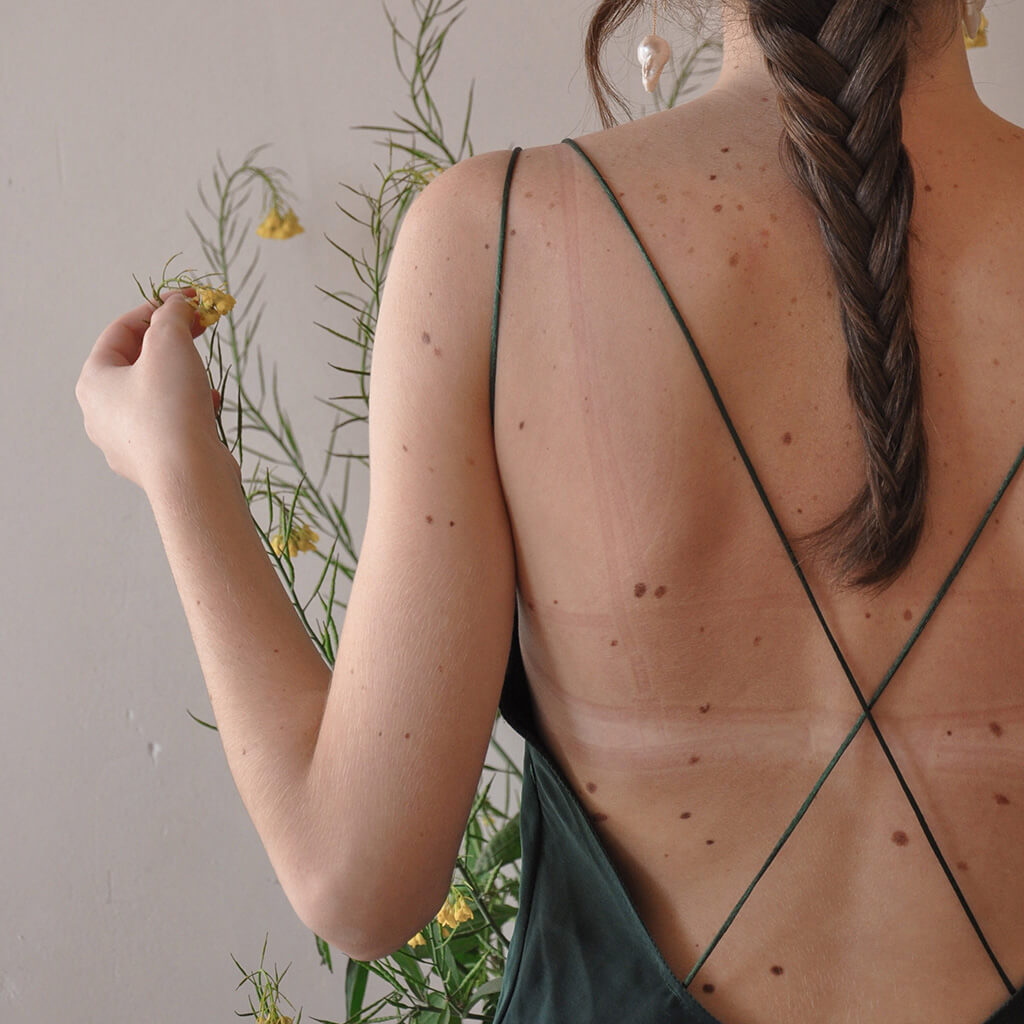
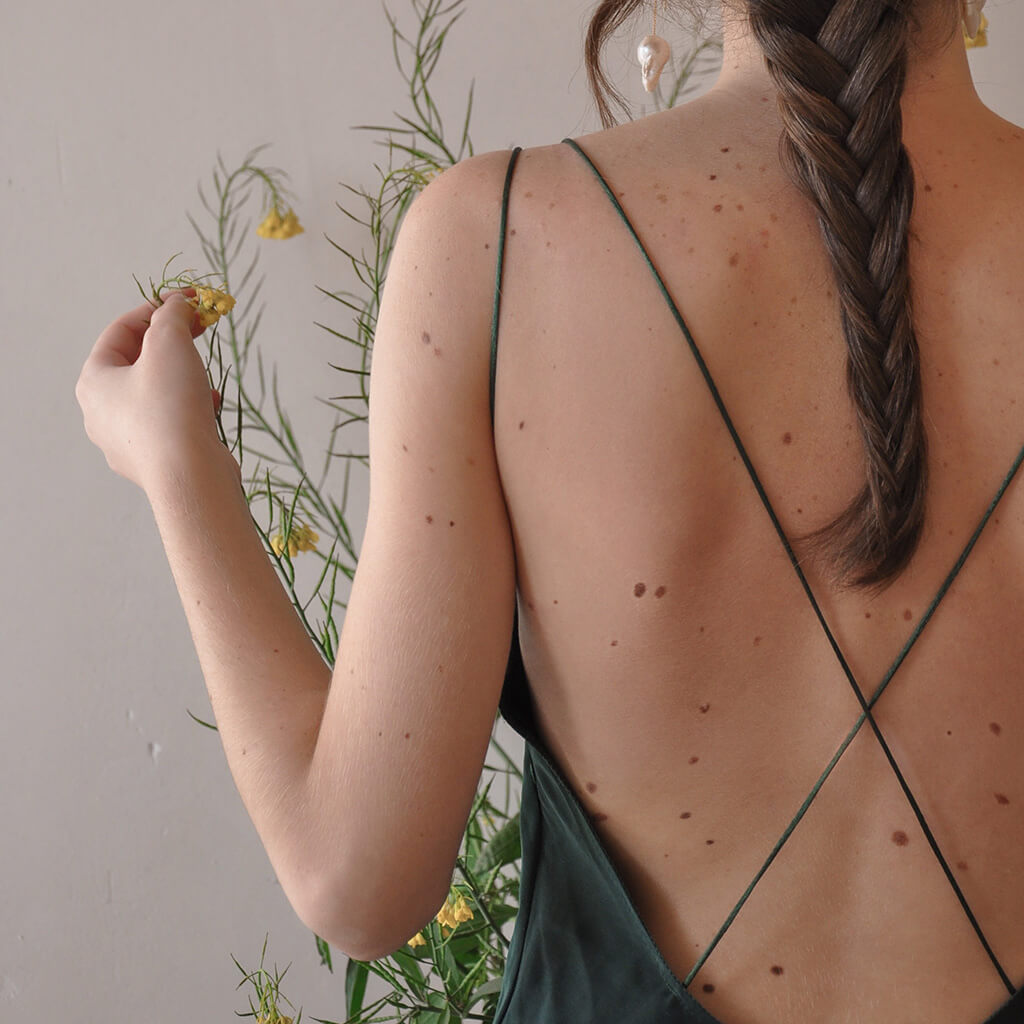
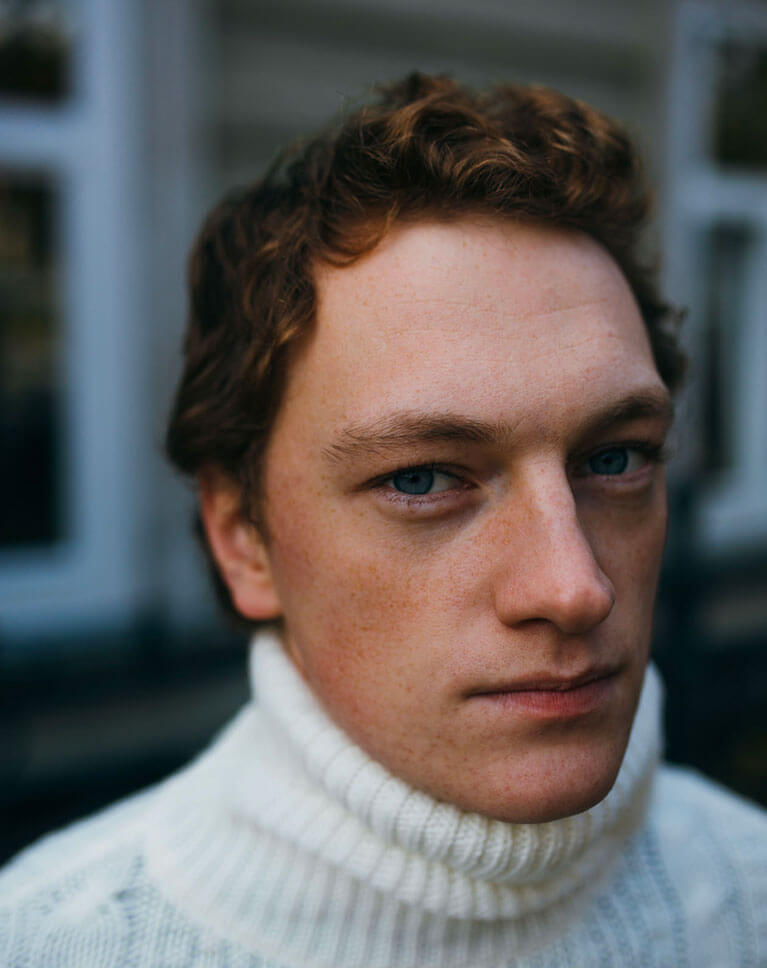
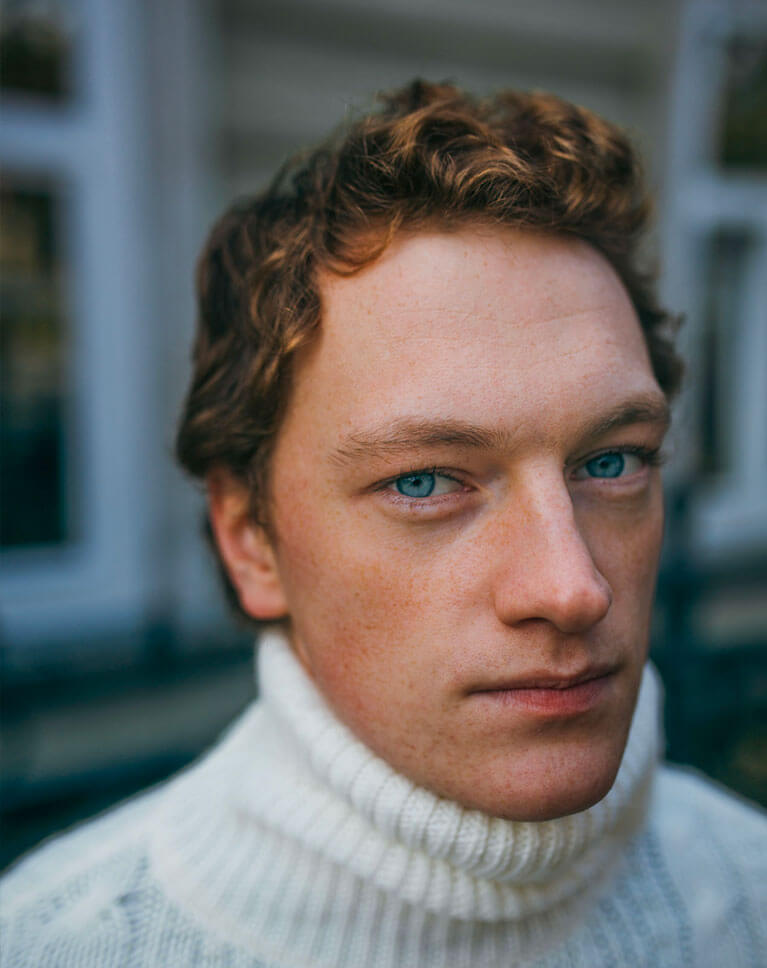
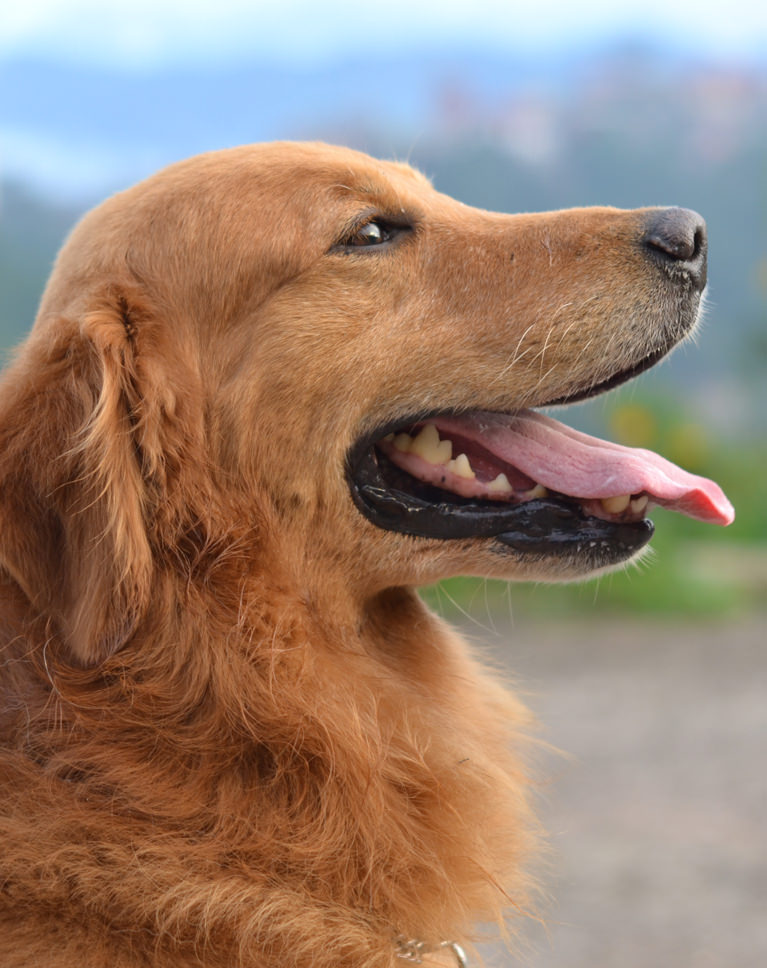
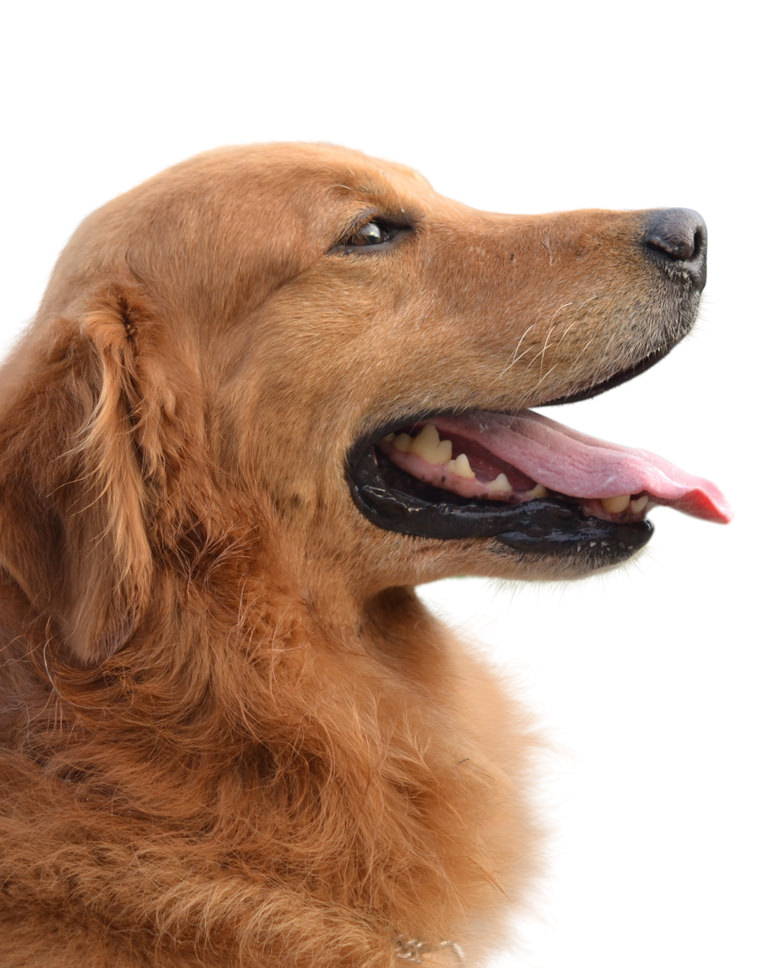
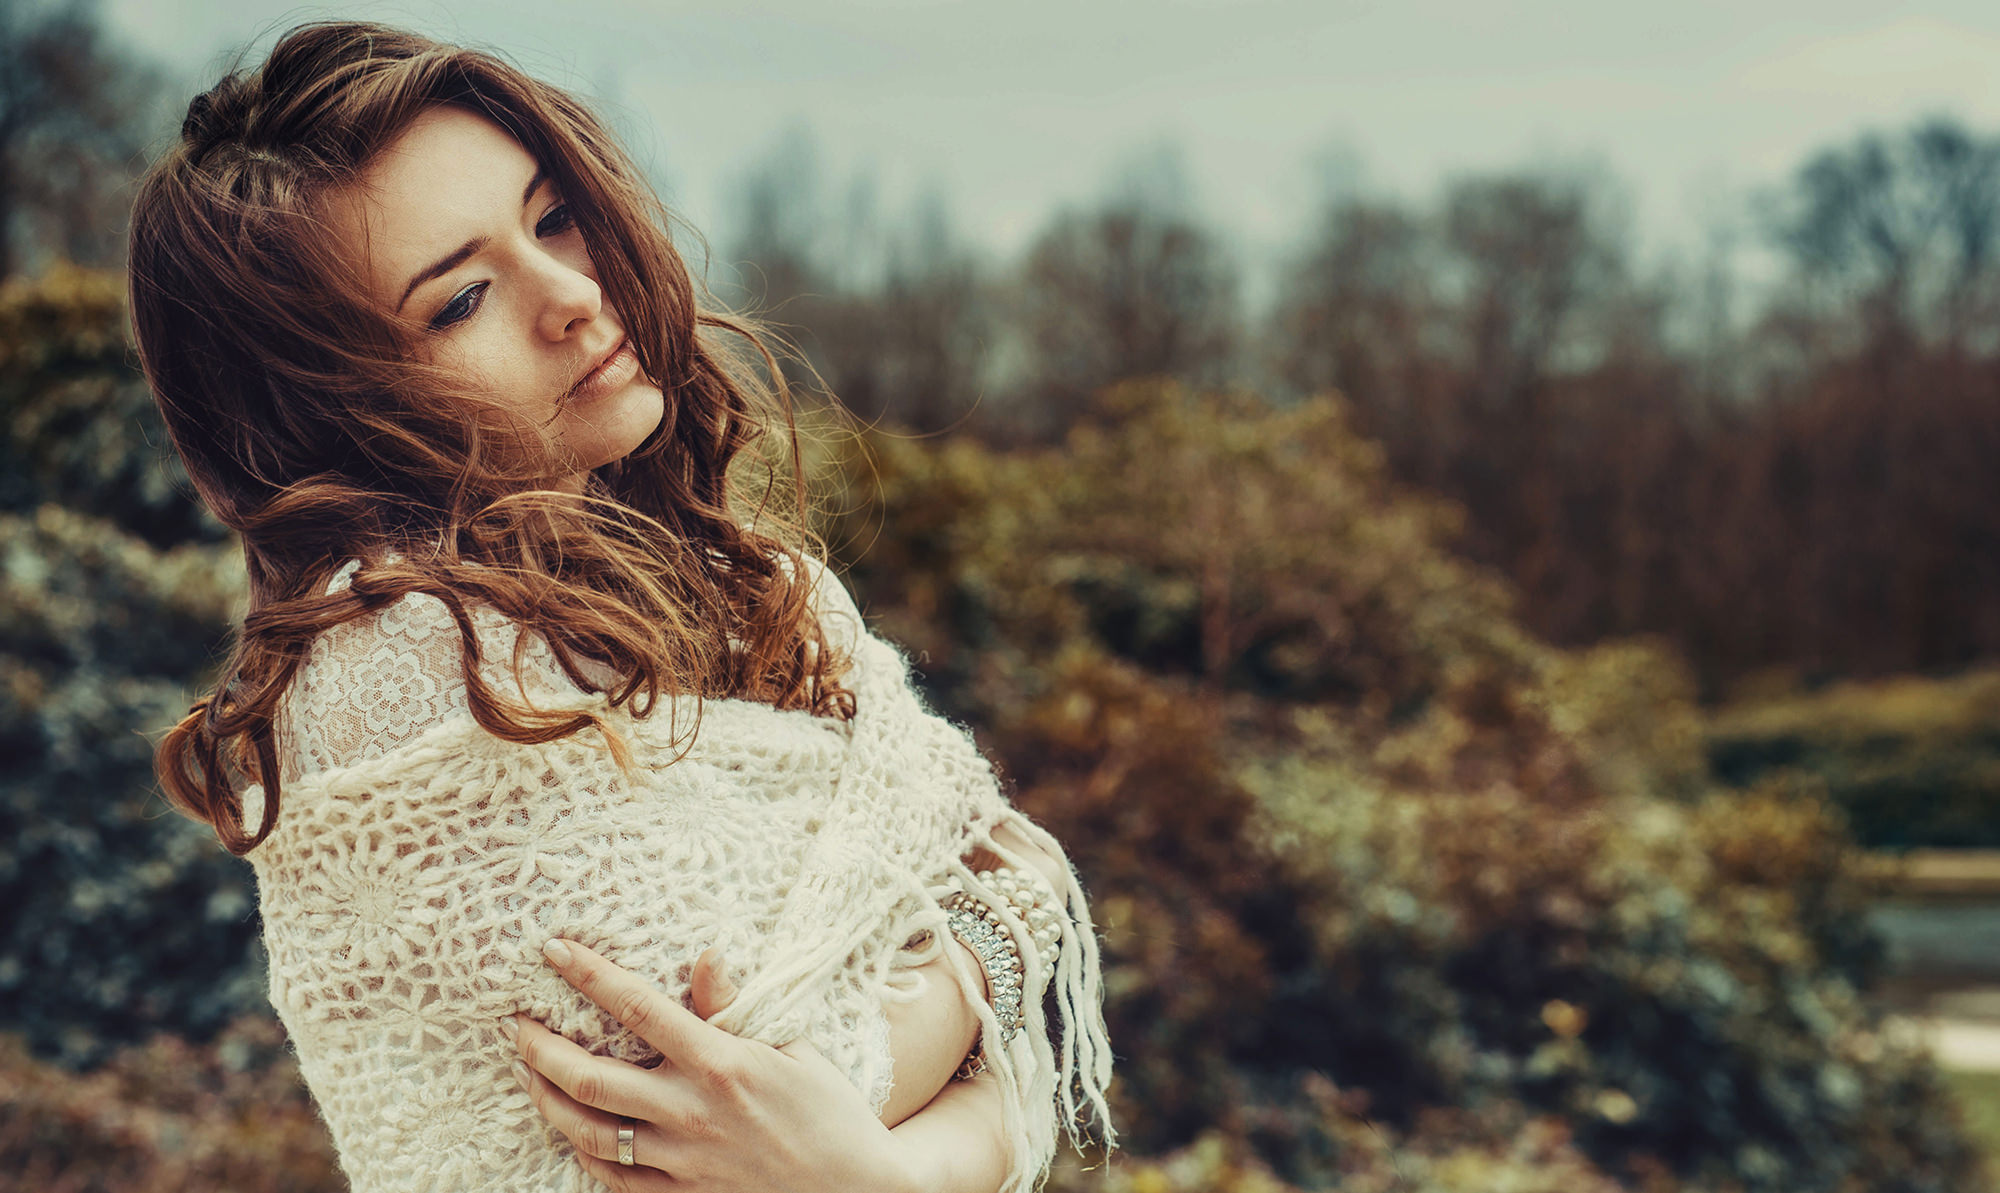
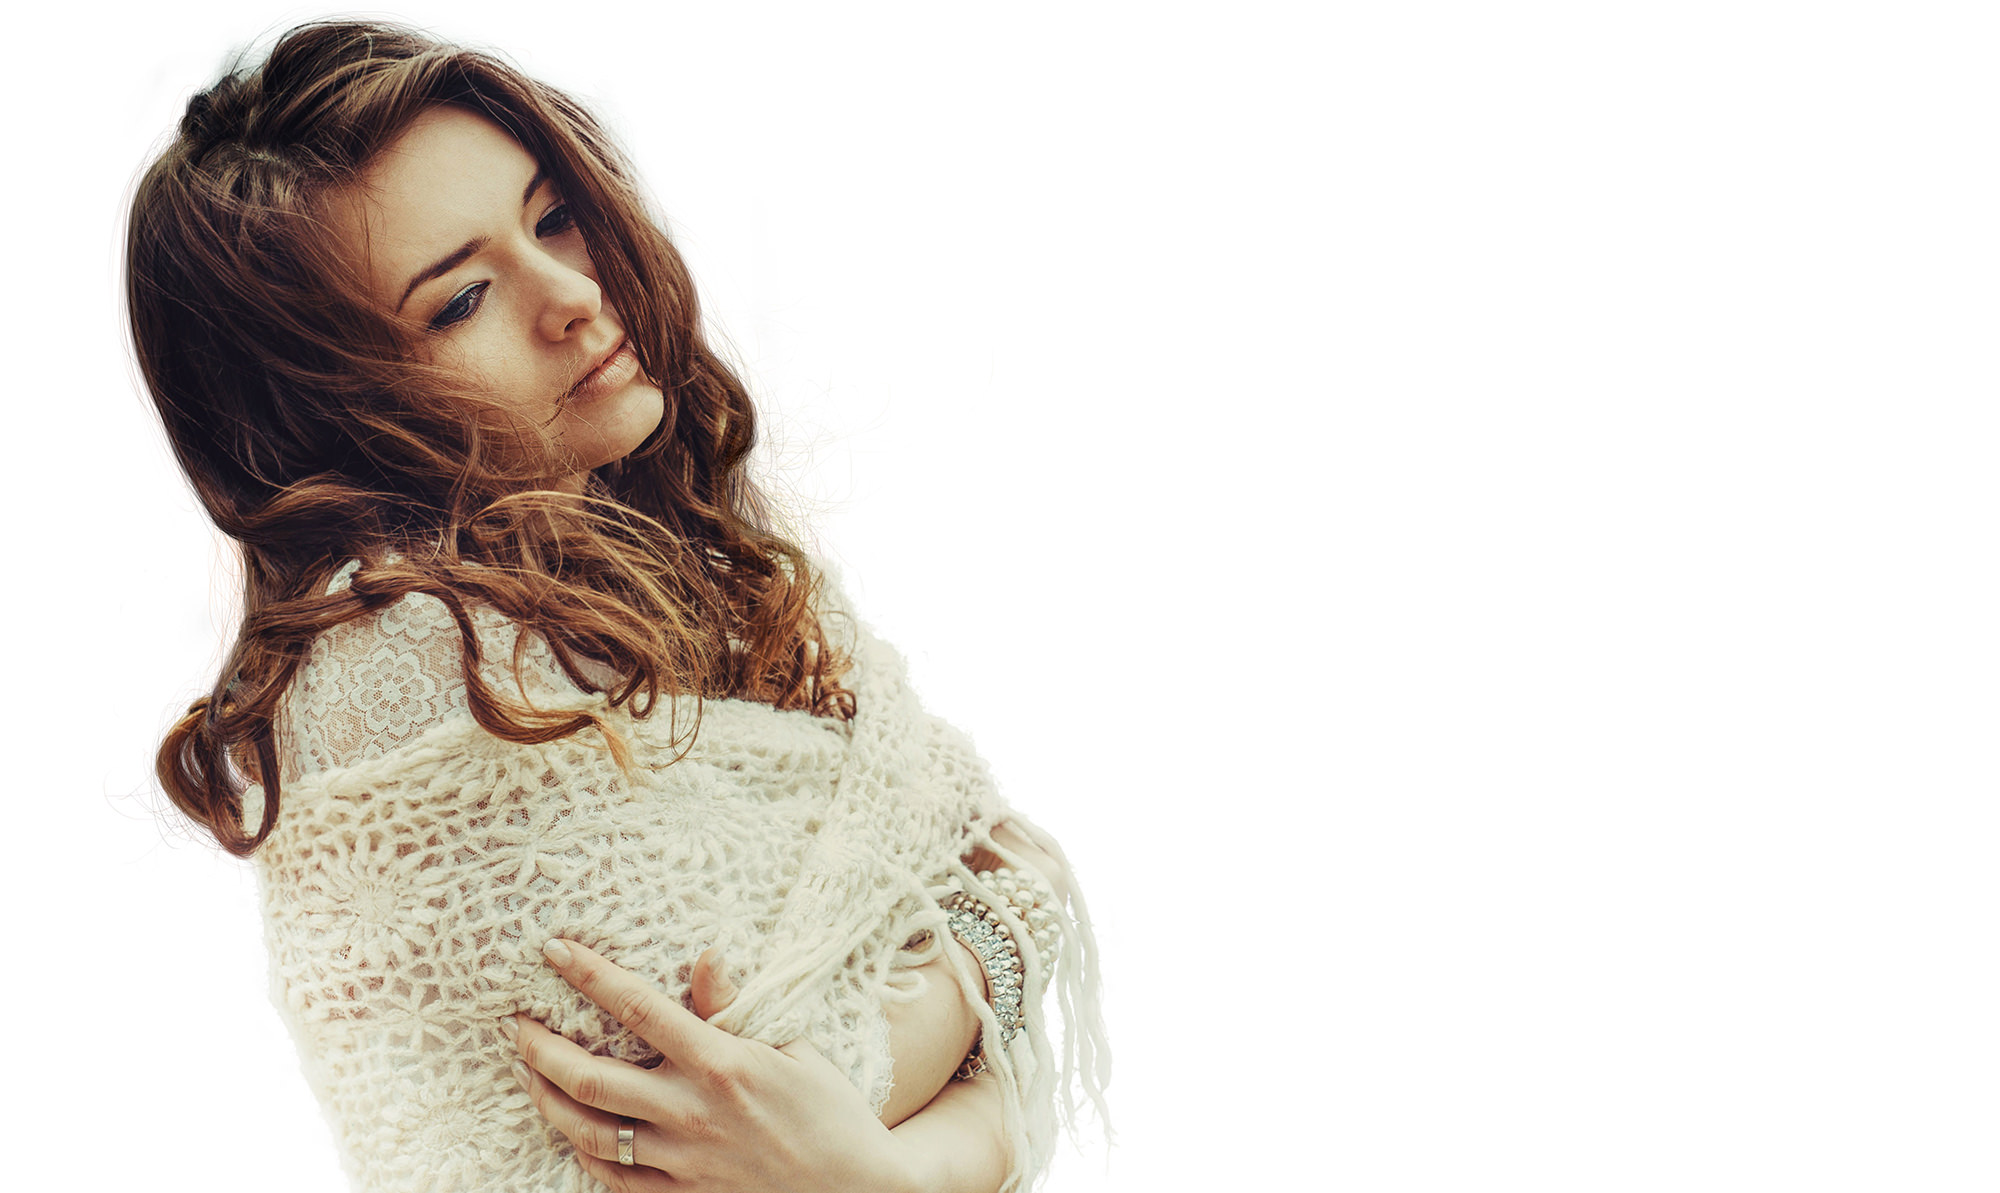
AFTER
BEFORE
Flawless Skin Tones in Minutes
Having perfect skin tones in your portraits can make a world of difference. Redness, especially around the nose, cheeks, and near the eyes, is a common issue that can detract from a natural look. With this technique, you can effectively reduce redness in your portraits using Hue/Saturation Adjustment Layers, achieving natural-looking skin tones and elevating your final image!
Adjusting Red Tones
1. To add a Hue/Saturation Adjustment Layer, navigate to “Layer” > “New Adjustment Layer” > “Hue/Saturation.” This creates a layer specifically targeting color adjustments.
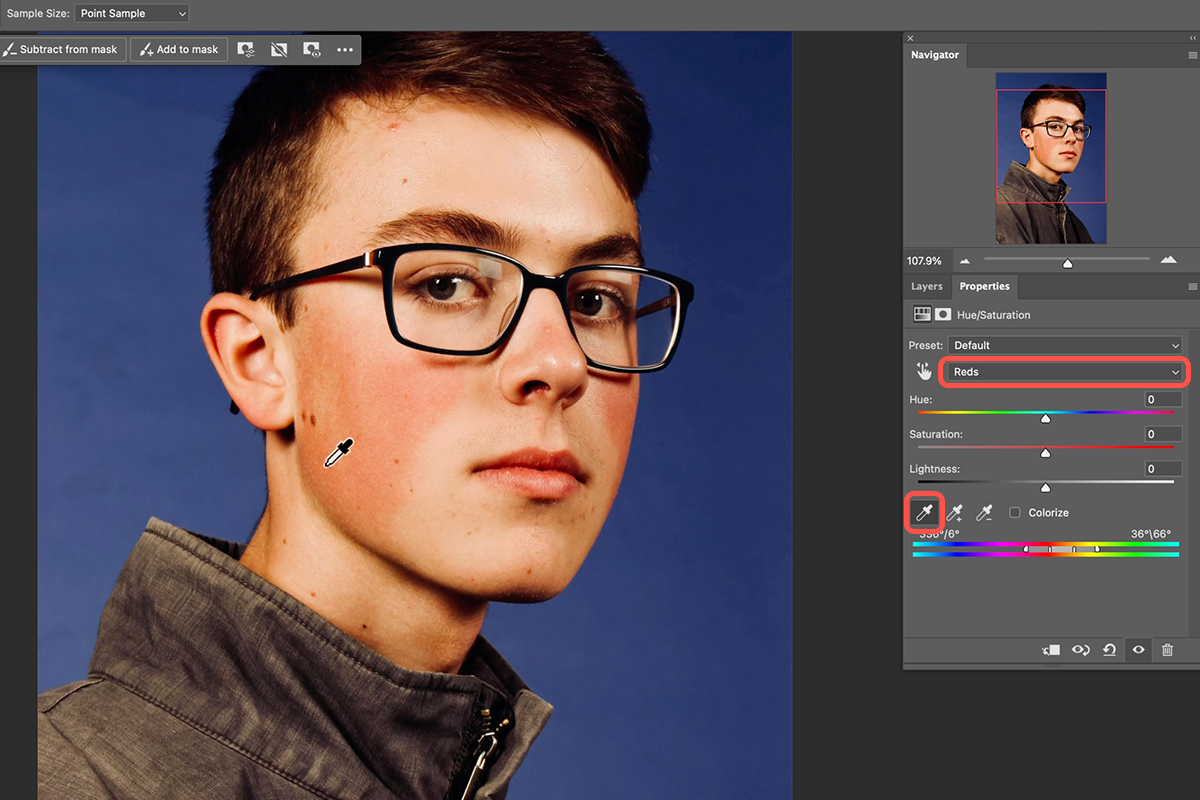
2. In the “Hue/Saturation” panel, click the dropdown menu next to “Master” and choose “Reds” to isolate the red tones you want to modify.
3. Use the eyedropper tool to click on a red area of your subject’s skin. This sets the reference point for the color adjustment.
4. Drag the “Hue” slider to the right. This will shift the red tones towards a more neutral color, effectively reducing the redness.
5. For more precise control, adjust the slider at the bottom of the panel. Moving it to the left narrows the range of reds affected by the adjustment.
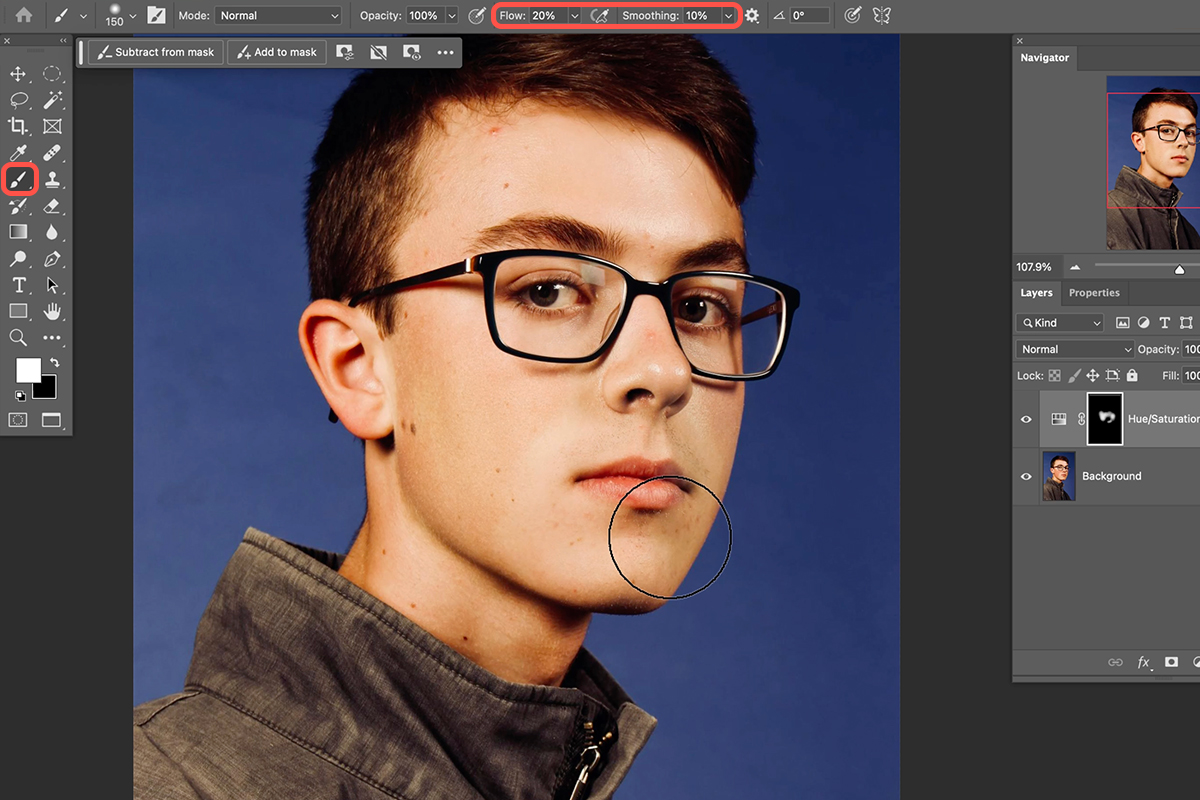
Refine the Adjustments with a Layer Mask
Now it’s time to refine the adjustments in the Layer Mask.
6. To invert the Layer Mask, click the layer mask thumbnail next to the “Hue/Saturation” layer. Press “Ctrl/Command + I” to invert the mask, hiding the adjustment effect entirely.
7. To paint back the effect, select the Brush Tool (B) and ensure white is your foreground color. Carefully brush over areas where you want to reduce redness, revealing the adjustment effect. Remember to set your brush’s flow to 20% and smoothing to 10%.
Adapting to Different Tones
This technique can be applied to various portraits with varying degrees of redness. Adjust the Hue, Saturation, and Lightness sliders based on the specific image to achieve a natural-looking reduction in redness.
For minor skin imperfections like red spots, use the Spot Healing Brush Tool (J). Sample a clear area of skin and click on the blemish to remove it.
With these simple steps and a little practice, you’ve unlocked the power to banish redness in Photoshop. Now you can take your portraits to the next level, revealing the natural beauty and flawless skin tones hiding beneath. Remember to practice and adjust the technique based on the specific photo you’re working on.
Download Sample Image & PSD
description
Take advantage of the brand new artificial intelligence masks located within Photoshop. Learn the proper workflow using Smart Objects in order to maintain maximum control over your image to create beautiful looking photos every single time.
Artist Credit
Special Thanks to the following artist for uploading their images and making them available for free for everyone to use.
Share
AFTER
BEFORE
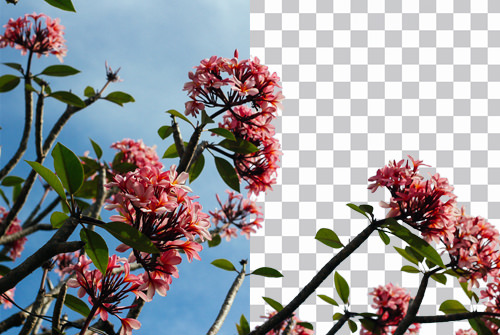
Masking Has Never Been Easier
Just updated for the end of 2022, we now have the ability to access artificial intelligence masks within Photoshop. These masks are located within the Adobe camera raw filter in Photoshop and are easily accessed through the filter menu.
For maximum flexibility in your workflow, it is recommended to first create a smart object out of your layer in which you would like to apply these new masks. To do this simply right click on the layer and select convert to Smart Object. Next, go to your filter dialogue and select Camera Raw Filter. Within the camera raw filter you are now able to access the new artificial intelligence masking, simply click on the masks feature and select whether you would like to cut out your subject the background or select individual people within the image.
When selecting new people in your images, Photoshop artificial intelligence also allows you to select certain areas of a person’s body-for instance just their hair or their skin or even the pupils of their eyes.
These new tools allow extensive control over masking and help to create dramatic changes in your images without focusing on the overly technical aspects of creating the masks.
In this example, we will show you how to select out the person’s pupils and add more contrast as well as saturation to make them appear more dramatic. You will also learn how to select this person’s clothing by first selecting the person as a whole and then subtracting out different features to leave their clothing as the only thing being selected. then once the clothing is selected we bring up the shadow levels and add a little bit of saturation to bring detail that wasn’t previously visible in the photo.
Follow along with the included sample image and PSD file available for download on this tutorial page.
How to Remove Redness from Skin in Photoshop
-

-
Add to
favorites
-
DifficultyMedium
-
Length1.5 hours
-
Videos6
-
Software
Description
The new artificial intelligence masks in Lightroom are the most powerful update to come to Lightroom classic ever. Learn to get the most out of these fantastic new tools to help create stunning images.
THIS COURSE INCLUDES
- 8 Sample Images
Share
Table of Contents
Course Downloads
More Power than Ever
IMPROVE SUBJECT & BACKGROUND
ORIGINAL
Create Enhanced Selections
The new artificial intelligence masks in Adobe Lightroom Classic allow you to select people easier than ever. You can even select certain parts of a person such as their eyes, skin, or hair for more advanced masking and editing capabilities.
Edit All Images in a Series
Oftentimes photographers will shoot a series of images with the same subject and when it comes time to edit those photos it can be a pain to edit each one of them individually. With Lightroom Classic’s new artificial intelligence masks you can make selections to your subject and enhance your photo and then instantly apply those changes across the entire series of photos saving a ton of time and creating better results.
Edit the Subject and Background Separately
Learn to edit your subject and the background independently of one another which will add a ton of control to the editing process. oftentimes the subject will be just a little bit too dark but the background will be properly disposed, use the new artificial intelligence masking tools to select just your subject and enhance their exposure bringing overall corrections to your photo.
FREQUENCY SEPARATION RETOUCHING
ORIGINAL
Color and Exposure Correction
Learn to color correct exposure correct and even color tone your photos. using a combination of masking your subject or background as well as luminance ranges oh, you can Target either highlights or shadows and correct those individually. then bring everything together in terms of color and light with color toning to create stunning artistic looks.
Follow Along from Start to Finish
Follow along as we go through different examples showing you how to get the most out of Lightroom masks and create stunning images in the process. You’ll learn an introduction to how masking works in Lightroom, how to add subtract and intersect masks for more control, and how to apply these changes to multiple images into a series.
Learn Advanced Masking

DRAW MORE ATTENTION TO YOUR SUBJECT
ORIGINAL
IMPROVE SUBJECT & BACKGROUND
ORIGINAL
Create Beautiful Color Toning
With the ability to isolate your background from your subject you can apply stunning color transformations to your images while choosing just the areas you would like to select. You learn how to create a background with cool science and the foreground with nice warm colors for stunning color combinations that will give your image an artistic feel.
Add, Subtract and Intersect Masks for More Control
The new masking Tools in Lightroom Classic allow you to add subtract or intersect different masks together – this will let you create more advanced selection than ever before. For instance if you want to create a vignette on your background but not include your subject you can simply start by creating a radial gradient and then subtract out your subject with just a couple of clicks.
IMPROVE SUBJECT & BACKGROUND
ORIGINAL
Create Better Edits – Faster
The new masking Tools in Lightroom Classic allow you to create better edits faster by selecting out your subject or background in making individual edits on them. The more powerful Lightroom becomes, the less you have to move into other programs like Photoshop to create stunning versions of your photos.
Follow Along with the Included Sample Images
Download and follow along with every tutorial step by step so you can get the most out of Lightroom classic and then apply these fantastic skills to your photos with ease.

Aaron Nace
PHLEARN Founder – Class Instructor
Aaron Nace is a photographer, Photoshop artist and founder of PHLEARN. He is the #1 Photoshop instructor in the world with millions of YouTube subscribers.
Reviews
Download Assets
description
Learn to remove any marks on skin while retaining all skin texture! This can be helpful for blemishes, clothing marks, cuts, bruises and more.
Download the included Frequency Separation Photoshop Action to make retouching easier than ever!
Artist Credit
Photo by Sunsetoned on Pexels
Share
AFTER
BEFORE
How to Remove Redness from Skin in Photoshop
-
-
Add to
favorites
-
DifficultyAdvanced
-
Length1.25 hours
-
Videos6
-
Software
Description
Learn to use the new advanced masking tools in Lightroom Classic to bring your photos to life! Select your subject, sky, light range and color range to edit specific parts of your images.
Is your subject too dark? Now you can target a person a lighten them, while leaving the background alone. Is the sky overexposed? Edit just the sky to bring back color and detail. The possibilities are endless.
THIS COURSE INCLUDES
- 5 Sample Images
Share
Table of Contents
Course Downloads
LEARN COLOR CORRECTION
ORIGINAL
Color Correction
Learn to target specific colors and adjust them to better suit your images. This can be used to correct skin tones, color casts or even to completely change the color of objects.
Combine & Conqueror
Add, subtract and intersect the new masking tool in Lightroom Classic to enhance selections and edit specific areas of your images. For instance, you can select your subject, then just the skin of the person and then color correct their skin without effecting any other areas of your image.
Follow Along
Use the included sample images to follow along with the tutorial and then practice on your own images once you have mastered the techniques.
ADD DETAIL TO SKIES
ORIGINAL
Fix Blown Out Skies
Use “Select Sky” to get an accurate mask of just the sky in your images and then add more detail by adjusting the color and the exposure. For more control, bring it into Photoshop and replace the sky!
Edit the Subject & Background Separately
One of the advantages of the new masking tools is that you can target either your subject or your background and work on them individually. This allows you to create stunning images and draw more attention to your subject.
Non Destructive Editing
Did you know that any changes you make in Lightroom Classic can be undone at any time? Feel free to try new things and make creative edits without worrying about messing up your original image.
Add Interest & Drama
Add Color and Style
In this image, we show you how to add more color to the background, and then color-correct the subject to match!
EDIT SUBJECT AND BACKGROUND SEPARATELY
ORIGINAL
Correct Exposure & Color
It can be difficult to expose an image perfectly for both the subject and the background, but now that is an issue of the past. Learn to target just your subject and expose them perfectly while retaining detail in the background.
Small Details Come to Life
Use the brush selection tool to paint over specific areas of your images and adjust exposure and color. In this example, we lighten the exposure of the eyes using natural selections.
Layer Masks
You can think of these new masking features in Lightroom as you would Layer Masks in Photoshop. Create as many as you want and alter them at any time for an unlimited array of photo editing power.
CORRECT EXPOSURE
ORIGINAL
Correct Distortion
Learn to correct distortion that can result from shooting with a wide-angle lens. The will make your subjects look more natural and flattering.
Add Detail to Highlights & Shadows
Don’t let your shadows get too dark or the highlights too light. Learn to target light ranges and adjust them to bring back exposure and create a more balanced image.
Easier than Ever
These new tools make editing your photos faster and easier, and in a lot of cases you won’t have to take them into Photoshop at all. Lightroom Classic is more powerful than ever!
Aaron Nace
PHLEARN Founder – Class Instructor
Aaron Nace is a photographer, Photoshop artist and founder of PHLEARN. He is the #1 Photoshop instructor in the world with millions of YouTube subscribers.
Reviews
-
Really useful, time saving techniques and great instructions! Thank you!
-
Super clear and useful as always!!
-
I learned so much what a good teacher you are thank you so much I feel so much more comfortable with lightroom
-
Very good tutorial! I wish you would do more tutorials related to new features in LRC and photoshop. I had actually decided to not renew my subscription, because I found more interesting tutorials on YouTube and other subscription offers, but with this tutorial I think and hope you might start catching up a bit. Let’s wait and see.
-
Great videos. Aaron simplified the masking process. Will have to watch again. Would have been nice to see a landscape photo worked on. Good job!
-
Outstanding! I had already played with some of the new masking techniques but was not aware how well the masking works with other masks. Also, I had been wondering how to add when in subtract mode. It was so easy that I missed it. I had always used the [alt] key to subtract but never to add. I had been trying to use the [shift] key unsuccessfully. Thank you.
-
This tutorial was excellent and the techniques are very useful to all photographers. Well done, as usual!
-
Could it be that you missed “Auto Mask”, because this helps a lot?
-
Love the new masking options! As always perfectly explained!!!
-
Great video series. I had used the masking tool in Lightroom, but only understood and used the basics. This coarse really helped me get a better understanding of all the tools available.
-
This explained everything so well. I’m so happy I took the time to watch and follow along with the sample images.
-
Superb course – exactly what I needed. I found the new masking in LR a bit confusing and after watching this and following along that is no more!
-
This is a fantastic course and a great way to start learning how to use LR masks. These masks are a game-changer, as far as I am concerned and Aaron’s come through with another fantastic course about a very relevant subject!!
-
Not able to watch the 5th one in the series. Keeps taking you back to the 2nd lesson.
-
To understand ” The New Lightroom “. For those who have used Lightroom earlier, this is the tutorials to do ! Thumbs up
-
This course is exactly what I want at this moment.
-
Thanks for a great tutorial. I was struggling a bit before watching the episodes but your examples and easy to follow instruction made these LR tools much more understandable
-
Thanks for the tutorial on this fairly new feature in Lightroom. I had been using the old style luminosity masking quite a lot but these new masks are so much more powerful, so much so that I can do most of my editing in Lightroom for many images. As always a super tutorial.
-
Great job as always!
-
Great stuff the images were a bit low quality though. But learn alot everyday from you
-
awesome as always, thank you for the to the point precise and perfectly explained mask tutorial.
-
Even though I’ve been using the masking features of LR I learned several new tricks from Aaron’s great tutorials which are always so easy to follow. He packs so much into every one of his amazing tutorials. I just love them.
-
Great tutorial! I really learned a tremendous amount about how to use the new LR masking.
-
Awesome stuff, helped me maneuver the subtract and intersect options into a new realm of possibilities!
-
Very interesting indeed. As always your courses are clear and helpful. Looking forward to see more videos.
-
Loved it 🙂 too bad the images’s quality are too low sometimes though.
-
Excellent job. It’s always interesting to learn new ways of doing things.
-
Really enjoyed this, thanks!

Download Sample Images
description
Learn how to add a beautiful shine to skin using the Brush Tool and Blend If in Photoshop!
Ready to learn more Photoshop? Check out The Beginner’s Guide to Photoshop and our comprehensive series of courses in our Photoshop Learning Path.
Share
GIVE SKIN A BEAUTIFUL GLOW


Download Sample Images
Download the Sample PSD
Click here to download the complete PSD file for this tutorial.
description
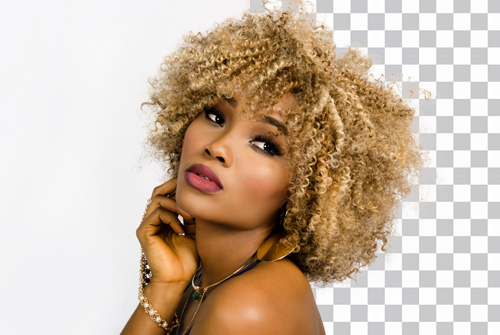
Learn how to make ultra-detailed selections of hair using Channels in Photoshop! Perfect cutouts, every time.
Share
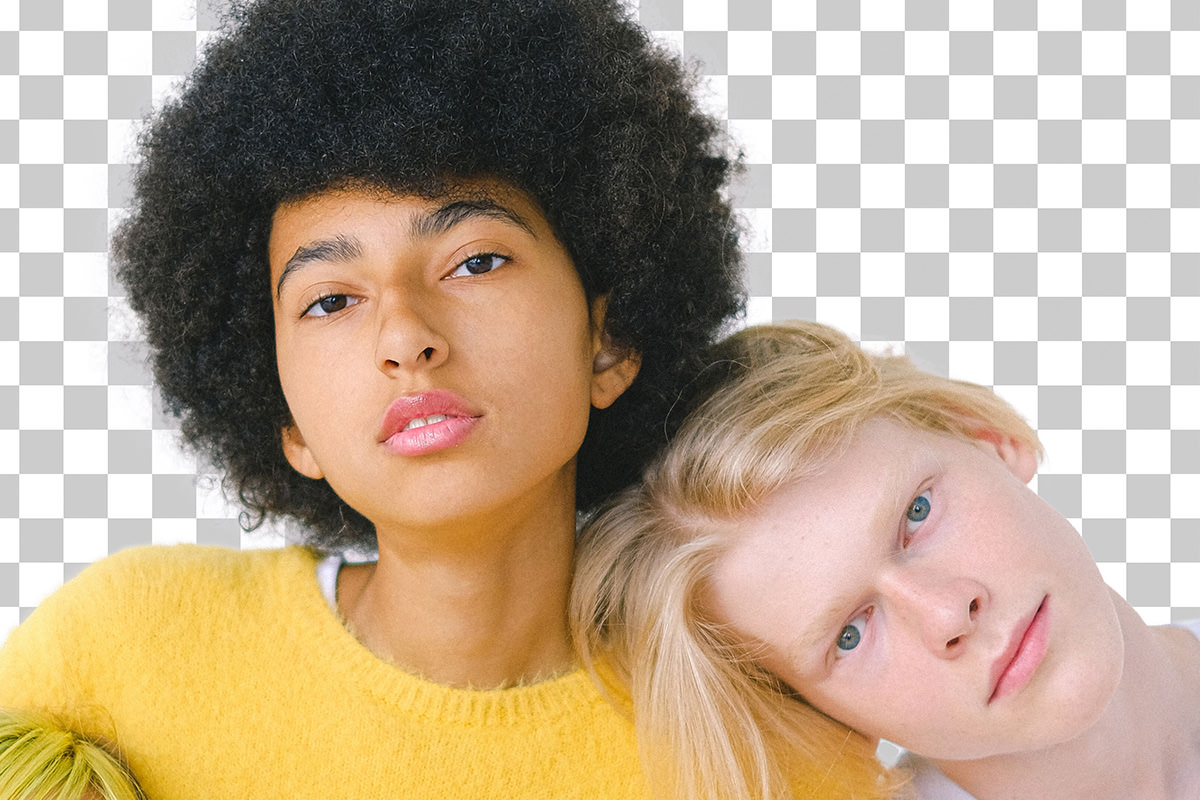
DETAILED SELECTIONS OF HAIR WITH CHANNELS
BEFORE
Quickly Cut Out Hair in Photoshop
The Challenge of Selecting Hair in Photoshop
Tools like the Pen Tool are great for making smooth, accurate selections of objects, products, and even parts of people like arms and hands.
Tools like Select Subject and the Magic Wand Tool are designed for speed, automating much of the process at the cost of losing a lot of the detail.
Let’s take a look at how an automated tool like Select Subject holds up when tasked with selecting multiple people in a portrait that has a lot of soft edges and fine details in their hair.
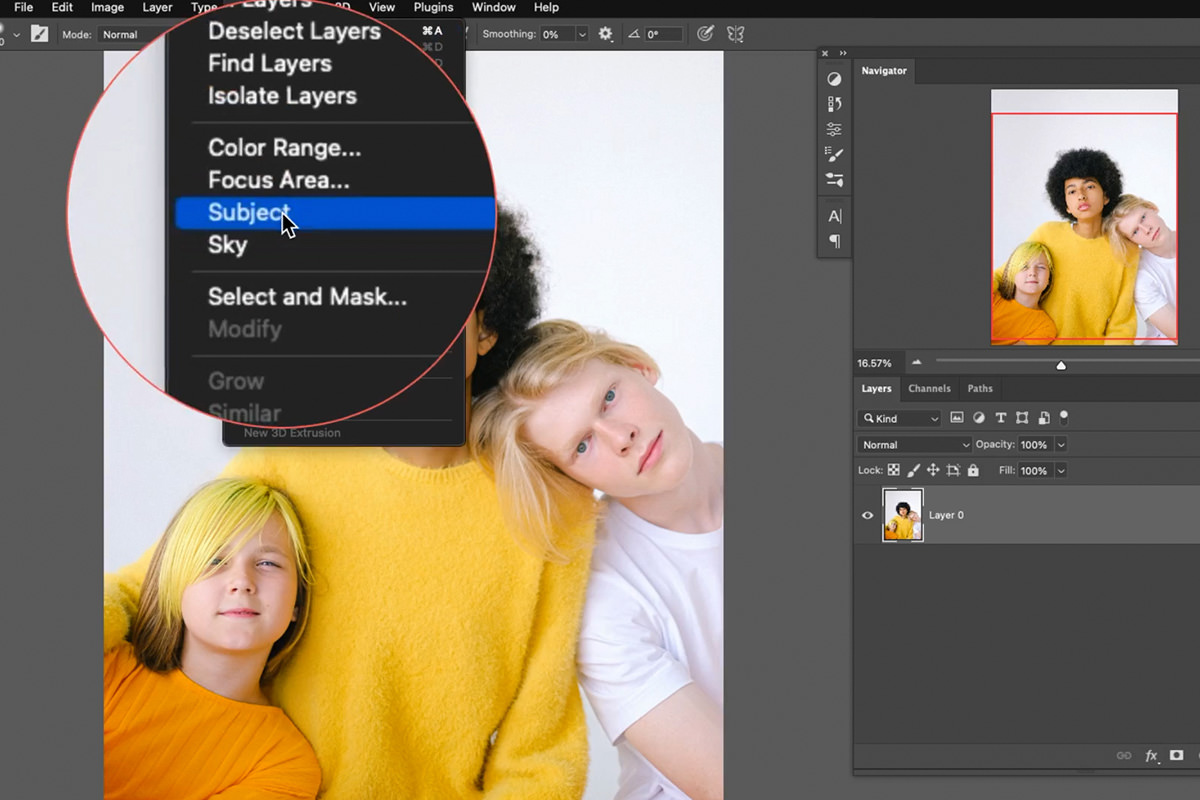
Open the Select menu and click on Subject.
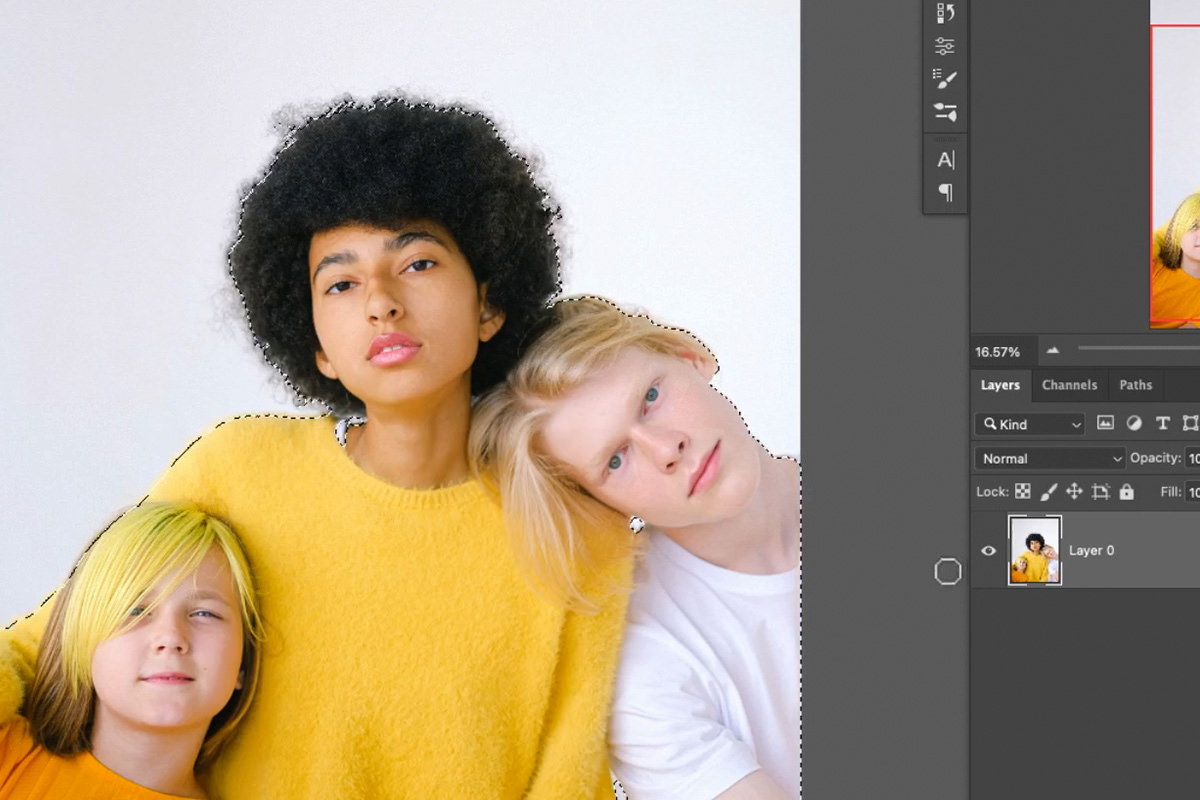
Photoshop will automatically try to identify, and make a selection around, what it determines to be the subjects in the photo. And overall, it does a pretty decent job.
But upon closer inspection, a lot of the finer details along the hair and softer edges are cut off. This result might be okay depending on what level of detail you need for the final image.
If you’re doing professional work, the more detail you can get, the more realistic and less Photoshop-ed the final result will look.
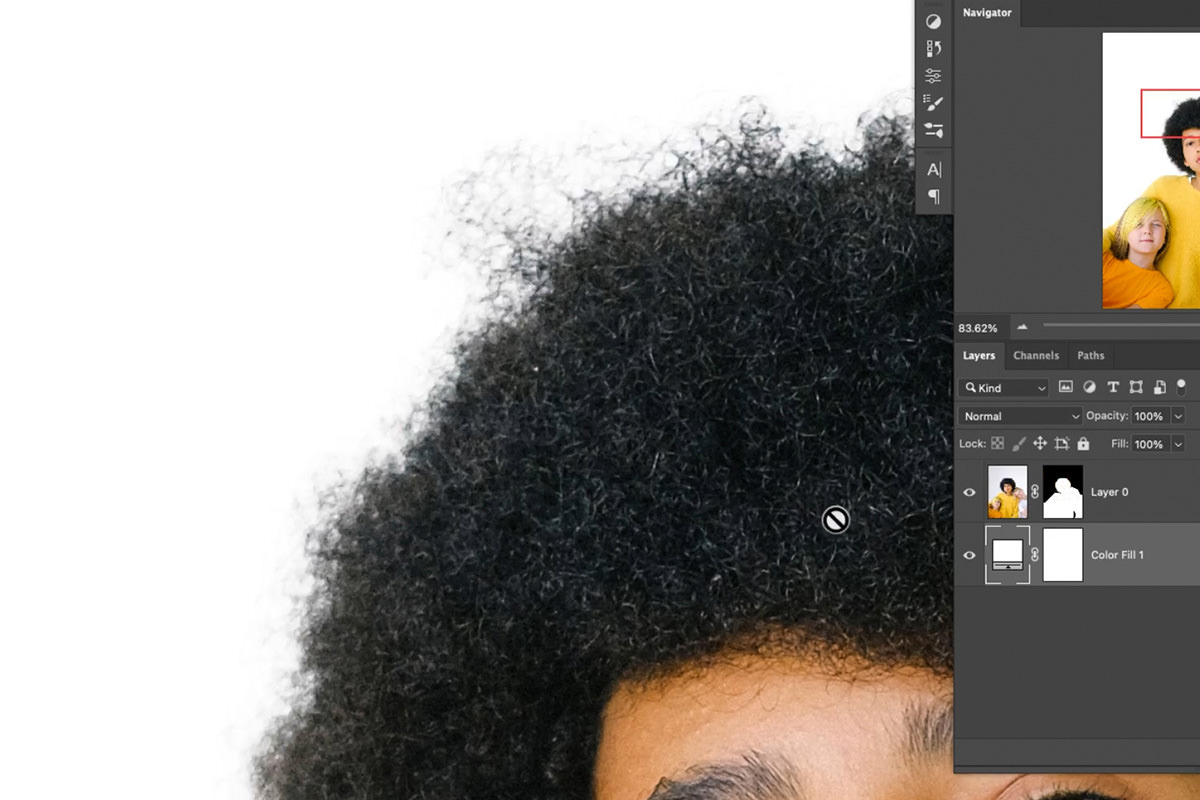
This is where Channels comes in!
Selecting Hair with Channels
To open the Channels panel, click on the Channels tab next to the Layers tab. Or you can open the Window menu, and select Channels.
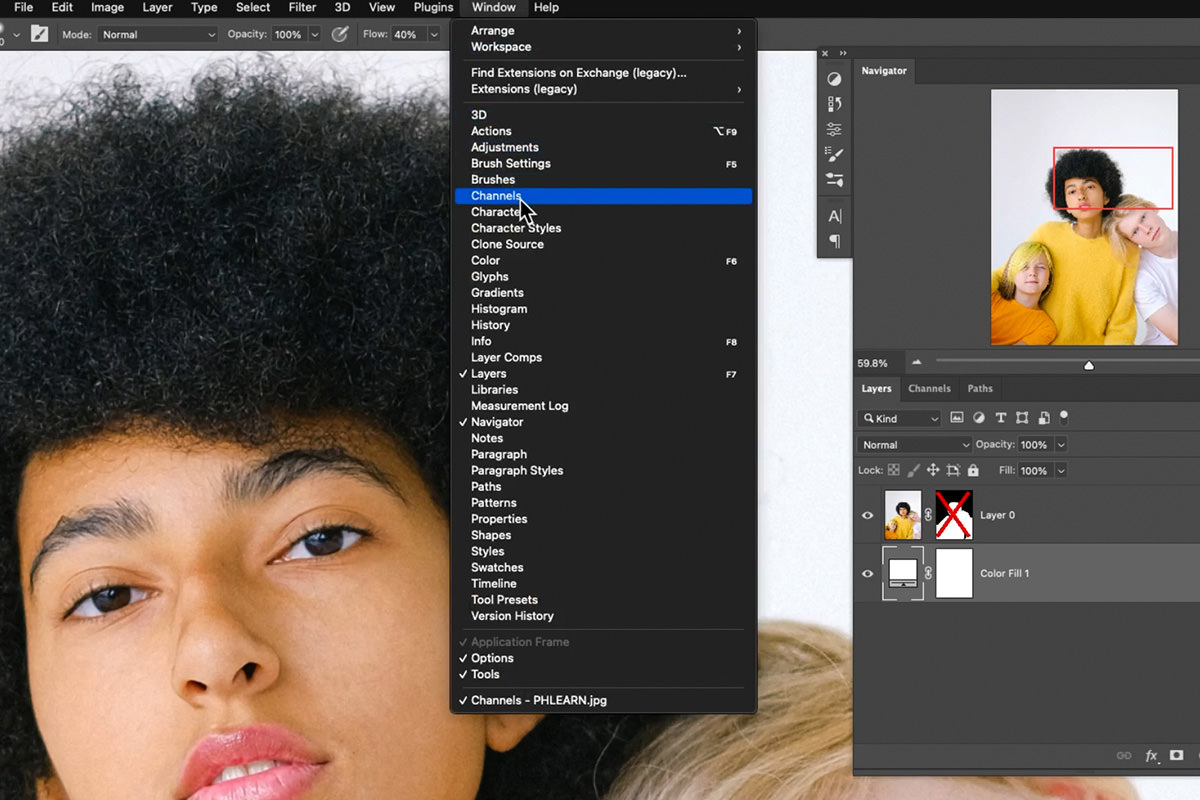
The Channels panel shows a break down the different color channels that make up the image. In this case (and as long as you’re working in RGB), those channels are red, green, and blue.
Using Channels to make selections is all about identifying the color channel that contains the most contrast–the lightest lights and the darkest darks.
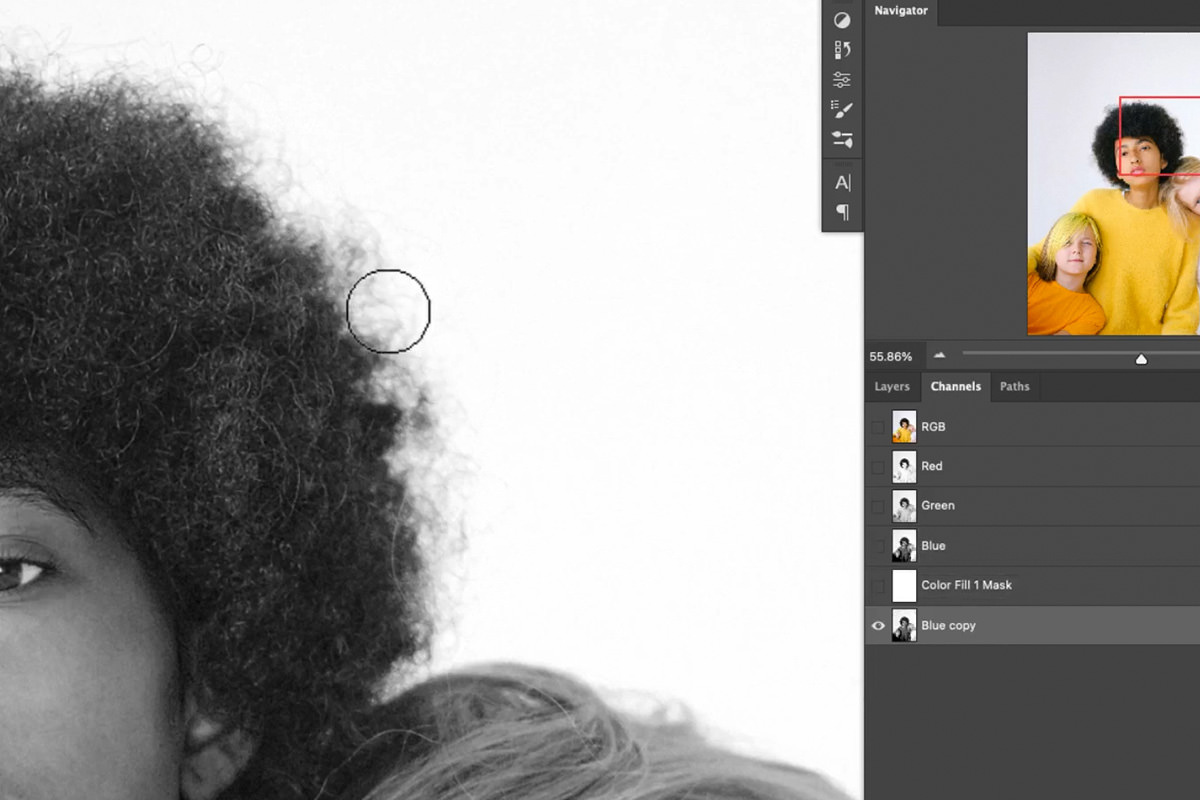
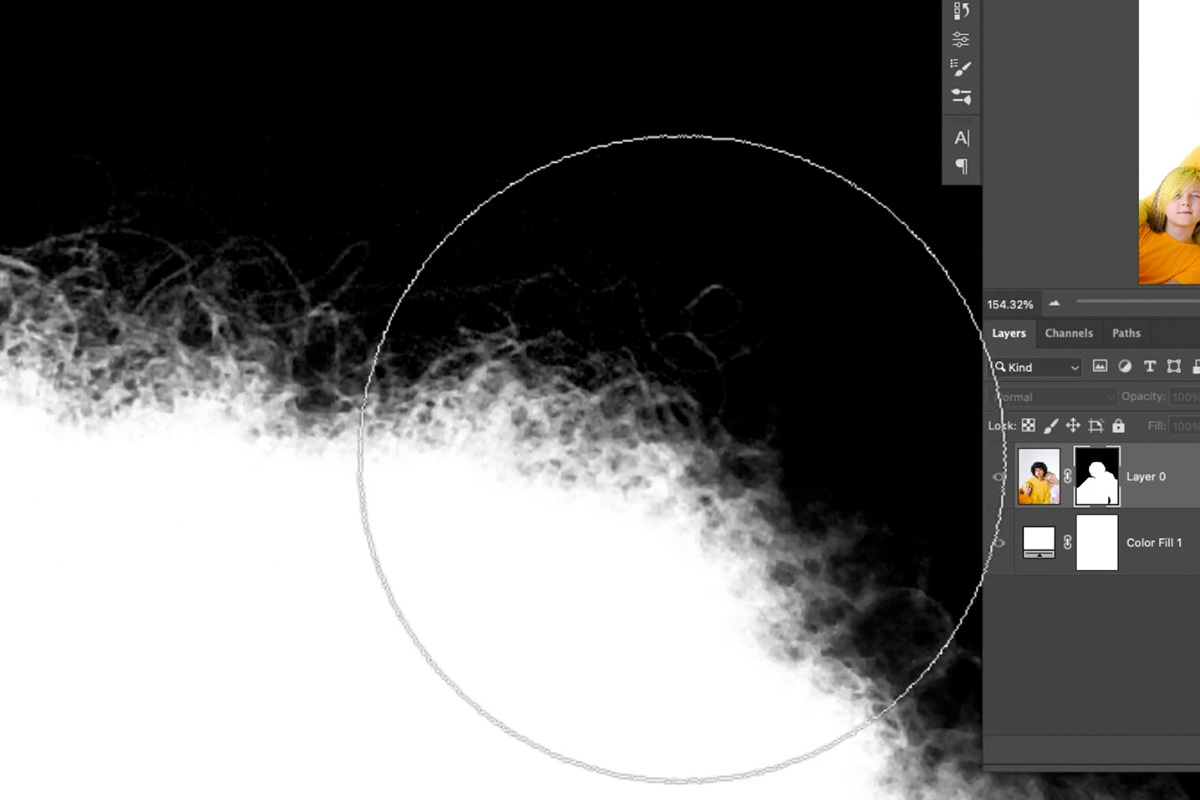
In our example image, the blue channel showed the most amount of contrast between the subjects and the background. Once you’ve identified the channel with the most contrast, duplicate it. (Making any changes to an original color channel can distort the colors in your project.)
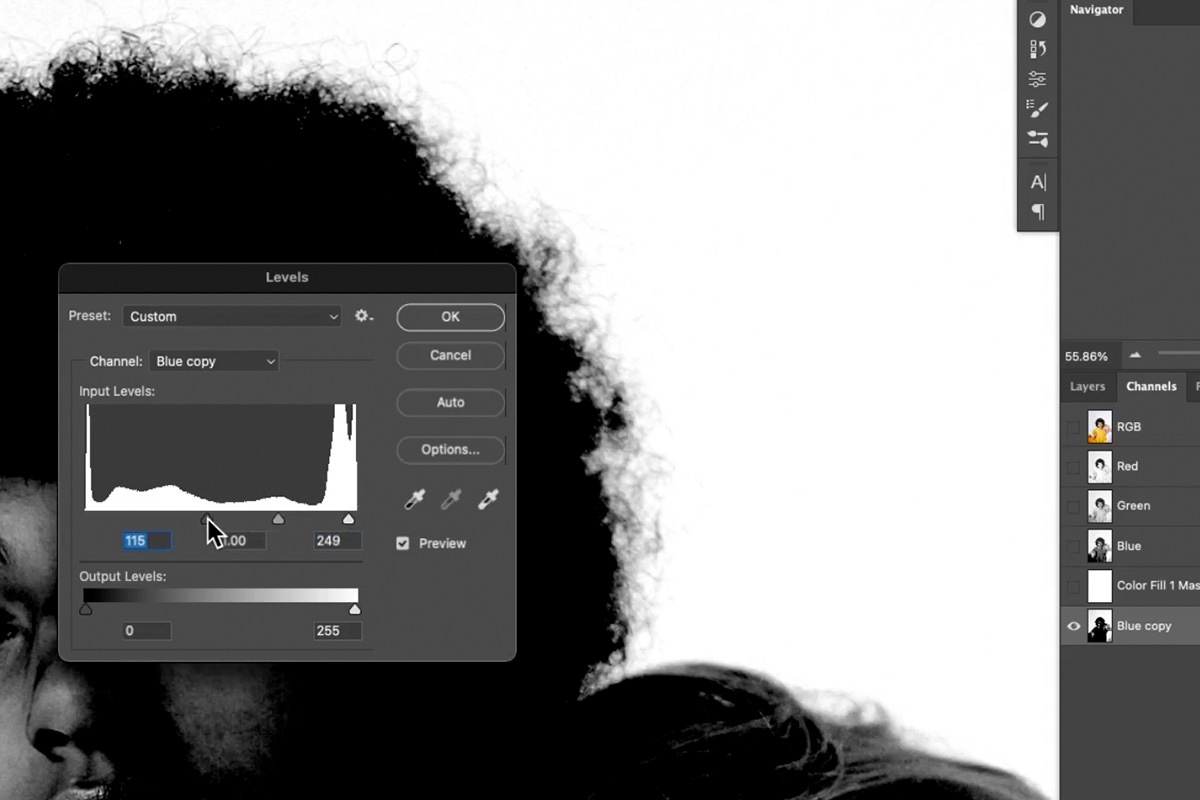
Once you’ve duplicated the blue channel, add a Levels Adjustment, moving the dark slider to the right and the light slider to the left to further exaggerate the amount of contrast.
Since masks use white and black to determine what is and isn’t selected, you’ll want each element to be as close to pure black or pure white as possible.
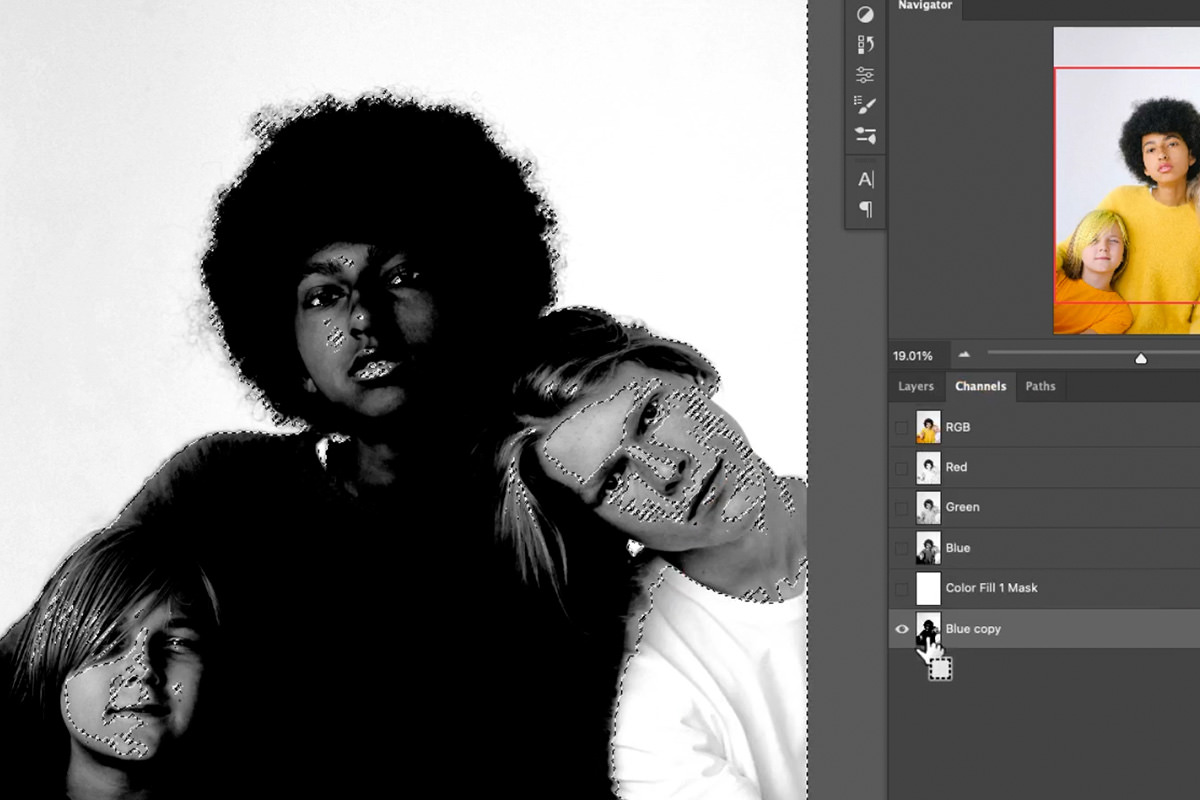
Once you’ve dialed up the contrast, hit CTRL or CMD and click on the copy of the blue channel. This will convert the channel into a selection.
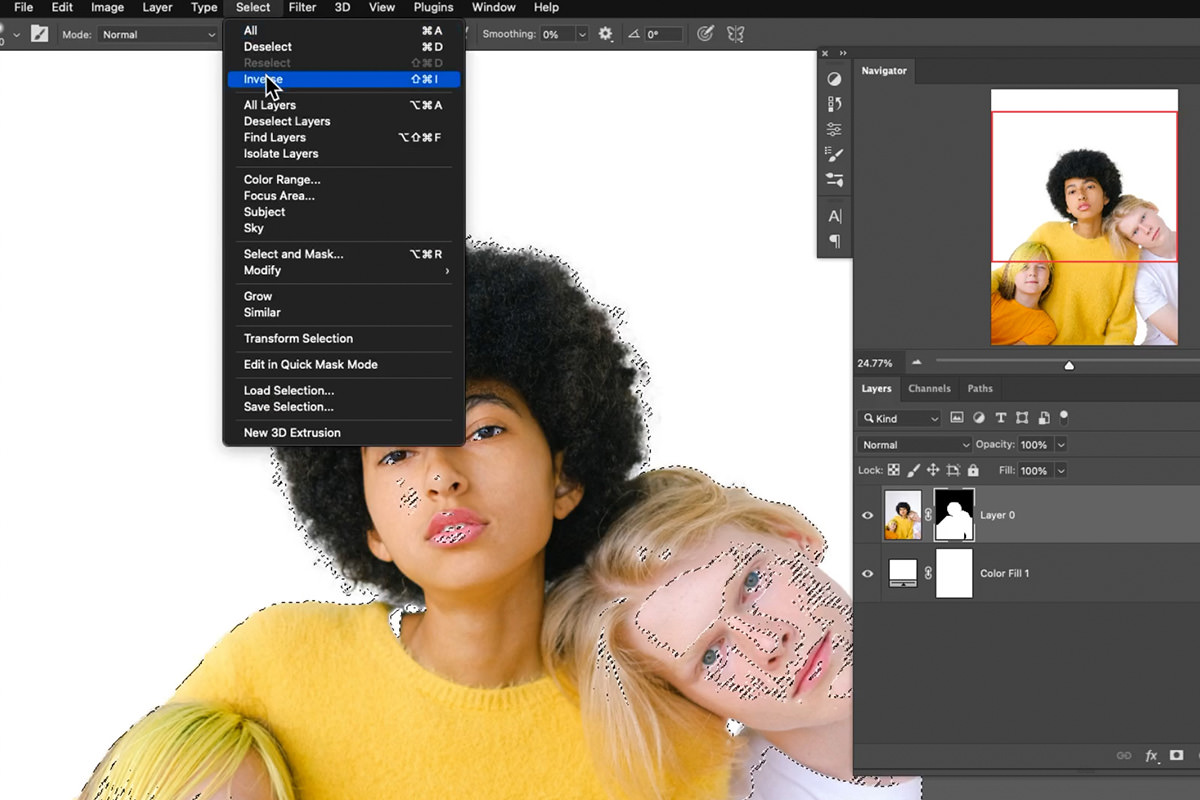
By default, Photoshop will select the lighter areas and not select the dark areas, so we’ll need to Inverse the selection in order to select the subjects.
Open the Select menu, and click on the Inverse option.
Now with the subject selected, click on the Layer Mask of the image, and paint with white along the edges of the subjects, paying close attention to the finer details in the hair.
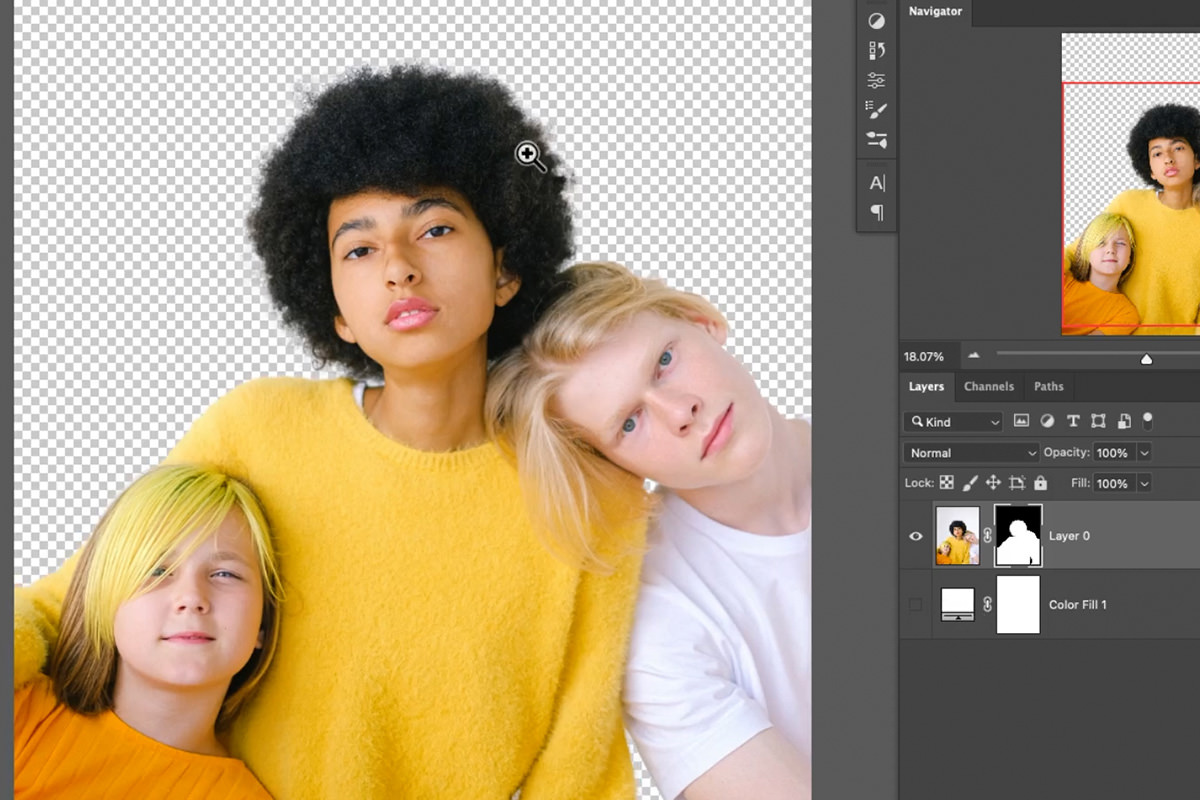
Once you’re finished, you should have an ultra-detailed selection with almost every strand of hair accounted for! Now you can place the subjects over a new background image or solid colored background.
Download Sample Images
Sample PSD
Download the sample PSD for this tutorial!
description
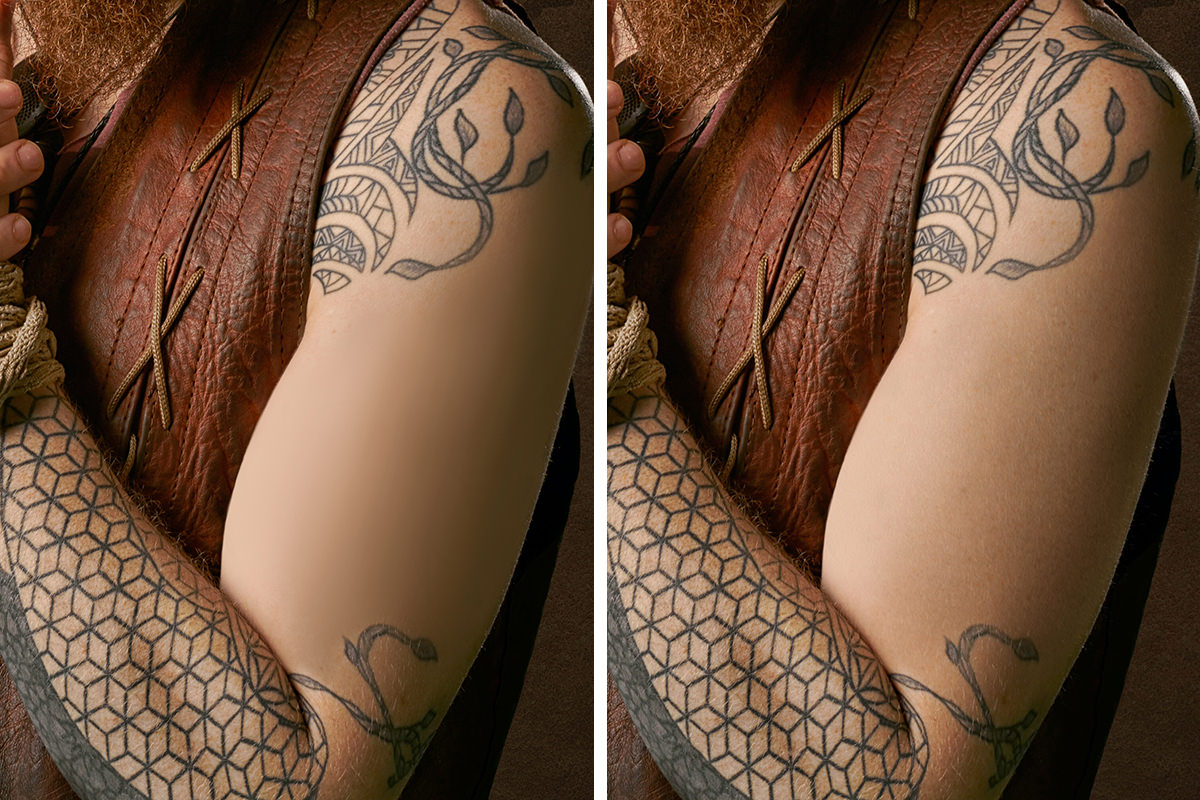
Skin is one of the most difficult things to work with in photo retouching. With so much fine detail and naturally-occurring texture, it might sound impossible that you can recreate it from scratch.
But it’s not!
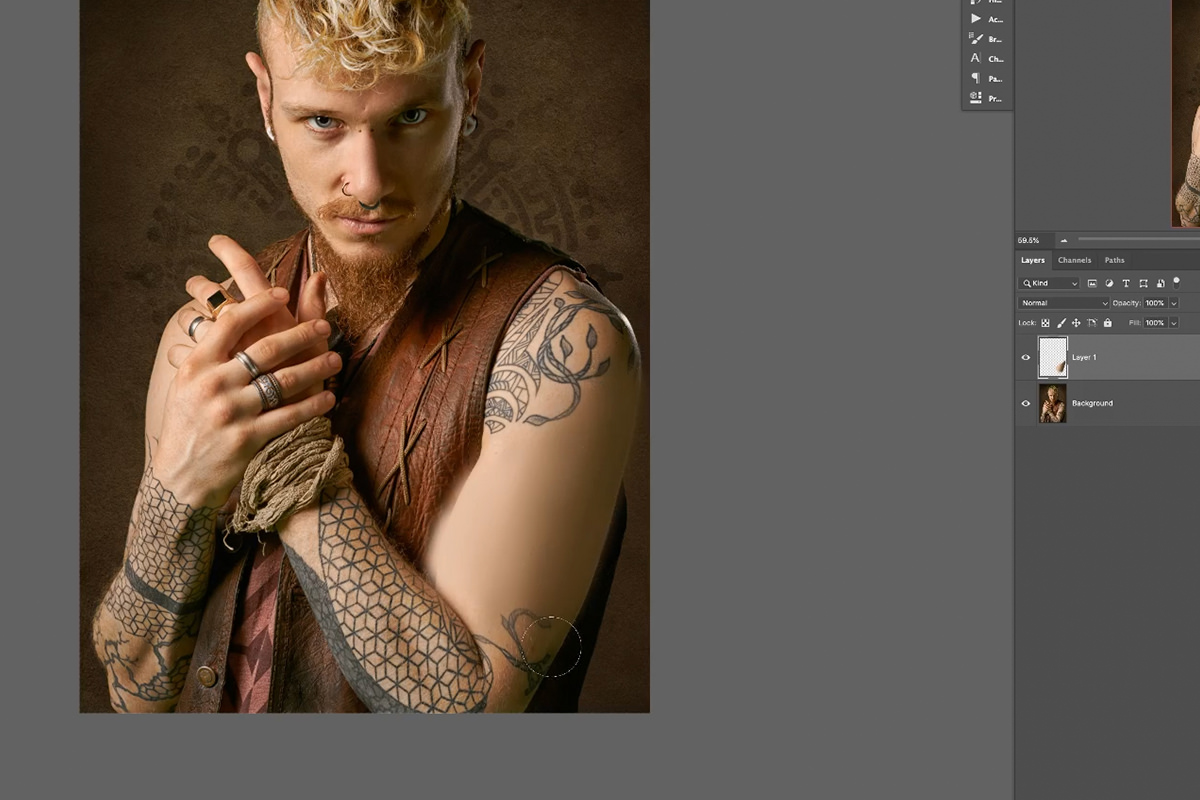
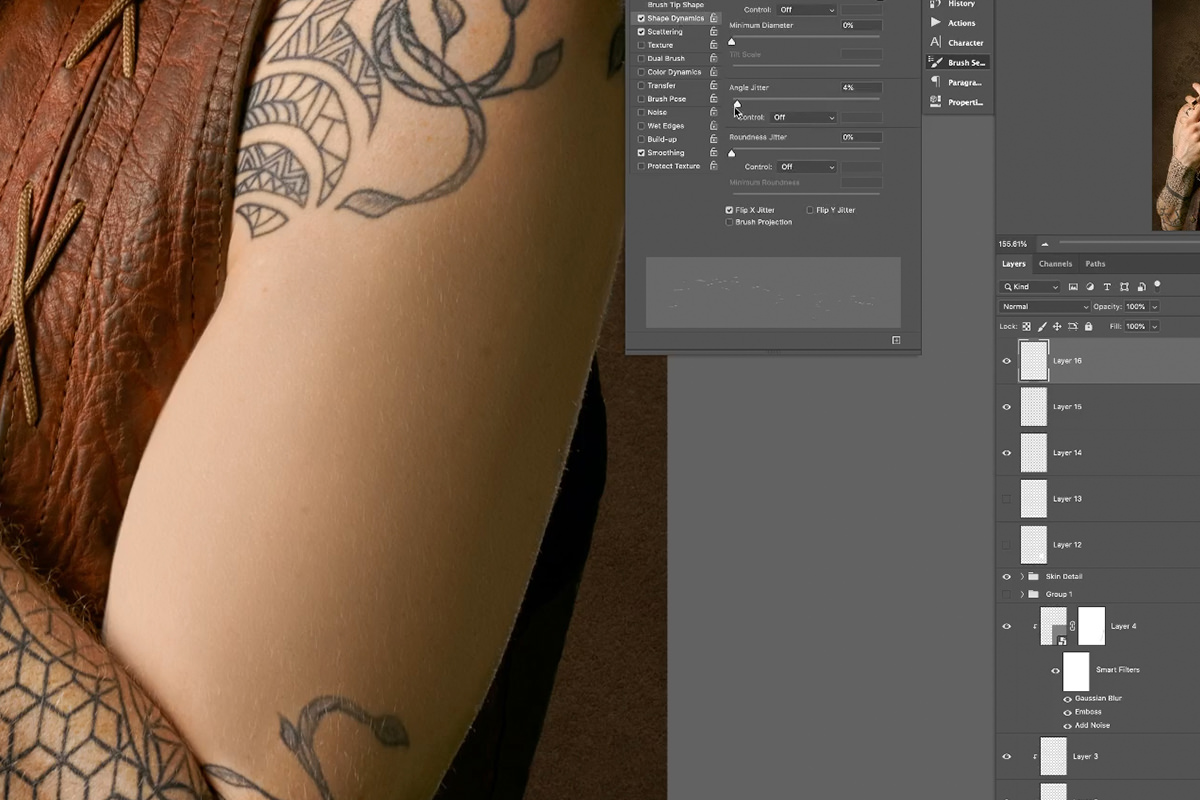
Learn how to create skin texture in Photoshop as we completely remove a tattoo from a person’s arm, and then use a combination of professional techniques and the included Photoshop Brushes to fill that area in with ultra-realistic skin texture.
Share
CREATE PHOTO-REALISTIC SKIN IN PHOTOSHOP
Create Realistic Skin Texture
Working with Skin in Photoshop
Skin is a delicate area with a lot of natural variation in both color and texture. One of the biggest challenges for new retouchers is removing distractions and blemishes from skin without leaving it blotchy or without detail. As you develop your skills, you might turn to advanced techniques like frequency separation, allowing you to work with both color and texture independently of one another so that you can worry less about the retouching of one damaging the other. But, sometimes even the advanced techniques need a little bit of support, and if you’re relatively new to retouching, you might need some techniques to repair skin that might have had some of the original texture removed.
In our example, we’re going to go through the process of removing a tattoo from a subject using the Brush Tool. The Brush Tool allows us to pretty easily fill an area with colors that match its surroundings but, while those areas will match color, highlight, and shadow, they will lack all of the original details of the person’s skin. This creates the perfect opportunity to recreate the original skin texture from scratch using just a couple of powerful Photoshop tools.
Creating Skin Texture from Back to Front
Whether you’re creating a detailed composite image or recreating skin texture, you should get used to the idea of building elements in a scene from the back to the front. As we make new skin texture, we’ll be doing just that. We’ll start with the color, highlight and shadow, then add texture, then add some freckles and spots, and then add some fine hairs. Working in this way will help each element appear more natural while also creating the depth necessary for it all to look realistic.
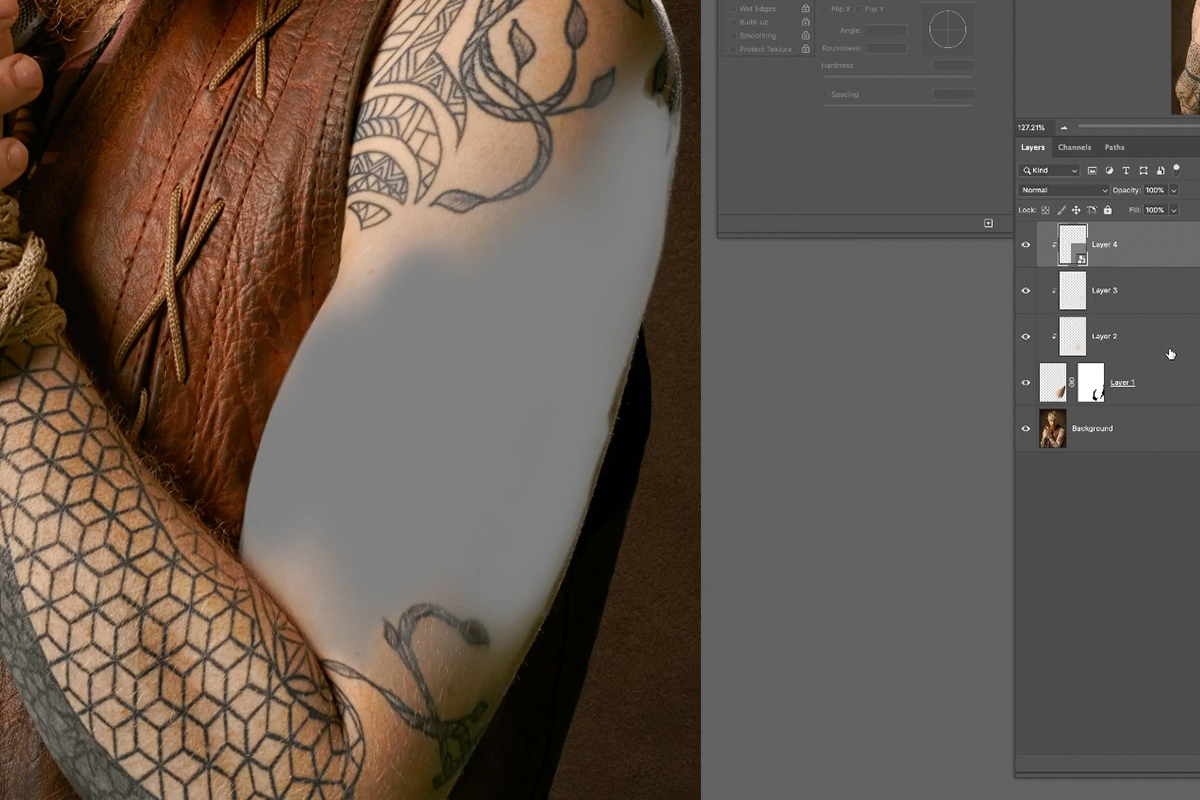
Removing a Tattoo with the Brush Tool
Our example image has a subject covered in tattoos. While tattoos are a perfectly normal thing to appear in a photo, and sometimes are what make a photo unique and interesting, we’re going to remove a tattoo to create a circumstance where we would need to recreate skin texture to fill in that area.
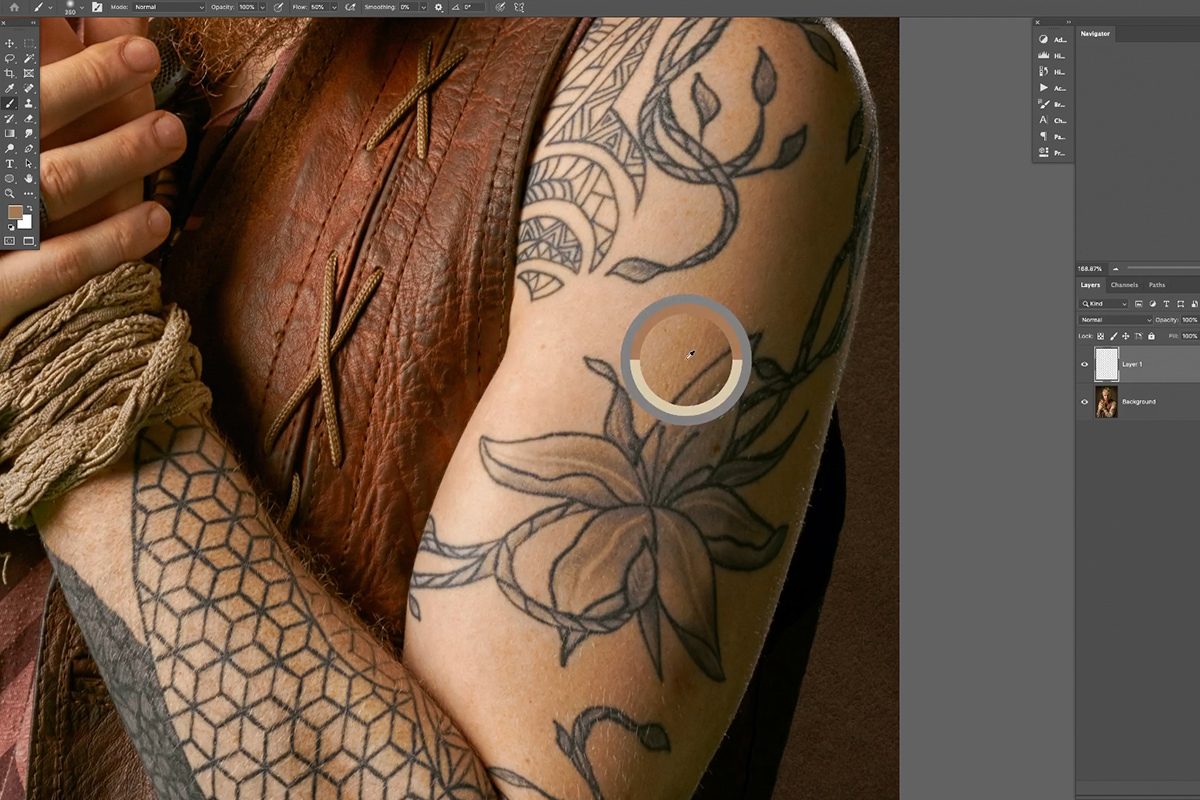
The process of removing a tattoo with the Brush Tool is relatively simple, especially since we’re not concerned with skin texture at the moment. First, create a new Layer. Then, select the Brush Tool and make sure that you have a large, soft brush set to a low Flow. This will make the blending process much, much easier. Once everything is set, begin Sampling colors from the subjects arm and begin painting over one of the tattoos.
The important thing to remember here is to follow the natural colors, highlights, and shadows that are visible around the area that you’re painting. In our example, there is a light source coming from camera-left creating shadows on the subject on camera-right side of their face and body. So painting will involve using brighter, highlighted skin tones along the left edge of the skin and darker tones along the right side.
As you paint, don’t worry about painting outside the area of the subject’s skin. If you do, just hide any unwanted paint using a Layer Mask once you’ve finished. You should end up with two Layers: the background Layer (the original image) and the Brush Layer which covers up a tattoo, matching the color and lighting from the rest of the arm.
Be sure to zoom out as you work and as you check your work! A zoomed out view will make it much easier to tell if the lighting and color is matching and blending correctly with the rest of the image.
A Note About Clipping Masks
Before we move on to creating the skin texture, it’s important to note that almost every new edit we add will be on a new Layer that is above and clipped to the Brush Layer we made in the first step. When a Layer is clipped to another Layer, it will only appear where that Layer appears. So every new edit we make will only appear where you painted. Make sure that the Brush Tool Layer is perfectly formed to the arm and doesn’t overlap any unwanted areas.
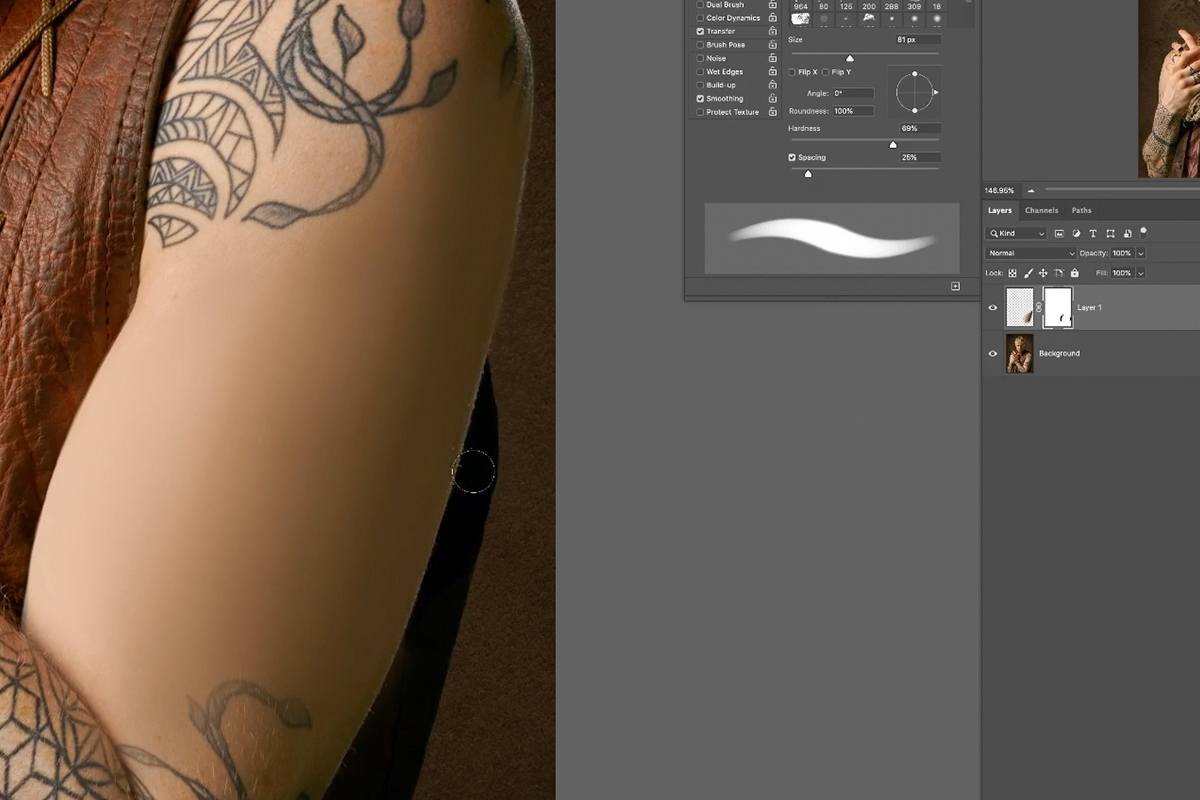
Create Skin Texture with Noise
Creating skin texture from scratch honestly isn’t that difficult if you’ve made it this far. In fact, we can use a relatively automated tool and some small adjustments to recreate skin details in just a few clicks.
First, create a New Layer and clip it to the skin color Layer. Grab the Rectangular Marquee Tool and create a selection around the part of the arm that you want to add texture to. Once the selection is active, go to Edit, then to Fill, and fill that area with 50% gray. (Noise can’t be applied to a blank Layer, so we need to fill the area with something first. We’ll be able to hide this gray in moment.)
After the selection is filled with gray, change the Blending Mode of the Layer to Soft Light. Soft Light will hide any values that are 50% gray. This gives us an area where we can apply noise without doing anything weird to the color of the subject’s skin.
Before going any further, right-click on the new Layer and select Convert to Smart Object. Smart Objects allow us to use Smart Filters, which are just Filters that can be changed and adjusted at any time (instead of being permanent). Noise is a Filter, so this will help us dial in the exact look we need without having to worry about starting over if we mess it up.
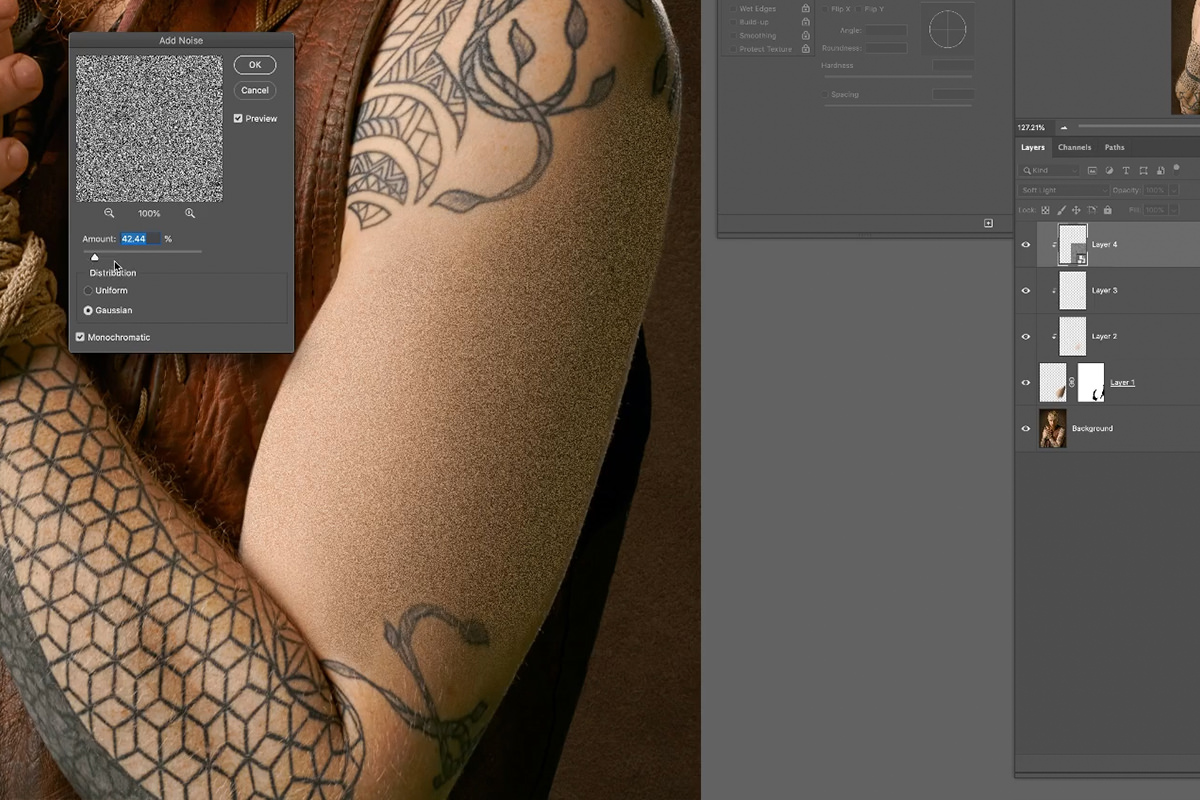
Now that we have Smart Object Layer where Noise can be applied, go to Filter, Noise, and Add Noise. You’ll get a live preview of what the Noise effect will look like–try and get it close, but don’t worry about it being perfect yet. We have a couple more Filters to apply before we’ll be able to see the complete effect.
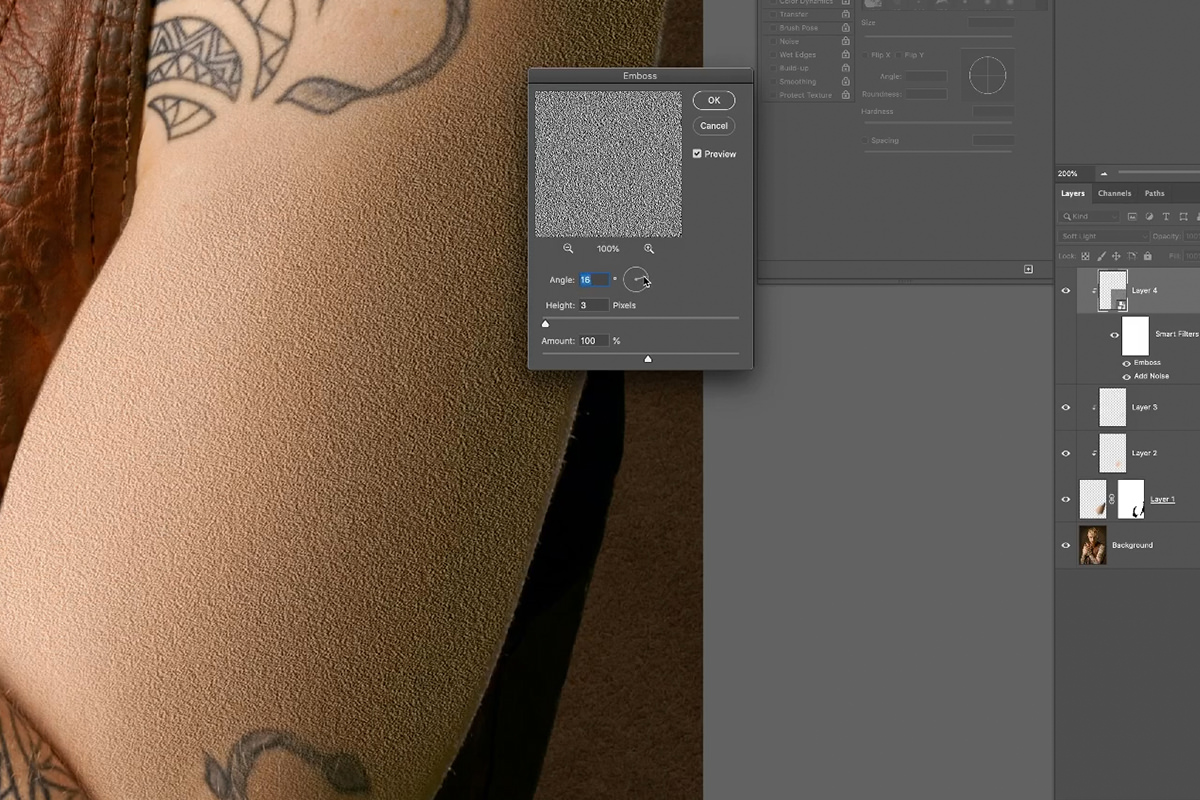
Next, go to Filter again, then to Stylize, and select Emboss. Emboss will add contrast to fine edges, giving the appearance of more texture and depth. Again, get it close, but it doesn’t have to be perfect yet.
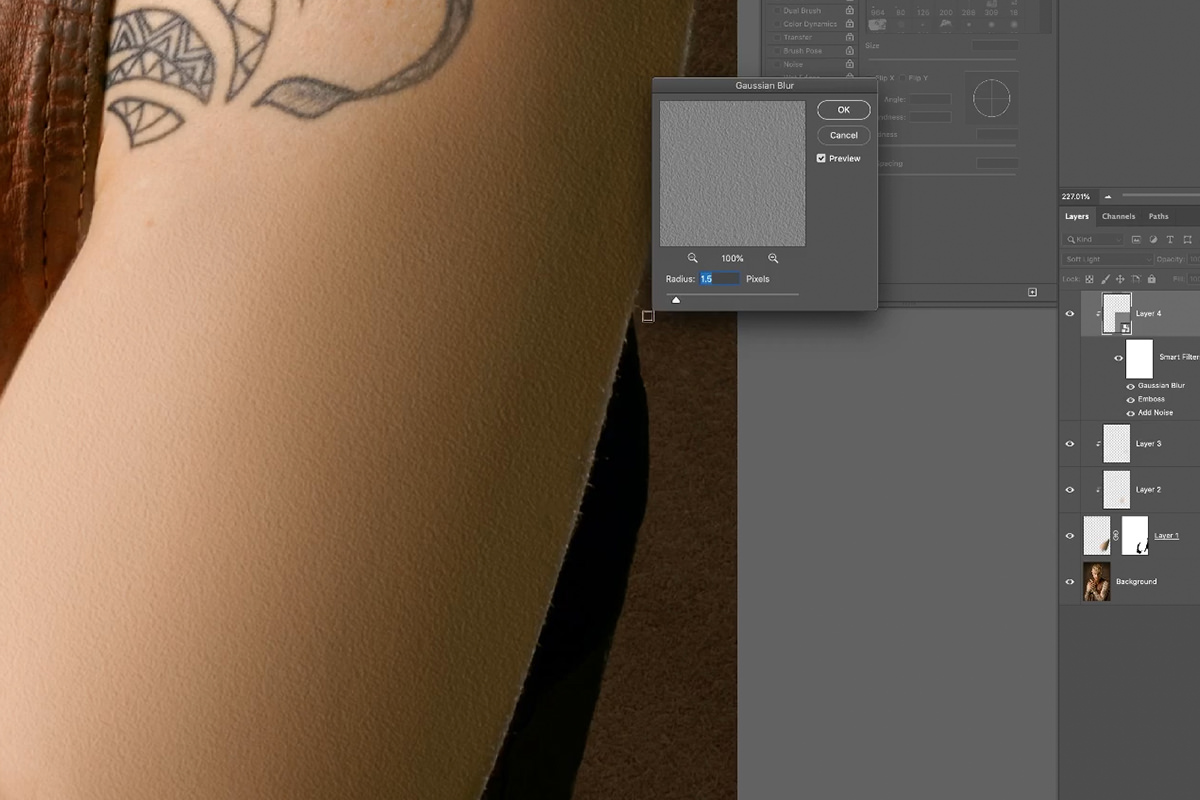
Lastly, go to Filter, then to Blur, and choose Gaussian Blur. Apply enough of a blur so that the texture isn’t as harsh, and so that the texture starts to blend in with the photograph.
Now that these 3 elements are set, go back and dial each in until you get something that closely matches the natural skin texture from the surrounding areas.
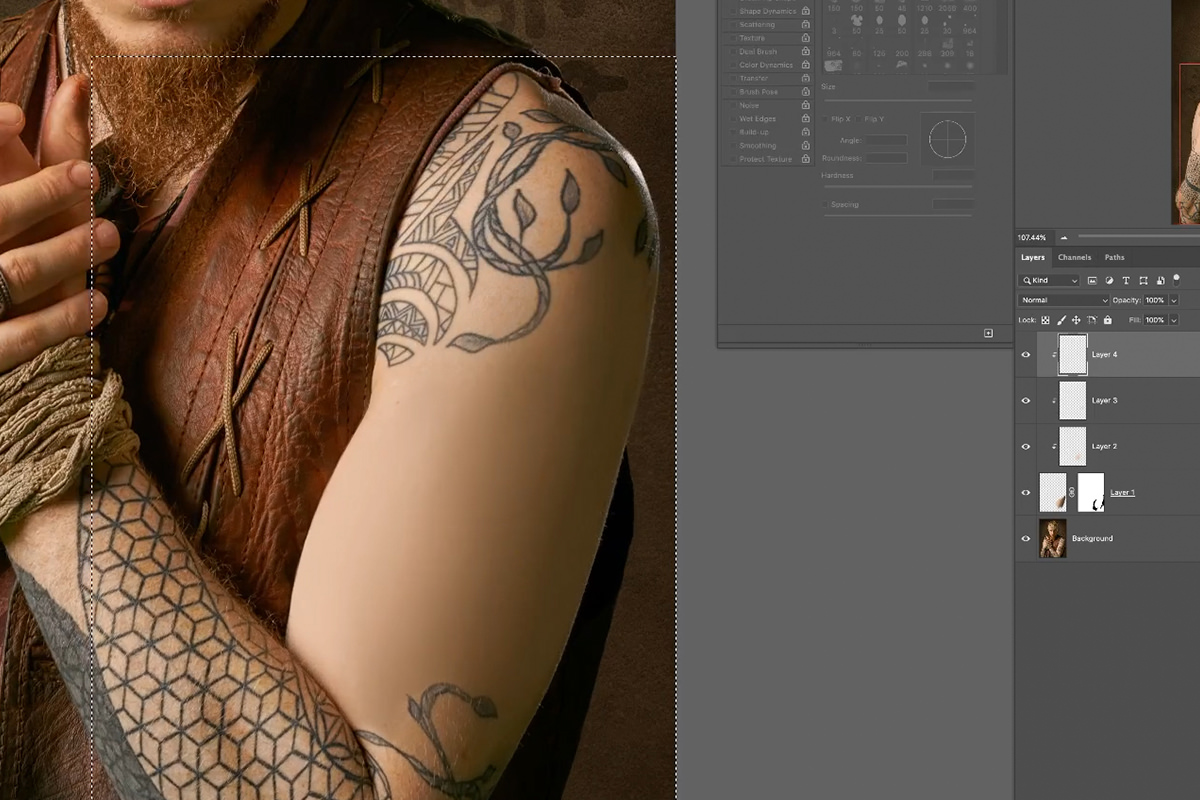
Adding More Detail with Custom Brushes
We’re looking pretty good, but it doesn’t look like real skin just yet. Skin has spots, tiny imperfections, freckles, color variation, and hair. That’s a lot of detail that we’re missing. So where do we even start trying to recreate it?
Custom Photoshop Brushes are an amazing tool for creating randomness and variation when you need it. Included in the download for this tutorial are the three custom Brushes we created to complete this edit. Two of the brushes are for adding skin detail, like spot and freckles, and the other one is designed to create fine, realistic hair. Watch and follow along if you want to learn how to make them, but feel free to use them straight away if you want to save some time.

Use the Brushes to create spots, freckles, and color variations in the skin.
Then apply some fine hairs over top. Make sure to look at other similar areas of the subject’s skin so that you can match the density, color, and thickness of each feature as closely as possible.
We recommend watching the video above to get a complete rundown of all of the techniques you can use to create realistic textures and features with these brushes. Just be sure to always work on new Layers whenever you’re adding a new or different feature, sample colors from the surrounding skin, and use Blending Modes, Opacity, and different Brush sizes to work in as much variation as possible.
You did it! Sit back, zoom out, and take a nice long look at your work. If anything feels wrong or out of place, don’t hesitate to go back in and make changes. We’ve worked non-destructively, using Smart Objects and new Layers which makes it easy to change, add, or remove elements in a snap.
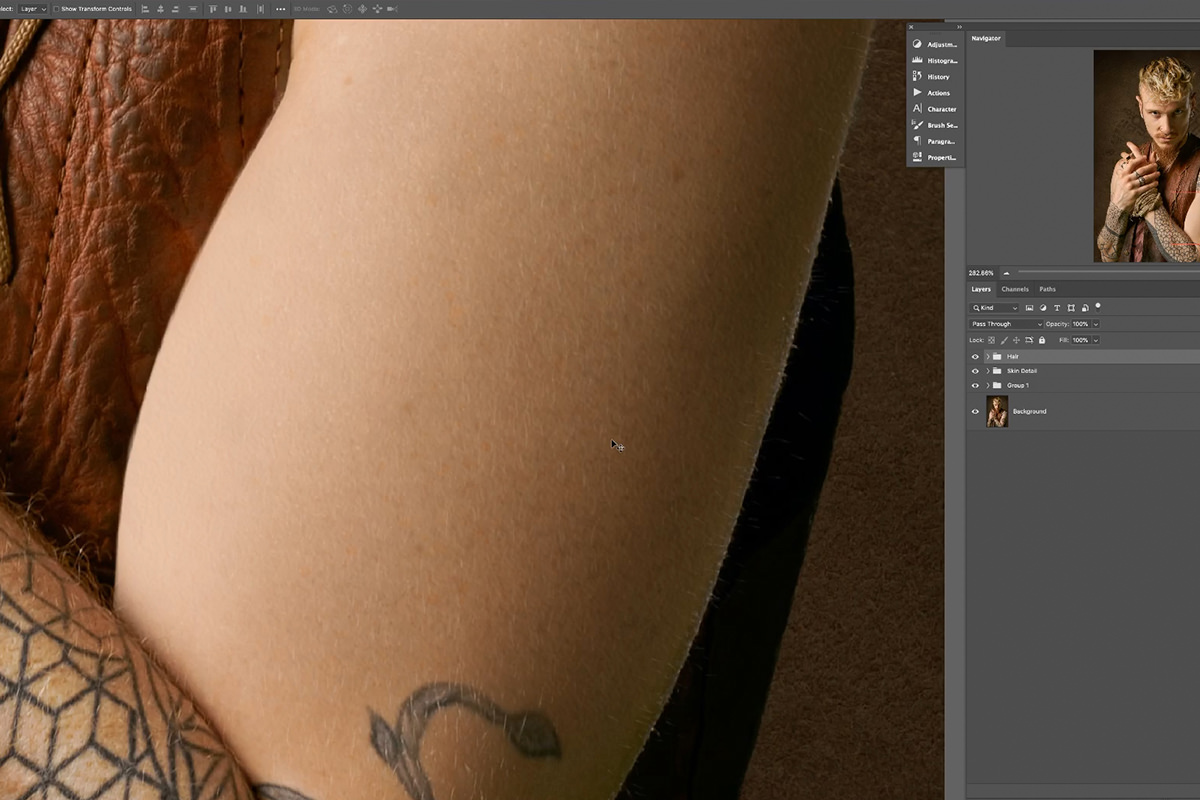
You can also add additional adjustments over the top of everything if you need the colors, highlights, and shadows to be dialed in even further. Some last minute changes to color can also help to tie each of the elements together, creating skin texture that looks unbelievably natural.
Catalog > Free Tutorials > Skin Retouching Basics in Photoshop
BEFORE
AFTER
Download Sample Images
Click the link below to download the sample images and follow along with this tutorial.
DownloadTutorial Description
Skin retouching doesn’t have to be a long and complicated process. Aaron shows you how to make short work of hair, fine lines, and larger blemishes as well as how to smooth out skin tones with a simple dodging and burning. Learn how to use the Spot Healing Brush Tool, Clone Stamp Tool, and Curves for professional, natural-looking results.
Ready for more? PHLEARN PRO gives you instant access to over 140 in-depth tutorials, teaching you everything there is to know about Photoshop, Lightroom, and photography.
From a comprehensive course guaranteed to take you from retouching beginner to a seasoned master, to a deep dive into pro techniques like Frequency Separation, PHLEARN PRO is your next step to creating extraordinary photos.
Flyaway Hairs & Fine Lines
Retouching skin is about making a bunch of small changes while preserving the more important details that make your subject unique. Flyaway hairs that cover the face and wrinkles around the eyes and mouth are two common types of distractions that, when reduced or removed, can help accentuate the parts of the image that matter most.
When working with small blemishes in Photoshop, the Spot Healing Brush Tool should be your go-to. With the Spot Healing Brush Tool active, make sure that Content-Aware and Sample All Layers are selected in the options. Content-Aware instructs Photoshop to use the image information around the area that you paint to fill and replace the contents within the area you paint. Sample All Layers simply tells Photoshop to use the information from all Layers in your project. This allows you to work on a new, blank layer without making changes to the original photo.
With those settings selected, create a new layer and then use the Spot Healing Brush Tool to paint over any hairs, lines, or small blemishes on the skin. You should only have to adjust the brush size to closely match the size of the area you’re trying to remove – Photoshop will handle the rest.
Larger Blemishes
Larger blemish removal works almost exactly the same way, you’ll only be using a larger brush and painting over a larger area. But painting larger areas with the Spot Healing Brush Tool, especially areas that have delicate textures like skin, can result in loss of texture and a blotchy appearance.
There’s two ways to work around this. First, you can use the Spot Healing Brush Tool to paint over that area several times until you get a result that looks good. If that’s not working, get as close as possible using the Spot Healing Brush and then use the Clone Stamp Tool to sample some skin texture from a nearby, unedited spot. You can then paint that texture over the Healing Brush to recover some of the detail.
Simple Dodge & Burn
Dodging and burning is a process of enhancing highlights and shadow areas to add definition and, in the case of skin retouching, even out skin tones. This can all be done using Curves Adjustment Layers and Layer Masks.
To begin with dodging, create a Curves Adjustment Layer and, in the Curves dialog, drag the midpoint up until the darker areas of the image are at a level that you like. Hit Okay and then hit CTRL or CMD + I to invert the Layer Mask of the Adjustment Layer, making it completely invisible.
Set the Blending Mode to Luminosity and then use the Brush Tool at a Flow of about 10% to paint white on the Curves Layer Mask. Paint over any dark areas that you want to lighten up – think dark under eyes and any distracting shadows. Your goal should be to reduce harsh shadows and bring out some of the detail.
Burning (darkening) can be achieved using the exact same process. In the Curves dialog, drag the midpoint down until the brightest highlights of the image are more even with the rest of the exposure. Invert the Layer Mask again, set the Blending Mode to Luminosity, and now paint on the highlight areas that you wish to smooth out.
These two Curves Adjustments Layers should combine to create a natural, smooth skin tone free of distracting shadows or highlight that are too bright.
Retouching Advice
We started off by saying that retouching doesn’t have to be a complicated process, but it certainly can be. Some edits might need dozens of Layers to accomplish the same goals that we set in this example. But these techniques are more than enough to get you started and we’re confident that you’ll see an immediate impact in your photos.
There are countless tools and techniques out there to take your retouching even further. Frequency Separation, retouching products, and more specific cases like retouching for athletes are all great examples.
No matter how much or how little retouching you decide to do, be sure to keep both your subjects and clients in mind. Your subject should still look like how you would expect them to look in real life. Preserving the qualities that make them unique and interesting should be a priority.
And always keep in mind where your final image will be going and how it will be used. You wouldn’t retouch an image for a magazine cover the same way you might retouch an image for your Instagram account.
Keep practicing, keep experimenting, and use the techniques taught here to help develop your own sense of taste and style.
Catalog > Free Tutorials > How to Dodge & Burn in Lightroom Using Range Masking

ORIGINAL
AFTER DODGE & BURN
Download Sample Images
Click the link below to download the sample images and follow along with this tutorial.
DownloadTutorial Description
Working with RAW in Lightroom is an effective way to take your images to the next level. Learn to dodge and burn your images quickly, easily, and accurately.
Highlights & Shadows
As photographers, our goal should always be to get a great looking exposure straight out of camera. Sometimes it’s not always possible depending on the lighting conditions and resources that we have to work with. Post-processing is an important step and no matter how great a picture might look without editing, Lightroom can help us enhance definition and recover details we didn’t know were there.
In our sample image, since we wanted to capture details in the sky at sunset, our subject is slightly underexposed. Previously in Lightroom, we could have used the Adjustment Brush to select the areas that we wanted to edit and then make the necessary changes to the highlights and shadows. While it was effective in some cases, it isn’t very precise and it would often be better just to send the image over to Photoshop to get the job done.
Now, with Luminance Range Masking, we can choose to have our adjustments appear only within the highlights or the shadows of a photo. This means that we can target specific parts of an image to brighten or darken, recovering details and adding definition that was missing. Best of all, we can save time by not having to send every image over to Photoshop whenever we need precision.
Catalog > Free Tutorials > How to Retouch Newborn Baby Skin


BEFORE RETOUCH
AFTER RETOUCH
Download Sample Images
Click the link below to download the sample images and follow along with this tutorial.
DownloadA Quick Guide for Helping Newborns Look Their Best
Welcoming a new life into the world is a profound moment that deserves to be captured and shared. In this tutorial, we cover some of the common traits of newborns and how to apply some light retouching in Photoshop to help them look their best. From adjusting red, blotchy areas to cleaning up dry, flaky skin, we’ll walk you through some techniques that anyone can learn to help capture memories that will last a lifetime.
Using Channels
We first want to reduce some of the redness in the subject’s skin. Rather than tackle each area individually, we can target areas of high contrast using Channels and then make a selection of the parts of the skin that appear darker.
By using Channels, we can make an incredibly accurate selection based off of the amount of contrast present in an image. To view the different color channels, click on the Channels tab. You’ll see three channels listed; one for red, one for green, and one for blue. Our goal is to identify the channel that has the most contrast between the light and dark areas of the photo. This will allow us to select the darker areas, which we can then adjust using an Adjustment Layer. To find the channel that has the most contrast, simply click on each and make a judgement based off of what you see.
If the image appears flat, that channel likely won’t be of much help. If the image has areas of light and dark, it will contain the information necessary for us to isolate the areas of skin that we want to retouch.
Making the Selection
In this case, the green channel has the most contrast. In order to get an accurate selection, we need to exaggerate the contrast in the green channel. First, duplicate the green channel by selecting it and hitting CTRL or CMD + J. Then hit CTRL or CMD + L to bring up the Levels dialog. You’ll see a graph showing the distribution of highlights, midtones, and shadows along with sliders underneath for each. Drag the right most slider about one-third of the way towards the middle. Then move the slider for the midtones just a bit to the left of the first. You should see the background change to pure white and the blotches on the baby’s skin should now appear greatly exaggerated.
Now that we’ve created enough contrast in the skin, we can turn those areas into a selection. Hold CTRL or CMD and click on the duplicated green channel. This will create a very accurate selection of that channel. Switch back to the Layers panel then go to Layer, New Adjustment Layer, and then to Curves. Photoshop will load the selection we made into the Layer Mask of our new Adjustment Layer. If you hold ALT or OPTN and click on the Curves Layer Mask thumbnail, you’ll notice the image will look just like the Channel that we were working with earlier.
Adjusting Skin Tones
With the Curves Adjustment Layer combined with the Layer Mask targeting the darker areas of the newborn’s skin, we can pretty easily make adjustments to smooth out the skin tones. In the Curves Adjustment Layer dialog, drag the center of line up until the darker areas of the skin closely match the lighter areas of the skin. To further blend any inconsistencies in the skin, create a New Layer, switch to the Brush Tool (B), and hold ALT or OPTN to sample an area of skin that has the color you want. Simply paint on the new layer in any areas that you feel could use a bit of blending.
Dry Skin and Other Blemish Removal
In this particular photo, there are some areas of dry skin on the baby’s arm. Fortunately, these are incredibly easy to touch up using the Spot-Healing Brush Tool. On a new layer, paint over portions of the skin that could benefit from a bit of blemish removal.
Add Shape and Definiton
After our adjustments so far, you might noticed that the image looks a little flat. We can enhance some of the highlights in the image which will help return some shape and definition to the subject’s face. On a new layer, select the Brush Tool. Using a large, soft brush paint white over every bit of the subject’s skin. Don’t worry about being precise, as we’ll be using Blend If along with Blending Modes to tell Photoshop specifically where we want these highlights to appear.
Once you’ve finished painting, double click on the Layer that you’ve been painting on. Under the Blending Options dialog, locate the Blend If sliders near the bottom of the panel. Holding ALT or OPTN to split the slider, drag the right half of the slider in the shadows all the way to the right. Then take the left half of that slider and drag it to about the middle. This will tell Photoshop that you don’t want this layer to affect any of the darker areas of the image. Change the Blending Mode to Soft Light and adjust the Opacity until you get a subtle effect that you like.
How to Remove Redness from Skin in Photoshop
-
-
Add to
favorites
-
DifficultyMedium
-
Length6.25 hours
-
Videos24
-
Software
DESCRIPTION
Creating precision masks and cutouts is one of the keys to mastering Photoshop. If you’re a product photographer, a web designer, or an artist making conceptual composites, you’ll need to be able to make accurate selections of objects and people to place on a variety of backgrounds.
In this tutorial, we cover several tools and techniques that, when combined, will allow you to create perfect masks of anything from the precision curves of designer products to the messy detail of a head of hair.
THIS COURSE INCLUDES
- 18 Sample Images
- 4 Photoshop Brushes
Share
Table of Contents
Photoshop Compositing: Masking (I)
-
01 - Tutorial Introduction1:32m
-
02 - Techniques Overview1:01m
-
03 - Magic Wand and Refine Edge14:53m
-
04 - Lasso Tool9:35m
-
05 - Color Range13:17m
-
06 - Focus Area7:13m
-
07 - Channels10:48m
-
08 - Custom Brushes15:35m
-
09 - Pen Tool16:12m
Photoshop Compositing: Masking (II)
-
01 - Examples Overview1:00m
-
02 - Logos & Graphics19:47m
-
03 - Solid Edges (Part I)17:16m
-
04 - Solid Edges (Part II)16:03m
-
05 - People (Part I)26:07m
-
06 - People (Part II)13:18m
-
07 - Pets & Animals (Part I)28:59m
-
08 - Pets & Animals (Part II)9:57m
-
09 - Pets & Animals (Part III)22:43m
-
10 - Pets & Animals (Part IV)24:59m
-
11 - Hair (Part I)18:14m
-
12 - Hair (Part II)18:17m
-
13 - Hair (Part III)13:25m
-
14 - Hair (Part IV)18:57m
-
15 - Hair (Part V)25:58m
Course Downloads
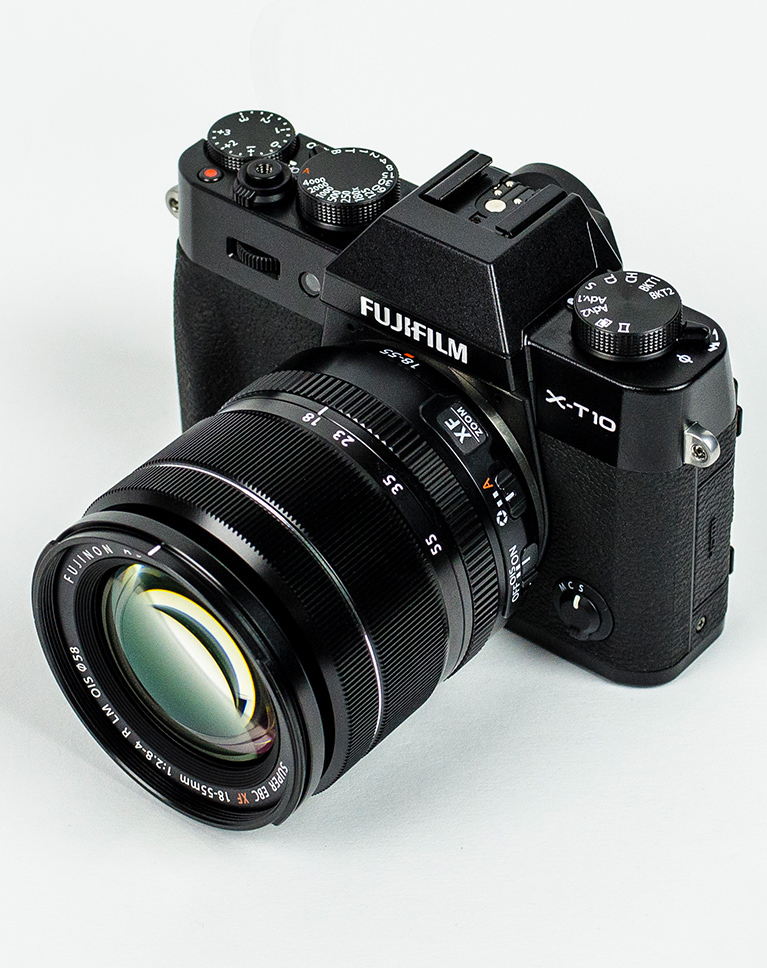
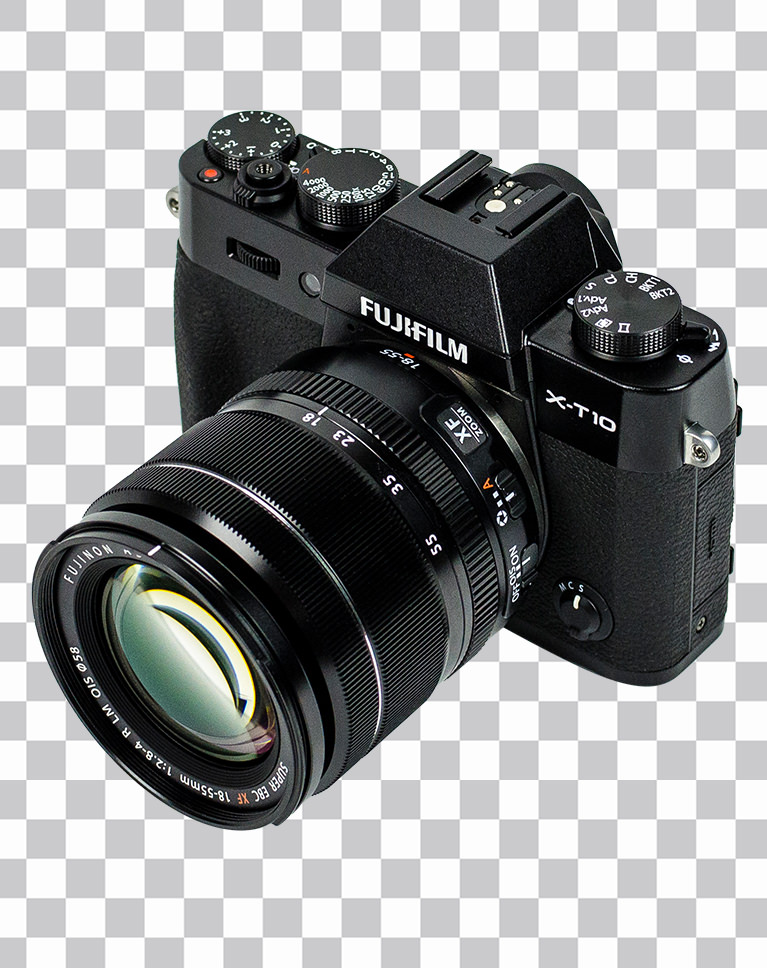
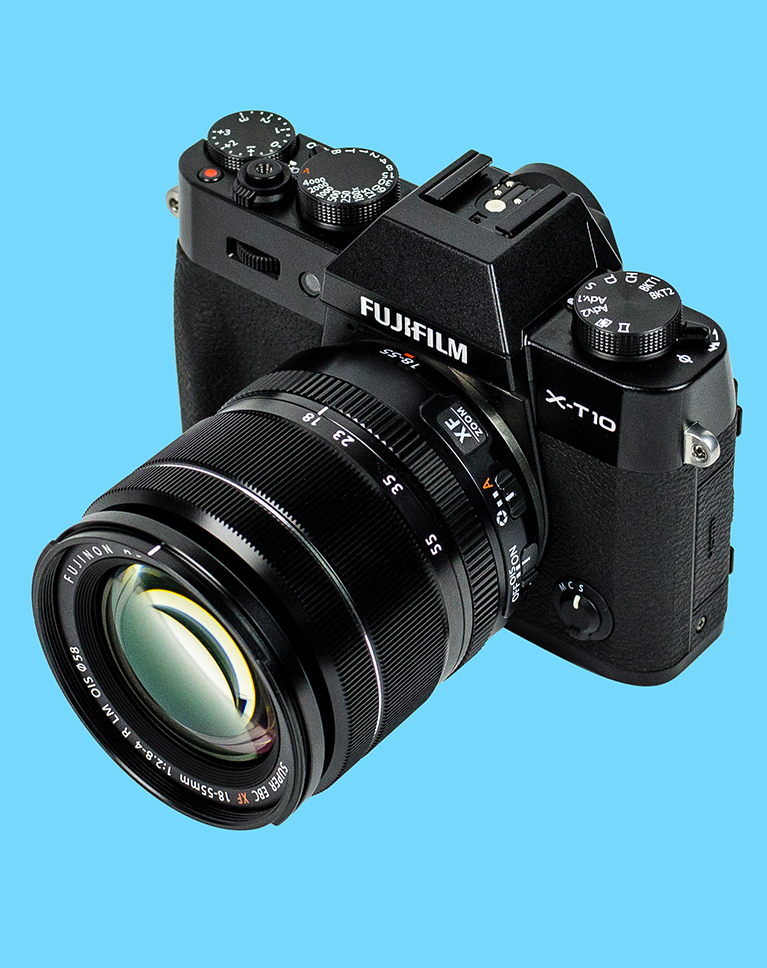
Quick & Clean Cutouts in Photoshop
ORIGINAL
CUT OUT
DETAIL
LAYER MASK
Tools & Techniques
There are dozens of tools and techniques that can help you cut an object or a person out of their background. We’ll provide you with a versatile set of options to handle any situation you encounter. From using the Pen Tool to create perfect curves or Channels to capture all of the details of soft edges, you’ll have access to every trick in the book.
The Perfect Combination
Once you have a handle on all of the best methods of masking and cutting out, the next step is understanding that you might need to use a combination of tools to get the job done right. We’ll cover how to mix and match techniques for those circumstances where just one won’t cut it.
Skills For Any Application
Web designers need images to blend seamlessly into the design of their pages. Product photographers need to provide stunning images that can be applied to a variety of backgrounds. Composite artists want to create realistic images that look like they’re straight out of camera. No matter what your goals with Photoshop are, understanding the techniques in this tutorial will bring you one big step closer to mastery.
ORIGINAL
CUT OUT
ADD A BACKGROUND
ADD SHADOWS & COLOR MATCH
More Than Meets the Eye
Sometimes cutting something out of a background means more than creating a perfect selection. Depending on the environment that the original photo was taken in, you might find yourself needing to lighten or darken edges or change the color of reflected light. Once we show you how to cut out the subject, we’ll take it a step further and show you how make it look like the new background was there all along.
Edit Faster
Creating accurate cutouts doesn’t have to mean spending hours upon hours in front of the computer. Some circumstances will require a bit of time and patience but we’ll show you some incredible tips on how to start with a rough selection and then refine only the areas that need it, saving you valuable time.
Recreate Details
Sometimes it’s better to make a rough selection and then paint the details back in. In this tutorial, we’ll show you how to create and utilize custom brushes to paint in realistic-looking hair and details that would have otherwise been impossible to cut out.
MAKE COMPLEX CUTOUTS & SELECTIONS
Professional Cutouts
Making precise masks and selections has never been easier! Master all of the tools Photoshop has to offer for making professional cutouts.
ORIGINAL
CUT OUT
LAYER MASK
Hair, Everywhere
Getting a realistic selection of hair is one of the most challenging and satisfying skills to master in Photoshop. We spend a ton of time covering several methods to make it happen. Whether the background is plain or complex, we’ll show you how to get impressive results, every time.
PETS & ANIMALS
HAIR
PEOPLE
LANDSCAPES & NATURE
Course Instructor
Aaron Nace
PHLEARN Founder
Aaron Nace is a photographer, Photoshop artist and founder of PHLEARN. He is the #1 Photoshop instructor in the world with millions of YouTube subscribers.
Reviews
-
I bought a course at affinityrevolution “Perfect selections” and it seems like content is 90% similar to this!
-
Great tutorial Will you be updating it when new features comming to photoshop….. like Select subject and remove background?
-
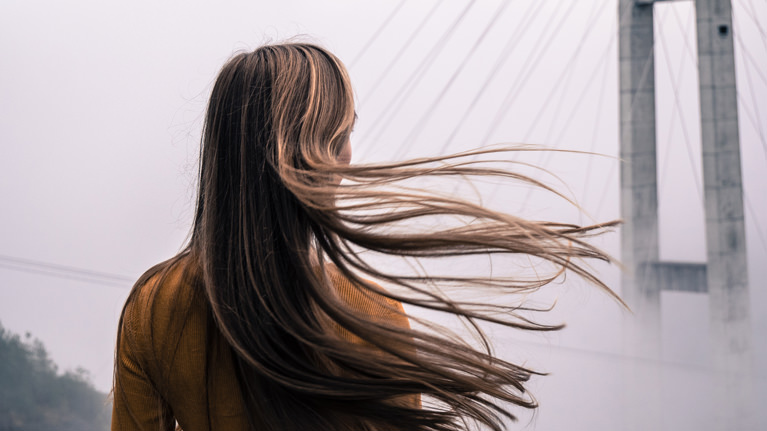
A great lesson with a great range of techniques taught that can be used on many different subjects. This is no slight on the tutorial, or on Aaron, but I had a lot of trouble with the fringing around the hair on the second lady (the one in front of the bridge). I’ve restarted that section 3 times now but I must be doing something wrong. I’m going to go back in and see how realistic (or time-consuming) it might be to shape that mask with the pen tool. Wish me luck!
-
Gotta say love watching Phlearn and how you make so enjoyable , and de mystifying PS 🙂
-
Have been using photoshop since version 1 (yes, I’m an old lady) and yet always there is more to learn, different and better ways to do things. Thank you for this tutorial, learned several things which will help in my work. BY the way, I used your technique to make a “hair” and then turned it 180 and created a double-ended version, since you aren’t using the base of the brush anyway. Then the shape dynamics-angle-control “Direction” feature worked great!
-
So far so good, have only got part way . However I have found the new Curve Pen tool much easier to use and control than the older tool, perhaps Pen tool videos need an update.
-
Excellent excellent teacher really well done and thanks Aaron
-
I like to thank aron for showing me masking and cutting out just love it
-
The cutting out of the baby with the pen tool and the replacing of the hair was a great lesson for me. Now I can move on to the pets which I am grateful for. The pen tool was hard but like you said if you put time into working at it you will get it. I got it now and I use it like nothing. Your class is very important to me because I don’t get to go shooting the way a walking people do to being in a wheelchair; so I shoot my kids and fur kids then place in backgrounds I want to use. I’ve been with you for three years now and I love how you have made it available for all to learn from you. #PhlearnPhiday <3 Rose
-
I love watching the tutorials.
-
Super grateful to Aaron, the tutorials are great and I learned a lot. I’ve been using photoshop for many years and right now I’m doing it correctly, I love you sensei!
-
VERY, VERY, SUPER COOL 😉
-
Hello there, this tutorials are really great. So much to learn and very good explanation. However i have very big problems in cutting out things like wedding veils. How shall i do this with the tranparency in the veil. A tutorial about such objects would be great.
-
Hello Phriends! Love the learning here! 😉 Advertising it to others big time! Guys, please let me know what is the intro song and where can I find it! 🙂 Thanks a lot!
-
Thank you for spreading the word about PHLEARN! The song is Glory Days off of premiumbeat.com
-
-
It’s always too good to follow your tutorials! You have a perfect didactics and the fact that everything happens “live”, that is, there are no stops that can hide some trick, makes it even more useful and applicable to the routine of all professional photographers and amateurs.
-
What Aaron does may seem like magic, but we promise no tricks are used in our tutorials 😉
-
-
I absolutely LOVE your tutorials. So informative and super easy to follow. I ran into a problem, though, and couldn’t figure out how to fix it. Being a “newbie” to Photoshop, I had to Youtube it. While trying to make the fur brush for the dog, I could not get my pen path to produce a stroke that was bigger in the middle and ends in a point on both ends. I am using a mouse and realized that I had the “Control” in the “Shape Dynamics” section of my brush properties turned off from where I was making the cat fur brush. I set it to “Pen Pressure” and then tried the stroke again. It turned out great! Might want to mention that in case someone else runs into that problem.
-
Aaron, will you marry me? 🙂 When the 1st time i use Photoshop to cut somethings out of background, it’s a so hard issue especially hair. Through many years, i can’t still seek methods that can make me happy until i find you, phlearn and now “Masking and Cutting Out Subjects”. You’re the Grand Master. I phlearned so much from this tutorial and thankful due it. Can’t thank you enough, Aaron. Keep it up.
-
You made Aaron blush 🙂 Thanks for taking the tutorial and we’re happy you loved it! Aaron has so many more tutorials on the way for you.
-
-
Phlearn tutorials are the absolute BEST! I’ve taken Photoshop in college and studied online tutorials from both Lynda.com and CreativeLive but only Aaron makes learning easy and fun while providing a comprehensive understanding. So many of the others are boring, confusing and/or shallow. Phlearn is my go-to source for Photoshop tutorials and a constant source of inspiration.
-
This was awesome!! I learned so much, thank you!!
-
Outstanding! I love this Workshop! So many “YES-Moments”. THANK YOU PHLEARN!
-
Aaron is a fantastic teacher and these tutorials are just treasure. I started watching and learned completely new things from the very first minutes. After having watched all the videos in this tutorial, I feel it has definitely helped me a lot and I am looking forward to exploring more from PHLEARN! Also, Aaron seems to be perfectionist to the point that annoys me that sometimes I am not 😛 Like this, I am also having a live example of how a great professional should act when it comes to little details. Congratulations and thank you for this amazing series, now gonna watch some more cool stuff from here!
-
The overlay trick – super! helpful. Thanks!! Love the videos.
-
Aaron please… include captions, these will help a lot, to the ones who dont speak english as natives…as me…
-
Thanks for your comment, all our PRO Tutorials include closed captioning, there is a CC button in the player that will display the closed captions – all the best! – Aaron
-
-
Best so far, I have problem with selections on most part, getting better as time goes on, but I learned so many new techniques in this tutorial and I want to say you rock
-
A really great tutorial!
-
Excellent tutorial!
-
Just amazing!!! One of the best of nothing but the best! Thanks so much for this tutorial and all the fabulous tutorials on this site. Super job!!
-
FANTASTIC! Thank you for the help
-
Phlearn tutorials have been absolutely invaluable to me. Without them, I’d be in a world of Photoshop pain. I love that Aaron’s instructions are clear and concise and are so easy to follow. I also like the way the videos come in short segments – this makes it easier to go back and find a topic you need without searching through a long video.
-
This tutorial by Aaron is THE best on extraction, it builds up from super easy to super difficult.I have seen countless videos on hair extraction by PS experts but this blows them all away, the use of clipping masks is a technique that must be known to many but no one teaches,another top class tutorial from King Aaron
-
Great stuff! Clearly organised and easy to follow. Loving it.
-
Super legit and useful tutorial! Well paced and jamed packed!!!!! Two thumbs up!!!
-
Yesterday I bought Photoshop Compositing: Masking & Cutting Out Subjects x1 .. the videos are obviously in English … I understand English written but not spoken .. Would there be a possibility of getting the written tutorial? .. if there was written tutorial would encourage me to buy more … thanks in advance.
-
Sorry, we don’t have written versions of our tutorials.
-

“Critique” is a detailed analysis and assessment of something, but in most forums those requesting it are really just looking for validation. “Here’s my picture, turned out great, what do you think?” What usually follows is crickets (a lack of response to spare feelings), or comments like “I agree,” rather than suggesting areas of valuable improvement. Here’s a better way to get honest and constructive feedback from viewers and what to do with whatever you learn.
How do I ask for critique?
The Easy Part: Decide whom you want to critique your image(s) (clients, professionals, etc.) and find a related Facebook group, ModelMayhem.com forum, trusted friend, etc.
The Hard Part: Post, link, or otherwise share your image(s) and ask for critique of those images you worked so hard to create.
The Harder Part: Accept what people tell you.
Use these tips I collected using my degree in watching Law and Order to plead your case and make those hard parts a little easier.
Objection: Leading the Witness!
Do you want cheerleading or honest, constructive criticism? Consider these examples.
- Exhibit A: “Oh this client was so fun to photograph and I’m so happy with how they turned out! What do you think?”
- Exhibit B: “I just shot my first newborn session. I’m a newbie so please don’t be harsh.”
- Exhibit C: “I’m trying out a new light setup and looking for a good balance of shadow and light. What do you think?”
People don’t want to burst your bubble, and those who do are often labeled “trolls”. If you really want honest, effective feedback, don’t set your witnesses up to fail. Requests like Exhibit C is more likely to get the type of responses that will help your skills improve.
Objection: Relevance!
Listening to critique is a lot like analyzing product reviews at amazon.com. Does that person suggesting selective color and brighter whites of the eyes really know what they’re talking about? How much weight does their opinion about composition carry? It’s not a science, just keep an open mind and take notes about what feels right to you.
Permission to treat as hostile: Denied!
If you’re posting somewhere often (like a Facebook Group), graciousness even in silence is better than being known as a resistant asker of criticisms. It sounds medieval but really just don’t be a jerk. You asked for criticism. Accept it and say, “thank you”. Nobody likes an ungrateful cuss.
What do I do now?
- Walk away, especially from whatever feels offensive. Notice I said “feels”. Sometimes criticism can feel like a personal attack even when it isn’t meant to be. Don’t react instinctively. Let it rest for awhile. Go munch on an apple.
- Wash your hands and come back. Find the core of each relevant suggestion. What do they really mean? What made them feel that way? Do you agree or disagree and how much
- Grab some cheese to go with that apple. Fruit and protein are friends.
- By now you’ve had time to digest both your apple and the criticism you received. Prioritize the helpful suggestions. Pick one or two to work on.
Critique can be an extension of client research. Just because you created an image with an intention in mind doesn’t always mean that intention is translated by a viewer. Constructive criticism can help you hone in on what’s working and what isn’t. Make adjustments until you “get it right”.
Also, eat more apples. Case closed.
You can learn more about the author at her blog.
How to Apply a Color Grading LUT in 13 Different Programs
5 Rules to Follow When Analyzing Someone’s Artwork

Focus Stacking: How to Master the Best-Kept Secret to Unbelievably Sharp Photos
The Art of the Surreal Selfie with Ben Zank
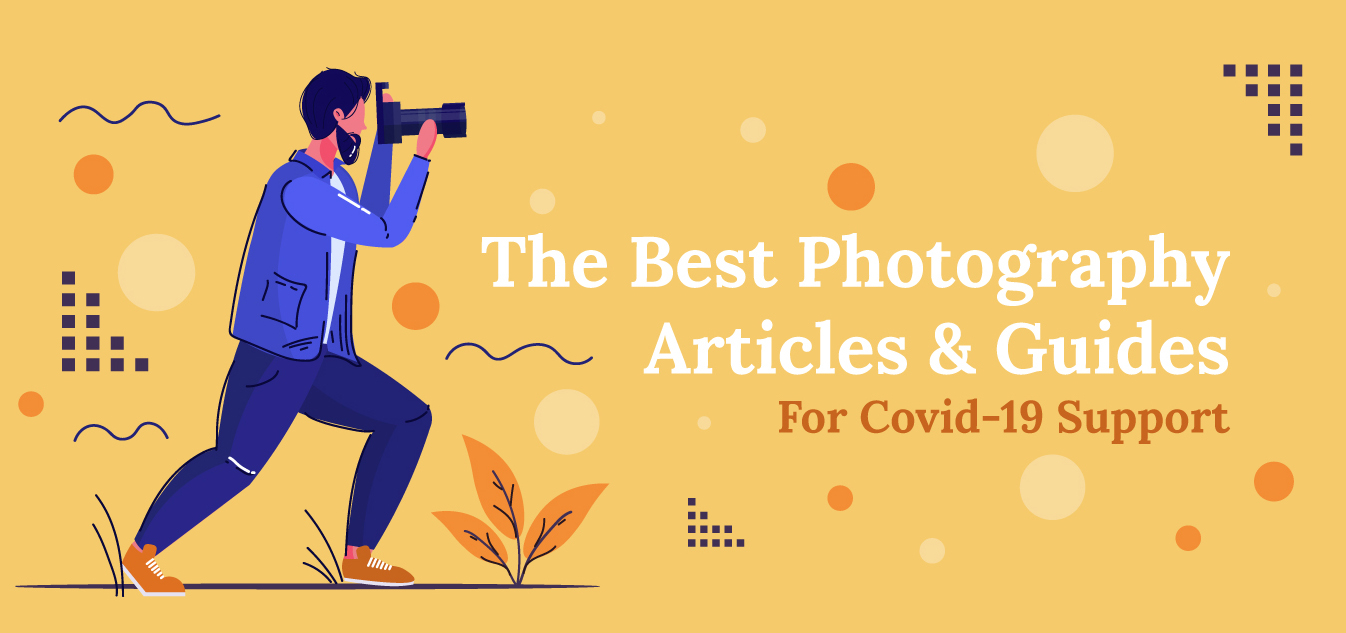
The Best Photography Articles & Guides for Covid-19 Support
Exposure Compensation: Automation with Creative Control

The Beginner’s Guide to Time-Lapse Photography
Catalog > Free Tutorials > How to Fix Baby Skin Color in Photoshop
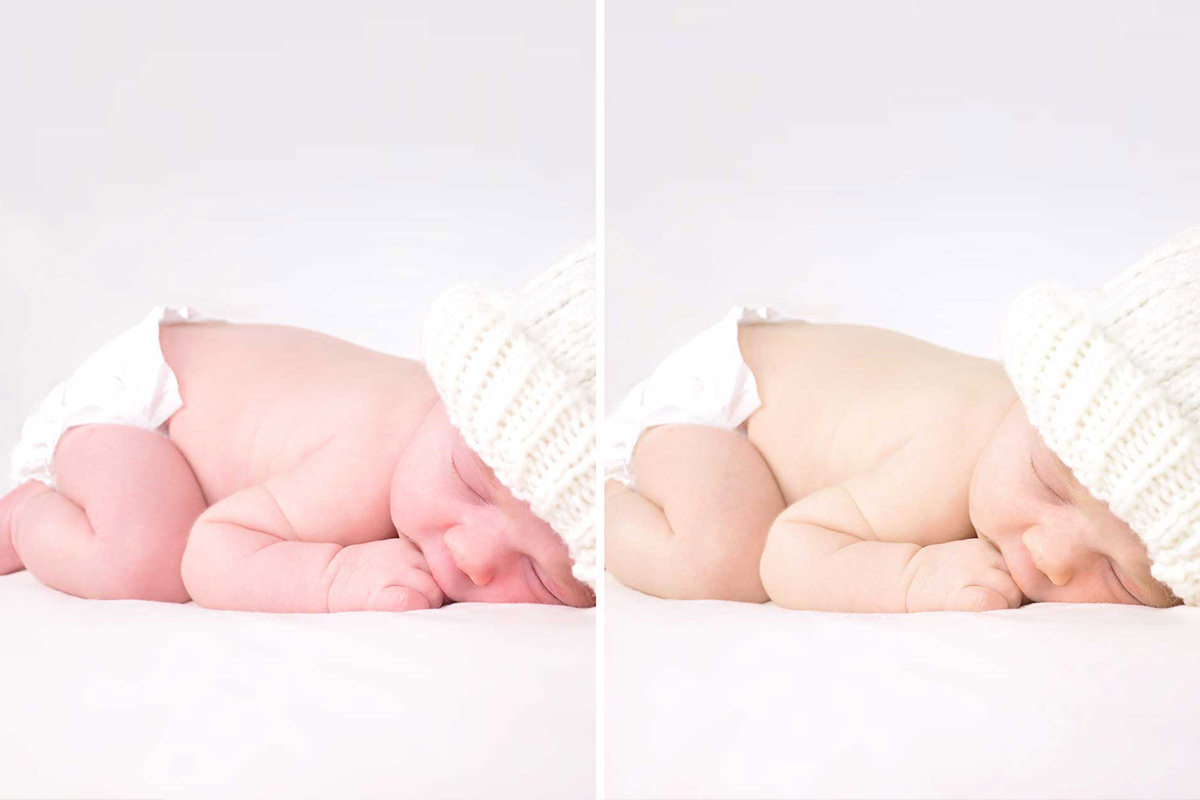
Tutorial Description
Sometimes babies and newborns will have too much red or blue in their Skin, which doesn’t look great in photos. Learn how to use a reference image to analyze skin tone and apply those changes to correct skin tone!
Use a reference image to compare color
It helps to have a reference image to judge ‘good’ Skin tone. To find a reference image, search on stock websites like Adobe Stock or just browse through google images. You will only be using the reference image to analyze Color, so you don’t need to find the ‘perfect’ photo—just one with good skin color.
To properly analyze skin tone it helps to have a large area of ‘averaged’ color. To get the average color of an area of skin first make a selection around the skin using the Marquee Tool. Then go to Filter – Blur – Average. This will take all of the Color in the selection and average them into one Color – perfect for analyzing average skin tones.
Do this for both the sample image and the image you wish to edit.
How to color match with a Hue/Saturation layer
After creating ‘average’ skin tone blocks in Photoshop, click on the color picker and use the Eyedropper to analyze the Color. Look for Differences in HSL (Hue, Saturation and Lightness). In this case the Hue was different by 17degrees.
To correct Skin color, create a Hue/Saturation Adjustment Layer and click on ‘reds’. Next change the values to match the target skin tone. In this example we change the hue by 17 degrees, Saturation +2 and Value by -5.
Catalog > Free Tutorials > How to Retouch Mature Skin in Photoshop
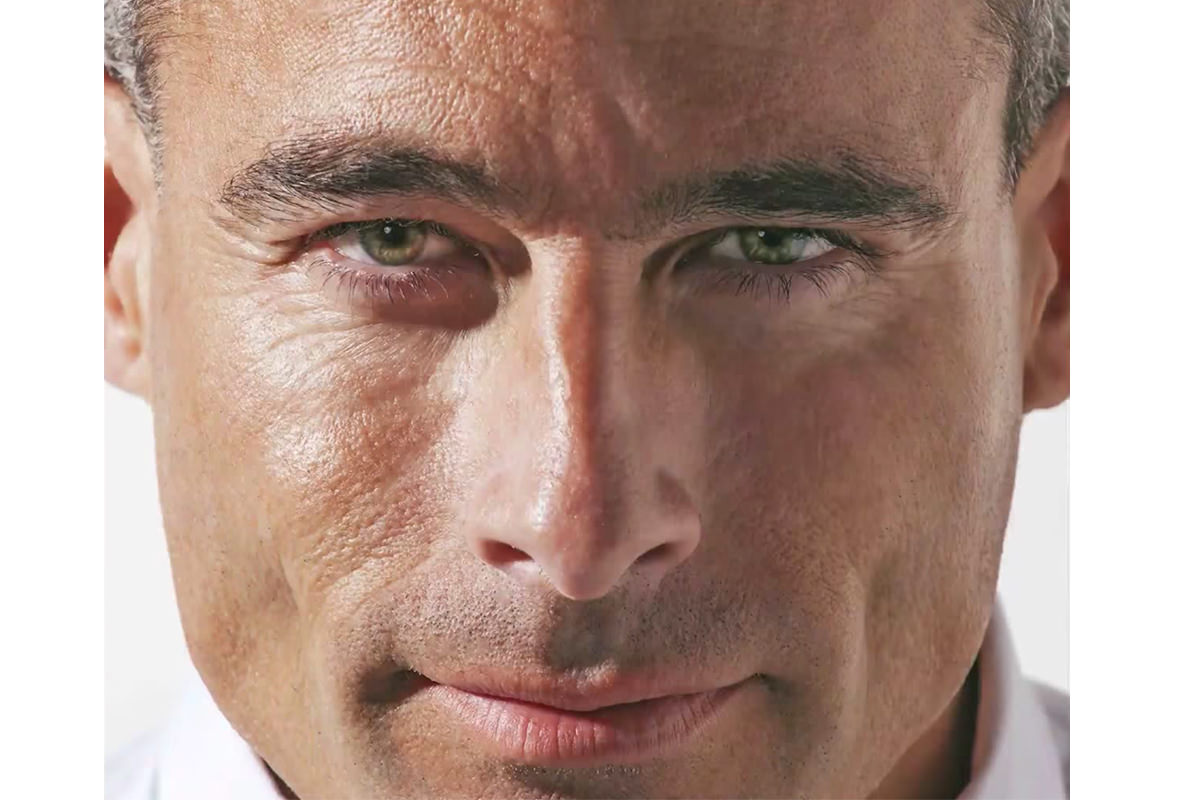
Tutorial Description
Who wouldn’t want to spend time Retouching handsome, mature men!? In today’s episode, learn how to eliminate wrinkles and pores, and add color back to the skin!
Keep the Handsome AND the Mature
Before you begin, remember that it is easy to get carried away with editing out elderly imperfections. You want the Skin to be smoother, but not completely devoid of Texture. The goal is not to turn a 60 year old man into a 20 year old! Experiment with lessing the intensity of layers, and playing around with how much you edit out.
1. On a copy of the Background layer (Cmd+J), go to Image -> Adjustments -> Shadows and Highlights. This dialogue is very helpful for editing older subjects, because you can control the Shadows for a less harsh Face.
2. To begin lessening the appearance of things like wrinkles and pores, duplicate the Background layer again. Use the Spot Healing Brush Tool on this layer to paint over unwanted lines. Be sure that “Content Aware” is selected at the top of the Screen. Once you’re finished, don’t hesitate to lower the Opacity of this layer. There’s a good chance your subject will look too plastic if you remove every single imperfection from the Face.
3. As time goes on, we tend to lose some Color and life in the look of our Skin. To add some color back into the image, create a Hue/Saturation Adjustment Layer and crank up the Saturation. Put a Layer Mask on this layer, and fill it with black to Invert it. Now, with a white Brush, you can paint some Color into the eyes and lips.
How to Remove Redness from Skin in Photoshop
-
-
Add to
favorites
-
DifficultyMedium
-
Length2.5 hours
-
Videos6
-
Software
DESCRIPTION
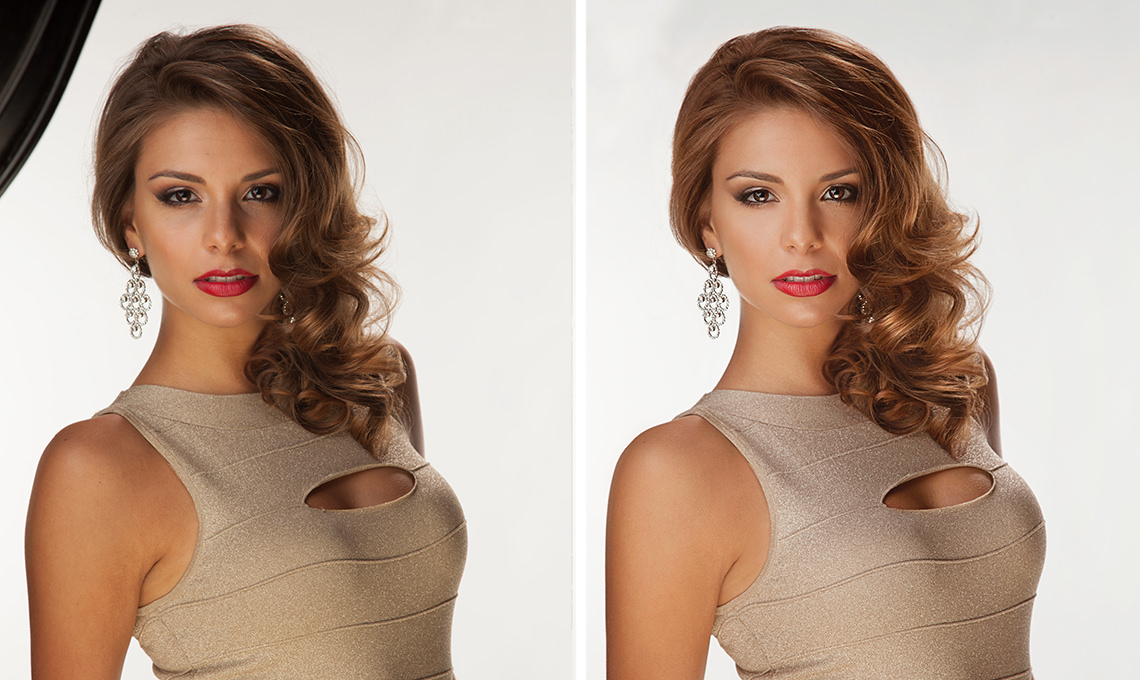
Start delivering portraits that will amaze all of your clients and friends. In this Phlearn PRO Tutorial, Beautiful Glowing Skin, we focus on beauty and glamour retouching so you will be able to deliver the quality of images that will keep everyone coming back.
THIS COURSE INCLUDES
- 1 Sample Image
- 1 Photoshop Brush
Share
Course Downloads
Learn Photoshop Retouching
Radiant Skin
Learn how to color skin in a way that will add life as well as match different skin tones. Make skin glow from within by paying special attention to certain colors and understanding how light passes through skin.
Skin Smoothing
Be sure to pay attention to the entire body. Most of the time it is not just the individual pores that need work, but the overall shapes. Learn how to smooth skin and keep your subjects looking their best.
Dodge and Burn
Learn how to dodge and burn to draw attention to your subject. Alter the highlights and shadows to create extra details in specific areas. Use what you learn to add style and interest to any image.
Sharpen the Details
Learn how to selectively sharpen different areas of the image to draw attention to where it’s needed. See exactly where and how to sharpen for the greatest impact.
Glamour Retouching
Create smooth glowing skin, perfect for a glamour portrait.
Retouch Makeup
Learn an amazing method for cleaning up makeup as well as removing red areas from skin. Our visual approach makes it easy to see what you are doing and doesn’t involve the clone stamp or healing brush tool.
Liquify Tool Best Practices
Make your subject look their best without looking unnatural using the liquify tool properly. Use what you learn to dramatically alter the shapes and tone a person bringing attention to the right places.
Retouch Hair and Eyes
Add the perfect amount of depth and detail to hair and eyes to really make them pop. Learn multiple techniques for enhancing color, shine and clarity. Your subjects will look better than ever.
Color Correction
Remove the complexities from correcting colors in shadows, mid-tones and highlights. At times, highlights are too warm or too saturated and need to be treated separately from other areas of an image. Learn how to correct color and restrict your changes to specific areas.
Reviews
-
Super learned so much hope I can keep it all in my brain thanks
-
Thank you Aaron! Your tutorial is still amazing as always
-
– Hey what’s that behind me ?!… Brain, what are you doing up there on the wall ? – I was blown away by the QUALITY & amount of knowledge I just had !
-
What a great tutorial, showing exactly what to do and how NOT to overdo it. Thank you.
-
Very nice and awesome tutorial.
-
I started learning Photoshop in my spare time a few weeks ago. It’s is my first pro tutorial and it helped a lot ! Aaron provides tons of great free tutorials on youtube also but I earnestly think that the pro tutorials are the cherry on the cake. It totally worth it. Thank you to Aaron and his team for the Phantastic job !
-
Excelente tutorial! Lo disfruté mucho.
Como es normal en todos tus tutoriales, es fácil de entender así como útil y valioso.
Usé esas técnicas para una foto donde la modelo tenía mucho maquillaje y quedó excelente.
Altamente recomendable, gracias Aaron!
——————————————————————-
Excellent tutorial! I enjoyed it a lot.As is normal in all your tutorials, it is easy to understand as well as useful and valuable.
I used these techniques to a photo where the model had a lot of makeup and was excellent.
Highly recommended, thanks Aaron!
-
Thank you Aaron for another great tutorial. I appreciate all the useful tricks that you pack in each video and the fact that you don’t hold back anything. Awesome didactics. I liked this one particularly because the techniques that you show are useful not only for high-end model shoots, but also for random family photos where you can make someone look even better than in real life. I put a lot of the techniques to use with this image, which is a candid capture at a restaurant. I thought she looked awesome already, but now I think subtle fixes here and there really make her pop. Thanks a lot.
-
Great tutorial.
I have a question though. When I create a layer using shift+alt+cmd+e, it seems to combine all visible layers and create a new one. However, i can’t go down to a lower layer and make changes because it’s covered with this new layer. In this example, I made some liquify changes early on and finished the course. However, I can’t go back and change the liquify changes because of the amount of layers created this way after. Thanks for any help. -
Awesome!! It’s very informative. I have learned a lot. You show so easy way to make a photo. Thanks for sharing.
-
Wow,there’s so much useful information here, this is definitely worth it,thanks alot phlearn.
-
OOPS…. Looks like I’ve done what Tony did !!!! Wrong colour !!!!!
Lets try again……
-
Just submitted the review below but I exported it with the wrong colour space (Prophoto) hence it looks nothing like the image I edited colour wise.
Hopefully this one (srgb) show show correctly 🙂 -
I’ve been totally wowed by Phlearn…simply brilliant!!! Aaron Nace you really rock, you have a natural flair for teaching and make it thoroughly enjoyable too. I only wish I’d found you sooner, as I’ve learned more in these last few weeks ‘Phlearning’ than I have in the last couple of years dabbling on the net. I watched the videos through first before doing anything, then went through again but meticulously following each step and doing the same which meant a lot of pausing/ rewinding and that’s the beauty of it, going at your own pace and really understanding.
If you’re thinking of buying any of these tutorials, just do it!!! You’ll be sooo pleased you did. I have a couple more downloaded ready to go through 🙂Thanks again Aaron & Phlearn.
ATB Tony. -
Great tutorial. Don’t learn Photoshop. PHlearn it. This is the place. Thanks Arron and team PHlearn.
-
Another amazing tutorial. Very simple and easy to follow techniques on turning a great photo to an amazing photo that pops with colors. Learning things like skin matching, removing redness, eye enhancement and two separate dodge and burn techniques while not using the dodge and burn tool. Exploring multiple possibilities of adjustments that you can make to images and allowing you to make the choice of the technique that you want to use.
If you plan on doing any type of portrait, headshot or model photography and plan on doing any type of skin retouching this is a must.
-
I downloaded this tutorial yesterday and I learned a ton. I would categorize myself as a advanced-beginner in Photoshop, so I was aware of some of the techniques used here. That said just seeing them used in context to this image taught me a great deal. It’s one thing to read about a specific technique, but seeing it used with a clear explanation as to why it’s being used is critical to learning.
In addition to that there was a lot that I had never seen before this tutorial. Once again these techniques were clearly explained so that I now feel I have a good grasp of them, and will be able to apply them on future retouching projects.
This is a very, very good tutorial. If you’re a beginner like me and you are looking to advance your knowledge in portrait/beauty retouching, this is a great tutorial for you.
-
This is a must for beginners. Easy to follow and you get results fast.
-
Awesome tutorial for color correction and making your subject look more Beautiful. No extreme retouching like Dodge and Burn but alot of great techniques you can use on every image. Hoping for a Dodge and Burn tutorial though like Pixel level retouching soon.
Catalog > Free Tutorials > Perfect Skin Texture & Tone with this Action!
Download Sample Images
Click the link below to download the Photosop Action and follow along with this tutorial.
DownloadTutorial Description
Give skin beautiful tone and texture with this FREE Photoshop Action! Simply load the action and it will automatically separate the skin texture from the skin tone, allowing you to edit each independently. Use it to remove minor blemishes while avoiding obvious spots and blotches in skin color. Then smooth out any harsh transitions between highlights and shadows without damaging any of the natural, delicate skin texture.
Take your retouching skills to the next level with our PRO tutorial How to Master Frequency Separation Retouching in Photoshop. You’ll learn how to use frequency separation to get polished, professional results in any portrait.
And for even more practice, try Professional Beauty Retouching in Photoshop where we walk you through a complete, high-end retouch using professionally photographed RAW images.
Catalog > Free Tutorials > Create an Amazing Cracked Skin Effect in Photoshop (Part 2)

BEFORE
AFTER
Creating a Cracked Skin Effect
In this episode we are creating a cracked skin effect in Photoshop, making it look more three-dimensional and adding blur. Be sure to check out Part 1 where you will learn how to wrap the Texture around a subject’s Face.
How to Give the Cracks Dimension
To apply the cracks in the first part of this tutorial we used the Multiply Blend Mode, making the darks interact with the photo and the Lights invisible. Now we want to add highlights on the edges of the cracks to give them more dimension. We do this by duplicating the original crack layer, inverting and desaturating it, and changing the Blend Mode to Screen. Now we have have white cracks on a Transparent Background. Next we use Blend If to make this layer invisible where the Underlying Layer is darker, removing it from the cracks. This section of the tutorial is pretty complex but will make a huge Difference in the final effect. Next step is to move this layer so it matches the lighting on the original photo.
Create a Peeling Effect on the Cracks
Next step is to make the Skin look like it is peeling up in some places just as paint would. To do this we use a Soft edged brush, painting white on a Soft Light layer. Painting around the cracks and the using the Lasso Tool to remove the Highlights from unwanted areas makes the Skin look as thought it is peeling up. After creating the Highlights we do the same thing with the Shadows, painting black on a Soft Light layer. In this tutorial we cover a small part of the image because of time restrictions.
Add a Blur to Blend into the Image
The original image was photographed using a shallow Depth of field meaning that some of the face is in focus and some of the Face is out of focus. To complete our cracked Skin effect we have to duplicate this gradual blur. To match the blur we use the Blur Tool on a New Layer. Be sure to check the option “Sample All Layers” and set your strength to about 50%. This will allow you to add the blur on a new blank layer, not effecting the layers underneath.
Catalog > Free Tutorials > Create an Amazing Cracked Skin Effect in Photoshop (Part 1)
BEFORE
AFTER
Adding Cracks to Skin
In this tutorial we show you how to create an amazing cracked skin effect in Photoshop. This is obviously not something you are going to do on every portrait you take but when you are looking for a creative outlet adding Texture to Skin is a lot of fun. Our goal is to take a flat image and make it look like it wraps around the subject’s Face and blend the images together to make the effect realistic. This part one of two episodes teaching how to make cracked Skin in Photoshop.
How to Transform and Warp the Crack Texture
The first step is choosing the proper Textures for the Face. For an added challenge try taking the photos yourself, you would be amazed at how many Textures you can photograph during an afternoon walk. For this tutorial we use an image by Liz West.
After choosing the best texture it is time to Transform and Warp it into place. Lower the Opacity of your Texture layer so you can see through to the original photo and hit CMD+T to start the Transform. From here it is up to you to rotate and Scale the texture so it fits the face. After getting the sizing and rotation correct hit CMD+T and right click on the layer and go down to Warp. This is where you want to do the majority of the wrapping around your subject’s face. Pull in the corners and adjust the handles to shape the texture around the Face.
Use the Liquify Tool for Details and Wrapping
After transforming and warping the texture it is time to take care of the smaller details and the wrapping. The Liquify Tool is prefect for doing just that. In this episode we show you how to use the Liquify Tool to push and pull the texture to wrap perfectly around the face, making sure to give the edges special attention, making the Texture look as though it is wrapping around the Face.
We also show you how to use the Freeze Mask Tool to take care of tricky areas like eyes and the nose.
Layer Blend Modes
After the texture is in place and warped correctly we use blending modes to make it look as though it interacts with the Skin. Using a Multiply blending mode will make the Light areas of a texture invisible and the darker areas blend in, the perfect choice for cracks. After changing the layer Blend Mode we use a Hue/Saturation Adjustment Layer to Color the texture similar to skin Color.
Check out Part 2
Be sure to check out Part 2 of this episode where we show you how to make the cracks look 3 dimensional and add a blur effect the the cracks.
Catalog > Free Tutorials > How To Correct Skin Tone and Stylize Your Photo

Correcting Skin Tones
Getting your white balance exactly right can be tricky. If you are on the cool side your subjects will look a bit too blue making them look a bit lifeless. We show you a quick method using Color Balance to correct Skin tones and get a nice base for further editing.
Coloring Shadows
If you do want your image to to have cool tones it is a good idea to keep those tones to the Shadows of the image, that way your Skin tones continue to look natural. In this photoshop tutorial we show you how to Colorize using the Hue/Saturation Adjustment Layer and then restrict those Colors to the Shadows using Blend If.
Adding Light Effects
When you are photographing into the Sun you have some great opportunities to add Lighting Effects in Photoshop. From a huge Lens Flare to a subtle Color grade the options are endless and each photo will require a different effect.
In this image we use the Gradient Tool to create a glow on the left side of the image. After bringing in the base Color we use Curves to add a bit of warmth to the Lens Flare.
Your tutorials are just the next level, clear, informative, to the point, great examples! I like the way you take the viewer through your thinking, showing your working flow and the different possible ways to get there.
I´ve been playing with masks for a while in LR and for years in Photoshop so I thougt I pretty much know it all but oh boy was I wrong:). This takes my editing in LR to a different level. Thank you sir!
So awesome. Learned new techniques that will be helpfull! Would be great if you would do one on face retouching in lightroom too and on using ai presets in lightroom.
Great course, I thought I knew a reasonable amount about masking but this took it to an entirely different level, so easy to follow too.
Soooo good, learned a lot 🙂
Thank you. Excellent attention to details and technique . Makes me feel maybe I can get there with a lot effort.
Really good tutorial. Thank you!
Been having a blast going through all kinds of old images and tinkering with masking. I’ve found sometimes that in instances with tree branches and sky masks (might work with hair as well, I don’t work a lot with models) where I subtract a luminance or color mask while zoomed in I can get it to refine some of the finer edges and details nicely as well.
I just signed up for the pro tutorials for the year and this was the first one that open and it was great. I was working on some photos and decided to use some of what I learned and it helped a lot. The trick now is to continue using what was learned before I forget what was learned. Great start.
This AI masking is just crazy, can’t even imaging where it’ll be in the future, but with your video, I just want to go back to my old pics and AI mask them all from scratch, great one, thank you.
Fantastic lessons highlighting the potential of the latest updates of Lightroom Classic.
Another great course! Thanks Aaron. You always explain things so clearly.
An absolutely great review of all the new masking features since the last update! Thank you!!
I learned a lot I am rather new to lightroom and now I know much more of masking!
Thank you once more Aaron. These on-going tutorials keep us up-to-date and provide the very best references to return to from time to time.
Very good Course, not only about masking techniques but also a lot of background info on how to edit ‘person’ photos and let your subject stand out.
Really, really good…. Aaron took the new masking tools and gave us real world examples on how to use them. Thanks Aaron!!
I do not know why you will not let me subscribe but I thank you for the years you gave me
thank you so much I really learned a lot as always you are a fantastic instructor
A great and short introduction to the new ai masking tools. After this tutorial, I was able to use the tools confidently
No one on Youtube has explained the masking functionality of ACR as comprehensively as Aaron. Now I have full knowledge of its possibilities, which are truly remarkable.
Great tutorial Aaron. These new masking features are a real game changer. Before watching this I thought that I had already mastered masking but as always I picked up lots of useful techniques that I hadn’t considered before now. Thanks and keep up the great work
Brilliant .. as always 🙂